
PIECES REVISITED
A simple Indoor Easy B model that's been an AMA National Record holder for many years. The author shares many construction and flying tips. Walt Van Gorder
PIECES was built in June of 1980 just prior to the FAI Indoor World Champs held at the old Northrop Institute site in West Baden, Indiana. After the FAI competition was completed, a number of top international competitors remained for one more day of Easy B flying. In addition, many top-notch American fliers were in attendance to fly at this famed indoor site. Against the glittering array of talent, Pieces flew to a 19:10, which was second to a fine 19:38 flight made by Otto Redenburg. (Editor's note: flight duration is given as minutes:seconds.)
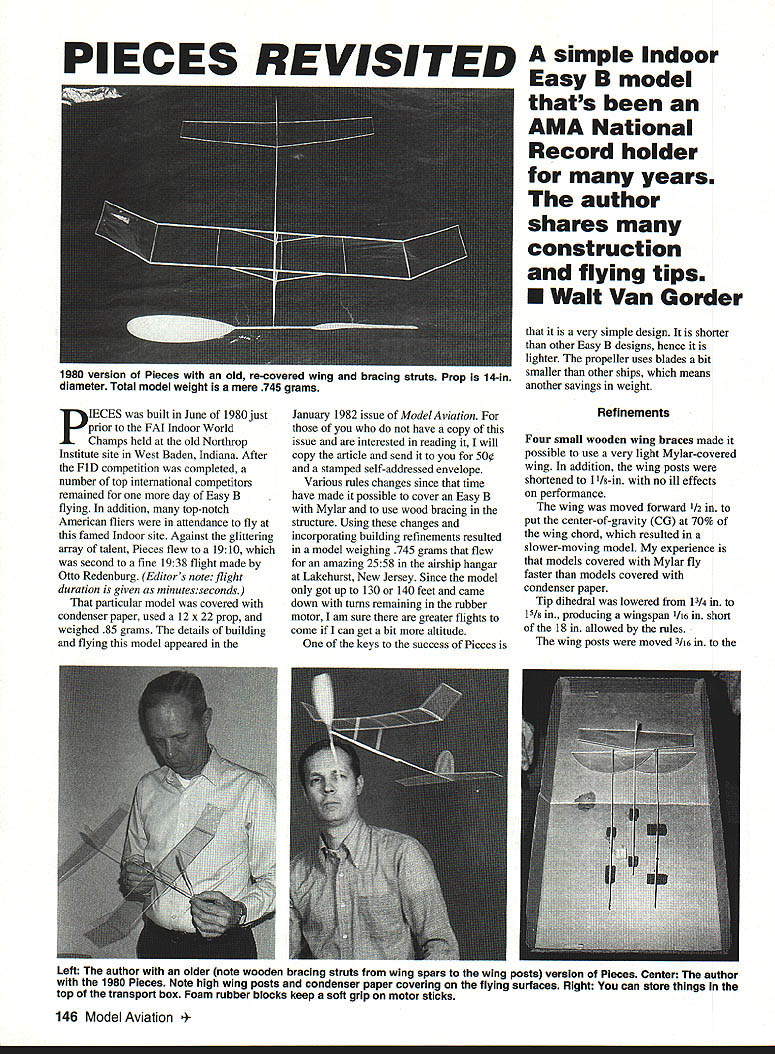
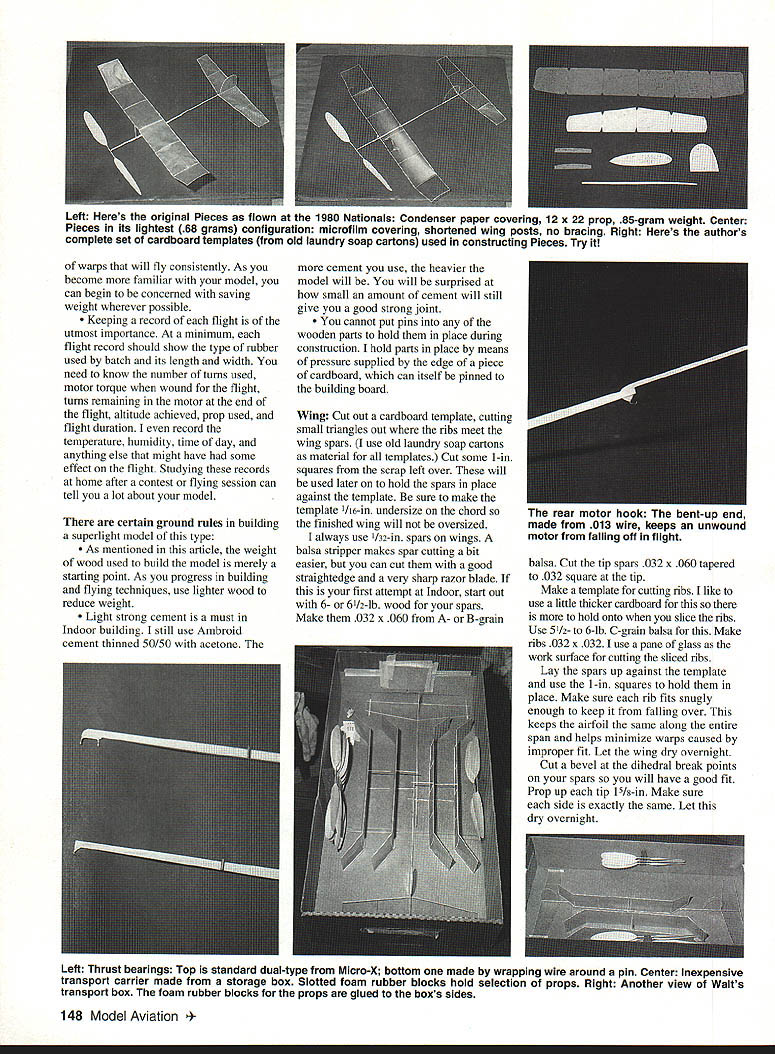
That particular model was covered with condenser paper, used a 12 x 22 prop, and weighed 85 grams. The details of building and flying this model appeared in the January 1982 issue of Model Aviation. For those of you who do not have a copy of that issue and are interested in reading it, I will copy the article and send it to you for 50¢ and a stamped self-addressed envelope.
Various rules changes since that time have made it possible to cover an Easy B with Mylar and to use wood bracing in the structure. Using these changes and incorporating building refinements resulted in a model weighing 74.5 grams that flew for an amazing 25:58 in the airship hangar at Lakehurst, New Jersey. Since the model only got up to 130 or 140 feet and came down with turns remaining in the rubber motor, I am sure there are greater flights to come if I can get a bit more altitude.
One of the keys to the success of Pieces is that it is a very simple design. It is shorter than other Easy B designs, hence it is lighter. The propeller uses blades a bit smaller than other ships, which means another savings in weight.
Refinements
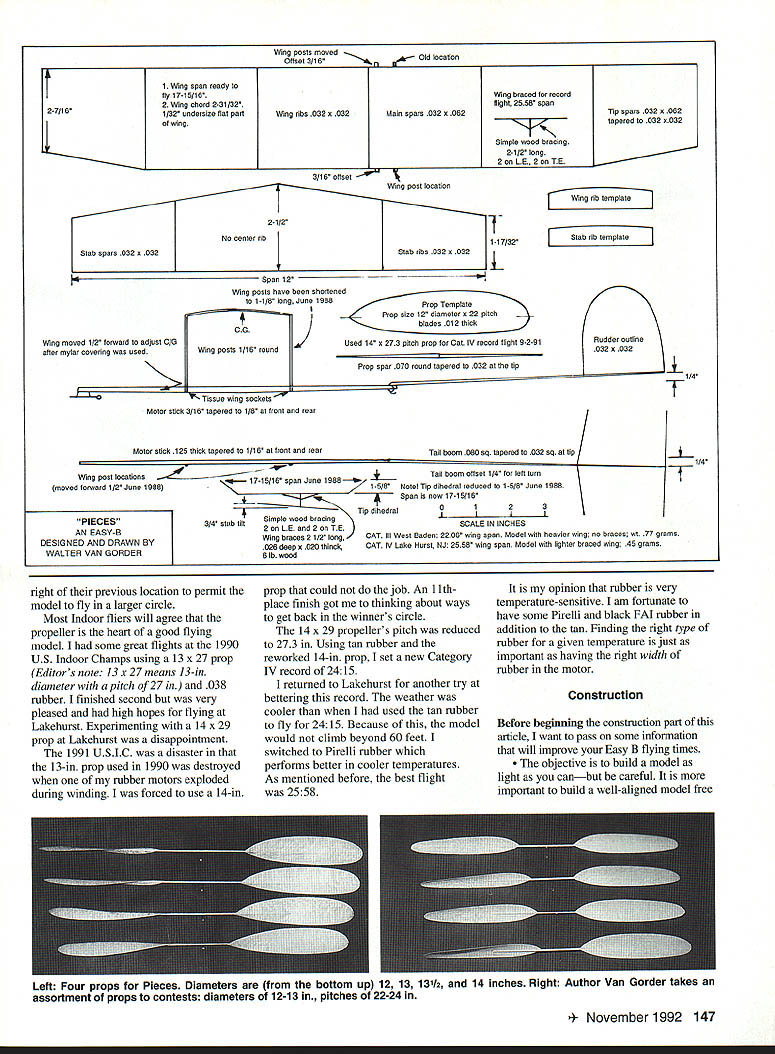
- Four small wooden wing braces made it possible to use a very light Mylar-covered wing. In addition, the wing posts were shortened to 1-1/8 in., with no ill effects on performance. The wing was moved forward 1/2 in. to put the center-of-gravity (CG) at 70% of the wing chord, which resulted in a slower-moving model. My experience is that models covered with Mylar fly faster than models covered with condenser paper.
- Tip dihedral was lowered from 1-3/4 in. to 1-5/8 in., producing a wingspan 1/16 in. short of the 18 in. allowed by the rules. The wing posts were moved 3/16 in. to the right of their previous location to permit the model to fly in a larger circle.
Most indoor fliers will agree that the propeller is the heart of a good flying model. I had some great flights at the 1990 U.S. Indoor Champs using a 13 x 27 prop (Editor's note: 13 x 27 means 13-in. diameter with a pitch of 27 in.) and .038 rubber. I finished second but was very pleased and had high hopes for flying at Lakehurst. Experimenting with a 14 x 29 prop at Lakehurst was a disappointment.
The 1991 U.S.I.C. was a disaster in that the 13-in. prop used in 1990 was destroyed when one of my rubber motors exploded during winding. I was forced to use a 14-in. prop that could not do the job. An 11th-place finish got me to thinking about ways to get back in the winner's circle.
The 14 x 29 propeller's pitch was reduced to 27.3 in. Using tan rubber and the reworked 14-in. prop, I set a new Category IV record of 24:15.
I returned to Lakehurst for another try at bettering this record. The weather was cooler than when I had used the tan rubber to fly for 24:15. Because of this, the model would not climb beyond 60 feet. I switched to Pirelli rubber which performs better in cooler temperatures. As mentioned before, the best flight was 25:58.
It is my opinion that rubber is very temperature-sensitive. I am fortunate to have some Pirelli and black FAI rubber in addition to the tan. Finding the right type of rubber for a given temperature is just as important as having the right width of rubber in the motor.
Construction
Before beginning the construction part of this article, I want to pass on some information that will improve your Easy B flying times.
The object is to build a model as light as you can—but be careful. It is more important to build a well-aligned model free of warps than to have it light. Get your model balanced properly and tune it for smooth, wide circles. Also check the motor stick for straightness—if it is slightly bent, it will unwind unevenly. Build a model free of warps that will fly consistently. As you become more familiar with your model, you can begin to be concerned with saving weight wherever possible.
- Keeping a record of each flight is of the utmost importance. At a minimum, each flight record should show the type of rubber used by batch and its length and width. You need to know the number of turns used, motor torque when wound for the flight, turns remaining in the motor at the end of the flight, altitude achieved, prop used, and flight duration. I even record the temperature, humidity, time of day, and anything else that might have had some effect on the flight. Studying these records at home after a contest or flying session can tell you a lot about your model.
There are certain ground rules in building a superlight model of this type:
- As mentioned above, the weight of wood used to build the model is merely a starting point. As you progress in building and flying techniques, use lighter wood to reduce weight.
- Light, strong cement is a must in indoor building. I still use Ambroid cement thinned 50/50 with acetone. The more cement you use, the heavier the model will be. You will be surprised at how small an amount of cement will still give you a good strong joint.
- You cannot put pins into any of the wooden parts to hold them in place during construction. I hold parts in place by means of pressure supplied by the edge of a piece of cardboard, which can itself be pinned to the building board.
Wing: Cut out a cardboard template, cutting small triangles out where the ribs meet the wing spars. (I use old laundry soap cartons as material for all templates.) Cut some 1-in. squares from the scrap left over. These will be used later on to hold the spars in place against the template. Be sure to make the template 1/16 in. undersize on the chord so the finished wing will not be oversized.
I always use 1/32-in. spars on wings. A balsa stripper makes spar cutting a bit easier, but you can cut them with a good straightedge and a very sharp razor blade. If this is your first attempt at indoor, start out with 6- or 6-1/2-lb. wood for your spars. Make them .032 x .060 from A- or B-grain balsa. Cut the tip spars .032 x .060 tapered to .032 square at the tip.
Make a template for cutting ribs. I like to use a little thicker cardboard for this so there is more to hold onto when you slice the ribs. Use 5/32- to 6-lb. C-grain balsa for this. Make ribs .032 x .032. I use a pane of glass as the work surface for cutting the sliced ribs.
Lay the spars up against the template and use the 1-in. squares to hold them in place. Make sure each rib fits snugly enough to keep it from falling over. This keeps the airfoil the same along the entire span and helps minimize warps caused by improper fit. Let the wing dry overnight.
Cut a bevel at the dihedral break points on your spars so you will have a good fit. Prop up each tip 1-5/8 in. Make sure each side is exactly the same. Let this dry overnight.
The stab and rudder are constructed in the same manner as the wing. Spars for the stab and the rudder outline are .032 x .032 square cut from 5-1/2-lb. A- or B-grain balsa. Stab ribs are .032 x .032, 5/32- to 6-lb. C-grain balsa.
Put a piece of wax paper on your building board and pin the cardboard rudder template down on the wax paper. The .032-square wood should be soaked in hot tap water for 10 minutes before bending it around the template. Lay it flat on the board next to the template and carefully pull it around the shape of the template. Hold it in place with some of those handy 1-in. squares of cardboard we used on the wing. Let this dry overnight.
The tail boom is made from 5-1/2-lb. A- or B-grain balsa .080 square, tapered down to about .032 square at the tip.
The motor stick is made from a piece of 6-lb. A-grain stock 1/8 x 3/16 x 9-1/4 in. long. Cut and sand it to the shape of the plan. Use any light dual thrust bearing available from your favorite indoor supplier. The rear motor hook is bent from .013 wire, and it can be glued on now. Be sure to bend the rear hook up at the end as shown on the plans. If the motor completely unwinds in flight, the little extra bent-up portion will keep the motor from falling off.
Glue the rudder outline to the tail boom. While this is drying, the tissue (Japanese tissue or similar) wing sockets can be made. Cut tissue strips about 1/4 in. wide and 1/2 in. long. Add a few drops of water to a few drops of white glue and mix. Lay a strip of the tissue in the glue. Take a 1/16-in. drill bit and roll the tissue around the smooth end. Very carefully slide the tissue tube off the drill bit and place it on a piece of wax paper. Let it dry completely.
Covering with the new lighter plastic covering is more difficult than with condenser paper because of static electricity. I used a static-charge eliminator called a Zerostat 3 to break up the static charge that is in the film. The Zerostat 3, or similar devices, are available at better record stores.
I put my wings on a jig and cover them in three sections. I still use Micro-X condenser paper cement and a very small brush. Be very careful not to use too much of this; a little goes a long way. To trim off the excess film, use a very sharp razor blade. I also use a hand-held 25-watt Weller soldering iron to seal any small slit that is left after the first trimming. Be very careful. Too much heat can result in burned wood or film shrinkage in one small area, and this can cause warps.
The prop that was first used for this model had a 12-in. diameter with 22-in. pitch. Take your time here, because a good prop is a crucial part of the model's performance. Make a cardboard template of the blade, and cut two blades from 5-1/2-lb., .012 C-grain balsa. Lightly sand the blades with No. 600 sandpaper. Sand the blades in one direction only.
The prop spar is made from 6-lb. or 7-lb., 1/8-in. square x 6-in.-long balsa, sanded round to .070 at the center and tapering to .032 at the tip. This is done by tapering a full sheet of 180-grit sandpaper to your work board and another to a large sanding block.
First sand off the corners of your spar. Next, without holding the spar, sand it between the two sheets of sandpaper, using a diagonal or circular motion. The spar will come out perfectly round after a few strokes. The same method is used for making wing posts round. Tapering the ends of the prop spar to .032 is done (after getting it round) by tilting the sanding block. Bob Meuser had an article on how to do this in the June 1977 issue of Model Aviation.
The prop shaft is made from .013 wire bent to the shape on the plan. After the shaft is put into the center of your spar, bend the end at a 90° angle and cut off the excess. Use a drop of Hot Stuff to secure it. As your props get lighter and larger, you can reduce the size of the shaft to save more weight. I use guitar string wire as small as .010.
Soak the blades in hot tap water for 15 minutes. Lay them on the prop form. You can use a can, bottle, jar, or jug of 5- to 6-in. diameter that has smooth sides. Lay the wet blades on the form 15° to the left of center. Lash them to the form with stretched-gauze bandage (such as an Ace bandage), just snug enough to hold them in place. Put two or three strips of masking tape around this to hold everything in place, and put it all in a preheated oven at 250° for 15 to 20 minutes. After everything has cooled down, remove the blades very carefully.
When building larger, lighter props you will need a longer spar to control flare (the prop tending to bend forward under power). Here are some suggested spar lengths:
- 13-in. prop: 7-1/2-in. spar
- 13-1/2-in. prop: 9-in. spar
- 14-in. prop: 10-in. spar
Make a jig to assemble the blades to the hub so they are at a pitch of 45° at a point 3-1/2 in. from the center of the hub. It is very important that both blades are set at exactly the same angle. So take your time and do it right.
Attach the wing posts to the wing spar as shown on the plans. Make sure the posts are 90° to the wing spars and in perfect alignment with each other front-to-rear.
Attach the tail boom and rudder assembly to the motor stick with 1/4 in. of left rudder and 1/4 in. of negative incidence as per the plan. Attach the stab with a 1/4 in. tilt for left turn. The left side will be higher when viewed from the rear of the model.
To locate the C.G., put the prop on and install a loop of rubber between the prop shaft hook and rear hook. If your model weight is 10–12 grams, use .045 to .050 rubber. If the model is under 10 grams, use .040 to .045 rubber. If you are just starting out, keep the CG at 55% to 60% of the wing chord. Carefully glue the wing post sockets to the motor stick so that the CG will fall at the desired percentage of the wing chord. As you gain more experience, you may want to try other CG locations. I have found that 70% CG works pretty well for the lighter models.
Final Assembly and Flying
Your model is now ready to fly. Install the wing and prop and test glide it without the rubber motor. Start out with zero incidence in the wing. Make several test glides. Adjust the wing incidence until you get a smooth glide.
You have now completed a model that has proven to be a good flier. How much duration you get will depend upon how familiar you become with it. Do not be afraid to change the size and length of your motor. Record your results. You will soon find the combination that will be just right for your model.
If you have any questions concerning construction or adjustment of Pieces, my address is 5669 Wincryview Lane, Cincinnati, OH 45233. Please include a self-addressed and stamped envelope.
I would like to thank all of the people who have helped me over the years—too many to list, but you all know who you are. Also, all the people who graciously give of their time at the contests.
Suppliers of Parts and Materials
- Jim Jones, 36631 Ledgestone Drive, Mt. Clemens, MI 48043
- Micro-X Products, P.O. Box 1063, Lorain, OH 44055
- Indoor Model Supply, Box 5311, Salem, OR 97304
- Sig Manufacturing Co., Inc., Montezuma, IA 50171
- Ray Harlan, 15 Happy Hollow Road, Wayland, MA 01778
- Wayne Triven, 7408 West Hanna Ave., Tampa, FL 33615
Transcribed from original scans by AI. Minor OCR errors may remain.

