
Pilots, man your planes!
Nothing is more unrealistic than a scale model flying by with no one at the controls. So why not put a pilot in that cockpit or cabin?
Bill Hannan
PERHAPS IN VIEW of the valiant gains being achieved by the women's libbers, we should say "Pilots, person your planes"? At any rate, it is pleasing to see occupants appearing in greater numbers of models these days. Certainly nothing could be less realistic than a scale model, particularly one with a large canopy or open cockpit, flying by with no one at the controls!
Many people claim lack of artistic talent as an excuse for omitting a pilot from their models. But that is a rather flimsy alibi these days, with ready-made products so readily available. Others claim that a pilot is simply "in the way," preventing clear unobstructed viewing of scale details inside the cockpit. The obvious answer to that comment is easily removable pilots. After all, even non-enthusiasts can appreciate pilots.
Cockpits:
For a very basic model, a pilot head may be mounted on a simple balsa cross-piece. However, some suggestion of an "office" can add greater realism, and direct more attention to the pilot.
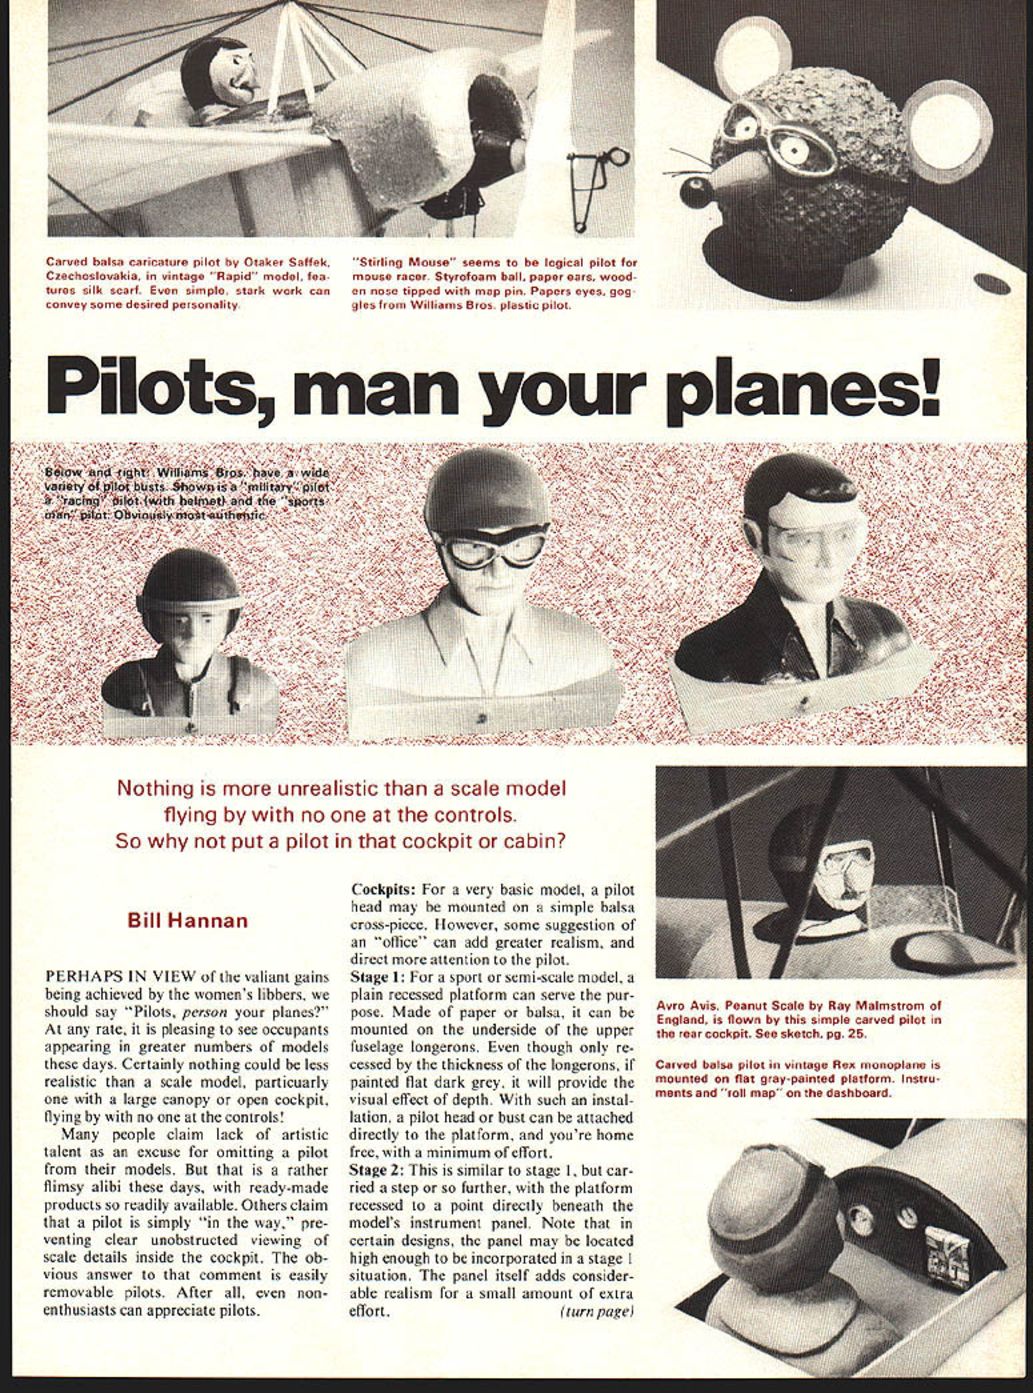
Stage 1: For a sport or semi-scale model, a plain recessed platform can serve the purpose. Made of paper or balsa, it can be mounted on the underside of the upper fuselage longerons. Even though only recessed by the thickness of the longerons, if painted flat dark grey, it will provide the visual effect of depth. With such an installation, a pilot head or bust can be attached directly to the platform, and you're home free, with a minimum of effort.
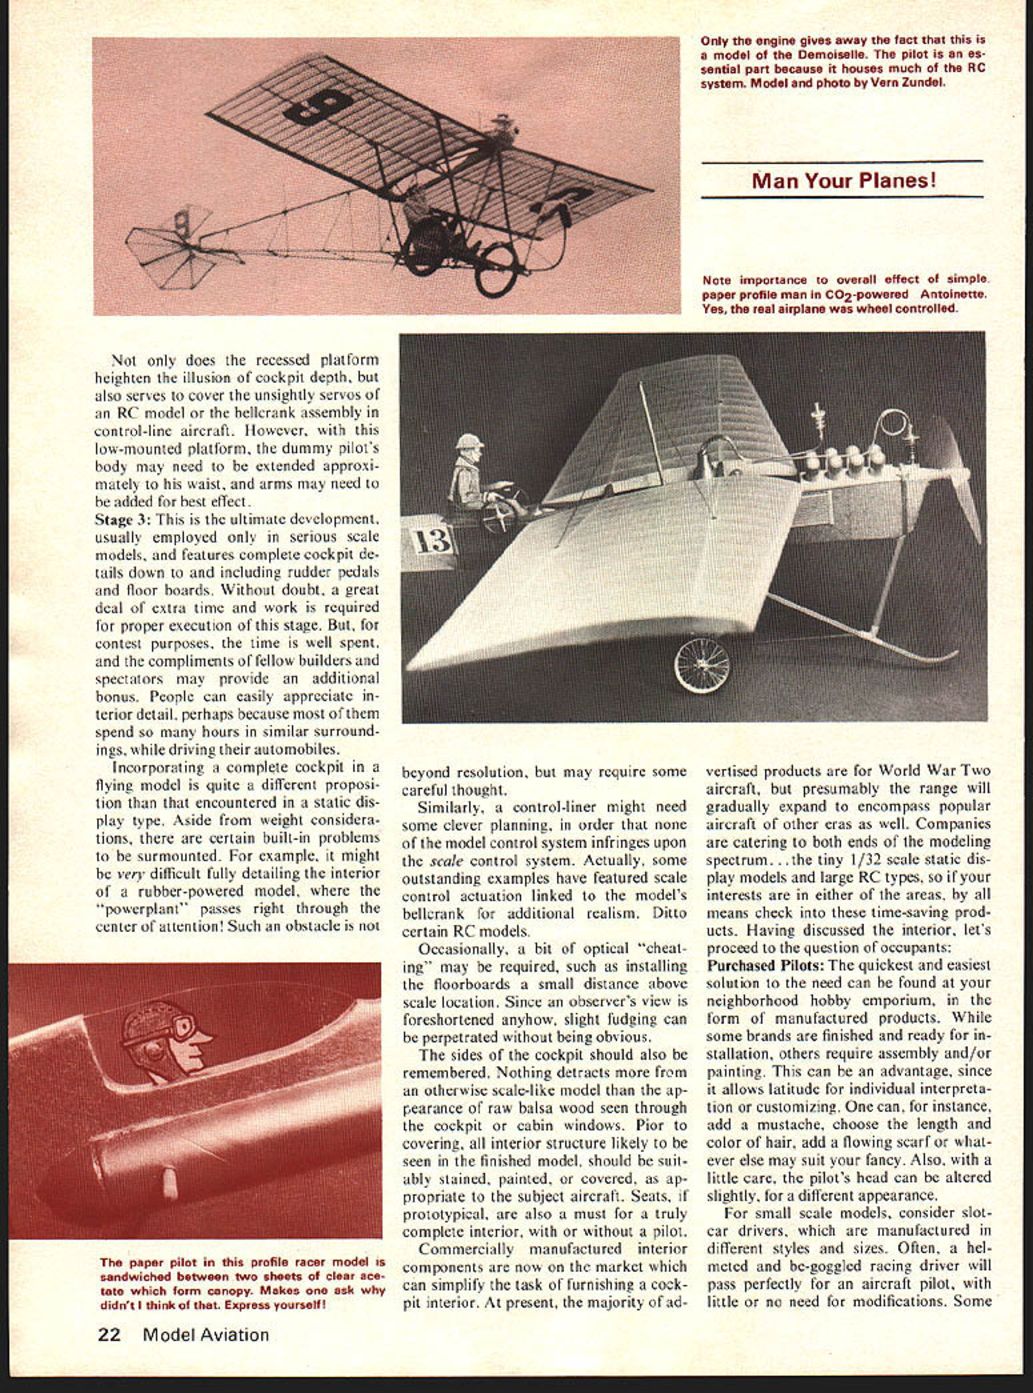
Stage 2: This is similar to Stage 1, but carried a step or so further, with the platform recessed to a point directly beneath the model's instrument panel. Note that in certain designs, the panel may be located high enough to be incorporated in a Stage 1 situation. The panel itself adds considerable realism for a small amount of extra effort. Not only does the recessed platform heighten the illusion of cockpit depth, but also serves to cover the unsightly servos of an RC model or the bellcrank assembly in control-line aircraft. However, with this low-mounted platform, the dummy pilot's body may need to be extended approximately to his waist, and arms may need to be added for best effect.
Stage 3: This is the ultimate development, usually employed only in serious scale models, and features complete cockpit details down to and including rudder pedals and floor boards. Without doubt, a great deal of extra time and work is required for proper execution of this stage. But, for contest purposes, the time is well spent, and the compliments of fellow builders and spectators may provide an additional bonus. People can easily appreciate interior detail, perhaps because most of them spend so many hours in similar surroundings, while driving their automobiles.
Incorporating a complete cockpit in a flying model is quite a different proposition than that encountered in a static display type. Aside from weight considerations, there are certain built-in problems to be surmounted. For example, it might be very difficult fully detailing the interior of a rubber-powered model, where the "powerplant" passes right through the center of attention! Such an obstacle is not beyond resolution, but may require some careful thought.
Similarly, a control-liner might need some clever planning, in order that none of the model control system infringes upon the scale control system. Actually, some outstanding examples have featured scale control actuation linked to the model's bellcrank for additional realism. Ditto certain RC models.
Occasionally, a bit of optical "cheating" may be required, such as installing the floorboards a small distance above scale location. Since an observer's view is foreshortened anyhow, slight fudging can be perpetrated without being obvious.
The sides of the cockpit should also be remembered. Nothing detracts more from an otherwise scale-like model than the appearance of raw balsa wood seen through the cockpit or cabin windows. Prior to covering, all interior structure likely to be seen in the finished model should be suitably stained, painted, or covered, as appropriate to the subject aircraft. Seats, if prototypical, are also a must for a truly complete interior, with or without a pilot.
Commercially manufactured interior components are now on the market which can simplify the task of furnishing a cockpit interior. At present, the majority of advertised products are for World War Two aircraft, but presumably the range will gradually expand to encompass popular aircraft of other eras as well. Companies are catering to both ends of the modeling spectrum — the tiny 1/32 scale static display models and large RC types, so if your interests are in either of the areas, by all means check into these time-saving products. Having discussed the interior, let's proceed to the question of occupants:
Purchased Pilots: The quickest and easiest solution to the need can be found at your neighborhood hobby emporium, in the form of manufactured products. While some brands are finished and ready for installation, others require assembly and/or painting. This can be an advantage, since it allows latitude for individual interpretation or customizing. One can, for instance, add a mustache, choose the length and color of hair, add a flowing scarf or whatever else may suit your fancy. Also, with a little care, the pilot's head can be altered slightly, for a different appearance.
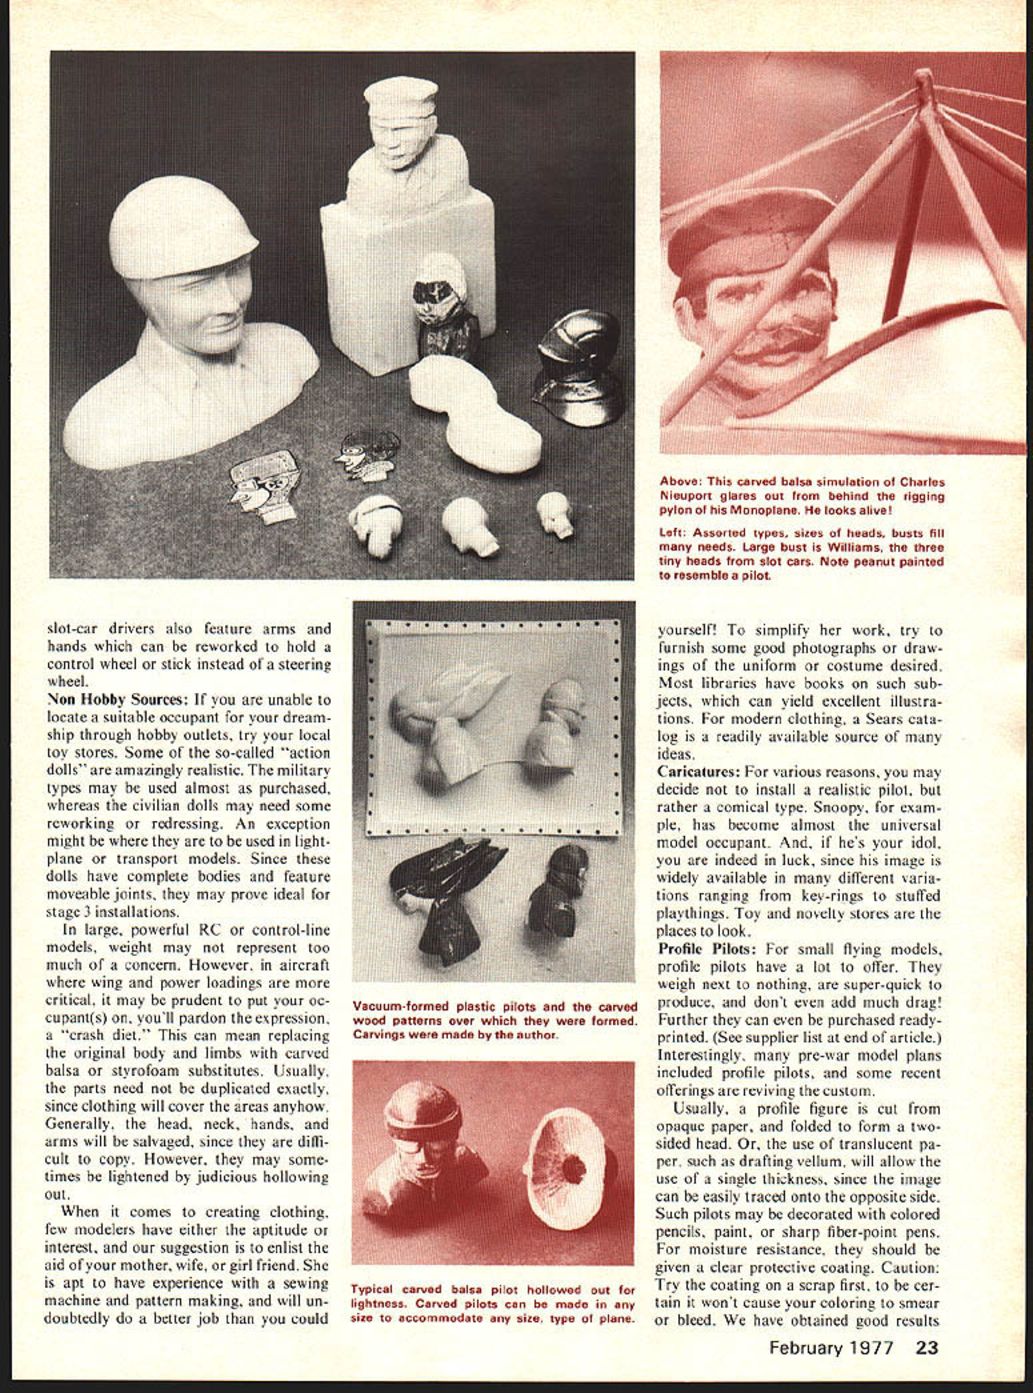
For small scale models, consider slot-car drivers, which are manufactured in different styles and sizes. Often, a helmeted and be-goggled racing driver will pass perfectly for an aircraft pilot, with little or no need for modifications. Some slot-car drivers also feature arms and hands which can be reworked to hold a control wheel or stick instead of a steering wheel.
Non Hobby Sources:
If you are unable to locate a suitable occupant for your dreamship through hobby outlets, try your local toy stores. Some of the so-called "action dolls" are amazingly realistic. The military types may be used almost as purchased, whereas the civilian dolls may need some reworking or redressing. An exception might be where they are to be used in lightplane or transport models. Since these dolls have complete bodies and feature moveable joints, they may prove ideal for stage 3 installations.
In large, powerful RC or control-line models, weight may not represent too much of a concern. However, in aircraft where wing and power loadings are more critical, it may be prudent to put your occupant(s) on, you'll pardon the expression, a "crash diet." This can mean replacing the original body and limbs with carved balsa or styrofoam substitutes. Usually, the parts need not be duplicated exactly, since clothing will cover the areas anyhow. Generally, the head, neck, hands, and arms will be salvaged, since they are more difficult to copy. However, they may sometimes be lightened by judicious hollowing out.
When it comes to creating clothing, few modelers have either the aptitude or interest, and our suggestion is to enlist the aid of your mother, wife, or girl friend. She is apt to have experience with a sewing machine and pattern making, and will undoubtedly do a better job than you could yourself! To simplify her work, try to furnish some good photographs or drawings of the uniform or costume desired. Most libraries have books on such subjects, which can yield excellent illustrations. For modern clothing, a Sears catalog is a readily available source of many ideas.
Caricatures:
For various reasons, you may decide not to install a realistic pilot, but rather a comical type. Snoopy, for example, has become almost the universal model occupant. And, if he's your idol, you are indeed in luck, since his image is widely available in many different variations ranging from key-rings to stuffed playthings. Toy and novelty stores are the places to look.
Profile Pilots:
For small flying models, profile pilots have a lot to offer. They weigh next to nothing, are super-quick to produce, and don't even add much drag! Further, they can even be purchased ready-printed. (See supplier list at end of article.) Interestingly, many pre-war model plans included profile pilots, and some recent offerings are reviving the custom.
Usually, a profile figure is cut from opaque paper, and folded to form a two-sided head. Or, the use of translucent paper, such as drafting vellum, will allow the use of a single thickness, since the image can be easily traced onto the opposite side. Such pilots may be decorated with colored pencils, paint, or sharp fiber-point pens. For moisture resistance, they should be given a clear protective coating. Caution: Try the coating on a scrap first, to be certain it won't cause your coloring to smear or bleed. We have obtained good results. with Testors' "Dullcoat" plastic model spray.
If you are reluctant to design your own profile pilots, consider tracing them from comic books. What could be more logical than a model plane piloted by Smilin' Jack or Steve Canyon? Or, in the case of the previously mentioned Snoopy or other Peanuts characters, a gift shop will yield full-color greeting cards with suitable silhouettes.
There are two other methods of producing truly unique profile pilots. The first involves taking a black and white photo of yourself or a friend. Be sure to photograph both a right and left side. Photo prints to the desired size may then be prepared. Using a very sharp modeling knife, cut out the photo print head sides and glue them together. The edges will appear white, and should be retouched with a soft pencil or grey paint until they blend inconspicuously.
A similar approach involves taking color transparencies of someone's head and shoulders, which when cut out may be applied to both sides of a center stiffener. Arriving at the correct size may take a few trials, but the resulting pilot is most distinctive and unusual.
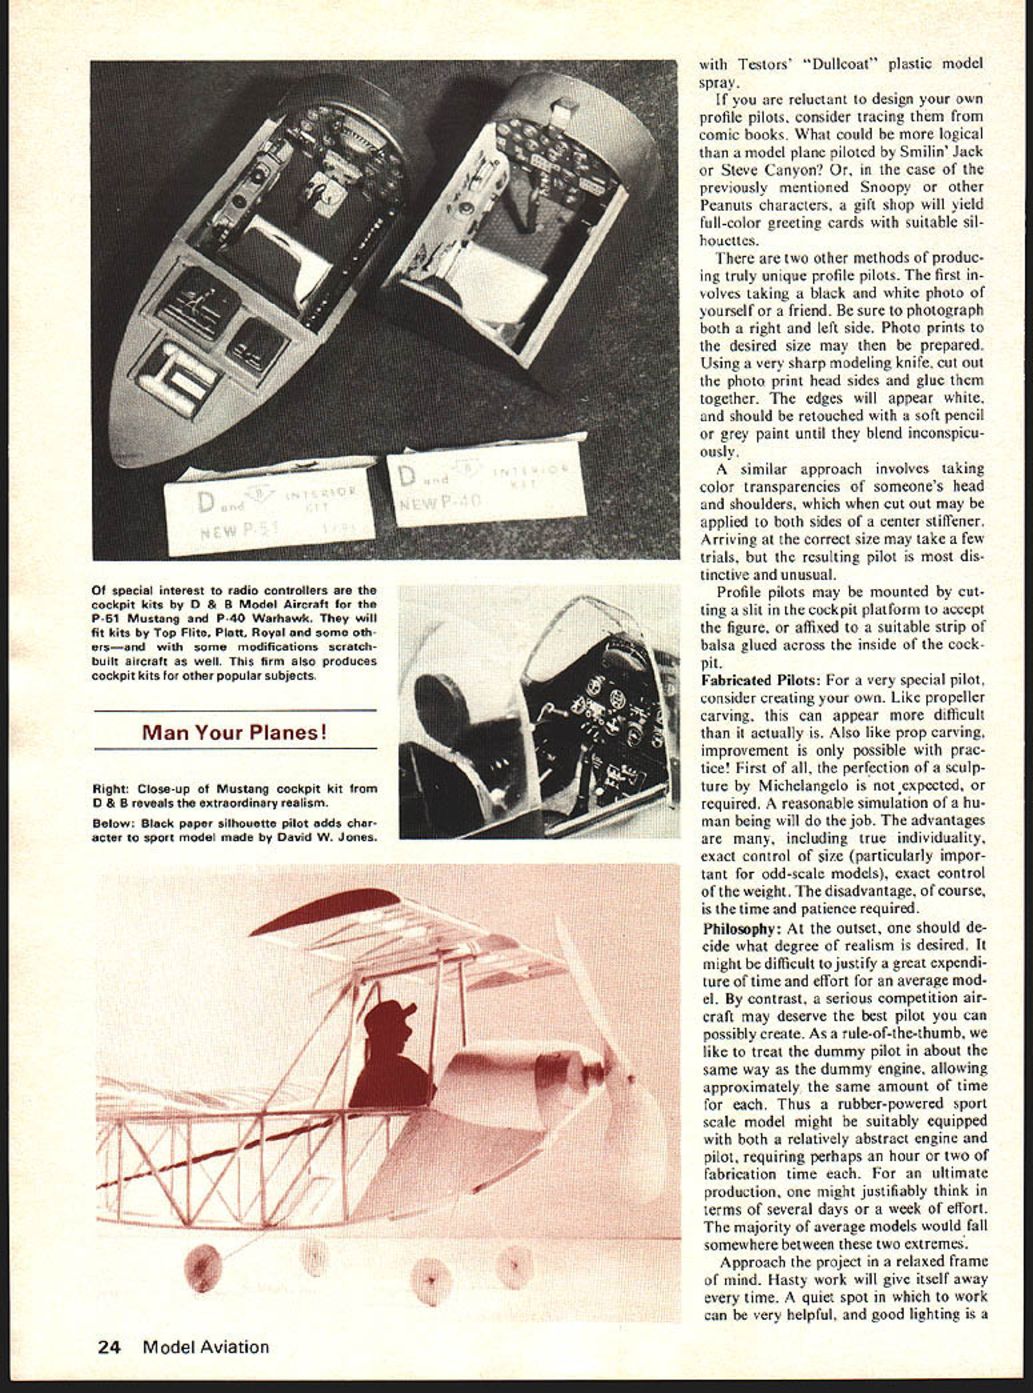
Profile pilots may be mounted by cutting a slit in the cockpit platform to accept the figure, or affixed to a suitable strip of balsa glued across the inside of the cockpit.
Fabricated Pilots:
For a very special pilot, consider creating your own. Like propeller carving, this can appear more difficult than it actually is. Also like prop carving, improvement is only possible with practice. First of all, the perfection of a sculpture by Michelangelo is not expected, or required. A reasonable simulation of a human being will do the job. The advantages are many, including true individuality, exact control of size (particularly important for odd-scale models), exact control of the weight. The disadvantage, of course, is the time and patience required.
Philosophy:
At the outset, one should decide what degree of realism is desired. It might be difficult to justify a great expenditure of time and effort for an average model. By contrast, a serious competition aircraft may deserve the best pilot you can possibly create. As a rule-of-thumb, we like to treat the dummy pilot in about the same way as the dummy engine, allowing approximately the same amount of time for each. Thus a rubber-powered sport scale model might be suitably equipped with both a relatively abstract engine and pilot, requiring perhaps an hour or two of fabrication time each. For an ultimate production, one might justifiably think in terms of several days or a week of effort. The majority of average models would fall somewhere between these two extremes.
Approach the project in a relaxed frame of mind. Hasty work will give itself away every time. A quiet spot in which to work can be very helpful, and good lighting is a decided asset. Keep the following points in mind as you proceed:
- Study photographs of the subject from the proper angles.
- Keep the pilot in scale with other cockpit details.
- Avoid excessive detail that will be lost at normal viewing distances.
- Select materials and construction techniques commensurate with the model's type and performance.
A few simple techniques will allow even the novice to turn out a pleasing pilot. For a semifinished appearance, a head and shoulders bust can be carved from balsa and mounted on a small platform. Arms, controls and other details may be added from scrap stock. Paint and shading can give the final touch.
Finally, remember that the purpose of adding a pilot is to enhance the overall appearance of the model. It should complement the craft, not detract from it. A well-proportioned, neatly finished pilot will add charm and realism without unduly increasing the complexity of the build. must, if best results are to be achieved.
We suggest that you consider your first attempt as only a dry run, as the second try is bound to be an improvement.
Tools: Only a minimum of tools is needed, and most are likely to be found in the average model builder's collection. Carving can be performed with any sharp-pointed modeling knife, but a lightweight type will provide greater control when working with tiny details.
After carving, a selection of small needle files or sanding sticks will be found useful. We prefer to contact-cement sandpaper to small hardwood sticks and dowels for the purpose.
Another less common item is a headband-type magnifier. Though not essential, such a device certainly assists in the execution of minute details, especially feature painting. A 4-power type is suitable, and, in fact, excessive magnification can be disturbing, since the range of sharp focus becomes much shallower with an increase in power.
Perhaps the most important quality items needed for the efficient production of pilots are brushes. Cheap brushes are simply a waste of money, and offer nothing except frustration. Sable-hair art brushes are the best answer, and although a bit costly, can last for many years with proper care. Although individual preferences are bound to vary, we feel that a number 00 and a number 5 brush of the round type will suit most situations apt to be encountered. Forget the tiny brushes "with only two hairs," as they are not superior for painting fine details. A larger brush, with a perfect point, will do a better job more easily. Knowledgeable stores, where particular artists buy their supplies, will furnish a glass of water in order that you may test the point of the brush before buying it. Simply dip the bristles in the water, and hold the brush up against good light, and examine it carefully. If it does not naturally form a perfect point, reject it in favor of one that does. After all, it's your money!
References: Just as in scale model building, references are particularly important. If you are really serious about producing the best possible results, you may wish to obtain some books on sculpture from a library or art supply store. However, most of us are not seeking another hobby and may prefer a less involved approach. The easy, low-cost answer is magazine, catalog, and newspaper reference material, found in almost any household. Also, a commercially produced pilot head or a realistic doll can be a great aid for visualization.
Finally, don't overlook the obvious... other members of your household, and most available of all, yourself and a mirror!
Materials: Pilots may be produced from many common materials, including wood, styrofoam, papier-mâché, or plastic. For a small model the foam packing material resembling peanuts has been adapted, and even actual peanut shells! Roy L. Clough, famous for his novelty models, often employed ping-pong balls as the basis for comical pilot heads, as does England's Ray Malmstrom.
Technique: Different modelers use different approaches to creating pilots, and no one system is necessarily superior. You may wish to try several, and determine the one best suited to your own purposes.
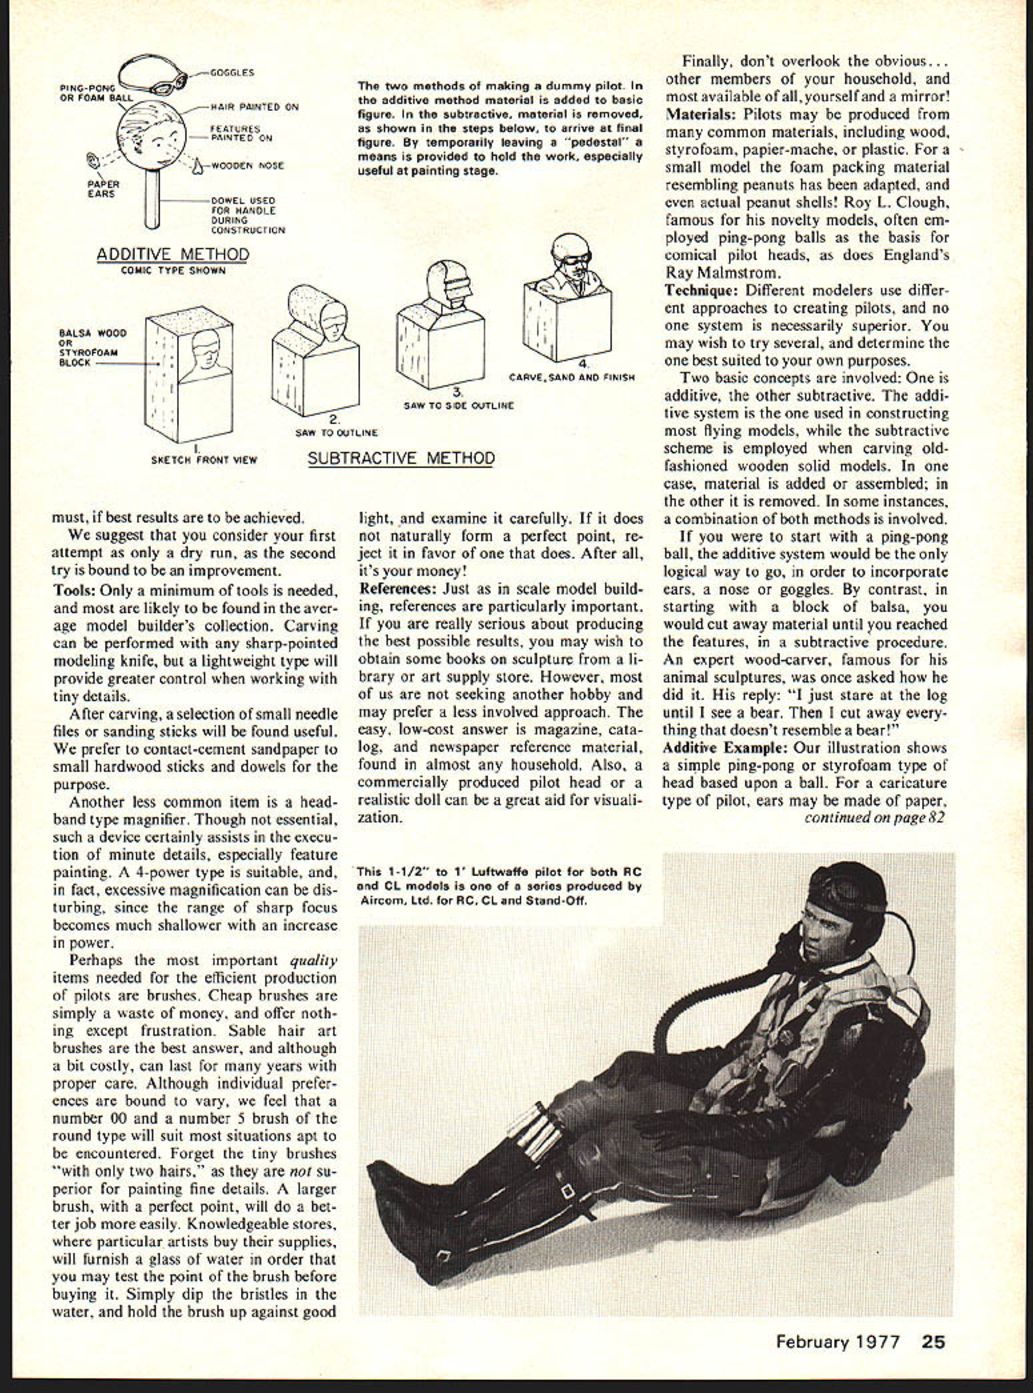
Two basic concepts are involved: One is additive, the other subtractive. The additive system is the one used in constructing most flying models, while the subtractive scheme is employed when carving old-fashioned wooden solid models. In one case, material is added or assembled; in the other it is removed. In some instances, a combination of both methods is involved.
If you were to start with a ping-pong ball, the additive system would be the only logical way to go, in order to incorporate ears, a nose or goggles. By contrast, in starting with a block of balsa, you would cut away material until you reached the features, in a subtractive procedure. An expert wood-carver, famous for his animal sculptures, was once asked how he did it. His reply: "I just stare at the log until I see a bear. Then I cut away everything that doesn't resemble a bear!"
Additive Example: Our illustration shows a simple ping-pong or styrofoam type of head based upon a ball. For a caricature type of pilot, ears may be made of paper, while the nose may be carved of wood. Features, such as the eyes, may be painted on, with other 3-dimensional details such as goggles added if desired.
For a more realistic subject, the ball is used merely as an armature or core, to support added papier-mâché, spackle, or a mixture of balsa dust and glue. This "putty" may be applied with a small artist palette knife or a screwdriver, to build up the features as required. The relatively rough texture that results can be quite realistic, perhaps more so than the smoothness most of us associate with skin. When fully dried, the surface can be additionally worked with sandpaper and files, if desired. Don Tynd actually did a lifelike "self-portrait" by this method, using a commercially made pilot head as an armature.
Subtractive Example: Select a lightweight block of balsa, allowing more vertical height than required for the finished pilot, in order to provide a good handhold during carving. Draw a front or side view of the proposed figure on the block, using a fiber-point pen or soft pencil. Using a coping or jig saw, cut roughly to outline. Next, draw an approximation of the remaining view on the block, and again saw to outline. Don't take off too much, or you will be back to the additive system again!
Using a sharp modeler's knife, begin to cut away the corners, using small straight-line cuts, gradually working down to the facial shapes. Refer constantly to your illustrations or commercially made example. Rotate the block, working from various sides, rather than trying to finish one side at a time. When you are satisfied with the contours, switch to files or sanding sticks for the finishing touches. As mentioned earlier, super-smoothness may not produce the most convincing results. This is not a spinner or cowling we are trying to create, but a human head, which can in some instances have almost prune-like wrinkles, which can add character almost automatically.
When you think you are satisfied with your carving, stop. Ask someone else if they think it is ready for painting. Likely they will suggest some improvements. None of us particularly enjoy criticism of our work, but constructive suggestions are useful if we are willing to accept them. One need not be an art critic to judge, but a fresh viewpoint can be of immeasurable assistance. If you'd rather not listen to anyone else's opinion, simply put the carving away for a day or so, then look at it carefully yourself. We're betting you'll see areas that can stand improvement!
Although we chose balsa as an example, foam can be substituted, and while it is easier to carve, may not allow such precise feature detail, unless they are applied by the additive method using spackle or a similar substance.
Stage 1: Cockpits very basic. A model pilot head may be mounted on a simple balsa cross-piece. However, some suggestion of a torso can add greater realism and direct attention to the pilot. A stage or semi-scale model plain recessed platform can serve the purpose. Made of paper or balsa, it can be mounted to the underside of the upper fuselage longerons; though recessed, the thickness of the longerons painted flat dark gray will provide the visual effect of depth. With such installation the pilot head or bust can be attached directly to the platform in your home with minimum effort.
Stage 2: This stage is a step further than Stage 1. The platform is recessed to a point directly beneath the model's instrument panel. Note certain designs' panels may be located high enough to be incorporated into the stage. In this situation the panel itself adds considerable realism for a small amount of extra effort.
Stage 3: The ultimate development, usually employed on serious scale models, features complete cockpit details down to rudder pedals and floorboards. Without doubt a great deal of extra time and work is required for proper execution; for contest purposes the time is well spent, and compliments from fellow builders and spectators may provide additional bonus. People can easily appreciate interior detail perhaps because they spend hours in similar surroundings driving automobiles. Incorporating a complete cockpit in a flying model is quite a different proposition than that encountered in a static display type. Aside from weight considerations, certain built-in problems must be surmounted. For example, it might be very difficult fully detailing the interior of a rubber-powered model if the powerplant passes right through the center of attention. Such obstacles may require some careful thought. Similarly, control-line models might need some clever planning in order that the model control system does not infringe upon the scale control system. Actually, some outstanding examples have featured scale control actuation linked to the model's bellcrank for additional realism. Ditto certain R/C models.
Occasionally a bit of optical cheating may be required, such as installing floorboards a small distance above the scale location. Since observers view foreshortened anyway, slight fudging can be perpetrated without being obvious. Sides of the cockpit should also be remembered. Nothing detracts from an otherwise scale-like model appearance more than raw balsa wood seen through cockpit cabin windows. Prior to covering, interior structure likely to be seen on the finished model should be suitably stained, painted, or covered appropriate to the subject aircraft. Seats prototypical also must be truly complete as part of the interior. Commercially manufactured interior components now on the market can simplify the task of furnishing cockpit interiors; they are available for the majority of subjects.
Vacuum-Formed Pilots:
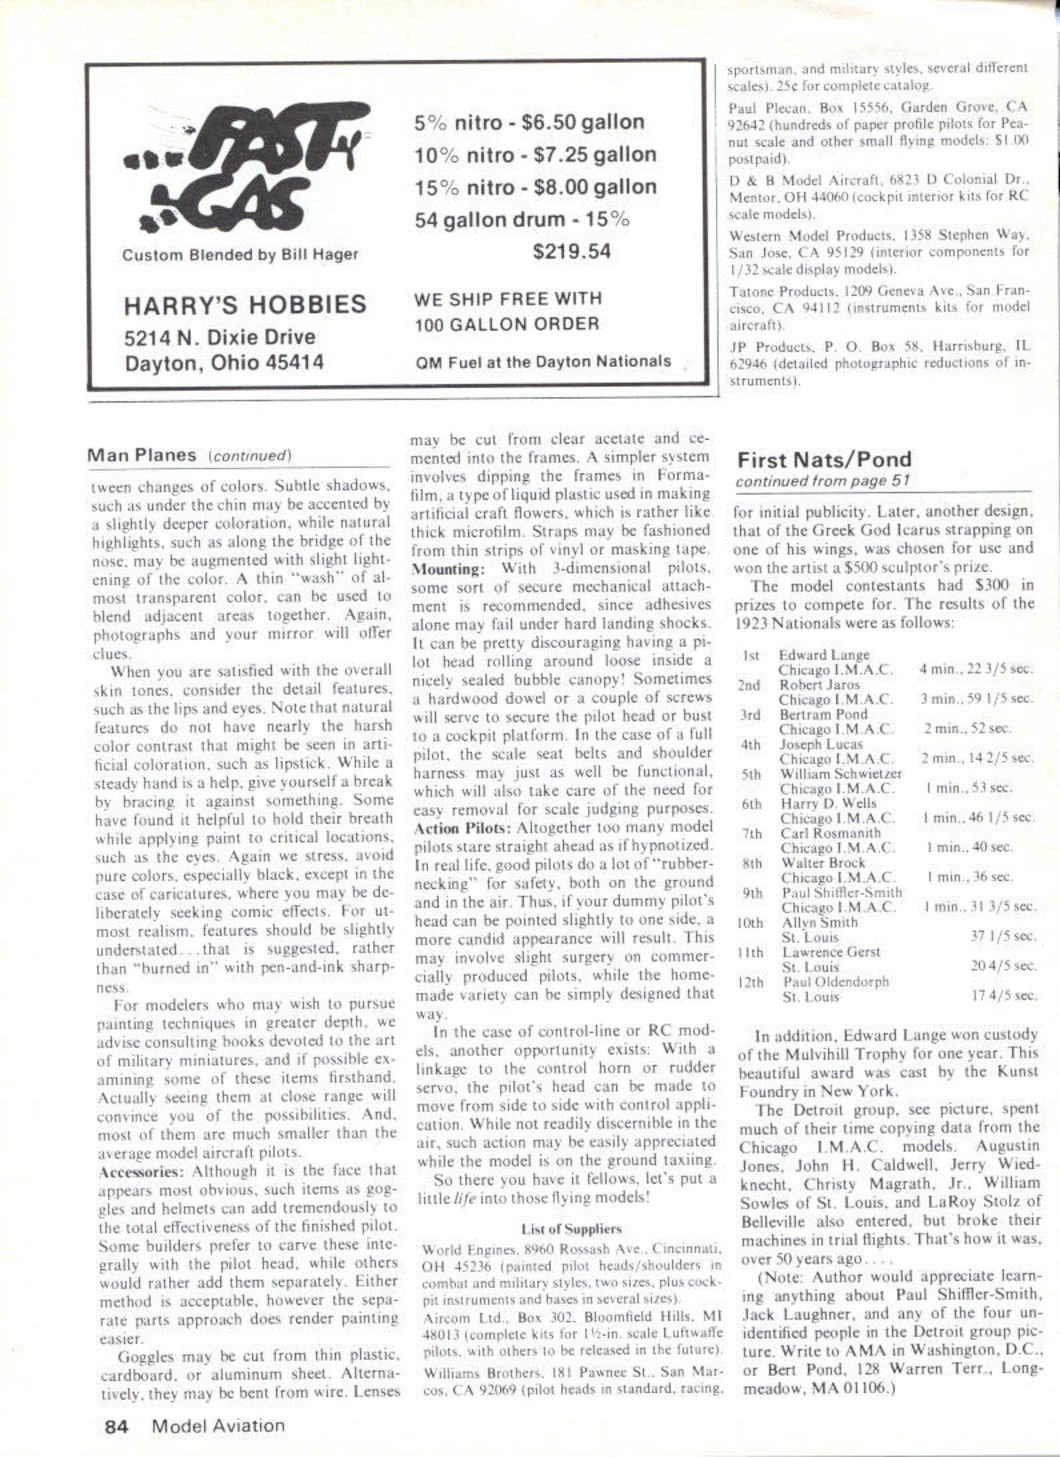
Pilots found in some kits are produced by this process and one of our photos shows an outstanding example, a large R/C model size Luftwaffe flier. This process can also be applied by the scratch-builder to create other sizes and types of pilots.
A Mattel Vac-U-Form toy is the simplest tool to employ, and although these are no longer manufactured, they can frequently be found at low cost in garage sales, swap meets, Goodwill Industries or Salvation Army stores.
If you are unable to locate a Vac-U-Form toy, or if you desire to produce larger parts than it will accept, you may care to build a forming unit of your own. These are made from easily available materials and utilize a common household vacuum-cleaner as the source of vacuum. Detailed directions for building such a unit were featured in Flying Models magazine, April, 1976 issue, and a similar unit in the May Flying Models article devoted to the Heinkel He-100 V8. Yet another unit was described in the April, 1976 edition of Model Builder magazine.
For a pattern or mold, you may use a commercial pilot or one of your own creations. In the latter case, bear in mind the need for "draft," or taper, since undercuts will prevent the finished plastic part from being removed. Also, the pattern will need to be split in halves, either fore and aft or crosswise, as shown in our photographs.
After forming, the halves may be cemented together and the joints filed or scraped smooth. The result is an exceptionally lightweight pilot that may be duplicated as often as desired.
Incidentally, there is a method by which one-shot pilots may be formed, even with undercut features. The process involves making a pattern from modeling clay, which is then thoroughly chilled in a freezer. With care, this will withstand a single quick vacuum-forming. The clay may then be dug out and reclaimed for possible future use, or discarded.
Finishing:
Regardless of the production approach, the finish of the pilot can be one of the most vital contributions to effectiveness. Carefully done, it can save a rather mediocre pilot, but badly done, it can totally ruin even the most perfect sculpture. Again, we emphasize the need for a calm state-of-mind, good lighting, and reasonably quiet working conditions. However, one of the author's earliest attempts at painting a pilot occurred on the fantail of an aircraft carrier during an Atlantic storm, so anything is possible, given strong enough dedication!
Select a type of paint compatible with the material of your pilot. Usually, acrylics or enamels are a safe choice, whereas dopes or lacquers may attack surfaces, especially of plastic. Also, matte colors are almost always more realistic than shiny paints, which reflect highlights and often look "sticky" even after they are dry. Glossy pilots in photographs are a dead give-away, immediately branding the subject as a model. Ditto glassy-eyed stares.
In the case of commercially molded pilots, any possible traces of mold release agents should be removed with a lukewarm mixture of liquid detergent and water, then rinsed and dried before painting.
Gather your reference material together, and study it carefully before commencing the application of paint. Color photos, in particular, can be most informative, and should be referred to constantly. Note the colors of the facial skin and features: most amateurs seem to color the face too pink and the lips too red. Work for general effect, rather than trying to pin down each minute detail. Nostrils, for example, should not be represented as black holes! Better not to indicate them at all if you are unable to treat them in a subtle manner.
Note that colors will change slightly during drying, so compensate as required. Pure right-out-of-the-bottle or tube paints are seldom a good choice. They should be mixed, a little at a time, until pleasing results are obtained. A plain white ceramic dish is suitable for the purpose. Keep thinner nearby, as the paints tend to dry on the palette, and for cleaning your brushes be- between changes of colors. Subtle shadows, such as under the chin may be accented by a slightly deeper coloration, while natural highlights, such as along the bridge of the nose, may be augmented with slight lightening of the color. A thin "wash" of almost transparent color can be used to blend adjacent areas together. Again, photographs and your mirror will offer clues.
When you are satisfied with the overall skin tones, consider the detail features, such as the lips and eyes. Note that natural features do not have nearly the harsh color contrast that might be seen in artificial coloration, such as lipstick. While a steady hand is a help, give yourself a break by bracing it against something. Some have found it helpful to hold their breath while applying paint to critical locations, such as the eyes. Again we stress, avoid pure colors, especially black, except in the case of caricatures, where you may be deliberately seeking comic effects. For utmost realism, features should be slightly understated... that is suggested, rather than "burned in" with pen-and-ink sharpness.
For modelers who may wish to pursue painting techniques in greater depth, we advise consulting books devoted to the art of military miniatures, and if possible examining some of these items firsthand. Actually seeing them at close range will convince you of the possibilities. And, most of them are much smaller than the average model aircraft pilots.
Accessories: Although it is the face that appears most obvious, such items as goggles and helmets can add tremendously to the total effectiveness of the finished pilot. Some builders prefer to carve these integrally with the pilot head, while others would rather add them separately. Either method is acceptable, however the separate parts approach does render painting easier.
Goggles may be cut from thin plastic, cardboard, or aluminum sheet. Alternatively, they may be bent from wire. Lenses may be cut from clear acetate and cemented into the frames. A simpler system involves dipping the frames in Formafilm, a type of liquid plastic used in making artificial craft flowers, which is rather like thick microfilm. Straps may be fashioned from thin strips of vinyl or masking tape.
Mounting: With 3-dimensional pilots, some sort of secure mechanical attachment is recommended, since adhesives alone may fail under hard landing shocks. It can be pretty discouraging having a pilot head rolling around loose inside a nicely sealed bubble canopy! Sometimes a hardwood dowel or a couple of screws will serve to secure the pilot head or bust to a cockpit platform. In the case of a full pilot, the scale seat belts and shoulder harness may just as well be functional, which will also take care of the need for easy removal for scale judging purposes.
Action Pilots: Altogether too many model pilots stare straight ahead as if hypnotized. In real life, good pilots do a lot of "rubbernecking" for safety, both on the ground and in the air. Thus, if your dummy pilot's head can be pointed slightly to one side, a more candid appearance will result. This may involve slight surgery on commercially produced pilots, while the homemade variety can be simply designed that way.
In the case of control-line or RC models, another opportunity exists. With a linkage to the control horn or rudder servo, the pilot's head can be made to move from side to side with control application. While not readily discernible in the air, such action may be easily appreciated while the model is on the ground taxiing.
So there you have it fellows, let's put a little life into those flying models!
List of Suppliers
World Engines, 8960 Rossash Ave., Cincinnati, OH 45236 (painted pilot heads/shoulders in combat and military styles, two sizes, plus cockpit instruments and bases in several sizes).
Aircom Ltd., Box 302, Bloomfield Hills, MI 48013 (complete kits for 1-1/2 in. scale Luftwaffe pilots, with others to be released in the future).
Williams Brothers, 181 Pawnee St., San Marcos, CA 92069 (pilot heads in standard, racing, sportsman, and military styles, several different scales). 25¢ for complete catalog.
Paul Plecan, Box 15556, Garden Grove, CA 92642 (hundreds of paper profile pilots for Peanut scale and other small flying models: $1.00 postpaid).
D & B Model Aircraft, 6823 D Colonial Dr., Mentor, OH 44060 (cockpit interior kits for RC scale models).
Western Model Products, 1358 Stephen Way, San Jose, CA 95129 (interior components for 1/32 scale display models).
Tatone Products, 1209 Geneva Ave., San Francisco, CA 94112 (instrument kits for model aircraft).
JP Products, P. O. Box 58, Harrisburg, IL 62946 (detailed photographic reductions of instruments).
Transcribed from original scans by AI. Minor OCR errors may remain.

