
Planarian
Barnaby Wainfan
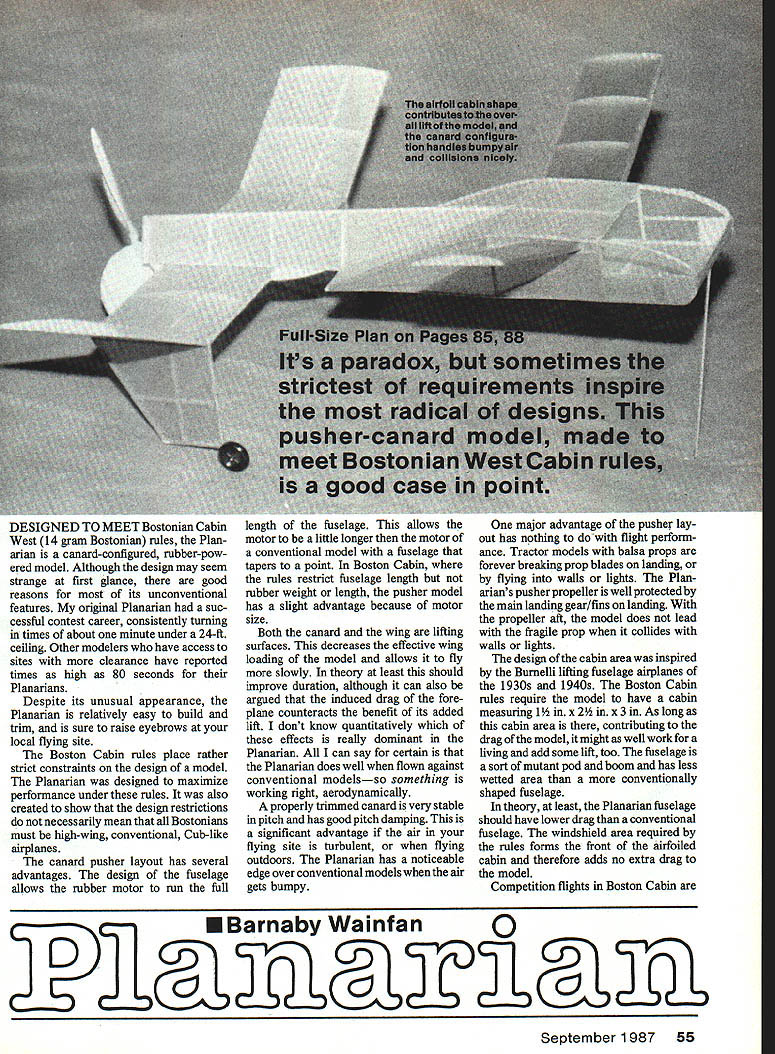
Designed to meet Bostonian Cabin West (14-gram Bostonian) rules, the Planarian is a canard-configured, rubber-powered model. Although the design may seem strange at first glance, there are good reasons for most of its unconventional features. My original Planarian had a successful contest career, consistently turning in times of about one minute under a 24-foot ceiling. Other modelers who have access to sites with more clearance have reported times as high as 80 seconds for their Planarians.
Despite its unusual appearance, the Planarian is relatively easy to build and trim, and is sure to raise eyebrows at your local flying site.
The Boston Cabin rules place rather strict constraints on the design of a model. The Planarian was designed to maximize performance under these rules. It was also created to show that the design restrictions do not necessarily mean that all Bostonians must be high-wing, conventional, Cub-like airplanes.
Advantages of the canard-pusher layout:
- The fuselage allows the rubber motor to run the full length of the fuselage, permitting a motor a little longer than that of a conventional model whose fuselage tapers to a point. In Boston Cabin, where fuselage length is restricted but rubber weight or length is not, the pusher layout gives a slight advantage.
- Both the canard and the wing are lifting surfaces, reducing effective wing loading and allowing slower flight. This should improve duration in theory, though induced drag from the foreplane may counteract some benefit. Empirically, the Planarian performs well against conventional models.
- A properly trimmed canard is very stable in pitch and has good pitch damping, which is an advantage in turbulent air or outdoors. The Planarian has a noticeable edge over conventional models in bumpy conditions.
- The pusher prop is less vulnerable to damage: tractor models with balsa props often break prop blades on landing or by hitting walls/lights. The Planarian’s pusher propeller is protected by the main landing gear/fins on landing.
- The cabin area was inspired by the Bumelli lifting-fuselage airplanes of the 1930s and 1940s. Boston Cabin rules require a cabin measuring 1½ in. x 2½ in. x 3 in. Since the cabin contributes to drag, shaping it as an airfoil adds lift and reduces wetted area compared with a conventional fuselage. The windshield area required by the rules forms the front of the airfoiled cabin and therefore does not add extra drag.
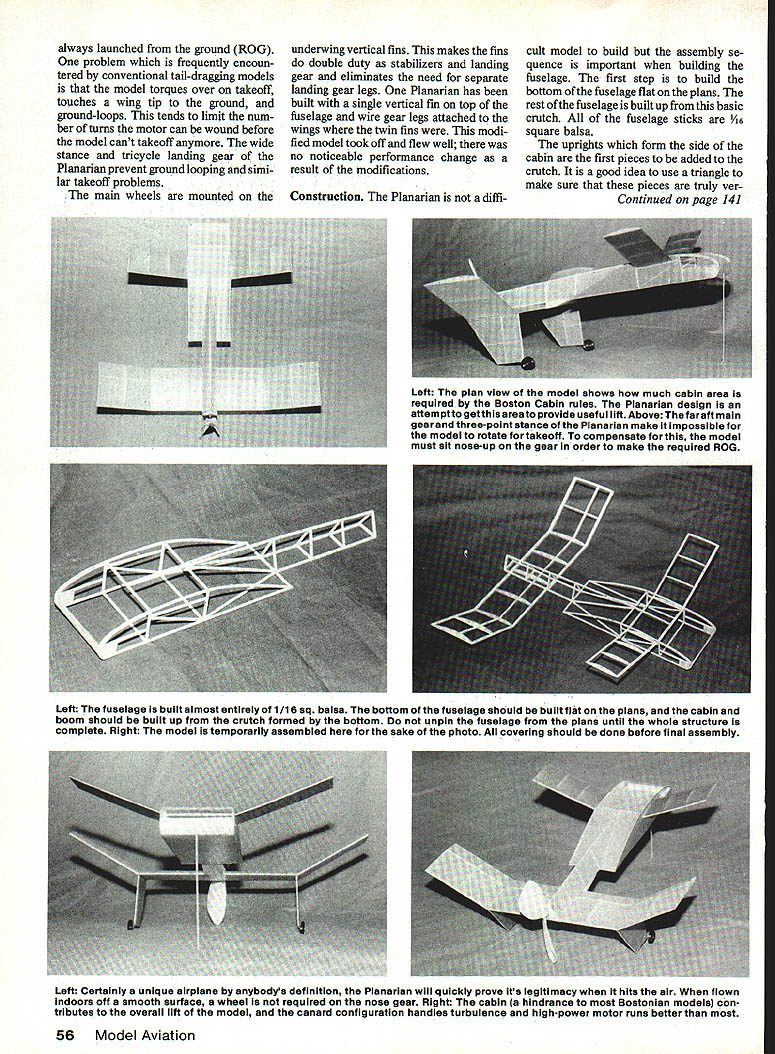
Competition flights in Boston Cabin are always launched ROG (ground takeoff). Conventional tail-dragging models often tip over at takeoff due to torque, touching a wingtip and limiting motor winds. The Planarian’s wide-stance tricycle landing gear prevents ground-looping and similar problems. Main wheels mounted under the wing and vertical fins make the fins double duty as landing gear and stabilizers, eliminating separate gear legs. Some builders have used a single vertical fin with wire gear legs or other modifications with no noticeable performance change.
Construction
The Planarian is not difficult to build, but the assembly sequence is important, especially for the fuselage. All fuselage sticks are 1/16 in. square balsa unless otherwise noted. Build the bottom of the fuselage flat on the plans; this crutch forms the basis for the rest of the fuselage. Do not unpin the fuselage from the plans until the entire structure is complete.
Fuselage build sequence
- Pin and build the bottom of the fuselage flat on the plans.
- Add the uprights that form the sides of the cabin. Use a triangle to ensure they are truly vertical.
- Install the canard bearers; ensure they are vertical and not canted fore-and-aft or laterally.
- Attach the upper longerons that form the sides of the cabin. Attach them at the trailing edge first, then bend into position. Make sure the bottom of the fuselage remains securely pinned to the building board before adding the top longerons to avoid lifting and warping.
- After the upper longerons are in place, install the cabin top cross members, side diagonals, and canard bearers to include the nose-up incidence angle shown in the side view on the plans. This nose-up incidence is essential to the trim of the model.
- Cut and add the windshield frames from 1/16 in. sheet and fit the 1/32 in. nose sheeting to complete the cabin structure.
- Build the tail boom up from the crutch in the same manner: install triangular formers first, then add the longeron that forms the top of the boom to complete the fuselage.
Wing, canard, and fins
- Wing and canard construction is straightforward. Note that the two tip ribs of each surface are doubled or made of 1/16 in. sheet instead of 3/32 in. to prevent them from sagging inward when the covering is shrunk.
- The canard dihedral is important to stability—too little dihedral can lead to spiral instability. A little extra dihedral will not hurt.
- The fins are built flat on the plan. Remember there are two of them.
Covering and final assembly
- Cover all components before final assembly. Use lightweight tissue, shrunk with rubbing alcohol (not water), and apply one coat of thinned clear dope.
- Assembly is straightforward, but ensure the fins are firmly attached to the wings since they also act as landing gear legs and must take landing loads.
- Add the main wheels and nose gear after assembly. The nose gear may be 1/32 in. round bamboo or music wire. It is very important that the nose gear be long enough so the model sits nose-up on the ground. The tricycle gear and aft main wheels prevent rotation for takeoff; the model must have a positive angle of attack when sitting on the gear to lift off.
- The original model’s nose gear had no wheel and took off fine on a smooth gymnasium floor. If you plan to fly outdoors off paved surfaces, consider adding a nose wheel.
Trimming and flying
- Center of gravity: near the trailing edge of the cabin.
- Motor: one loop of 1/8 in. rubber. For maximum performance, the motor should be about 1½ times the length of the fuselage.
- Direction: the model flies best to the left, with the torque. If you build a right-handed prop so it can be wound normally, fly the model to the right.
- Turn radius: use a small tab on the left fin to set turn radius.
- Winding: start trimming with about 600 turns and work up. Maximum contest winds are about 2,000 turns. Remember the Planarian is a pusher and must be wound "backwards"—releasing the model wound the wrong way will cause it to taxi backward.
- All trimming flights should be made from an ROG.
Flight characteristic note:
- As a canard, the Planarian does not stall in the classic sense unless the CG is extremely far aft. If the model is slightly tail-heavy it will take off normally and settle into a slow, mushing descent as power decreases; this is corrected by moving the CG forward slightly. When properly trimmed, the Planarian will circle smoothly for about one minute in a typical high school gym.
Acknowledgement
The Planarian plans are the work of Carlo Godel, who did a beautiful job with them on very short notice. He has my heartfelt thanks for his effort.
Transcribed from original scans by AI. Minor OCR errors may remain.

