
Plane Talk: Hangar 9 F6F Hellcat 60 ARF
Stan Alexander
Introduction
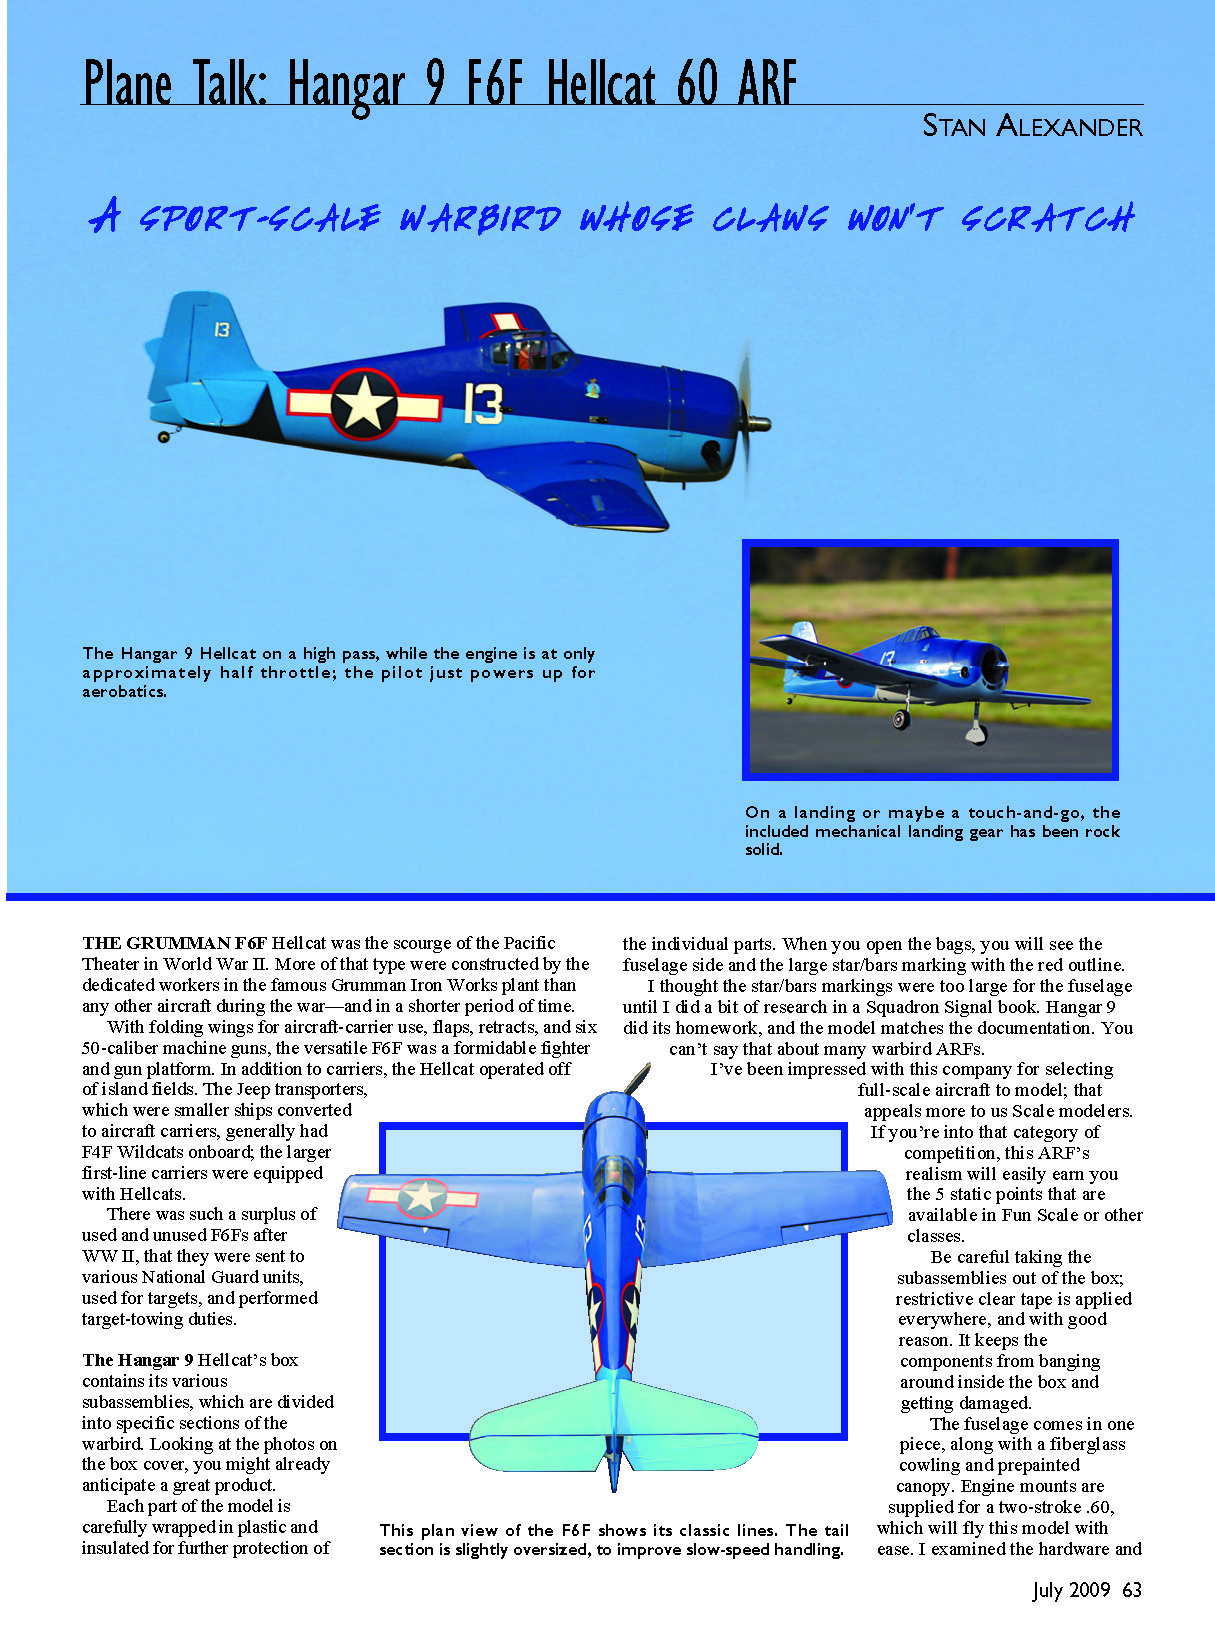
The Grumman F6F Hellcat was the scourge of the Pacific Theater in World War II. More of that type were constructed by the dedicated workers in the famous Grumman Iron Works plant than any other aircraft during the war—and in a shorter period of time.
With folding wings for aircraft-carrier use, flaps, retracts, and six .50-caliber machine guns, the versatile F6F was a formidable fighter and gun platform. In addition to carriers, the Hellcat operated off island fields. The Jeep transporters, which were smaller ships converted to aircraft carriers, generally had F4F Wildcats onboard; the larger first-line carriers were equipped with Hellcats.
There was such a surplus of used and unused F6Fs after WWII that they were sent to various National Guard units, used for targets, and performed target-towing duties.
Unboxing and First Impressions
The Hangar 9 Hellcat's box contains its various subassemblies, which are divided into specific sections of the warbird. Looking at the photos on the box cover, you might already anticipate a great product.
Each part of the model is carefully wrapped in plastic and insulated for protection. When you open the bags, you will see the fuselage side and the large star-and-bars marking with the red outline. I thought the star-and-bars markings were too large for the fuselage until I did a bit of research in a Squadron/Signal book. Hangar 9 did its homework, and the model matches the documentation. You can't say that about many warbird ARFs.
I've been impressed with this company for selecting full-scale aircraft to model; that appeals to scale modelers. If you're into that category of competition, this ARF's realism will easily earn you the 5 static points that are available in Fun Scale or other classes.
Be careful taking the subassemblies out of the box; restrictive clear tape is applied everywhere, and with good reason. It keeps the components from banging around inside the box and getting damaged.
The fuselage comes in one piece, along with a fiberglass cowling and prepainted canopy. Engine mounts are supplied for a two-stroke .60, which will fly this model with ease. I examined the hardware and used most of what was supplied, including the hinges, wheels, dummy engine, and various nuts and bolts.
Assembly
Wing and Retracts
- The wing comes in three panels. Preinstalled retracts are mounted on the center panel.
- The outer two panels house the aileron servos in handy hatches on the underside of both the port and starboard panels.
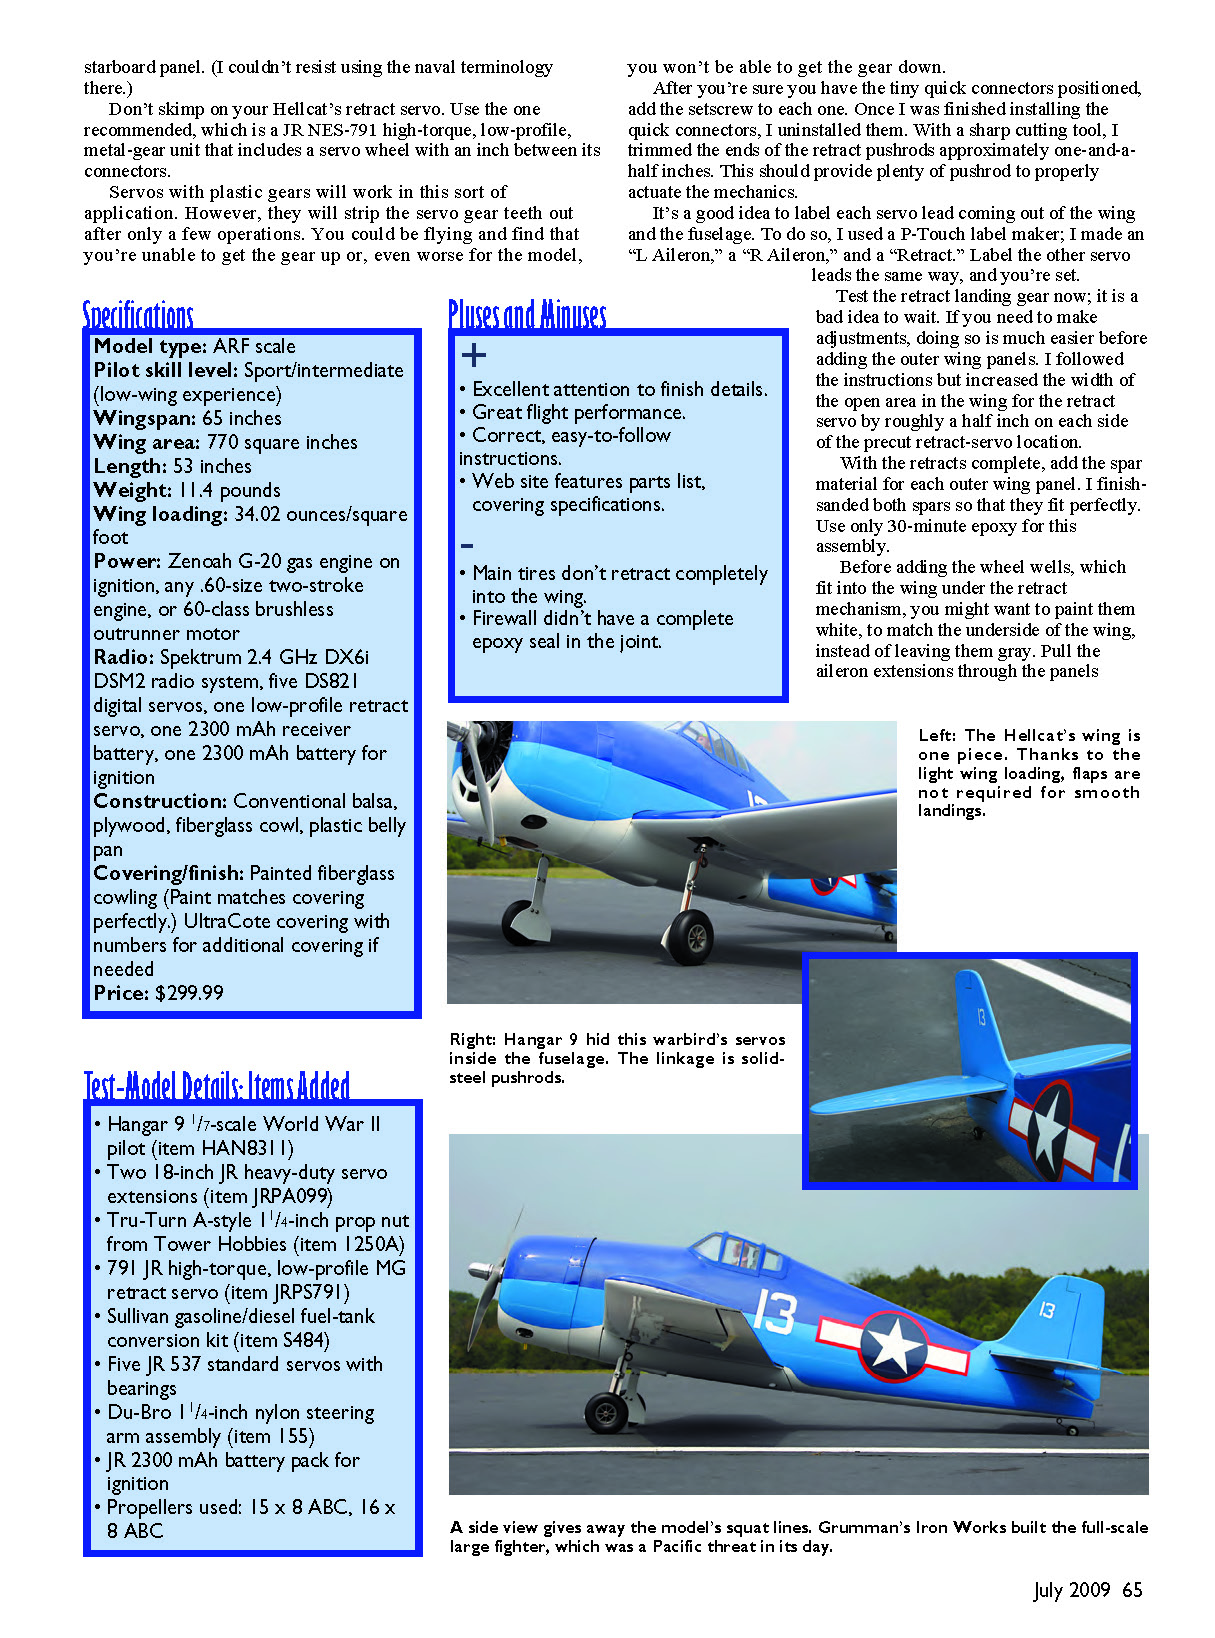
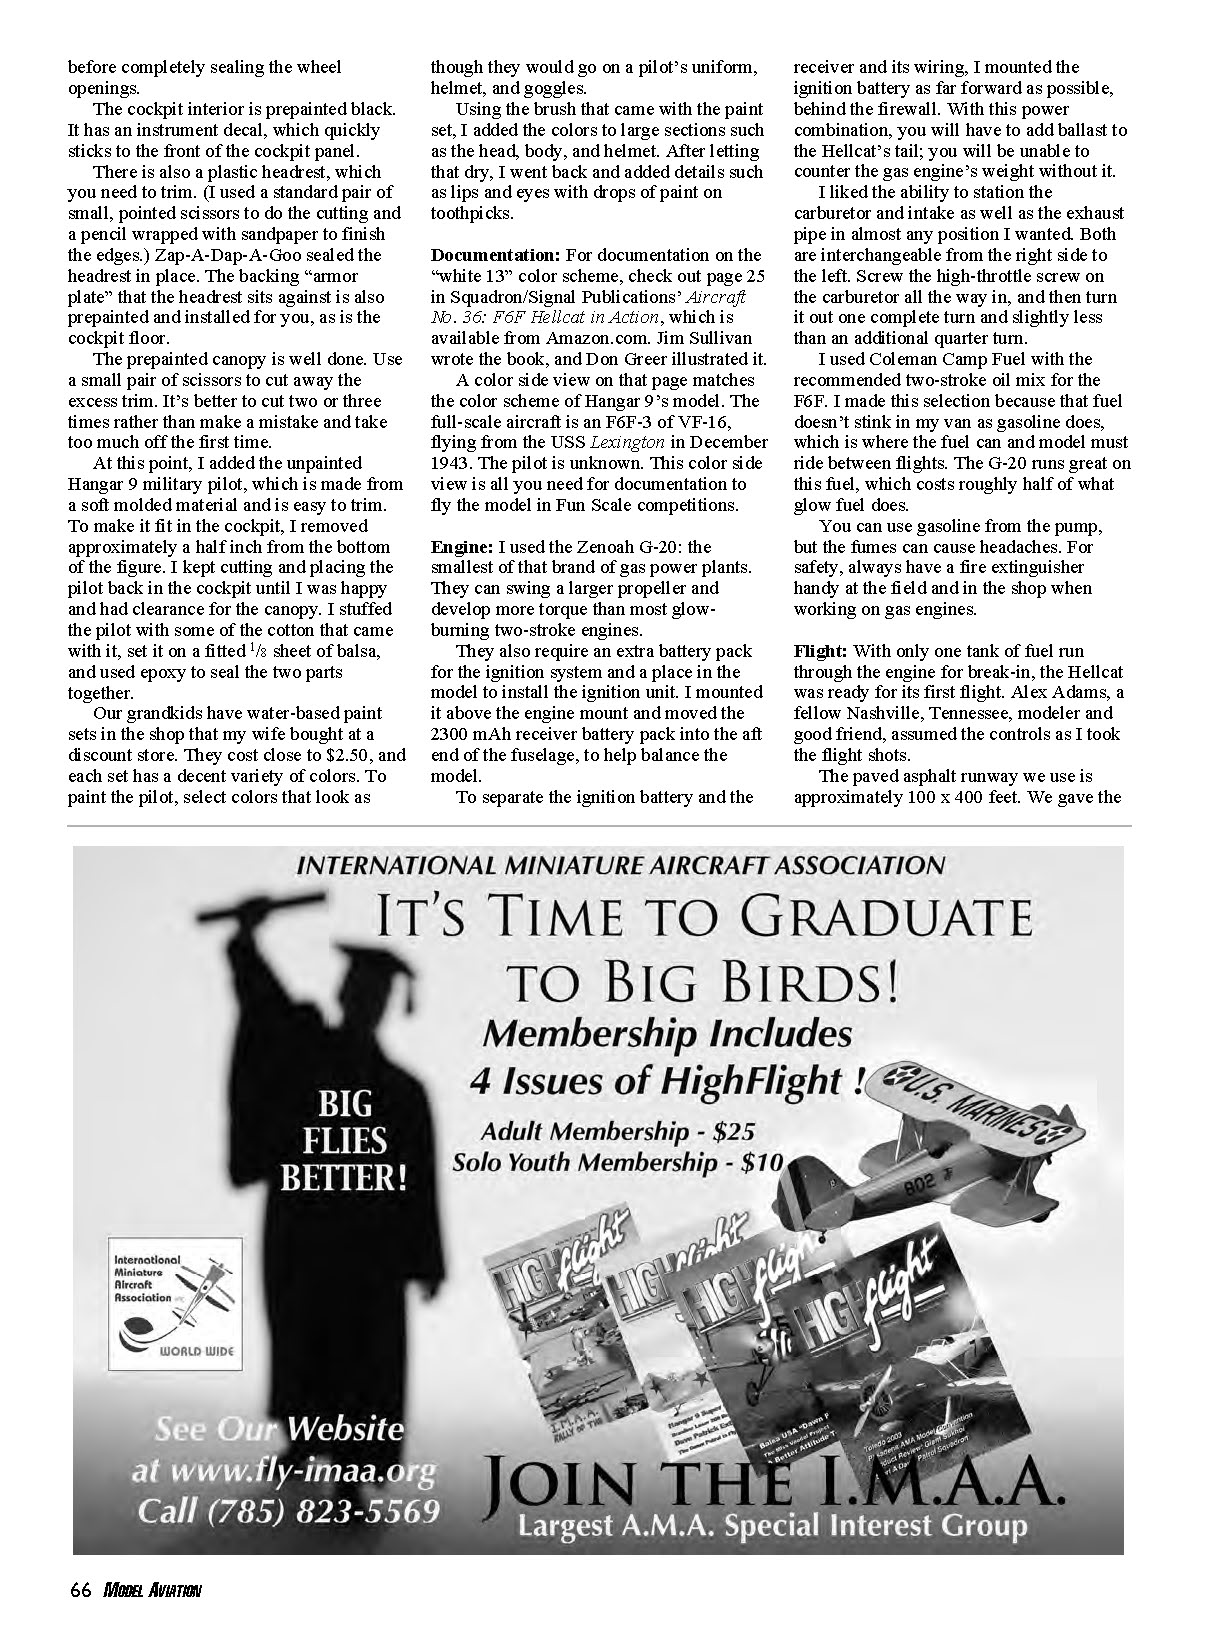
Don't skimp on your Hellcat's retract servo. Use the recommended JR NES-791 high-torque, low-profile, metal-gear unit. It includes a servo wheel with 1-inch spacing between its connectors. Servos with plastic gears will work initially but can strip their gears after only a few operations. You could be flying and find you cannot retract the gear, or worse, cannot extend it.
After positioning the tiny quick connectors, add the setscrew to each one. Once the connectors are installed, trim the ends of the retract pushrods with a sharp cutting tool—approximately 1.5 inches—to provide ample pushrod length to actuate the mechanics properly.
Label each servo lead coming out of the wing and fuselage. I used a P-Touch label maker to make "L Aileron," "R Aileron," and "Retract." Label the other servo leads in the same way so wiring is simple and clear.
Test the retract landing gear now; it is a bad idea to wait. If adjustments are needed, they are much easier before adding the outer wing panels. I increased the width of the open area in the wing for the retract servo by roughly 1/2 inch on each side of the precut retract-servo location to improve fit and access.
Spars and Wheel Wells
With the retracts complete, add the spar material for each outer wing panel. Finish-sand both spars for a perfect fit. Use only 30-minute epoxy for this assembly.
Before adding the wheel wells (which fit into the wing under the retract mechanism), paint them white to match the wing underside instead of leaving them gray. Pull the aileron extensions through the panels before completely sealing the wheel openings.
Cockpit, Canopy, and Pilot Figure
The cockpit interior is prepainted black and has an instrument decal that quickly sticks to the front of the cockpit panel. There is a plastic headrest that needs trimming; use small pointed scissors for the cutting and a pencil wrapped with sandpaper to finish the edges. Zap-A-Dap-A-Goo sealed the headrest in place. The backing "armor plate" that the headrest sits against is also prepainted and installed for you, as is the cockpit floor.
The prepainted canopy is well done. Use a small pair of scissors to cut away the excess trim. It's better to cut two or three times rather than remove too much on the first pass.
I added the unpainted Hangar 9 military pilot, made from a soft molded material and easy to trim. To fit the cockpit, I removed approximately 1/2 inch from the bottom of the figure. I trimmed and test-fitted the pilot until I had canopy clearance. I stuffed the pilot with some of the cotton that came with it, set it on a fitted 1/8" sheet of balsa, and used epoxy to seal the two parts together.
For painting the pilot, I used inexpensive water-based paint sets and a small brush for large sections. After drying, I added details such as lips and eyes with drops of paint on toothpicks.
Documentation and Markings
For documentation on the "white 13" color scheme, check page 25 in Squadron/Signal Publications' Aircraft No. 36: F6F Hellcat in Action, available from Amazon. Jim Sullivan wrote the book, and Don Greer illustrated it.
A color side view on that page matches the color scheme of Hangar 9's model. The full-scale aircraft is an F6F-3 of VF-16, flying from the USS Lexington in December 1943. This color side view is sufficient documentation to fly the model in Fun Scale competitions.
Engine and Fuel
I used the Zenoah G-20, the smallest of that brand's gas powerplants. Gas engines can swing larger props and develop more torque than most glow-burning two-stroke engines.
Gas engines require an extra battery pack for the ignition system and space in the model to install the ignition unit. I mounted the ignition unit above the engine mount and moved the 2300 mAh receiver battery pack into the aft end of the fuselage to help balance the model.
To separate the ignition battery and the receiver and its wiring, mount the ignition battery as far forward as possible behind the firewall. With this power combination, you will likely need to add ballast to the Hellcat's tail to counter the gas engine's weight.
I liked being able to position the carburetor intake and exhaust pipe on either side as needed; both are interchangeable between right and left. Set the high-throttle screw on the carburetor all the way in, then back it out one full turn plus slightly less than an additional quarter turn.
I used Coleman Camp Fuel with the recommended two-stroke oil mix for the F6F. I chose this because that fuel doesn't stink in my van like gasoline does (the fuel can and model must ride in the van between flights). The G-20 runs great on this fuel, which costs roughly half of what glow fuel does.
You can use pump gasoline, but fumes can be unpleasant. For safety, always have a fire extinguisher handy at the field and in the shop when working on gas engines.
Flight Impressions
With only one tank of fuel run through the engine for break-in, the Hellcat was ready for its first flight. Alex Adams, a fellow Nashville modeler and good friend, flew while I took flight photos.
We used a paved asphalt runway approximately 100 x 400 feet. We gave the model most of the runway for takeoff at half throttle; it became airborne at roughly 75 feet.
Since the F6F is a warbird, gradually apply throttle. If you "firewall" it, you can end up with a ground loop or excessive rudder input. Using a slow-throttle technique, the Hellcat needed no rudder for takeoff. The G-20 idles wonderfully upright or inverted.
At the recommended aileron throws, the model was a bit sensitive, but you can easily adjust this in the radio. The model has good throttle authority throughout the power range. The G-20 keeps it flying at a slower pace but has plenty of torque and power for aerobatics.
The F6F's retracts performed reliably—no dragging or hanging down in flight. When lowered, they locked into position and held during landings.
When properly balanced, this ARF stalls straight ahead with the nose dropping and then continuing to mush forward. This is desirable in a warbird—no tip-stalling or sudden snaps into a spin.
Additional flights to explore the Hellcat's envelope have been a joy. Don't let the ignition battery run low; I limit the 1200 mAh ignition battery to about two flights before recharging.
The model tends to dive slightly in turns; adding a bit of rudder and a small amount of elevator produces a beautiful, scale-like turn. Rolls have a realistic military style, with a hump in the middle.
I only wish the model had flaps—another option to play with—but it performs excellently without them.
With the big round cowl and a 16 x 8 propeller, this ARF slows quickly for final approach. Don't cut the throttle until after your final turn; keep the engine at high idle.
I have flown this aircraft in varying conditions, and it handles wind well. Like many warbirds, it punches through wind with no problems.
Conclusion
I enjoyed building the Hangar 9 Hellcat. I've learned a lot about gas engines and ignition systems with it. I've also learned how to keep the ignition components separate from the receiver and servos and found suitable fuel sources. Now I'm looking forward to changing the F6F's markings and adding some details.
Stan Alexander onawing4602@att.net
Manufacturer / Distributor
- Hangar 9 / Horizon Hobby
4105 Fieldstone Rd. Champaign, IL 61822 (217) 352-1913 www.hangar-9.com
Sources
- JR — (800) 338-4639, www.jrradios.com
- Tower Hobbies — (800) 637-6050, www.towerhobbies.com
- Amazon.com — www.amazon.com
- Zap Glue — (760) 246-6462, www.zapglue.com
- Du-Bro — (800) 848-9411, www.dubro.com
- Sullivan Products — (410) 732-3500, www.sullivanproducts.com
Other Printed Reviews
- Model Airplane News: January 2007
- Fly RC: February 2007
Transcribed from original scans by AI. Minor OCR errors may remain.

