
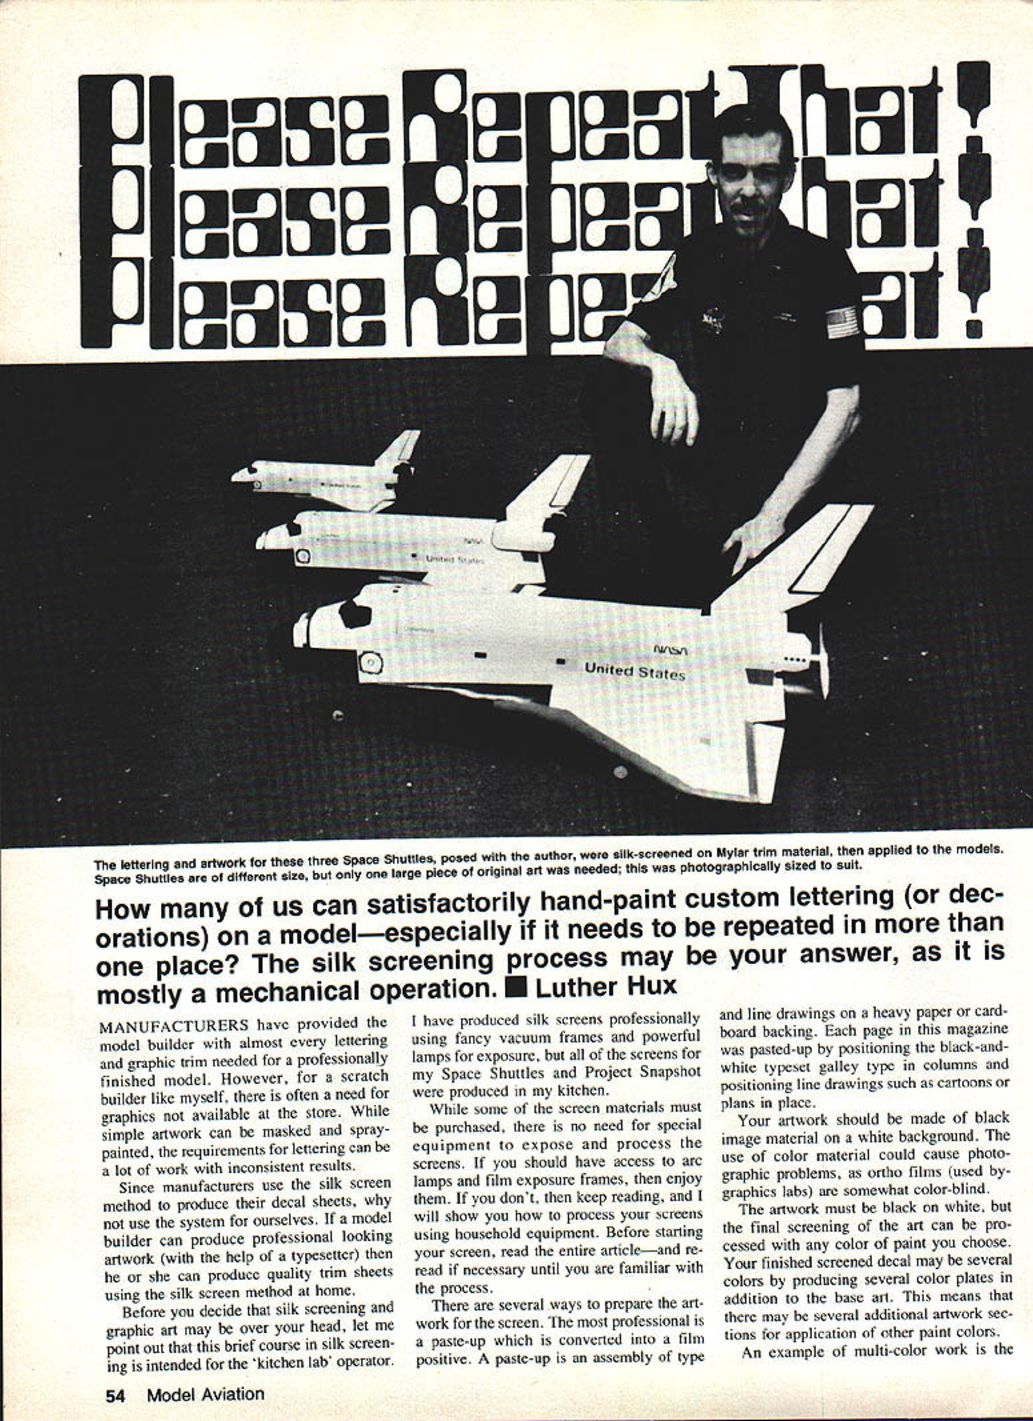


Please Repeat That!
Luther Hux
How many of us can satisfactorily hand-paint custom lettering or decorations on a model—especially if it needs to be repeated in more than one place? The silk-screening process may be your answer, as it is mostly a mechanical operation.
Manufacturers provide the model builder with almost every lettering and graphic trim needed for a professionally finished model. However, for a scratch builder there is often a need for graphics not available at the store. While simple artwork can be masked and spray-painted, lettering requirements can be a lot of work with inconsistent results.
Since manufacturers use the silk-screen method to produce decal sheets, why not use the system yourself? If a model builder can produce professional-looking artwork (with the help of a typesetter if needed) he or she can produce quality trim sheets using silk screening at home.
Before you decide that silk screening and graphic art may be over your head, this brief course is intended for the "kitchen lab" operator. I have produced silk screens professionally using vacuum frames and powerful lamps, but all of the screens for my Space Shuttles and Project Snapshot were produced in my kitchen. While some screen materials must be purchased, there is no need for special equipment to expose and process screens. If you have access to arc lamps and film exposure frames, use them. If you don't, keep reading—I'll show how to process screens using household equipment. Read the entire article before starting, and re-read if necessary until familiar with the process.
Artwork and Film Positives
Artwork basics
- Artwork should be black image material on a white background. Color originals can cause photographic problems because ortho films used by graphics labs are somewhat color-blind.
- The artwork must be black on white, but the final screening can be processed with any paint color.
- Multi-color work requires separate black-and-white artwork for each color plate (for example, red and blue portions of the U.S. flag). Position each color plate so the inks align correctly on the background decal material.
- Artwork can be hand-drawn, cut from books or plans, typeset, or created using press-on type from an art supply store.
- Once artwork is perfect, have it photographed at a commercial lab and printed on litho film positives. You can resize photographically to produce several sizes.
Film positive definitions
- A film positive is clear where the original is white and black where the original has black letters or art (opposite of a photographic negative).
- Film positives are labeled right-reading or wrong-reading:
- Right-reading: when laid on the table with the acetate/Mylar backing on top, the opaque image is against the table and the lettering is readable.
- Wrong-reading: lettering is backwards.
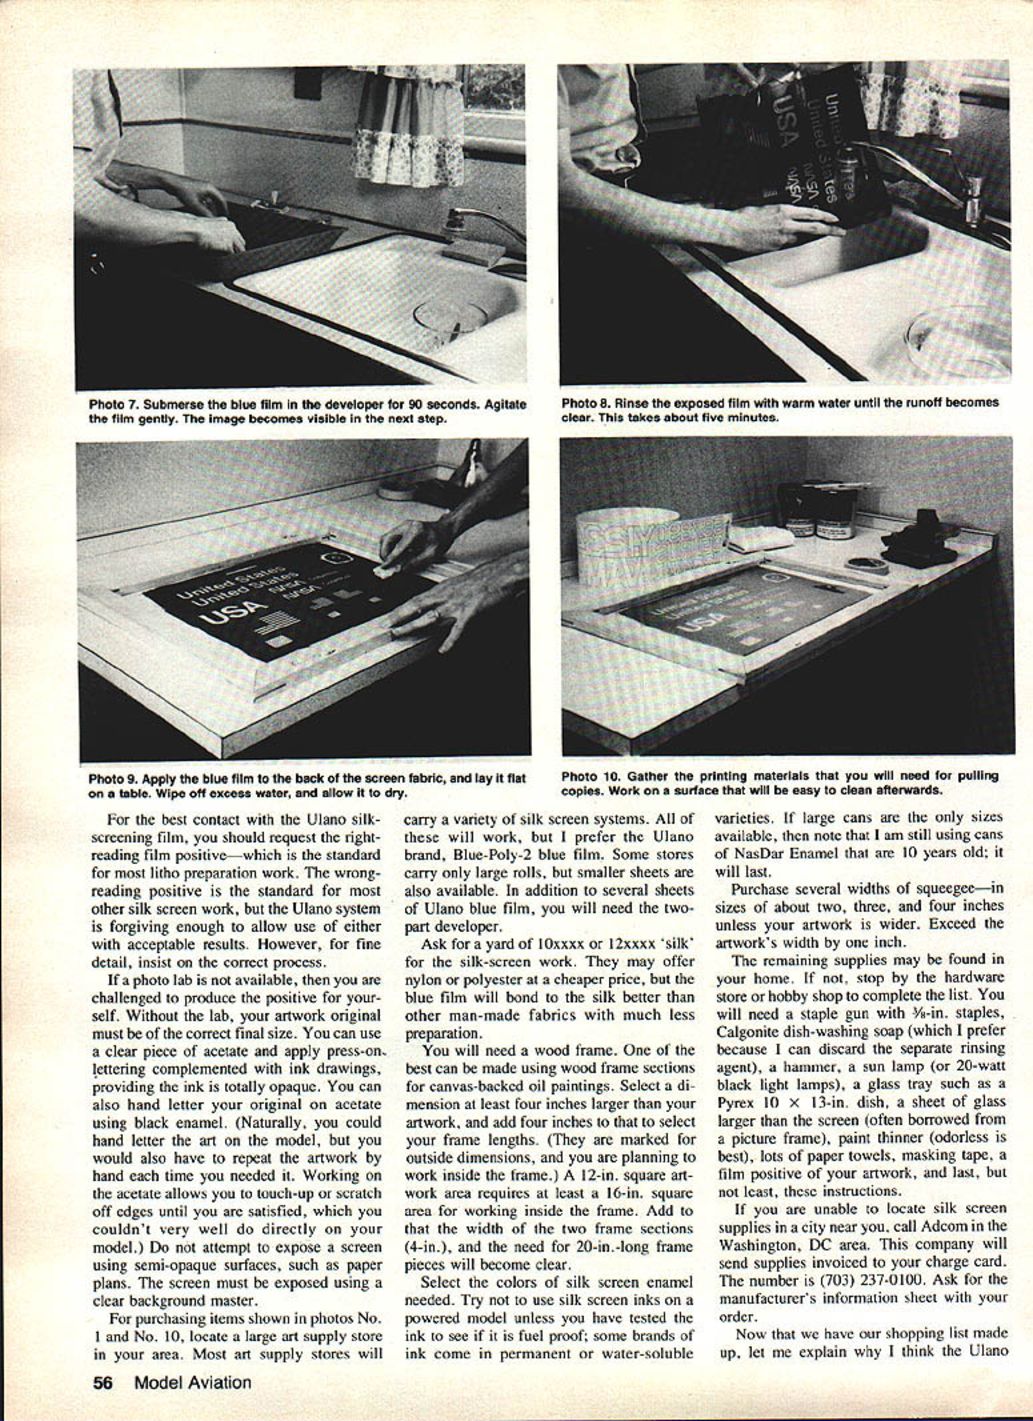
- For the Ulano silk-screening film, request right-reading film positives (standard litho preparation). The Ulano system is forgiving, but for fine detail insist on correct positives.
- If a photo lab is available, use it. If you must produce positives yourself, your artwork original must be correct final size, and you must make the positive on a clear acetate backing. Do not attempt to expose a screen using semi-opaque surfaces such as paper plans.
Supplies and Shopping List
Recommended brand and materials
- Ulano Blue-Poly-2 silk-screen film (sheets). Some art supply stores sell only large rolls; smaller sheets are available.
- Ulano two-part developer (follow manufacturer instructions).
- Silk fabric (ask for 10x10 or 12x12 "silk"; polyester/nylon may be cheaper but Ulano blue film bonds better to silk).
- Wood frame (see frame instructions below).
- Silk-screen enamel colors (oil-based screen printing inks preferred for model work; some inks are permanent or water-soluble—test for fuel resistance on powder-coated models).
- Several squeegee widths (about 2", 3", 4"—exceed artwork width by ~1").
Household and miscellaneous items
- Staple gun with 1/2" staples (heavy-duty), plus 3/8" staples suggested for fabric stapling.
- Calgonite dish-washing soap or trisodium phosphate for degreasing (avoid soaps with rinse agents that leave residues).
- Hammer.
- Sun lamp or several 20-watt black light lamps (for exposure).
- Glass tray such as a Pyrex 10 x 13" dish.
- Sheet of glass larger than the screen (often borrowed from a picture frame).
- Paint thinner (odorless preferred).
- Lots of paper towels.
- Masking tape.
- Film positive(s) of your artwork.
- Sandpaper (wet-or-dry, 600-grit).
- Fan (to prevent overheating during exposure).
- Plastic sheeting, newspaper, and cardboard for cleanup area.
- Optional: contact Adcom (Washington, DC area) for suppliers and catalog (703-237-0100).
Frames and Fabric Preparation
Choosing a frame
- One of the best frames can be made from wood frame sections for canvas-backed oil paintings. Select a frame at least four inches larger (inside working area) than your artwork. For example, a 12" square artwork needs at least a 16" square working area; account for the width of frame sections when buying lengths.
- If you do not use oil-painting frame sections, select rigid wood that will not warp under the pressure of stretched fabric. The corners must be strong to prevent twisting.
Preparing the silk
Photo 2
- Cut a piece of silk fabric approximately six inches larger than the frame.
- Degrease the fabric by washing in trisodium phosphate (if available) or Calgonite dishwasher powder. Use about two tablespoonfuls of powder dissolved in a cup of hot water, then pour the cup contents into a bowl of warm water large enough to submerge the fabric. Do not pour undissolved particles.
- Wash thoroughly, then rinse thoroughly with plain water several times. Any soap residue will prevent the blue film from bonding to the fabric.
Attaching and stretching the fabric
Photo 3
- Spread the wet fabric smoothly over the wood frame and keep it wet until staple attachment is completed.
- Use a heavy-duty staple gun with 3/8" staples. Do not use a household paper stapler.
- Apply all staples at alternating 45-degree angles in a zig-zag pattern (staples should not run parallel to the frame edge). This improves grip and prevents tearing.
- Procedure:
- Drive the first staple at the center of one of the long sides.
- Grip the fabric at the opposite end of that side, pull tightly, and staple the center of the opposite side.
- Continue toward corners, staggering staples every ~2" and trimming excess fabric when done.
- For the opposite long side, pull evenly against the staples on the first side and staple toward the corners.
- On the third side, staple with very little pull (1/8"–1/4" from at-rest position).
- On the fourth side, pull firmly and staple toward corners; fabric should be tight enough to bounce a quarter off the center.
- If tension is low after all sides, re-staple with alternating-angled staples between existing ones while pulling tightly. Avoid too many staples (one per inch is a guideline).
- Use a hammer to seat staples firmly without cutting the fabric.
Final mechanical prep
- To improve adhesion of photo film, roughen the fabric surface with wet 600-grit sandpaper on the same side as the staples (do not sand where silk and frame edge meet). Keep silk and sandpaper wet and sand for only about two minutes. Stay at least 1" from the edge.
- Rinse screen thoroughly, then blow out water and grit with an air hose or vacuum cleaner output (clean the vacuum first). Avoid dusty areas.
Exposing and Developing the Blue Film (Ulano Blue-Poly-2)
Preparing the developer
Photo 4
- Mix developer just before use. Follow Ulano packet instructions:
- Dissolve Part A in 16 oz (about 480 ml) of 75°F water.
- Pour in Part B and stir until fully dissolved.
- Pour the mix into a photo tray or glass baking dish. Do not store overnight. Avoid contact with eyes or food. Skin contact is usually not a problem unless you have cuts.
Test-strip exposure and setup
Photo 6
- The Ulano Blue-Poly film is exposed to light with the film positive in direct contact with the blue film and a sheet of glass pressing them together for best contact.
- Set up on a flat, black surface (black paper prevents reflections). If needed, use 1/4" foam rubber under the black paper to ensure flatness.
- For exposure testing: place a small piece of Blue-Poly film on the black paper with emulsion side up (clear polyester backing down). Cover one edge with an opaque black strip and place a sheet of glass over the area. Mount your light source above the exposure area.
- Light sources:
- Sun lamps: for a 1 ft² screen, mount the lamp ~1 ft above and expose 30–40 minutes. Use a fan to avoid overheating.
- 20-watt black light fluorescent lamps: easiest, cover the screen area and expose about 10 minutes at 4–5" distance.
- 250-watt photoflood with reflector will work; avoid spot lamps.
- Arc lamps: high power, exposures 2–10 minutes depending on distance—use a test strip.
- Mark the Blue-Poly film with a waterproof marker every inch or two for test steps.
- Run a test strip: expose in incremental steps (e.g., 20–40 minutes in 5-minute steps, or 5–15 minutes in 1-minute steps) to determine correct exposure. Keep a record of your exposure plan.
Developing and determining correct exposure
- Place the exposed blue film in the developer for ~90 seconds, ensuring the film is fully covered and gently agitating. A light gray scum appears (washes off).
- Rinse the film in warm (not hot) water. Underexposed areas will break up into patches; moderately exposed areas dissolve in steps, rinsing off as blued water. Continue rinsing until blue rinse water clears (about 5 minutes).
- If the entire test band rinses out, double exposure times and retest. If the blue film holds to the polyester backing about halfway up the test scale, you are likely in the correct range.
- Identify the first exposure step that has a strong blue color equal to fully exposed edges—this indicates the thickest emulsion. Thinner (lighter-blue) steps may work and sometimes bond better to silk. Overexposed steps may refuse to bond.
Exposing your final positive
- Place Blue-Poly film on the black paper with polyester backing against the paper and the blue emulsion surface facing up.
- Place the right-reading film positive over the blue film so words read correctly, then cover with glass that exceeds the artwork area (small glass will show a black line at the edge).
- Expose according to your test-strip results.
- Manufacturer’s method: sometimes they recommend flopping the blue film emulsion-down and using a wrong-reading positive to get the image closer to the emulsion—use that method only if your positives are wrong-reading or if you have hand-made artwork positioned accordingly.
- Good contact between film positive and emulsion is essential to avoid soft or blurred edges. The table surface must be flat, and the glass must press material firmly together.
Developing the exposed film positive
- After exposure, develop and rinse as above.
- Place two layers of paper towels on a countertop, turn the screen over (wood up, fabric and film down), and gently wipe excess water from the inside. The fabric should have an even dark blue color indicating consistent bonding.
- Let the screen dry for several hours; do not use heat—fan air is acceptable. Forced drying can distort the image. When the screen appears light blue, you may stand it on one edge for better drying.
- Wait until fully dry (preferably overnight) before attempting to remove the polyester backing.
Removing the Backing and Patching
- Pull the polyester backing up at one corner and roll it over itself 180° so you pull parallel to the fabric. Do not pull outward from the fabric—tiny emulsion parts will tear off.
- If any emulsion peels loose, stop and let the screen dry longer.
- Place a light box behind the screen and check for pinholes. Fill pinholes with Ulano’s patching emulsion or brush on emulsion with a camel-hair brush from the fabric side. Allow patches to dry thoroughly.
- If your film positive was right-reading and the emulsion side was against the blue emulsion during exposure, the completed film on the fabric will be right-reading—important for lettering that must read correctly after transfer.
Printing: Inks, Squeegees, and Pulling the Screen
Ink selection and preparation
- Oil-based screen printing inks are preferred for model work for durability and gloss; ordinary house paints are usually too thin.
- Mix the ink thoroughly to smooth consistency; add reducer if too thick.
- Beware inks on powder-coated models; test for fuel resistance. Some inks come in permanent or water-soluble varieties.
- If large cans are the only sizes available, note that properly stored oil-based inks can last many years.
Preparing the work surface
- Pulling the screen requires:
- Squeegee (rubber blade with handle).
- Silk-screening paint.
- Plenty of paper towels.
- Paint thinner.
- Work on a solid surface: sheeted or solid wing, or a trim sheet (recommended). A fabric-covered open-framework wing is difficult to work on.
- Wash the trim sheet thoroughly with alcohol and tape it securely to the table.
- Place the screen over the trim sheet either in direct contact or using a "pop-up" system (screen spaced ~1/4" above the trim sheet with cardboard strips along the edge of the frame).
- Direct contact risks smearing; if used, hinge the screen and lift from one side to prevent smears.
- Most professionals use a gap so the fabric lifts behind the squeegee and does not touch the surface when lifting.
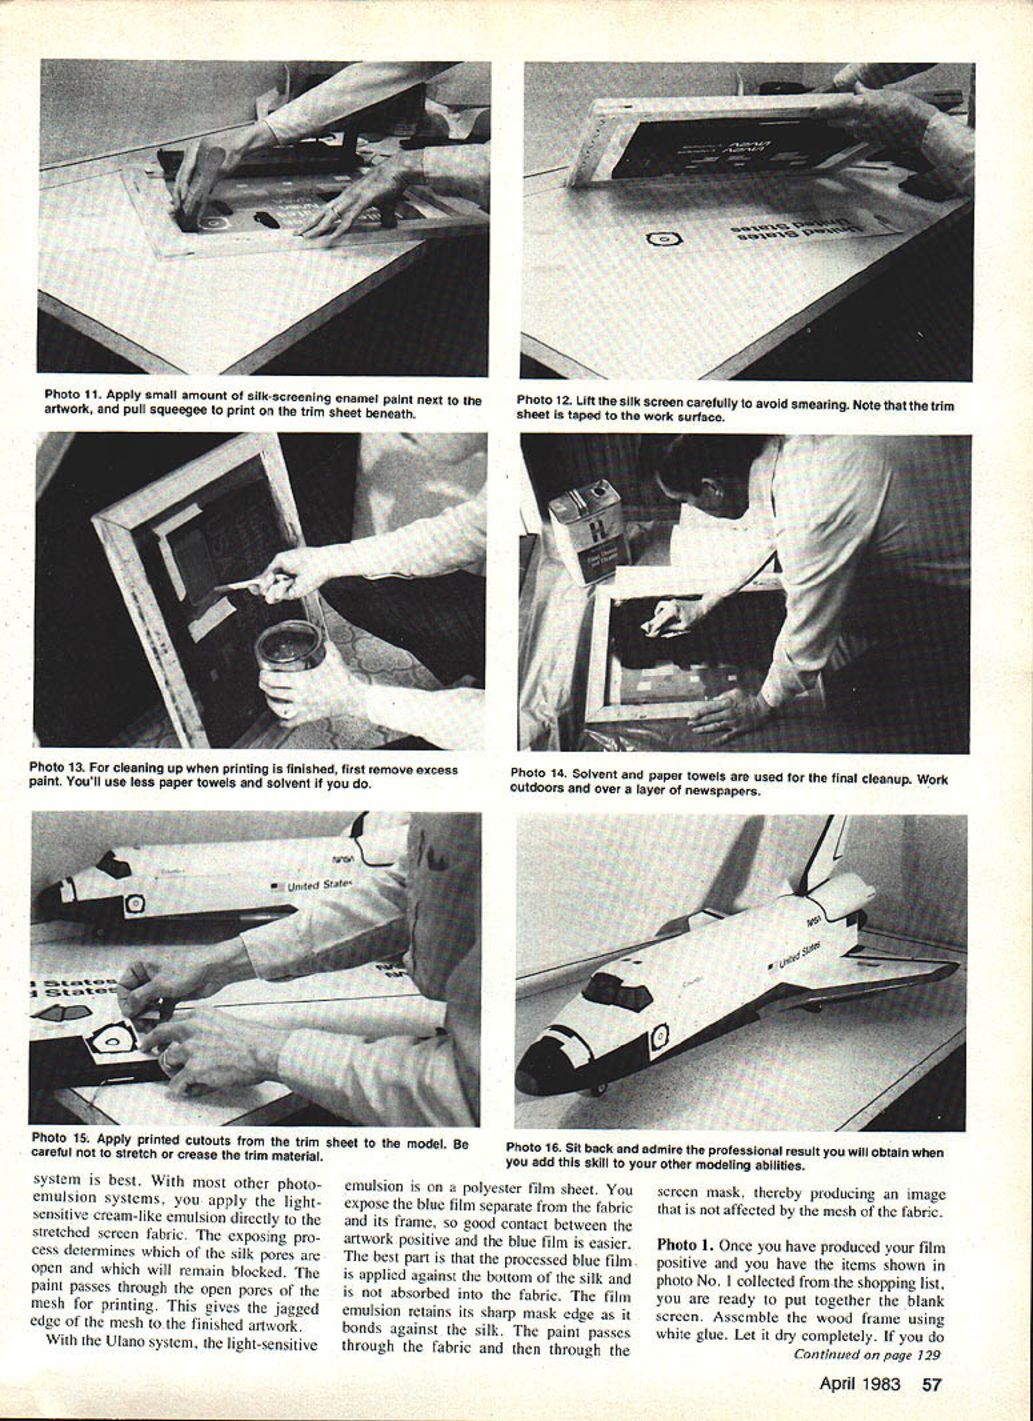
Pulling the screen
- Use a scrap balsa stick to apply a strip of ink about 1" away from one end of the artwork area. Work with one section at a time.
- There should be enough paint ahead of the squeegee for the entire length of the pull; a 1/2" bead of paint (by width of the art) will last for about a 10" pull.
Photo 11
- Place the squeegee behind the paint strip, tilt the squeegee toward the artwork at about 20°, and apply steady pressure (about 2–3 pounds) while pulling the squeegee with a smooth stroke.
- Lift the squeegee without stringing paint over unused portions.
Photo 12
- Carefully lift the screen and inspect the print. Practice until comfortable; multicolor screens require positioning and registration for each color. Avoid bonding the blue film to partially dried paint when doing multicolor work.
Immediately after printing
Photo 13
- Scrape off excess paint from the screen surface immediately after pulling using scrap balsa or cardboard. Leaving paint on the screen greatly increases cleanup time.
Cleaning and Maintenance
Photo 14
- Clean outdoors to avoid vapor buildup and inhalation hazards. Lay plastic over a smooth surface (a rough surface can crack the emulsion). Cover with newspaper and paper towels and place the screen on the towels with the wood side up.
- Do most cleaning from the fabric side. Pour a small amount of thinner over the painted area and mop up with paper towels. Replace towels several times until clean.
- Check fabric pores by holding to light to ensure pores are clear. Be careful when wiping the emulsion side—not to press hard enough to crack the emulsion from stretching.
- Clean the squeegee as well. Place thinner-soaked material in a plastic bag and keep away from flames. Do not smoke while cleaning.
Troubleshooting and Tips
Blue film won't stick
- Check:
- Was silk thoroughly degreased and rinsed? Any soap residue will prevent bonding.
- Was the blue film overexposed, making emulsion too hard to bond? The film should feel slightly tacky after exposure.
- Were the wrong cleaning agents used?
- If blue film comes off with polyester backing, strip the blue and start over—fabric is reusable; wash out any blue pieces with a powerful hot-water spray.
Pinholes and small defects
- Touch up pinholes from the fabric side with tempera (water-soluble) paint for small spot fixes, or use Ulano patching emulsion.
For beginners
- Prepare several mini-screens and test strips to learn before larger jobs.
- Some art store clerks can help; treat advice selectively.
- The best teacher is trial and error.
Applying Trim Sheets to the Model
Photo 15
- Allow printed art to dry for at least 24 hours. Cut around the art and apply it to the model carefully—do not stretch the trim sheet material, or the paint will crack.
- If you need to reposition large sheets (sign-company technique):
- Spray the model surface with a non-rinse soap solution (e.g., 409, Fantastic) so the artwork will slide into position.
- Once positioned, rub from the center to the edges and use a 2" roller to force out the soap, again from center to edges. The soap has no final effect on adhesion.
Final Notes
Photo 16
- The finished model is ready for its test flight. Most of us can repair damaged models; with a finished silk screen on hand, artwork is easily repairable too.
- These instructions cover the basics for amateur silk-screen production. For unusual problems and advanced techniques consult specialized books, but expect to learn most from practice.
- Good luck with your screens and your flying.
Transcribed from original scans by AI. Minor OCR errors may remain.

