

Pole Cat P-30
When his kitted P-30 was lost on an out-of-sight flight, our author was so enthusiastic about designing his own that he had the model airborne within a week. With its relatively long, thin motor, racy-looking wing pylon, and sound, lightweight construction, this unusual, great-flying P-30 has been pulling in trophies ever since.
— Don De Loach
It was in the spring of 1986, before attending my first AMA Nationals as a Junior, that I built my first P-30 model. A kitted One-Night 28, it flew exceedingly badly. You can imagine my dismay when I realized that this plane weighed 70 grams—almost twice the minimum. Although the One Night never really pleased me, somehow my interest in P-30 remained fervent.
My second P-30, a Potent built from a Pharis kit (unfortunately now out of stock), was much more encouraging in every respect. Boy, did I love that airplane. I think that the key to its outstanding performance was the lightweight construction—the model was right at the 40-gram minimum. In addition, its moments were what I consider to be optimal.
When the Potent finally was lost on an out-of-sight flight at the Planesmen Labor Day meet toward the end of the 1988 summer season, in a sense I was excited. It was an excuse to work on a new P-30. My experience with the Potent, I figured, gave me a good chance of creating quite a competitive original-design model.
I was right. The Pole Cat was designed in about an hour, and the prototype was built the following week. I was so pumped up about having an original-design P-30 that I built the airplane directly over my original drawings, rather than taking the time to make a copy.
The model flew right off the board, and it's been a flawless competitor ever since.
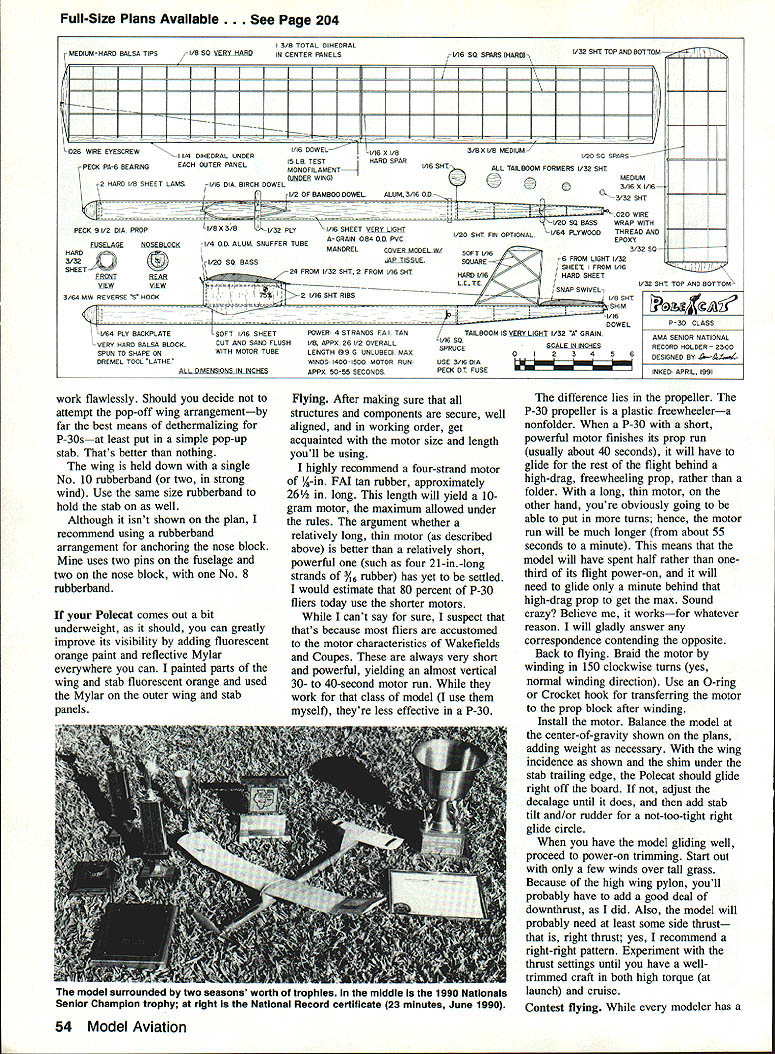
Some of the philosophy underlying this design is worth at least a brief discussion. The area and dimensions of the wing and stabilizer are similar to those used in the Potent. While the block tips on the wing add weight, one is necessary as an anchor for embedding the wire eyelet for the pop-off wing dethermalizer. The fuselage dimensions are close, too. I really liked the 18-inch hook-to-hook distance in the Potent; it was perfect for the four-strand 1/8-in. motors I'm partial to (more on this later).
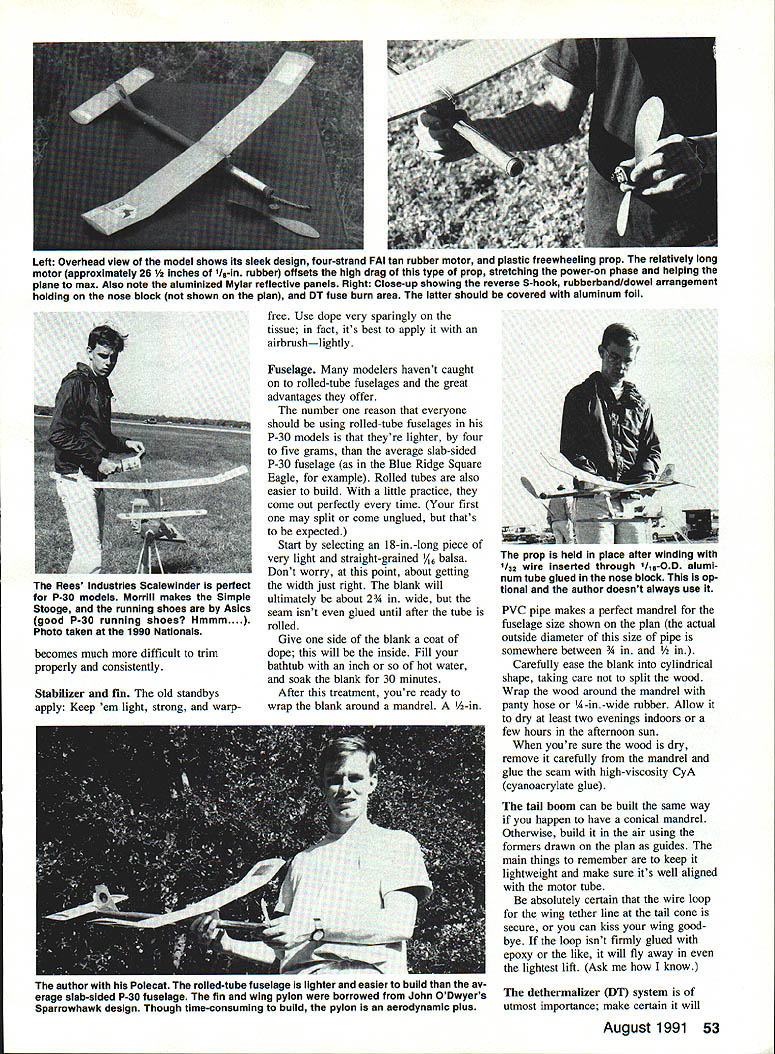
The fin and wing pylon duplicate those used by John O'Dwyer in his Sparrowhawk Coupe D'Hiver design. Though a bit time-consuming and tricky to build, the pylon gives the model an aerodynamic edge as well as racy looks.
Construction
Except for the special comments that follow, standard Free Flight construction methods are used.
Wing
The key point here is to avoid using wood so light that you sacrifice strength. At the 1987 Lincoln Nationals, the one hitch I encountered with my Potent was that the wind broke the wing several times during winding.
A strong wing begins with a very hard, straight-grained leading edge and bottom spar. The remaining spars and the trailing edge are of lighter-weight wood, but it must still be strong and of good quality. When the wing is completed, you may want to cap one or more of the top spars with 6,000-strand carbon-fiber tow (available from MRL Model Supplies). The carbon greatly increases the strength of the balsa but adds little weight.
Cover the wing with lightweight Japanese tissue, and carefully apply at least one coat of highly thinned nitrate dope. Be absolutely certain that the wing is free of warps. With a warped wing, the model becomes much more difficult to trim properly and consistently.
Stabilizer and fin
The old standbys apply: keep them light, strong, and warp-free. Use dope very sparingly on the tissue; in fact, it’s best to apply it with an airbrush—lightly.
Fuselage
Many modelers haven’t caught on to rolled-tube fuselages and the great advantages they offer.
The number-one reason that everyone should be using rolled-tube fuselages in his P-30 models is that they’re lighter, by four to five grams, than the average slab-sided P-30 fuselage (as in the Blue Ridge Square Eagle, for example). Rolled tubes are also easier to build. With a little practice, they come out perfectly every time. (Your first one may split or come unglued, but that’s to be expected.)
Start by selecting an 18-in.-long piece of very light, straight-grained 1/16-in. balsa. Don’t worry, at this point, about getting the width just right. The blank will ultimately be about 2 3/8 in. wide, but the seam isn’t even glued until after the tube is rolled.
Give one side of the blank a coat of dope; this will be the inside. Fill a bathtub with an inch or so of hot water, and soak the blank for 30 minutes.
After this treatment, you’re ready to wrap the blank around a mandrel. A 5/8-in. PVC pipe makes a perfect mandrel for the fuselage size shown on the plan (the actual outside diameter of this size of pipe is somewhere between 1/2 in. and 3/4 in.). Carefully ease the blank into cylindrical shape, taking care not to split the wood. Wrap the wood around the mandrel with panty hose or a 1/4-in.-wide rubber. Allow it to dry at least two evenings indoors or a few hours in the afternoon sun.
When you’re sure the wood is dry, remove it carefully from the mandrel and glue the seam with high-viscosity CyA (cyanoacrylate glue).
The tail boom can be built the same way if you happen to have a conical mandrel. Otherwise, build it in the air using the formers drawn on the plan as guides. The main things to remember are to keep it lightweight and make sure it’s well aligned with the motor tube.
Be absolutely certain that the wire loop for the wing tether line at the tail cone is secure, or you can kiss your wing goodbye. If the loop isn’t firmly glued with epoxy or the like, it will fly away in even the lightest lift. (Ask me how I know.)
The dethermalizer (DT) system is of utmost importance; make certain it will work flawlessly. Should you decide not to attempt the pop-off wing arrangement—by far the best means of dethermalizing for P-30s—at least put in a simple pop-up stab. That's better than nothing.
The wing is held down with a single No. 10 rubberband (or two, in strong wind). Use the same size rubberband to hold the stab on as well.
Although it isn't shown on the plan, I recommend using a rubberband arrangement for anchoring the nose block. Mine uses two pins on the fuselage and two on the nose block, with one No. 8 rubberband.
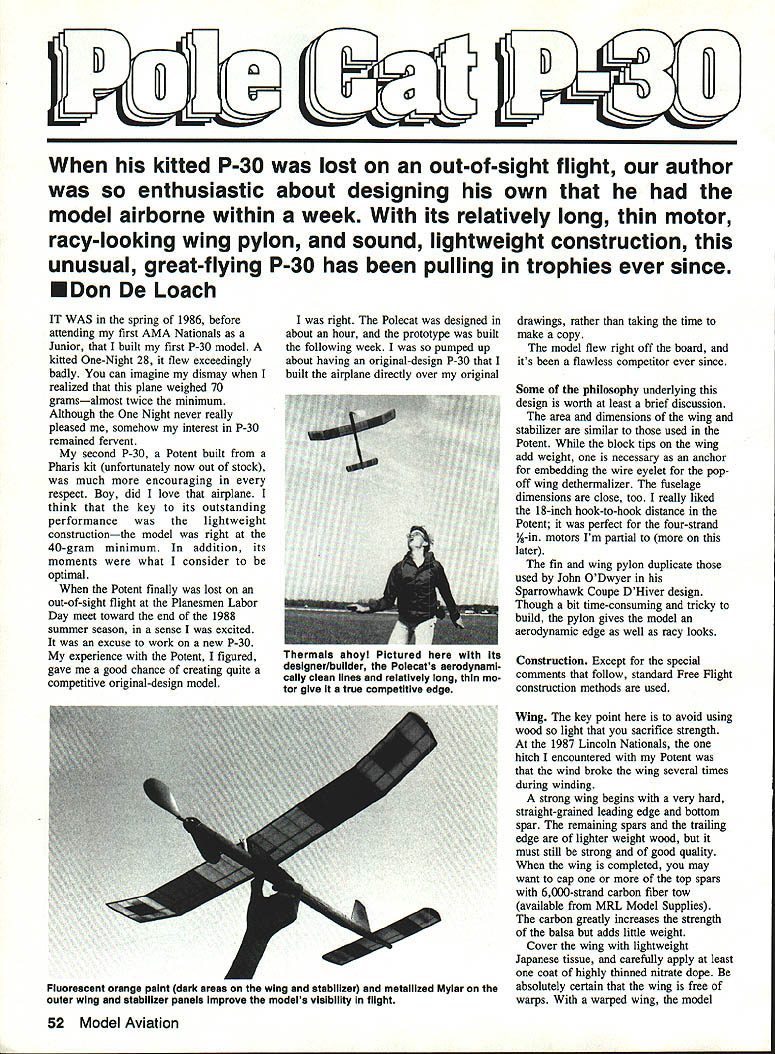
If your Pole Cat comes out a bit underweight, as it should, you can greatly improve its visibility by adding fluorescent orange paint and reflective Mylar everywhere you can. I painted parts of the wing and stab fluorescent orange and used the Mylar on the outer wing and stab panels.
Flying
After making sure that all structures and components are secure, well aligned, and in working order, get acquainted with the motor size and length you'll be using.
I highly recommend a four-strand motor of 1/8-in. FAI tan rubber, approximately 26-1/2 in. long. This length will yield a 10-gram motor, the maximum allowed under the rules. The argument whether a relatively long, thin motor (as described above) is better than a relatively short, powerful one (such as four 21-in.-long strands of 3/16 rubber) has yet to be settled. I would estimate that 80 percent of P-30 fliers today use the shorter motors.
While I can't say for sure, I suspect that's because most fliers are accustomed to the motor characteristics of Wakefields and Coupes. These are always very short and powerful, yielding an almost vertical 30- to 40-second motor run. While they work for that class of model (I use them myself), they're less effective in a P-30.
The difference lies in the propeller. The P-30 propeller is a plastic freewheeler—a nonfolder. When a P-30 with a short, powerful motor finishes its prop run (usually about 40 seconds), it will have to glide for the rest of the flight behind a high-drag, freewheeling prop, rather than a folder. With a long, thin motor, on the other hand, you're obviously going to be able to put in more turns; hence, the motor run will be much longer (from about 55 seconds to a minute). This means that the model will have spent half rather than one-third of its flight power-on, and it will need to glide only a minute behind that high-drag prop to get the max. Sound crazy? Believe me, it works—for whatever reason, I will gladly answer any correspondence concerning the opposite.
Back to flying. Braid the motor by winding in 150 clockwise turns (yes, normal winding direction). Use an O-ring or crochet hook for transferring the motor to the prop block after winding.
Install the motor. Balance the model at the center of gravity shown on the plans, adding weight as necessary. With the wing incidence as shown and the shim under the stab trailing edge, the Pole Cat should right off the board. If not, adjust the decalage until it does, and then add stab tilt and/or rudder for a not-too-tight right glide circle.
When you have the model gliding well, proceed to power-on trimming. Start out with only a few winds over tall grass. Because of the high wing pylon, you'll probably have to add a good deal of downthrust, as I did. Also, the model will probably need at least some side thrust—that is, right thrust; yes, I recommend a right-right pattern. Experiment with the thrust settings until you have a well-trimmed craft in both high torque (at launch) and cruise.
Contest flying
While every modeler has a different style of competition flying, here's what's always worked well for me in flying a P-30. First of all, use a stooge and winder you're comfortable with. By far the best P-30 winder I have found is Dave Rees's Scalewinder. Its 10:1 ratio makes winding a lot quicker than it is with hand drills.
The most important consideration, I believe, is how you use your motors. I make up four or five motors before every contest, carefully weigh and braid them, and prestretch them for eight to nine minutes. I also recommend storing the motors in separate zip-lock style sandwich bags, and listing each winding with the number of turns and the torque. (You'll learn a lot about P-30 motors and rubber in general when you start doing this.) I've found that a tan P-30 motor is best on about its second or third winding, and is adequate until its sixth winding.
Be sure, however, not to wind the same motor twice in a row; rest each one about an hour between windings. Also, keep a logbook with other data such as the site, temperature, humidity, and cloud conditions. Maintaining careful records will help you learn how to correct mistakes in the future.
Thermal-picking equipment is another important consideration. For models as light as P-30s, cattail fuzzies and soap bubbles will work fine, especially on extra-calm days (I used cattail fuzzies on just such a day for all my record flights). Also, a thermistor is often helpful if you know how to use it, and thermal streamers work great for me. It makes sense to use several of the above methods along with at least one helper throwing cattail fuzzies or blowing bubbles, or both. Always remember that thermals are the lifeblood of P-30 fliers.
Finally, the chase is important. Walking or running works fine on calm days, but when the wind picks up you'll need a motorcycle. After retrieving the model I put it in a box strapped to the back of my motorcycle. This is a necessity. Not only is it next to impossible to carry a two-piece airplane while driving a motorcycle, but the box protects the fragile structure.
I'll be happy to answer any questions you may have. Write to me at 3428 Bryn Mawr, Dallas, TX 75225. Please enclose a self-addressed stamped envelope to assure a reply.
Suppliers
- Dave Rees, 301 Yearling Drive, Goldsboro, NC 27530 (10:1 winder)
- FAI Model Supply, P.O. Box 3957, Torrance, CA 90510 (tan rubber, Mylar covering, thermal streamers, 1/16-oz. fuse)
- Champion Model Products, 880 Carmen Court, La Verne, CA 91750 (balsa, props, tissue)
- Peck-Polymers, P.O. Box 710399-FM, Santee, CA 92072 (props, tissue, wire, washers, thrust bearings)
Transcribed from original scans by AI. Minor OCR errors may remain.

