
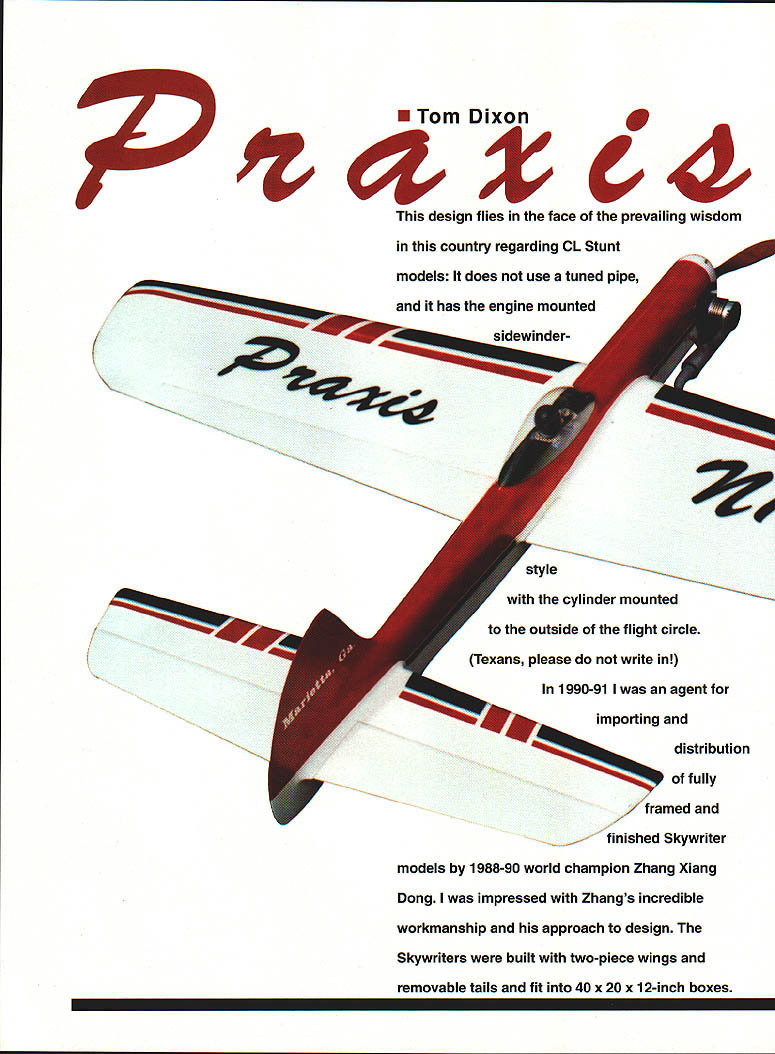


Praxis
Tom Dixon
This design flies in the face of the prevailing wisdom in this country regarding CL Stunt models: it does not use a tuned pipe, and it has the engine mounted sidewinder-style with the cylinder mounted to the outside of the flight circle. (Texans, please do not write in!)
In 1990–91 I was an agent for importing and distributing fully framed and finished Skywriter models by 1988–90 world champion Zhang Xiang Dong. I was impressed with Zhang's incredible workmanship and his approach to design. The Skywriters were built with two-piece wings and removable tails and fit into 40 × 20 × 12‑inch boxes. The more I looked at his side-mounted no‑cowl nose treatment, the more I was impressed with its elegant simplicity. It was a natural way to mount an engine, with thrustline, wing, and stab on the same center line.
During 1993 I built a Walt Pyron‑designed P‑39 Airacobra for Classic Stunt. This model, designed in 1958, uses a Fox .35 with the cylinder mounted outboard. The Fox is notoriously fickle about running properly with an outboard‑mounted cylinder; however, with proper adjustment of tank height and a little experimenting with different plugs and fuels, the Fox ran perfectly. I figured that if the Fox worked this way, anything else would too.
At about the same time I was experimenting with lots of power (a Merco .61) in an airframe originally designed for a .40 or .45. My Charisma flew very well with the Merco, despite being overweight. I began to feel that there could be no such thing as overpowering a CL Stunt model, provided the wing loading was within acceptable limits and the correct propeller was used.
For convenience I ordered a foam core of Bob Baron's Avanti design from Scott Smith. The Avanti was originally flown with an O.S. .40 and .45 FSR and placed second at the 1984 World Champs. As I sheeted the Avanti wing, the thought occurred to mate this with a Skywriter‑style fuselage. The no‑spinner front end would allow me to try a variety of different‑length engines without worrying about spinner mating.
The work proceeded to a rough sketch to make it all come together. The model is an amalgam of Avanti and Skywriter. The wing is mounted 3/8 inch below the thrustline, while the stab is on the thrustline. Mounting the wing on the thrustline would require the leadouts to exit 5/16–3/8 inch toward the bottom of the fuselage to allow wings‑level flying; the landing gear length and weight and the muffler weight on a side‑exhaust engine will bias the vertical center of gravity somewhat. It was easier to move the wing than the leadouts; that's why the wing is 3/8 inch off center.
I have flown and observed many tuned‑pipe setups, and I am not convinced about the claims made for increased power and constant speed. And even if this were true, the cost and complexity is double that of a conventional four‑stroke‑type Stunt run.
What certainly is true is that lots of power is a good thing. Not speed, but power or torque. Any model with lots of power will maintain its speed better after tight turns; will punch through turbulent air better; and will generally maintain line tension better under all conditions. The F2B rules limit us to 10 cc (.61 cubic inches) engine size. It makes sense to use this size engine in an airframe that can be built at the correct size and weight to use the power.
The original .60‑size models had up to 900 square inches of wing area. They flew fine but could be a handful in high winds. At the world level, .60‑powered models are 650–680 square inches. This size model won the World F2B Championship in 1986, '88, '90, and '94. These models usually weigh about 56 ounces and use props that are 11–12 inches in diameter and 5‑1/4–5‑1/2 inches true pitch.
Where possible, the lower diameter is used in a three‑blade configuration. The smaller diameter one can use and still have adequate thrust and overhead line tension, the better. Diameter can cause precession problems as it increases, leading to instability or lack of "groove." This is one of the major problems with piped models. At the high rpm they use, the prop mass becomes a significant gyroscope. A gust of wind that yaws the model also causes a pitch change due to the 90° effects of precession. The lower rpm of traditional setups largely negates this problem. If you've seen pipe models "jump around" and "bounce" out of bottoms in maneuvers, this is often the cause. The "high‑energy gyroscope" of the high‑rpm prop is the culprit. A wiggling rudder cannot offset all the forces associated with this effect. Keeping the rpm and prop diameter as low as practical helps a lot.
Praxis was cobbled up to be a practical, easy‑to‑build and maintain model using traditional .60 power—either a Merco .61 or Super Tigre .60. Several new engines can also be used, including the ST .60 copy Double Star from Moldova and the Discovery engines from Ukraine. If kept light, Praxis will perform well with the ST .51 or Royal/OS .46s. However, there ain't no substitute for cubic inches!
Specifications
- Type: CL Stunt
- Wingspan: 59 inches
- Engine size/type: Merco .61 (typical)
- Flying weight: 46 ounces
- Construction: sheet & foam
- Covering/finish: Silkspan
CONSTRUCTION
There is nothing especially difficult about the construction of this model if you've ever built a full‑bodied competition stunter. Nonetheless, I will cover a few points for the less‑experienced builders.
Wing
The wing can be built‑up or foam. In most cases a built‑up wing will be one or two ounces lighter.
Begin wing construction by sandwiching the rib blanks between plywood templates and carving and sanding to shape. Repeat for the opposite wing. Don't worry too much about the "bevel" on the ribs, as the glue will allow adequate strength in contact with sheeting. I prefer to use an Adjusto‑Jig for built‑up wings, but the wing can be built on a flat surface such as a hollow door if care is taken to shim the spars to maintain true shape for the entire span.
A foam wing can be ordered as a bare core or completely sheeted from Aerosmith Aviation—contact Scott Smith for details. I sheeted the core myself, using Hobbypoxy laminating epoxy as adhesive. The sheeted panels should weigh 3½–4¼ ounces per panel for optimum performance.
The four‑inch bellcrank from Dan Winship is the best I've ever seen. Control horns are 3/8‑inch wire, manufactured by Robin Hienr of Melbourne, Australia. Bushings of 3/32‑inch I.D. brass tubing are soldered into the horns for long wearing properties. Pushrods are SIG carbon‑fiber units with 3/32‑inch wire ends. I like to wrap the carbon tubes with some carbon‑fiber cord where the stub of the wire exits the tube side, to ensure it will never split and fail. The flap/elevator ratio is 1:1.
Tail Surfaces
These are pure Baron Avanti in shape and area. However, the structure is simple: solid 3/16‑inch sheet balsa sanded to shape.
A stab assembly this size is usually sheeted foam or built‑up and sheeted. But weighing test panels convinced me that solid 3/16‑inch balsa of the proper density is as light as the more complex structures and is certainly a lot easier to fabricate. Two of the best‑turning models I've ever built (a Mackey Lark and a Super Chief) used simple sheet tail surfaces.
Fuselage
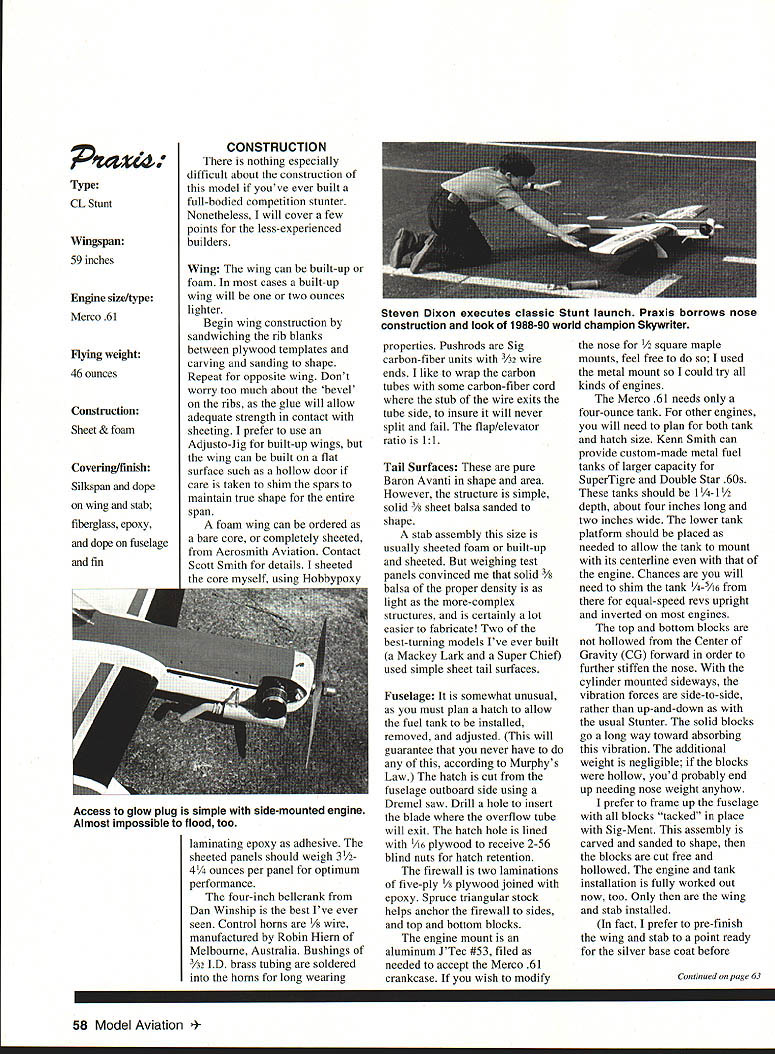
The fuselage is somewhat unusual, as you must plan a hatch to allow the fuel tank to be installed, removed, and adjusted. (This will guarantee that you never have to do any of this, according to Murphy's Law.) The hatch is cut from the fuselage outboard side using a Dremel saw. Drill a hole to insert the blade where the overflow tube will exit. The hatch hole is lined with 1/16‑inch plywood to receive 2‑56 blind nuts for hatch retention.
The firewall is two laminations of five‑ply 1/8‑inch plywood joined with epoxy. Spruce triangular stock helps anchor the firewall to the sides, and top and bottom blocks.
The engine mount is an aluminum J'Tec #53, filed as needed to accept the Merco .61 crankcase. If you wish to modify the nose for 1/2‑inch square maple mounts, feel free to do so; I used the metal mount so I could try all kinds of engines.
The Merco .61 needs only a four‑ounce tank. For other engines you will need to plan for both tank and hatch size. Ken Smith can provide custom‑made metal fuel tanks of larger capacity for Super Tigre and Double Star .60s. These tanks should be 1‑1/4 inches deep, about four inches long and two inches wide. The lower tank platform should be placed as needed to allow the tank to mount with its centerline even with that of the engine. Chances are you will need to shim the tank 1/8–1/16 inch for equal‑speed revs upright and inverted on most engines.
The top and bottom blocks are not hollowed from the center of gravity (CG) forward in order to further stiffen the nose. With the cylinder mounted sideways, the vibration forces are side‑to‑side, rather than up‑and‑down as with the usual stunter. The solid blocks will go a long way toward absorbing this vibration. The additional weight is negligible; if the blocks were hollow, you'd probably end up needing nose weight anyway.
I prefer to frame up the fuselage with all blocks "tacked" in place with Sig‑Ment. This assembly is carved and sanded to shape, then the blocks are cut free and hollowed. The engine and tank installation is fully worked out now, too. Only then are the wing and stab installed.
I also prefer to pre‑finish the wing and stab to a point ready for the silver base coat before installation in the fuselage. Working on all the components separately lets the work go faster and cuts down on dings and hangar rash from handling the complete model.
Finish
I am not one of the country's best finishers! I prefer light and good enough to flawless, but too heavy.
Paint a coat of Hobbyopoxy clear on the wing and tail. When this has cured, sand it and brush on a couple of coats of SIG clear nitrate dope. Medium silkspan is then applied, using nitrate as adhesive. The silkspan is given a thorough sanding with 180‑ and 240‑grit sandpaper after one or two coats of nitrate, then another two or three coats are sprayed on. Sand with 320 and 400 grit as needed.
Next comes a filler coat of nitrate and talc. (I use a pharmaceutical talc which has no scent or oils—check with your druggist.) The filler is sanded with 240, then 320, and finally 400 grit. This is a tedious process!
After the wing and tail are installed, the fuselage and fin are covered with SIG glass cloth. This is applied using Hobbyopoxy finishing epoxy thinned with acetone or dope thinner; lay the cloth on the model and brush the epoxy mixture through the cloth. Do not use any more epoxy than necessary to tack the cloth down; the wood will absorb the thinned glue, adding weight.
After the first epoxy coat, sand lightly with 240 paper, and apply a second thinned coat of epoxy. It will look like it is not filling the cloth, but it is—don't worry. After curing at least 24 hours, sand the second coat with 80‑grit paper to break the hard surface shell, then wet‑sand with 320 and 400. Low spots will show up "shiny" when light is bounced off the surface; keep sanding until they are gone.
If you sand through the cloth in a spot or two, these can be touched up with cyanoacrylate (CYA) glue and kicker, then sanded to match the surrounding areas.
After glassing, add Epoxolite fillets, then give the fuselage and fin a couple of coats of nitrate and then a filler coat. I always sand out the fillets well, using 240 paper, then clean thoroughly with alcohol. Two coats of unthinned nitrate are then brushed onto the fillets. I've never had a fillet "bubble" using nitrate‑based filler.
The colors are SIG dope. The white has extra pigment added (from Windy Urtnowski). The red and blue are from SIG spray cans. I hate cleaning the gun and changing trim colors! As long as you're satisfied with basic colors, the cans are so much easier. The clear top coat is automotive acrylic lacquer (DuPont 3608S or equivalent). Be sure to use only the recommended thinner if you use acrylic.
Allow the clear to dry four or five days (a month for dope!), then wet‑sand with 1000‑grit and 1500‑grit paper. I use auto windshield washer fluid as a medium for wet‑sanding, as the fine grit paper wants to "grab" when using water. After sanding, polish the clear with DuPont #7 white compound, then Brasso. Finally, apply a coat of wax.
Flying
The Praxis is flown on .018 cable, 69 feet in length (from the centerline of the airplane to the centerline of the handle). If a .51 or .46 engine is used, the lines should be about 65 feet long.
I use a .285 venturi in the Merco .61, along with a Kustom Kraftsmanship needle assembly, with a brass tubing extension soldered to the needle to clear the fuselage. The muffler is a custom tube type (manufactured for me by Art Adamisin), shortened on the intake stack to pull it up close to the fuselage. I use Taftinder PA blend fuel, 10% nitro.
The prop is usually a three‑bladed Bolly 11‑1/4 × 6‑1/2 that I have depitched to 10‑1/4 × 6‑1/2.
Pitch selection: use 5¼ or 5½ inches depending on conditions. More pitch is used in dead air, and less in high wind. If you have props of the same make and diameter, reworked in 1/4‑inch pitch increments from 5 to 6.25, you will be ready for any conditions. A 12 × 6 two‑blade reworked in various pitches is also good. Master Airscrew wood props, the old Top Flite "paddle blades," and the B‑Y&O props from Clarence Bull are excellent. I prefer a wide 12 × 6 to a narrow 13 × 5 due to the precession effects mentioned earlier.
Enjoy your Praxis and fly safely!
And just what does Praxis mean? It's used in various psychological and theological texts to refer to the integration of thought and behavior—a fitting name for a model that integrates a number of different beliefs.
- Tom Dixon
PHOTOS: the author GRAPHIC DESIGN: Heather Erdahl
Author's 10‑year‑old son Steven prepares startup. Steven, seasoned mechanic & budding flier.
SOURCES
- Merco .61 custom engines, Double Star Engines, control horns: Controline Sales, Box 67166, Marietta, GA 30066
- Bellcrank: Dan Winship, 5971 Oak Hill East Dr., Plainfield, IN 46168
- Foam wings and cores: Aerosmith, RDI Box 290, Athens, NY 12015
- Fuel tanks: Ken Smith, 521 Jansen Ave., San Dimas, CA 91773
- Three‑bladed props: Brian Eather, 9 Medley Ave., Liverpool NSW 2170, Australia
- Bolly props: Unit 8–9, 100 Hewittson Rd., Elizabeth West, SA 5113, Australia
- Wooden props: B‑Y&O Props / Clarence Bull, Box 492, Harrisburg, OR 97448
- Paint pigment: Windy Urtnowski, 93 Elliott Pl., Rutherford, NJ 07070
Transcribed from original scans by AI. Minor OCR errors may remain.

