
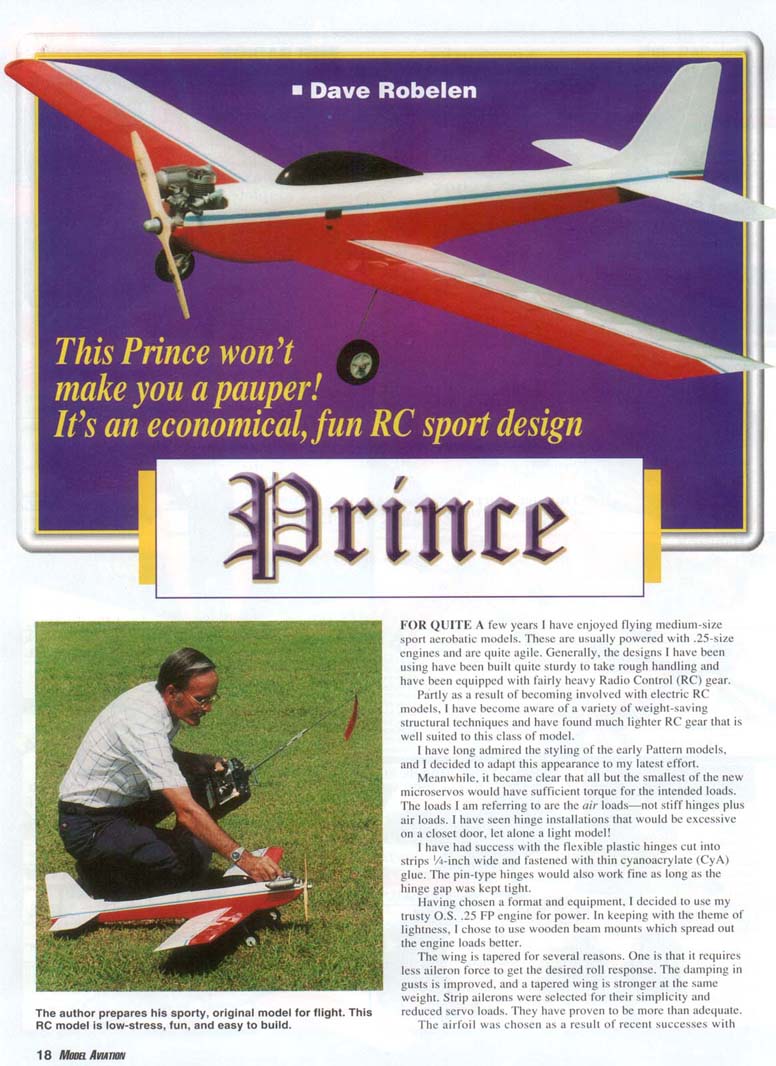

Prince
Dave Robelen
For quite a few years I have enjoyed flying medium-size sport aerobatic models. These are usually powered with .25-size engines and are quite agile. Generally, the designs I have been using have been built quite sturdy to take rough handling and have been equipped with fairly heavy radio-control (RC) gear.
Partly as a result of becoming involved with electric RC models, I became aware of a variety of weight-saving structural techniques and found much lighter RC gear that is well suited to this class of model. I have long admired the styling of the early pattern models and decided to adapt that appearance to my latest effort.
It became clear that all but the smallest of the new microservos would have sufficient torque for the intended loads. The loads I am referring to are the air loads—not stiff hinges plus air loads. I have seen hinge installations that would be excessive on a closet door, let alone a light model! I have had success with flexible plastic hinges cut into strips 1/4-inch wide and fastened with thin cyanoacrylate (CyA) glue. Pin-type hinges will also work fine as long as the hinge gap is kept tight.
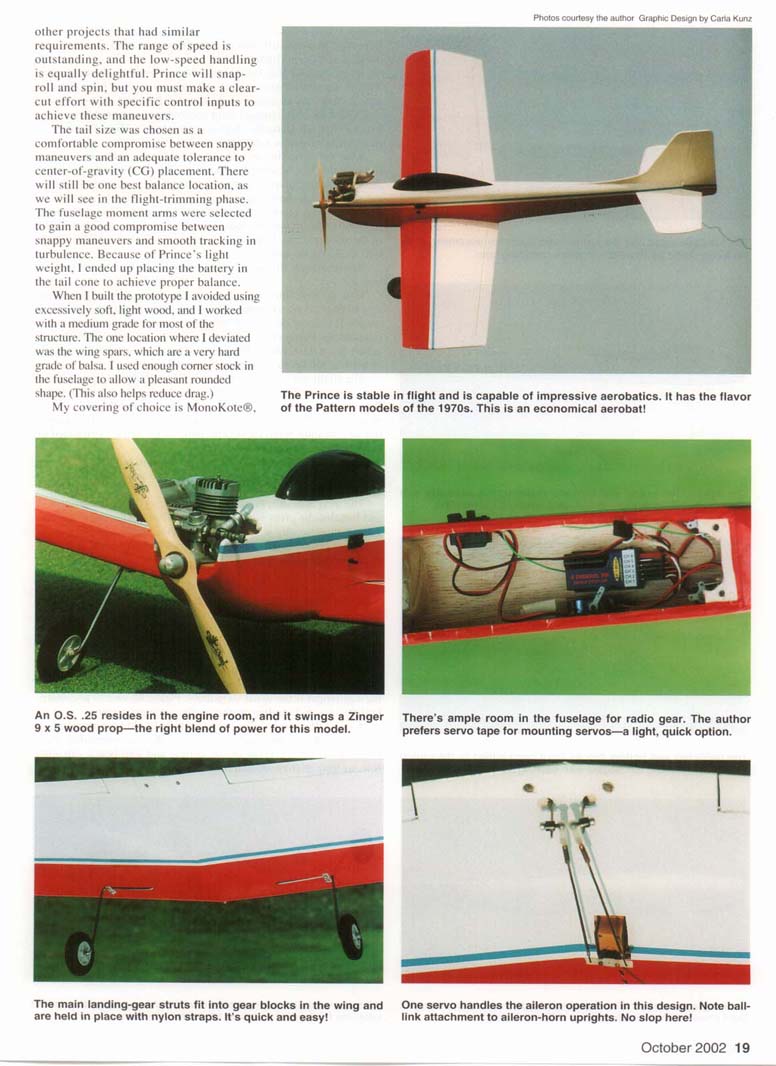
Having chosen a format and equipment, I decided to use my trusty O.S. .25 FP engine for power. In keeping with the theme of lightness, I chose wooden beam mounts which spread out the engine loads better.
The wing is tapered for several reasons: it requires less aileron force to get the desired roll response, damping in gusts is improved, and a tapered wing is stronger at the same weight. Strip ailerons were selected for their simplicity and reduced servo loads; they have proven to be more than adequate.
The airfoil was chosen based on recent successes with other projects that had similar requirements. The speed range is outstanding, and the low-speed handling is equally delightful. Prince will snap-roll and spin, but you must make clear, positive control inputs to achieve these maneuvers.
Tail size was chosen as a compromise between snappy maneuvers and tolerance to center-of-gravity (CG) placement. The fuselage moment arms were selected to balance snappy maneuvering with smooth tracking in turbulence. Because of Prince's light weight, I ended up placing the battery in the tail cone to achieve proper balance.
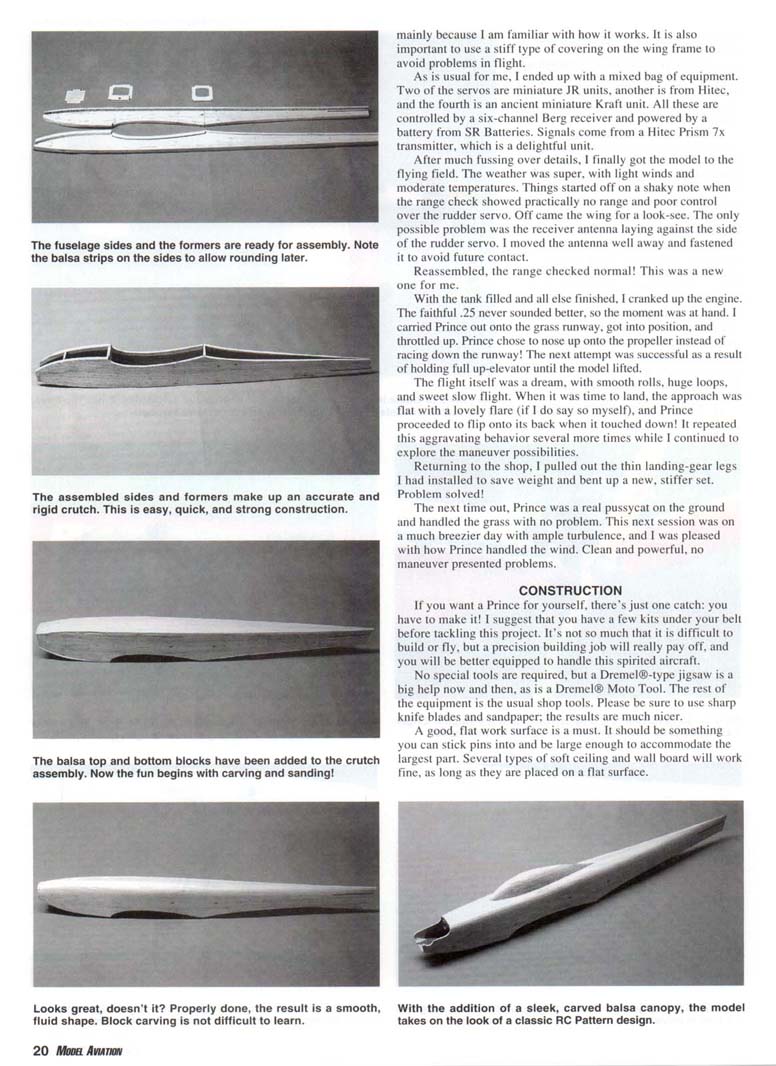
When I built the prototype I avoided excessively soft, light wood and used medium-grade wood for most of the structure. The one exception was the wing spars, which are a very hard grade of balsa. I used enough corner stock in the fuselage to allow a pleasant rounded shape (this also helps reduce drag). My covering of choice is MonoKote®, mainly because I am familiar with how it behaves. It is important to use a stiff type of covering on the wing frame to avoid problems in flight.
As is usual for me, I ended up with a mix of equipment. Two of the servos are miniature JR units, another is from Hitec, and the fourth is an older miniature Kraft unit. All are controlled by a six-channel Berg receiver and powered by an SR Batteries pack. Signals come from a Hitec Prism 7x transmitter, which is a delightful unit.
Flight tests produced typical first-flight troubleshooting. The range check initially showed practically no range and poor control over the rudder servo. Removing the wing revealed the receiver antenna laying against the side of the rudder servo. I moved the antenna well away and fastened it to avoid future contact; reassembled, the range checked normal. With the tank filled and everything finished, I cranked up the engine. The faithful .25 never sounded better, so I opened her up and she leapt into the air. A quick trim adjustment and she tracked beautifully.
On the ground for the first official launch, Prince chose to nose up onto the propeller instead of racing down the runway. The next attempt succeeded by holding full up-elevator until the model lifted. The first flight was a dream: smooth rolls, huge loops, and sweet slow flight. On landing, however, the model flipped onto its back when it touched down. Returning to the shop, I replaced the thin landing-gear legs I had installed to save weight with stiffer legs. Problem solved.
On a breezier day with turbulence, Prince handled the wind well—clean, powerful, and no maneuver presented problems. After several flights I found that Prince is nimble, will snap-roll and spin when you make the proper, positive control inputs, and is forgiving enough for pleasant sport flying.
CONSTRUCTION
If you want a Prince for yourself, there's just one catch: you have to make it. I suggest having a few kits under your belt before tackling this project. It's not that it is difficult to build or fly, but precision in building will pay off and you'll be better equipped to handle this spirited aircraft.
No special tools are required, but these are a big help:
- Dremel-type jigsaw
- Dremel® Moto-Tool
- Sharp knife blades and sandpaper
- Metal yardstick or piece of storm-door edging for straight cuts
- Cutting surface that is kind to knife blades (Lexan® preferred, Plexiglas® acceptable)
- Flat work surface you can stick pins into (soft ceiling or wallboard works)
I built using medium CyA with thin CyA on hinges and epoxy around the nose for fuelproofing. You may be able to find all materials at a well-stocked hobby shop, or from mail-order balsa suppliers. I have dealt with Superior Balsa; others recommend Lone Star Balsa.
Material guidance:
- Medium-grade balsa for most thin sheet parts
- Lighter-grade wood for top plank and canopy
- Hard-grade balsa for wing-spar sticks
When cutting parts:
- Make copies of small parts and trace larger parts onto separate paper; do not slice up the plan sheet.
- Use a glue stick to tack patterns onto balsa; it works well for cutting paired ribs glued together—pull apart soon after cutting.
- The leading-edge strip tapers in depth from root to tip—use a straightedge for cutting strips.
- Shape trailing-edge strips before clamping them to the board.
- Do not cut ailerons free until after the wing frame is assembled and sanded.
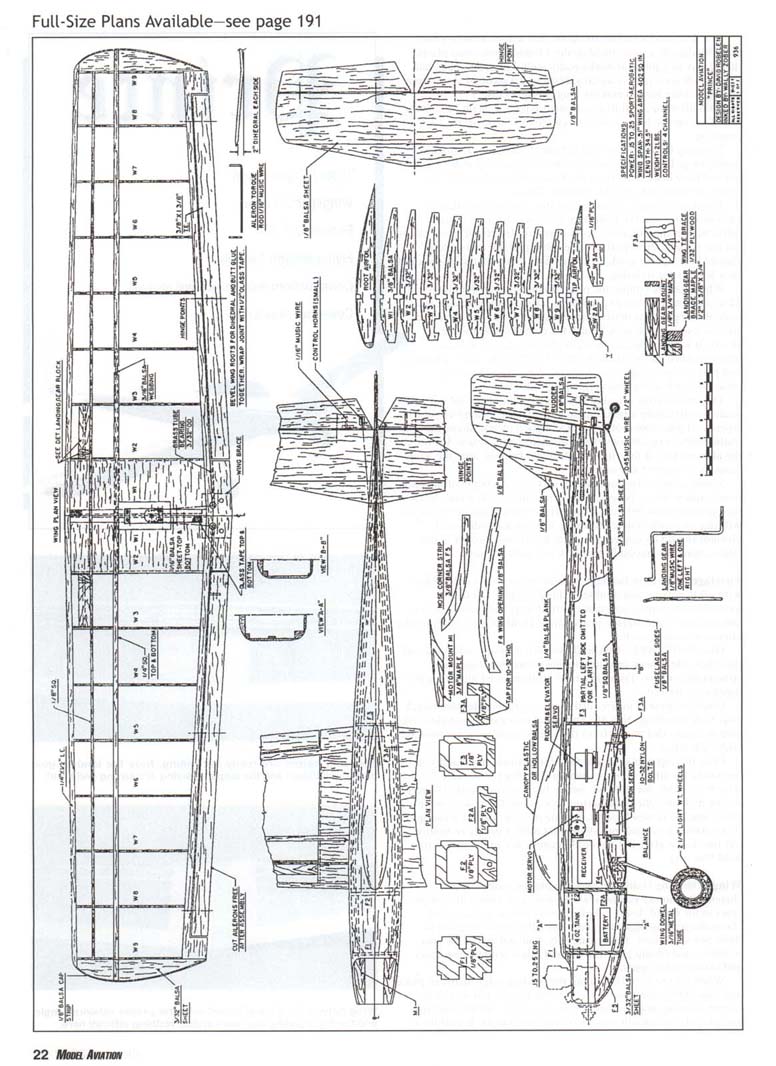
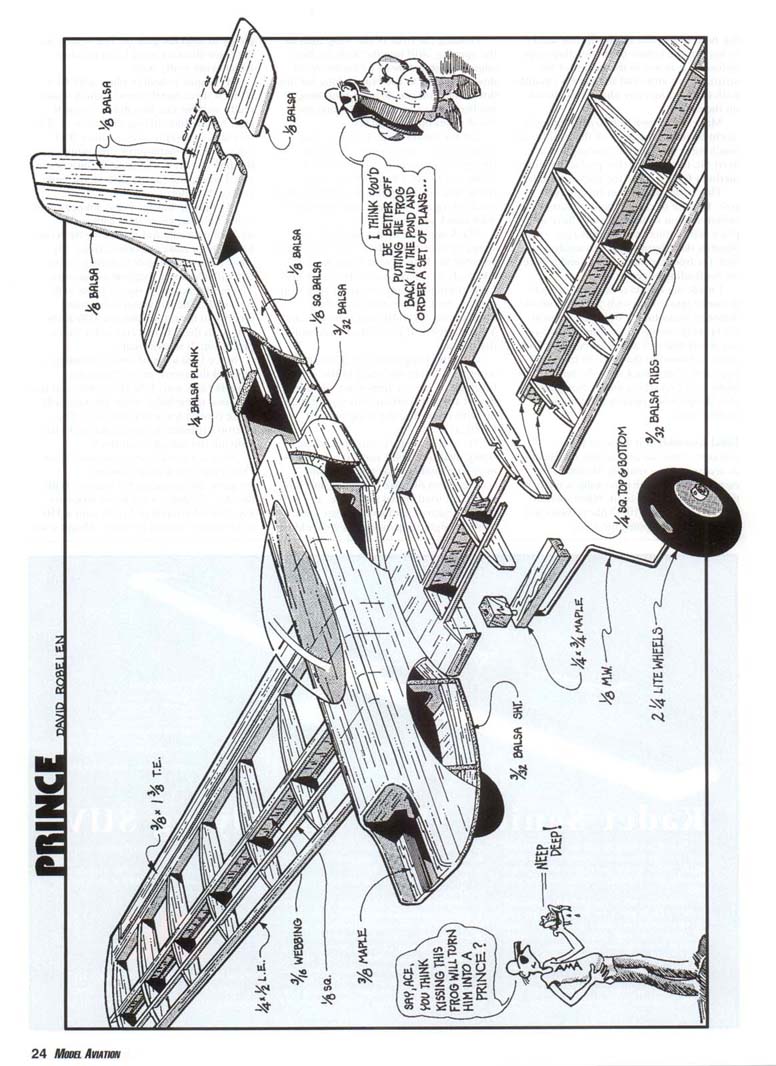
Warm up by cutting out the tail surfaces. A couple of parts have a splice line to use three-inch-wide wood. Install the elevator joiner before cutting out the center so the elevators will line up better. Sand hinge lines to a sharp bevel and round the rest of the edges.
Fuselage
- Build two side assemblies with all strips and doublers glued in place. Make certain they are mirror images before proceeding.
- Glue the F2 and F3 bulkhead assemblies to one side, then add the other side. Check that everything is straight and square.
- Trim the corner stringers and glue the sides together at the tail.
- Drill holes in the firewall to match your tank plumbing, then glue the firewall in place and install the engine mounts. Ensure the engine-mount surfaces are aligned with each other.
- Glue the top plank on and the rear bottom sheet, then shape the fuselage. I prefer an X-Acto™ whittler's blade or any sharp knife. Leave the nose bottom open until the wing can be fitted and the dowel located.
- Decide on the canopy: if balsa, shape it now. I prefer to hollow the inside after the canopy is covered because it's easier to hold.
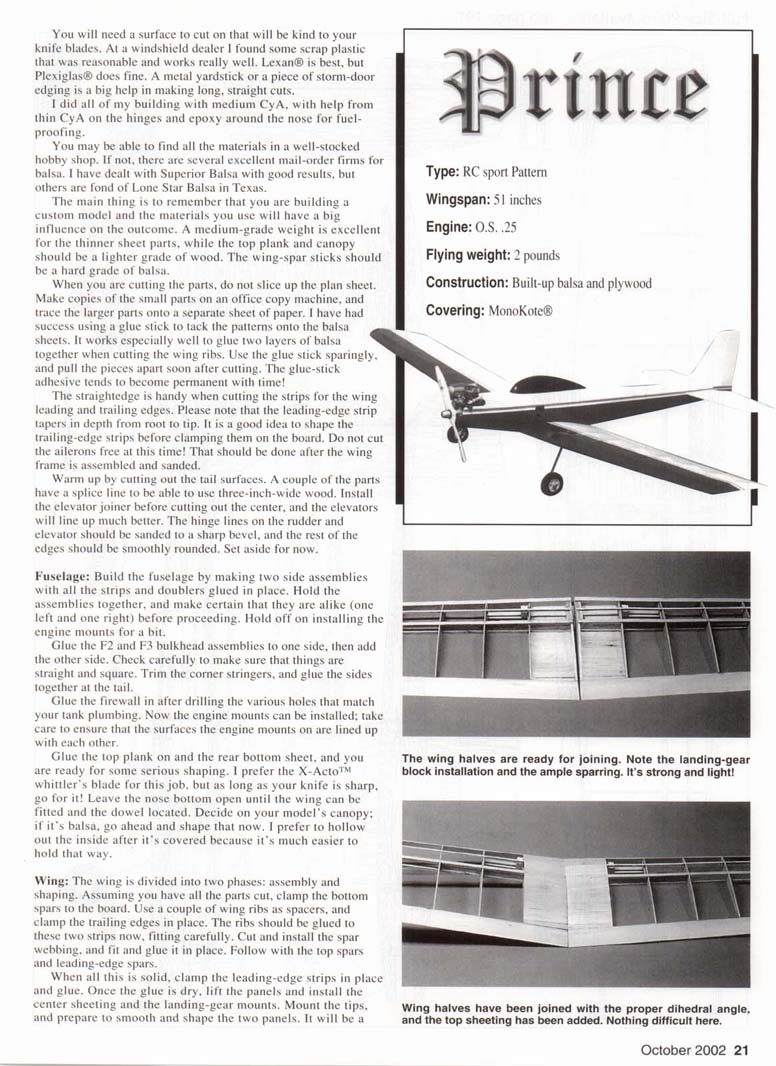
Wing
The wing construction is assembly and shaping.
- Clamp the bottom spars to the board, using a couple of wing ribs as spacers, and clamp the trailing edges in place.
- Glue the ribs to the bottom spars, then cut and install the spar webbing.
- Fit and glue the top spars and leading-edge spars.
- Clamp and glue the leading-edge strips. When dry, lift the panels and install the center sheeting and landing-gear mounts.
- Mount the tips, then smooth and shape the panels. Use a fine-tip felt marker to lay out the center of the leading-edge radius (note: this is not the center of the strip). Carve and sand the panels smooth with the leading edge shaped as shown on the plans.
- Make the center joint by trimming a slight bevel on the panel ends and sanding until they fit perfectly. I used medium CyA to glue the halves together.
- Cut the ailerons free now. Cut all the way across the center section so you have a piece to glue over the linkage. Shorten the ailerons about 1/8 inch for free movement, and sand a bevel on the leading edge.
- Torque rods: I made mine from 1/16-inch music wire with 3/32-inch OD brass-tubing bearings. Cement the bearings to the wing, trim wood that affects movement, glue the trailing-edge piece back over the torque rods, and glue the plywood bottom plate on the trailing edge.
Final Assembly
- Fit the wing to the fuselage, trimming and sanding the opening as necessary for a snug, centered, and untwisted fit. Drill and tap for 10-32 plastic bolts and screw them in to trap the wing.
- With the front of the wing held tight in the opening, drill into the wing leading edge through bulkhead F2 for the front dowel. I prefer brass tubing for the dowel—wood-on-wood wears too quickly.
- Decide on a fiberglass band around the wing center if desired. I chose not to after bending the wing frame and verifying the strength. If used, bond fiberglass with CyA.
- Plank the chin of the fuselage and shape to final section. I covered the pieces with MonoKote® while parts were still separate—read and follow covering instructions carefully.
- Glue the wing dowel in place in the wing and fasten the wing to the fuselage. Line up the tail feathers carefully with respect to the wing and fuselage.
- Do not omit the canopy—its presence affects flying qualities.
- The 1/8-inch wire landing gear requires effort to bend properly; use a vise, hammer, gloves, and patience. A single strap on each leg is sufficient to hold the gear in. I used Dave Brown Lectra-Light treaded wheels.
- Engine mounting: I used #4 x 1/2-inch sheet-metal screws with 1/16-inch pilot holes.
- Fuel tank: Sullivan four-ounce RST type with metal tubes protruding through the firewall. Use a fuel filter and fill the tank on the inside of the firewall.
- Throttle linkage: combination of thin Sullivan guide tube with .020-inch throttle wire; used Sullivan hardware for connections.
- Control horns: small Goldberg units with Goldberg snaplink connectors. Pushrods are 3/16-inch square balsa with 1/16-inch wire inside.
- Tail wheel: mounted directly to the rudder with .046-inch wire strut and a coil for shock protection.
- Servo mounting: I use servo-mounting tape; glue patches of thin plywood to balsa where the tape adheres for better bond.
- Aileron hardware: Du-Bro strip aileron linkage used stock.
- Assemble the model and check the CG before permanently mounting the battery. With the O.S. .25 and a 9 x 5 wood propeller, my Prince balanced just right with a 350 mAh battery behind the wing.
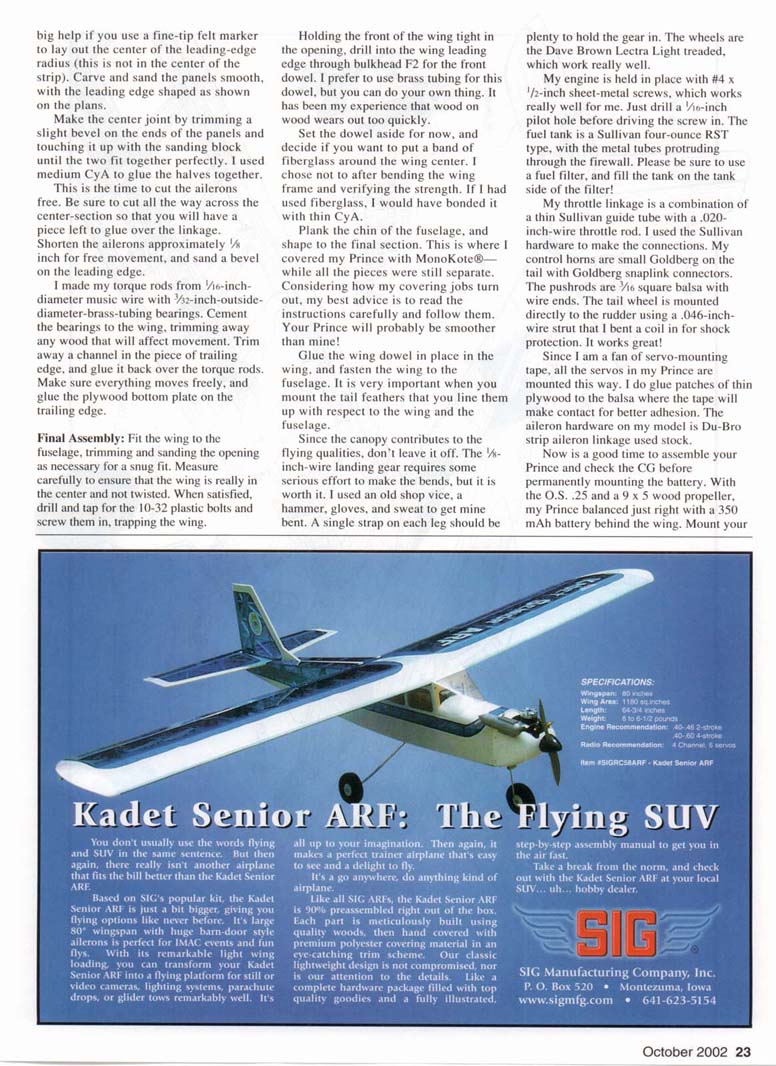
Switch the harness, give everything a good going-over, and charge the batteries in the model and transmitter. I hope you were able to get some running time on your engine before heading out with a new airplane. The setup that has worked well for me is a 9 x 5 Top Flite Power Point propeller, .5 fuel, and a K&B Long Reach Idle Bar glow plug. If you have engine troubles with another setup, try this configuration.
FLYING
This is the easy part!
Recommended control throws:
- Elevator: 1/2-inch up and down
- Ailerons: 1/4-inch up and down
- Rudder: as much movement as you can get
Preflight and engine:
- Make sure the engine idles well and recovers to full throttle.
- Set the needle valve for maximum rpm with the nose pointed up 30°.
Takeoff:
- Point Prince into the wind and hold the elevator full up.
- Slowly advance the throttle toward maximum.
- As speed builds, relax the elevator until you gently pull back for a smooth liftoff.
- Climb out before making trim adjustments.
Trimming:
- With throttle at roughly 50%, set all trims for straight-and-level flight.
- At idle, if the nose wants to drop and requires constant back-stick, the model is likely nose-heavy.
- If the elevator is overly sensitive and it's hard to hold level flight, the model may be tail-heavy.
- Balance carefully with approximately a half tank of fuel for good transitions from speed to glide.
- Final control-throw settings can be adjusted to taste.
Aerobatics:
- For more serious aerobatics, consult the plentiful reference books and, if possible, get instruction from an experienced pilot.
If you build Prince, balance carefully, check control throws, use the recommended engine, and don't skimp on servo quality. You will be rewarded with a nimble, enjoyable sport model.
SPECIFICATIONS
- Length: 34.5 inches
- Wing area: 402 square inches
- Wing loading: 10.9 ounces per square foot
CONTACT
Dave Robelen Route 4, Box 369 Farmville, VA 23901 aplusfarm@hovac.com
I hope things go well for you and your Prince. Let me know if I can be of help, and if you take a picture I would love to see it.
Transcribed from original scans by AI. Minor OCR errors may remain.

