
Product Review - 2004/01
Joe Utasi 3440 Riverhills Dr., Cincinnati OH 45344
Montana Design Python
Pros:
- Instructions and photo/hints-and-tips CD
- Kit engineering
- Flying qualities
Cons:
- Wood could have been a little better (has been addressed by manufacturer)
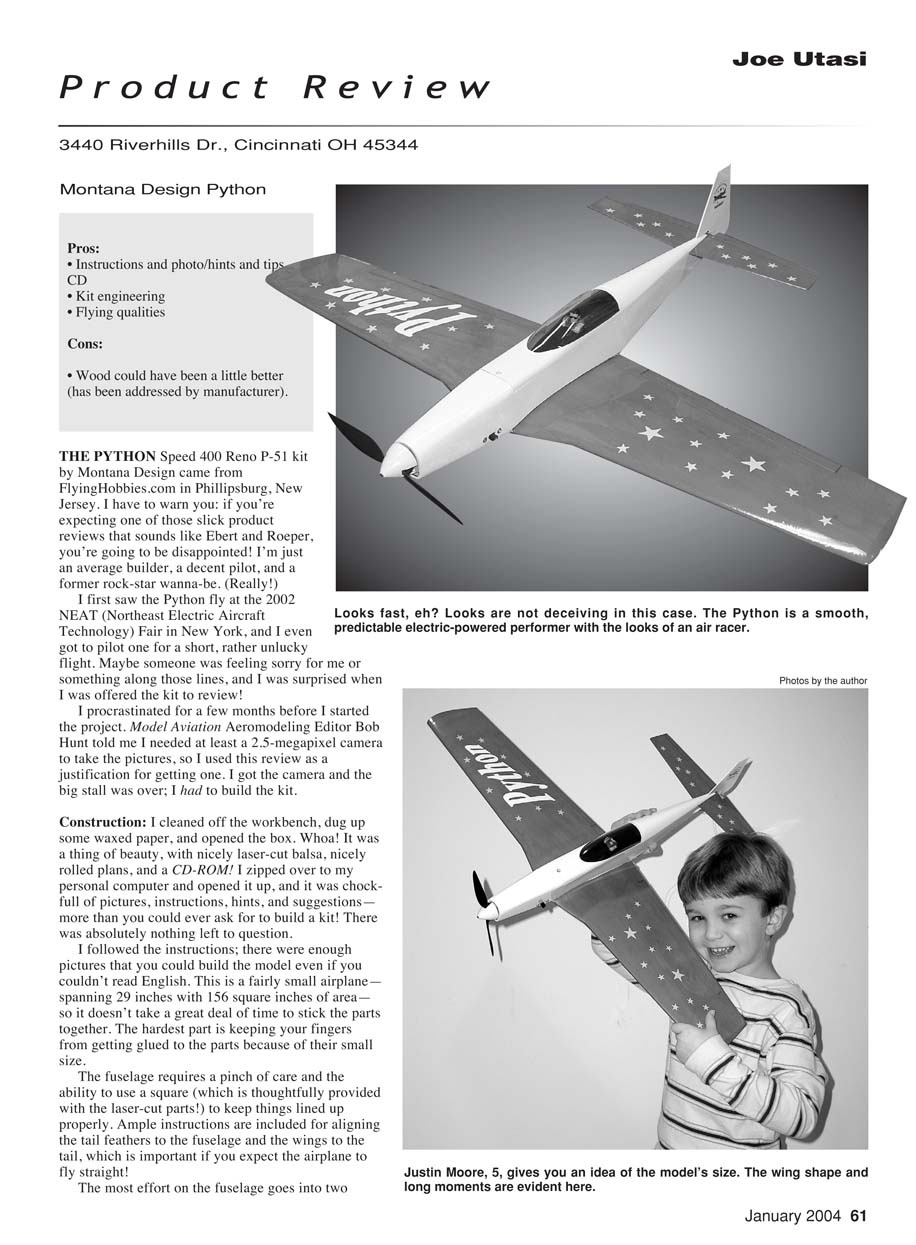
The Python Speed 400 Reno P-51 kit by Montana Design came from FlyingHobbies.com in Phillipsburg, New Jersey. I have to warn you: if you're expecting one of those slick product reviews that sounds like Ebert and Roeper, you're going to be disappointed! I'm just an average builder, a decent pilot, and a former rock-star wanna-be. (Really!)
I first saw the Python fly at the 2002 NEAT (Northeast Electric Aircraft Technology) Fair in New York, and I even got to pilot one for a short, rather unlucky flight. Maybe someone was feeling sorry for me or something along those lines, and I was surprised when I was offered the kit to review!
I procrastinated for a few months before I started the project. Model Aviation Aeromodeling Editor Bob Hunt told me I needed at least a 2.5-megapixel camera to take the pictures, so I used this review as a justification for getting one. I got the camera and the big stall was over; I had to build the kit.
Construction: I cleaned off the workbench, dug up some waxed paper, and opened the box. Whoa! It was a thing of beauty, with nicely laser-cut balsa, nicely rolled plans, and a CD-ROM! I zipped over to my personal computer and opened it up, and it was chockfull of pictures, instructions, hints, and suggestions—more than you could ever ask for to build a kit! There was absolutely nothing left to question.
I followed the instructions; there were enough pictures that you could build the model even if you couldn't read English. This is a fairly small airplane—spanning 29 inches with 156 square inches of area—so it doesn't take a great deal of time to stick the parts together. The hardest part is keeping your fingers from getting glued to the parts because of their small size.
The fuselage requires a pinch of care and the ability to use a square (which is thoughtfully provided with the laser-cut parts!) to keep things lined up properly. Ample instructions are included for aligning the tail feathers to the fuselage and the wings to the tail, which is important if you expect the airplane to fly straight!
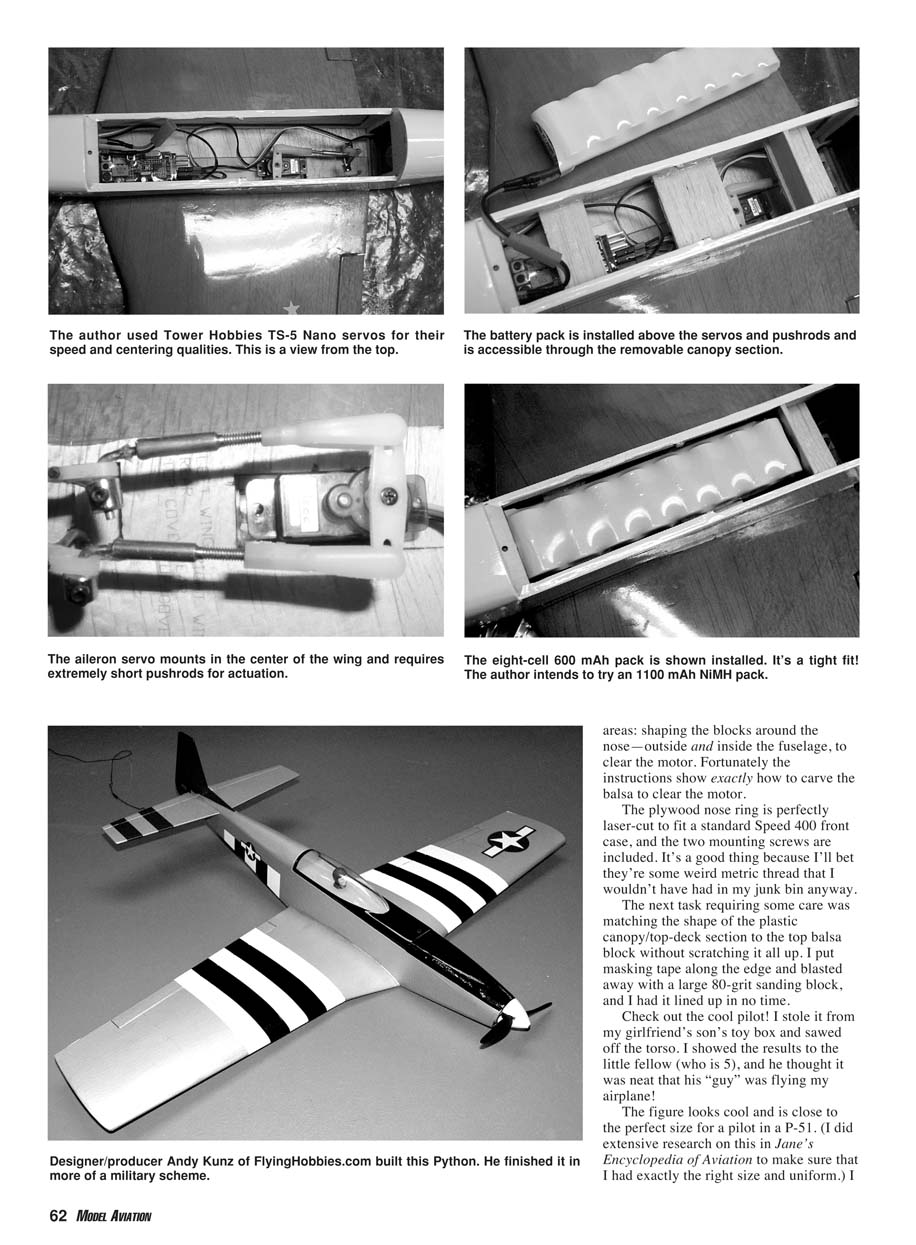
The most effort on the fuselage goes into two areas: shaping the blocks around the nose—outside and inside the fuselage, to clear the motor. Fortunately the instructions show exactly how to carve the balsa to clear the motor.
The plywood nose ring is perfectly laser-cut to fit a standard Speed 400 front case, and the two mounting screws are included. It's a good thing because I'll bet they're some weird metric thread that I wouldn't have had in my junk bin anyway.
The next task requiring some care was matching the shape of the plastic canopy/top-deck section to the top balsa block without scratching it all up. I put masking tape along the edge and blasted away with a large 80-grit sanding block, and I had it lined up in no time.
Check out the cool pilot! I stole it from my girlfriend's son's toy box and sawed off the torso. I showed the results to the little fellow (who is 5), and he thought it was neat that his "guy" was flying my airplane!
The figure looks cool and is close to the perfect size for a pilot in a P-51. (I did extensive research on this in Jane's Encyclopedia of Aviation to make sure that I had exactly the right size and uniform.) I just hate airplanes without pilots!
With the fuselage finished, I moved on to the wing. If you're an old geezer, this wing construction might remind you of the old Top Flite Schoolboy kit. Lay down the bottom sheeting, glue the ribs, then stick on the top covering. There's nothing to it.
But wait! The instructions (yes, I did read them) mentioned something about "washout." Sure enough, there were laser-cut shims to put under the wing's trailing edge and tip to guarantee that you get the washout built in and perfect under both wings. It was way too cute.
It took some thinking to get the sheeting and stuff to fit around that little triangle-shaped front wing extension where the wing meets the fuselage, and this is probably where some of you might scratch your head. Use your sanding block and get creative here. It's no big deal.
To put on the top covering I used a slow-cure cyanoacrylate glue (CyA) to make sure it would all be in place. The wing is so small that you can use your palms to hold it all in place until it sets. Sand it to perfection and cover with your favorite stuff.
As a first-time product reviewer I had to find something wrong someplace, right? The choice of balsa could have been a little better. The fuselage had some soft wood and the wing had some hard wood.
I spoke to Andy Kunz at FlyingHobbies.com, and he agreed and told me that the problem would be fixed in production kits. He also surprised me when he told me he'd send out another plastic canopy piece that would be lighter. I got the new one a couple days later, and it was half the weight!
I put the airplane together, figuring that it would be heavy since I used plenty of CyA on the joints and made no effort to do anything special. I put it on my postal scale and it weighed less than 5 ounces! That is amazing since it's a rock-solid airplane and doesn't "feel" soft, mushy, or delicate in any way. It's definitely a product of good design! I didn't want to weigh the model down in finishing, so I used UltraCote Lite covering.
I got a 600 mAh eight-cell Ni-Cd pack for the Python, and it works well. But since I've flown the airplane, experts have told me there's a new NiMH 1100 mAh battery of the same size that will give almost twice the flying time. It figures; I'm always the last to know.
I used Tower Hobbies TS-5 Nano servos because they're fast and they center perfectly—something that is important on a model that flies fast. An FMA receiver and a Jomar throttle that mounts directly to the motor brush terminals round out the equipment list. All put together, the Python weighed just less than 16 ounces, ready to fly.
Flying
I knew from my former flight experience with this model that the controls would be "slow," so I doubled the control travels, put in approximately 40% exponential on my JR radio, and asked for a hand launch.
The hand launch was less than graceful, and it ended up with the model coming straight in on its nose from roughly seven feet up. The wing broke loose from the fuselage (it's glued on!) and the elevator servo gave up the ghost, so back to the shop.
The next day I went back to the field and decided to do the honors myself. I checked the controls, and everything looked good (or so I thought). I powered up, gave the model a mighty heave-ho, and it was up to approximately 15 feet and inverted before I could get my hand to the stick!
I was grateful for that extra control travel as I crammed the stick all the way over to correct. The Python rolled about slowly as time seemed to stand still, and it finally got upright as it neared the ground. After the dramatics the model picked up speed and headed for the sky with authority.
It seems as though this airplane needs roughly 50 feet to "pick up speed"—and speed it does! Just when you think it's maxed out, it doubles again! Even with all that control travel, this model wants to groove and you literally have to force it to turn. It's not skittish at all.
After putting in a whole lot of trim, I had the flippers all back to center and the Python tracked straight as an arrow. I tried some aerobatics: a loop and a roll. It can do them, but this baby just likes to scream from one end of the field to the other.
I rate this airplane "cool" and "fun to fly," especially if you want to go fast and impress your buddies. I can imagine three or four of these models fighting for the low line as they round a pylon.
Specifications
- Wingspan: 29 inches
- Wing area: 156 square inches
- Wing loading: 14–17 ounces per square foot
- Weight: 14–18 ounces
- Motor: 6-volt Speed 400
- Cells: Seven or eight; 600–800 mAh
- Radio: Two to four channels
- Price: Basic kit, $55 (includes all wood—laser-cut balsa and plywood—clear plastic canopy, hatch). Standard kit, $65 (includes basic kit, tail, hardware, and propeller).
Distributor
Montana Design 409 S. Sixth St. Phillipsburg, NJ 08865 (908) 454-6411 Sales@MontanaDesign.com www.montanadesign.com
Transcribed from original scans by AI. Minor OCR errors may remain.

