
Product Review
David Adams E-mail: flyingadams@yahoo.com
DJ Aerotech Boeing B-17
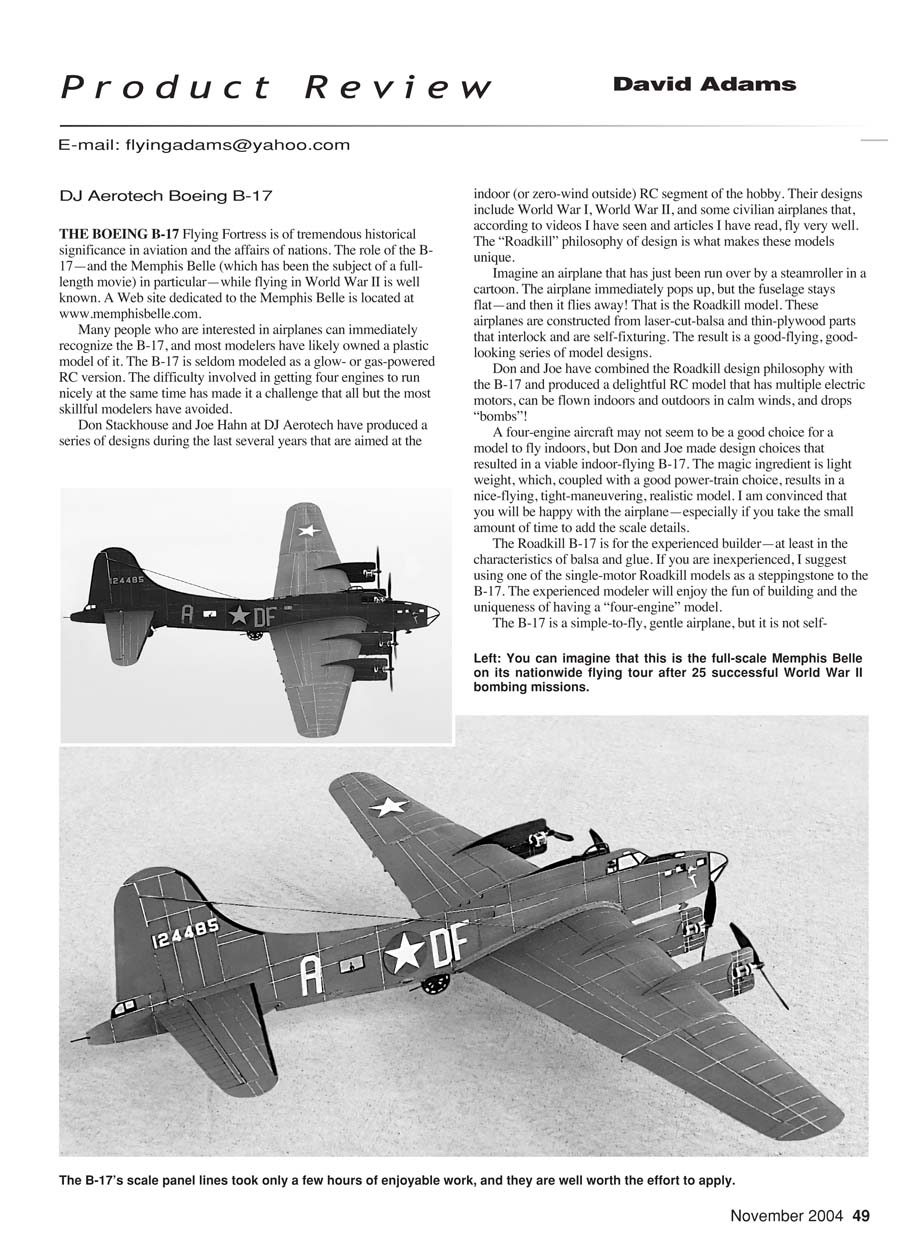
THE BOEING B-17 Flying Fortress is of tremendous historical significance in aviation and the affairs of nations. The role of the B-17—and the Memphis Belle (which has been the subject of a full-length movie) in particular—while flying in World War II is well known. A Web site dedicated to the Memphis Belle is located at www.memphisbelle.com.
Many people who are interested in airplanes can immediately recognize the B-17, and most modelers have likely owned a plastic model of it. The B-17 is seldom modeled as a glow- or gas-powered RC version. The difficulty involved in getting four engines to run nicely at the same time has made it a challenge that all but the most skillful modelers have avoided.
Don Stackhouse and Joe Hahn at DJ Aerotech have produced a series of designs during the last several years that are aimed at the indoor (or zero-wind outside) RC segment of the hobby. Their designs include World War I, World War II, and some civilian airplanes that, according to videos I have seen and articles I have read, fly very well. The "Roadkill" philosophy of design is what makes these models unique.
Imagine an airplane that has just been run over by a steamroller in a cartoon. The airplane immediately pops up, but the fuselage stays flat—and then it flies away! That is the Roadkill model. These airplanes are constructed from laser-cut balsa and thin-plywood parts that interlock and are self-fixturing. The result is a good-flying, good-looking series of model designs.
Don and Joe have combined the Roadkill design philosophy with the B-17 and produced a delightful RC model that has multiple electric motors, can be flown indoors and outdoors in calm winds, and drops "bombs"!
A four-engine aircraft may not seem to be a good choice for a model to fly indoors, but Don and Joe made design choices that resulted in a viable indoor-flying B-17. The magic ingredient is light weight, which, coupled with a good power-train choice, results in a nice-flying, tight-maneuvering, realistic model. I am convinced that you will be happy with the airplane—especially if you take the small amount of time to add the scale details.
The Roadkill B-17 is for the experienced builder—at least in the characteristics of balsa and glue. If you are inexperienced, I suggest using one of the single-motor Roadkill models as a steppingstone to the B-17. The experienced modeler will enjoy the fun of building and the uniqueness of having a "four-engine" model.
The B-17 is a simple-to-fly, gentle airplane, but it is not self-righting in roll or pitch—a trait that is required in an airplane for the beginner. I do not recommend the B-17 to someone with no solo flight time, but not because it has four motors; the only difference in flight characteristics between one motor and four is that the propwash from four motors makes the inner wing section greatly effective at low speeds.
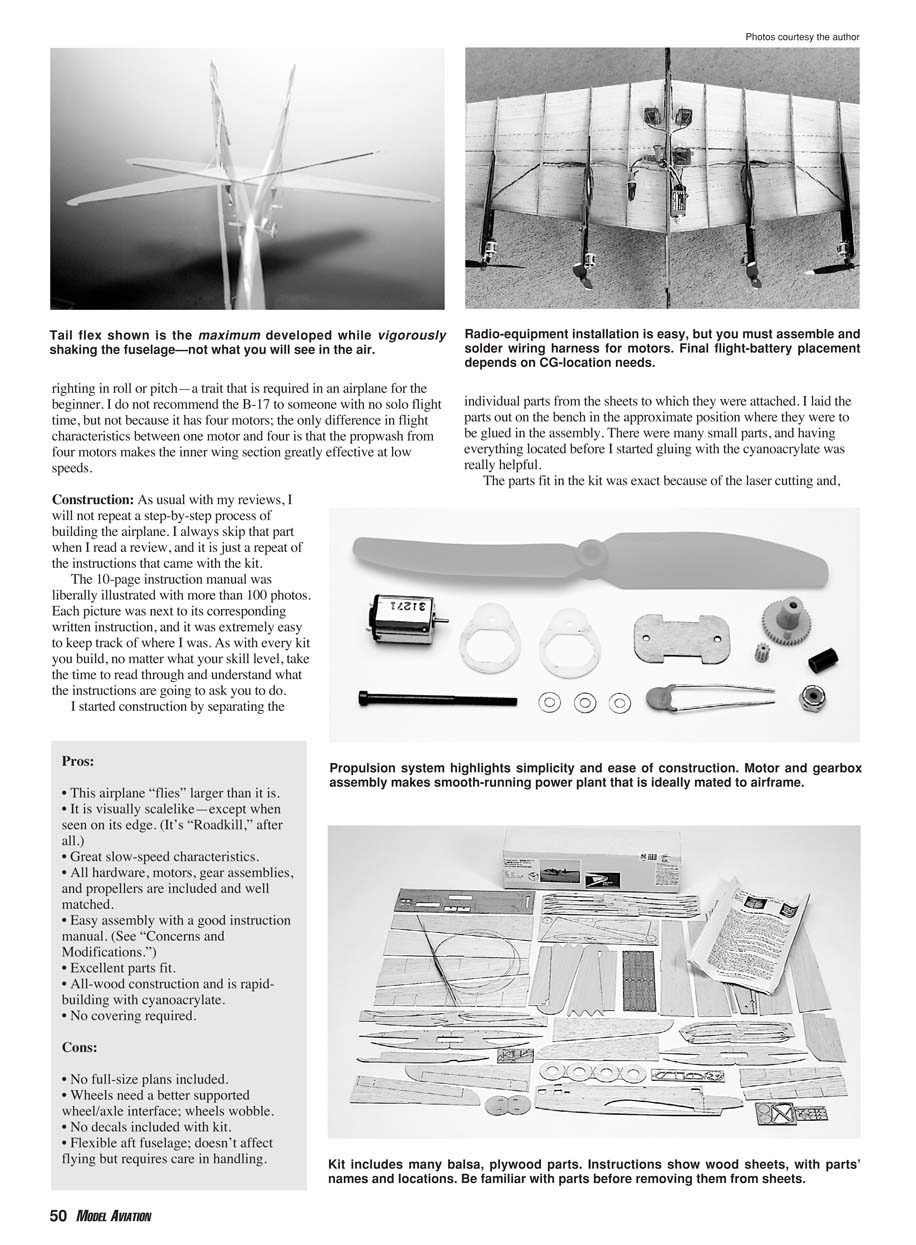
Construction: As usual with my reviews, I will not repeat a step-by-step process of building the airplane. I always skip that part when I read a review, and it is just a repeat of the instructions that came with the kit. The 10-page instruction manual was liberally illustrated with more than 100 photos. Each picture was next to its corresponding written instruction, and it was extremely easy to keep track of where I was. As with every kit you build, no matter what your skill level, take the time to read through and understand what the instructions are going to ask you to do.
I started construction by separating the individual parts from the sheets to which they were attached. I laid the parts out on the bench in the approximate position where they were to be glued in the assembly. There were many small parts, and having everything located before I started gluing with cyanoacrylate was really helpful.
The parts fit was exact because of the laser cutting and, where necessary, was self-fixturing. Just be certain that when you apply the top sheeting of the wing, the panels are on a flat surface, and you use a slow-drying glue. I used thick cyanoacrylate and worked rapidly. A slower-curing wood glue will work if you prefer a less hurried pace. Once the glue was set, the wing was incredibly strong in bending and torsion while retaining a light weight.
I spent a total of four evenings on construction and radio installation and an evening detailing the model.
Pros and Cons
Pros:
- This airplane "flies" larger than it is.
- It is visually scale-like—except when seen on its edge (it's "Roadkill," after all).
- Great slow-speed characteristics.
- All hardware, motors, gear assemblies, and propellers are included and well matched.
- Easy assembly with a good instruction manual. (See "Concerns and Modifications.")
- Excellent parts fit.
- All-wood construction and rapid building with cyanoacrylate.
- No covering required.
Cons:
- No full-size plans included.
- Wheels need a better supported wheel/axle interface; wheels wobble.
- No decals included with kit.
- Flexible aft fuselage; doesn't affect flying but requires care in handling.
Concerns and Modifications
Although the airplane was easy to construct without full-size plans, I would prefer to have a set from which to work.
While reviewing the wing’s construction, I noticed that the illustrations showed a segment of a P-40 wing. Although it illustrated the technique used and was noted in the accompanying text, I would be more comfortable if a photo of the B-17 wing being constructed were used.
The main wheels needed more reinforcement at the hub. In the landing photos I noticed that the wheels were cocked at an angle and seemed wobbly. Now they tend to sit cocked to one side. I recommend using a small piece of hard plastic or metal tubing approximately 3/16 inch long that is a good fit over the wire axle. Use a bit of epoxy to fillet the tube to the wheel.
When you pick up the completed, unpainted airframe, you will notice that the aft section of the fuselage is wobbly. From the wing TE (trailing edge) forward, the structure is rigid. The tail section is also rigid. However, the fuselage section aft of the wing TE to the front of the horizontal tail will sag when the airplane is banked 90°.
Also, when I picked up the airplane by the aft fuselage (something I can do with all my airplanes), I heard the sound of balsa creaking—not a great confidence builder. I noticed that the fuselage became stiffer after I applied a couple coats of spray paint.
I e-mailed Don at DJ Aerotech and received a prompt and complete answer based on his experiences with the airplane. He assured me that the flexible fuselage was not a problem in flight, and that turned out to be true.
However, if I were to build another B-17, I would run a strip of roughly 1/2-inch carbon-fiber tape on either side of the fuselage, which should stiffen it enough to withstand careless handling. The weight gain would be negligible.
Finish and Decorations
As you construct each of the sheet assemblies, carefully sand each side smooth. Then when you assemble the wing, tail, motor nacelles, and fuselage, the airplane will already be sanded and ready to finish.
Although the instructions didn’t discuss the finish until Step 100, I recommend that you paint the airplane before you install the radio-control system and motors so you don’t get paint on those components.
DJ Aerotech says not to use excessive paint and to use markers or two lightly fogged-on coats of spray paint. I carefully ignored this advice and ended up a half-ounce heavier, but the airplane does look nice. I didn’t paint the underside of the B-17 because I had already installed the radio gear.
I downloaded the Memphis Belle markings from the DJ Aerotech Web site and glued them in place. I would have preferred to have them included in the kit. Even better, they could have been supplied on sticky paper. The airplane looked nice at this stage, but it still looked like a small model.
I have a large book called The Great Book of World War II Airplanes, which has a three-page pullout of the Memphis Belle. Since it was too cold and windy outside to fly, I decided to add some scale detail.
I used a thin silver marker and a light, flexible straightedge, and using the pullout as a guide, I added major panel lines. I rubbed the painted balsa in places to add variations in texture to the finish. Then I went back and added some of the smaller panel lines. You can vary the spray and rubbing to make the flat areas look like curved panels.
The amount of detail is only limited by your imagination and how long it stays cold and windy so you can work on it. The process was fun, and I think the finished airplane looks better for the small effort I put in.
Radio Equipment
To control the B-17, I used a Hitec Feather receiver, an ESC of unknown origin with approximately 10 amps of capacity (the sticky Velcro is on the label side of the ESC), and four Hitec HS-50 servos. I used my Futaba 8U transmitter.
I recommend buying a transmitter that is likely to be better than "sufficient" for all your flying needs and that is capable of storing multiple airplane settings. Not having to change transmitters each time you change airplanes means that you can use switch positions and transmitter setup menus until your automatic reactions take over. Not having to fumble for a switch might save an airplane someday.
I powered the B-17 with a seven-cell 700 mAh NiMH battery (the same-size pack I used in the A-10 and other GWS airplanes). This AAA-size battery is ideal for low-current-drain applications where light weight is beneficial. These batteries also seem to be forgiving when mishandled.
I haven't made the step to Li-Poly batteries yet; my charging habits of years of mistreating Ni-Cd and NiMH doesn't mix well with the care that the Li-Poly variety requires. However, DJ Aerotech has had success with them, and the lighter weight for a given battery capacity will add to the B-17's performance.
Flying
I viewed videos of the B-17 flying at one of the large indoor meets early last year. It flew nicely and dropped bombs. It was a cute little airplane and didn't prepare me at all for what I was about to experience.
A bad thing about this part of the year (October) is that it is cold, typically overcast, and usually windy, which is not really conducive to flying most airplanes and never a great time to fly a slow flyer. I also have trouble convincing my body to go outside and get frostbite even though this is my favorite hobby. However, one of the many good things about being retired is that you can fly anytime the weather allows.
While waiting for the weather to break, I set up surface deflections per the instructions and checked the CG. To get the proper CG, I had to move the battery pack to the side of the fuselage nose instead of the suggested position under the wing leading edge. Don't fly without the CG in the recommended position. You can move it later to fine-tune the airplane to your individual tastes in handling, but I found the recommended position perfect.
Finally a morning came when the wind was dead calm; however, it was gray, overcast, yecchy, and the temperature was 39°—polar-bear-frosting degrees. The polar bears seem to like it, but I certainly don't! But calm air is difficult to come by, so off my photographer and I went.
At the flying field, the battery was peaked, the gloves came off so I could find the sticks, and the B-17 was set approximately 30 feet away from me on the smooth runway. I applied full power, and the model accelerated, running with the tail high and straight down our club's paved runway. I gave a bit of up-elevator and it lifted off smoothly.
The pitch trim was dead on, and there was a slight left roll (which a couple clicks of trim took care of). I remember thinking that it was an easy-flying airplane. The sound of the motors and propellers vibrating the airframe was great. It is a nice low-frequency sound with enough volume to sound "right."
I found myself grinning even more than normal. Flying airplanes is fun, after all. Against the dull, gray sky with the cold, dreary weather, it was easy to visualize the B-17 taking off from a field in England and heading out over the English Channel during the war.
I found it easy to keep a tight racetrack pattern over the runway to help the photographer take the pictures. Turns to the right and left were nice, elevator response was good, and full throttle gave a comfortable and higher-than-scale climb rate. The flight speed was slow and scale-like.
Although the batteries were still okay after several minutes, I was getting colder and decided to land. Cutting throttle gave an all-right glide, but I added a little power to flatten the descent rate. A final turn positioned the airplane over the runway, and I proceeded to add up-elevator until a flare was obtained just as the wheels touched down. The landing roll was straight and no problem. The flight was smooth and uneventful—the way you prefer all flights to be.
As I sat writing this review, I realized that this was the first airplane I had ever flown that I had not tried to loop or roll on the first flight. I was flying it similar to how the full-scale B-17 would have been flown. The illusion of its being a bomber is realistic, and you find yourself flying it as if it is one. However, flying past a basketball hoop indoors, the illusion might not be quite as convincing!
The DJ Aerotech Roadkill-series B-17 is a great addition to any modeler's hangar. It is fun to build and enjoyable to fly. The illusion of full-scale flight is enhanced because of the airplane's slow flight speed. I urge you to spend the small amount of time necessary to add some scale details and enhance the illusion. I recommend this B-17. MA
Editor's note
DJ Aerotech wanted us to convey that since the kit in this review was produced, the hole diameter in the wheel hub has been reduced for a tighter fit, which takes care of the problem cited.
The company also informed us that the decals were not included in the kit for several reasons: they add a substantial amount to the kit price, they tend to dry out in storage, and it seems as though no matter which individual aircraft markings are included, someone inevitably wants another version. With that in mind, the decals are posted as a BMP file on DJ Aerotech's Web site. Anyone can download them into the Microsoft Paint program (which is included with every copy of Windows), print them out on 8 x 11-inch paper, or use them as the basis for another version of the airplane while in the Paint program and then print them out.
Specifications
- Model type: Scale indoor and park flyer
- Wingspan: 45.4 inches
- Wing area: 270 square inches
- Length: 33.4 inches
- Recommended weight: 9–11 ounces with six-cell 600 mAh NiMH battery
- Review model's weight (ready to fly): 12.4 ounces with seven-cell 700 mAh NiMH battery
- Power: Four MPS-1A electric motors (supplied in kit)
- Batteries: Seven 700 mAh NiMH
- Recommended radio: Four-channel for aileron, elevator, motor, and rudder with microreceiver, ESC, and microservos
- Radio used: Futaba 8U transmitter; Hitec Feather receiver; Hitec HS-50 microservos (rudder, elevator, one on each aileron); 10-amp ESC
- Materials used in kit: Laser-cut balsa and plywood
- Street price: $124.95 from Web site
Manufacturer
DJ Aerotech 719 Fisk St. Piqua, OH 45356 (937) 773-6772 Fax: (937) 773-9494 www.djaerotech.com
Products used in review
- Futaba 8U Super Series radio system
- Great Planes Manufacturing
- Box 9021
- Champaign, IL 61826
- (217) 398-8970
- www.futaba-rc.com
- HS-50 servos; Feather receiver
- Hitec RCD USA, Inc.
- 12115 Paine St.
- Poway, CA 92064
- (858) 748-6948
- www.hitecrcd.com
Transcribed from original scans by AI. Minor OCR errors may remain.

