
Profile Bearcat
Frank Williams
Background and motivation
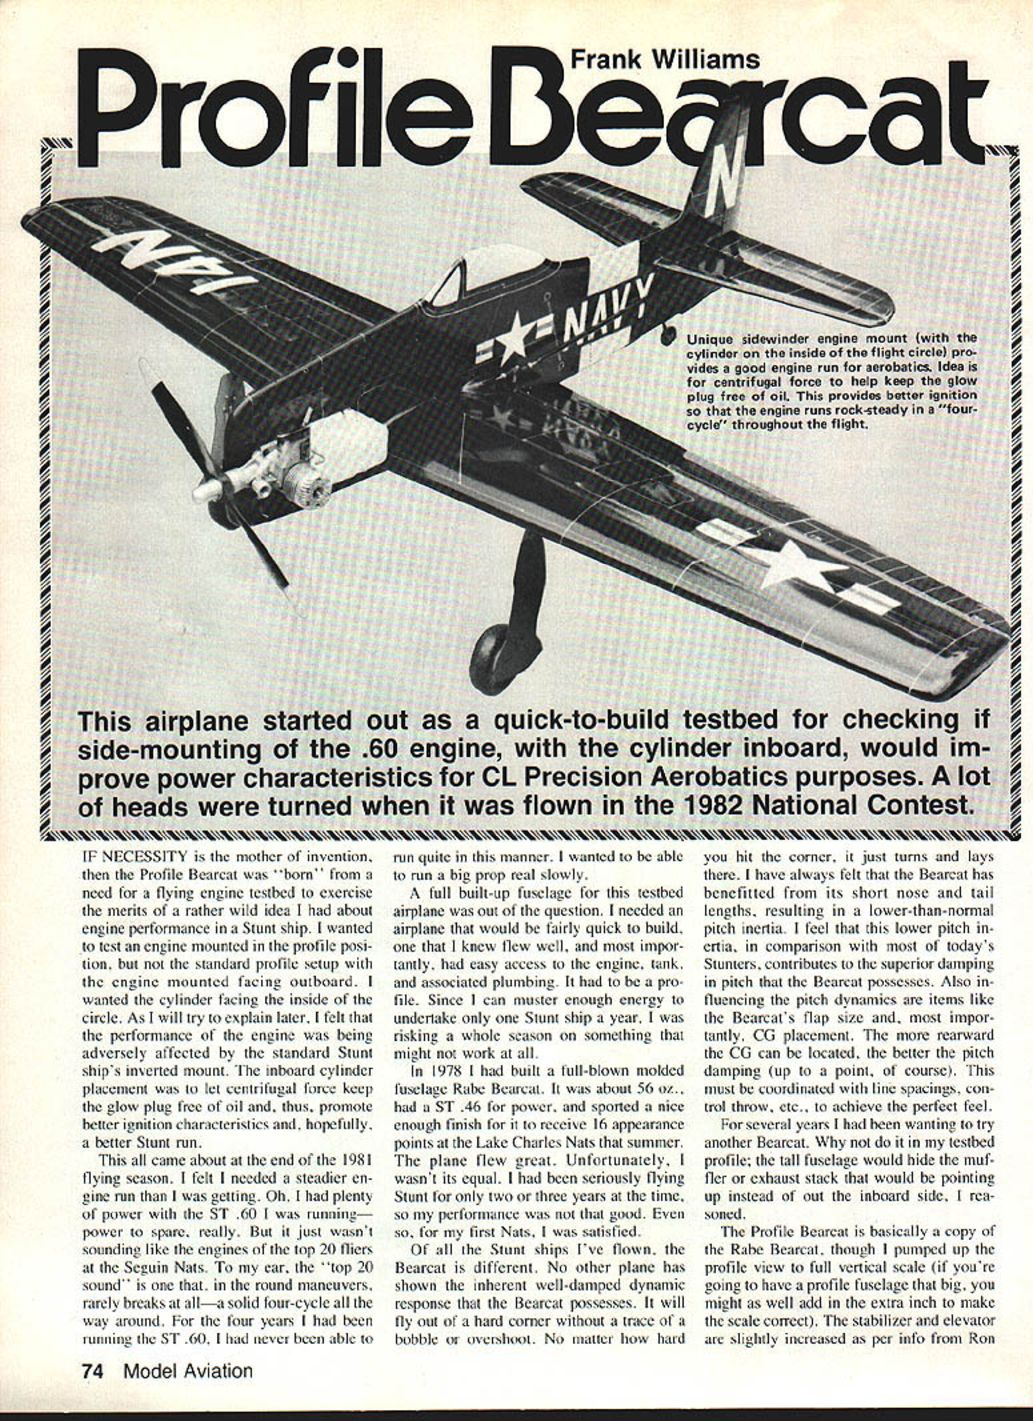
If necessity is the mother of invention, then the Profile Bearcat was born from a need for a flying engine testbed to exercise a rather wild idea I had about engine performance in a Stunt ship. I wanted to test an engine mounted in the profile position, but not the standard profile setup with the engine mounted facing outboard. I wanted the cylinder facing the inside of the circle. I felt that the performance of the engine was being adversely affected by the standard Stunt ship's inverted mount. The inboard cylinder placement was to let centrifugal force keep the glow plug free of oil and, thus, promote better ignition characteristics and, hopefully, a better Stunt run.
This all came about at the end of the 1981 flying season. I felt I needed a steadier engine run than I was getting. Oh, I had plenty of power with the ST .60 I was running—power to spare, really. But it just wasn't sounding like the engines of the top 20 fliers at the Seguin Nats. To my ear, the "top 20 sound" is one that, in the round maneuvers, rarely breaks at all—a solid four-cycle all the way around. For the four years I had been running the ST .60, I had never been able to run quite in this manner. I wanted to be able to run a big prop real slowly.
A full built-up fuselage for this testbed airplane was out of the question. I needed an airplane that would be fairly quick to build, one that I knew flew well, and, most importantly, had easy access to the engine, tank, and associated plumbing. It had to be a profile. Since I can muster enough energy to undertake only one Stunt ship a year, I was risking a whole season on something that might not work at all.
In 1978 I had built a full-blown molded fuselage Rabe Bearcat. It was about 56 oz., had a ST .46 for power, and sported a nice enough finish for it to receive 16 appearance points at the Lake Charles Nats that summer. The plane flew great. Unfortunately, I wasn't its equal. I had been seriously flying Stunt for only two or three years at the time, so my performance was not that good. Even so, for my first Nats, I was satisfied.
Of all the Stunt ships I've flown, the Bearcat is different. No other plane has shown the inherent well-damped dynamic response that the Bearcat possesses. It will fly out of a hard corner without a trace of a bobble or overshoot. No matter how hard you hit the corner, it just turns and lays there. I have always felt that the Bearcat has benefitted from its short nose and tail lengths, resulting in a lower-than-normal pitch inertia. I feel that this lower pitch inertia, in comparison with most of today's Stunters, contributes to the superior damping in pitch that the Bearcat possesses. Also influencing the pitch dynamics are items like the Bearcat's flap size and, most importantly, CG placement. The more rearward the CG can be located, the better the pitch damping (up to a point, of course). This must be coordinated with line spacings, control throw, etc., to achieve the perfect feel.
For several years I had been wanting to try another Bearcat. Why not do it in my testbed profile; the tall fuselage would hide the muffler or exhaust stack that would be pointing up instead of out the inboard side, I reasoned.
Design and construction decisions
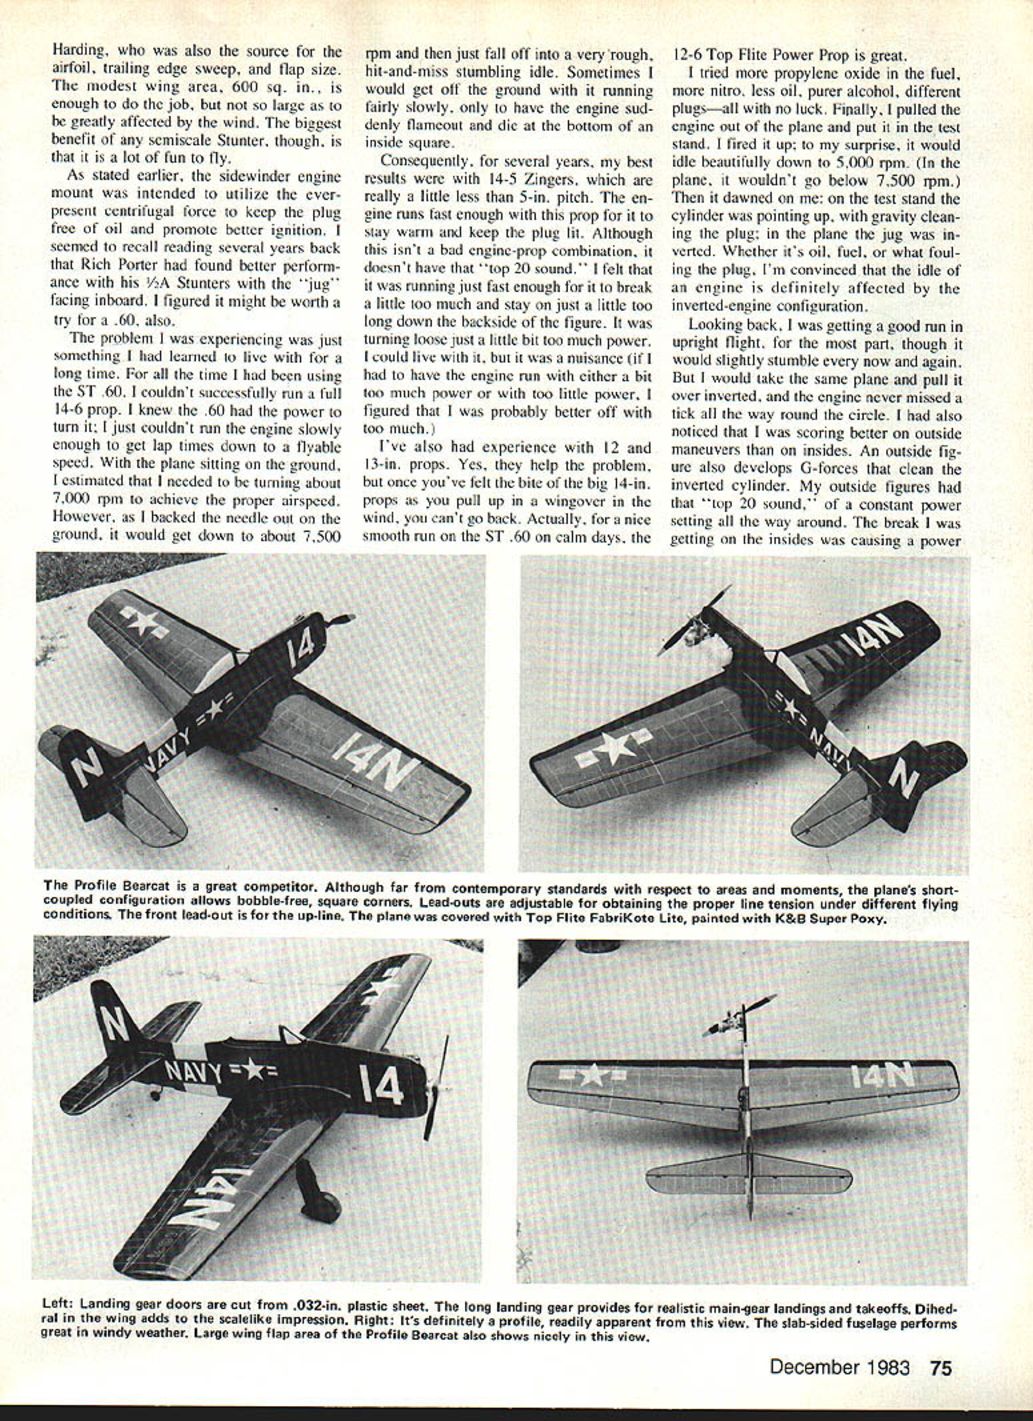
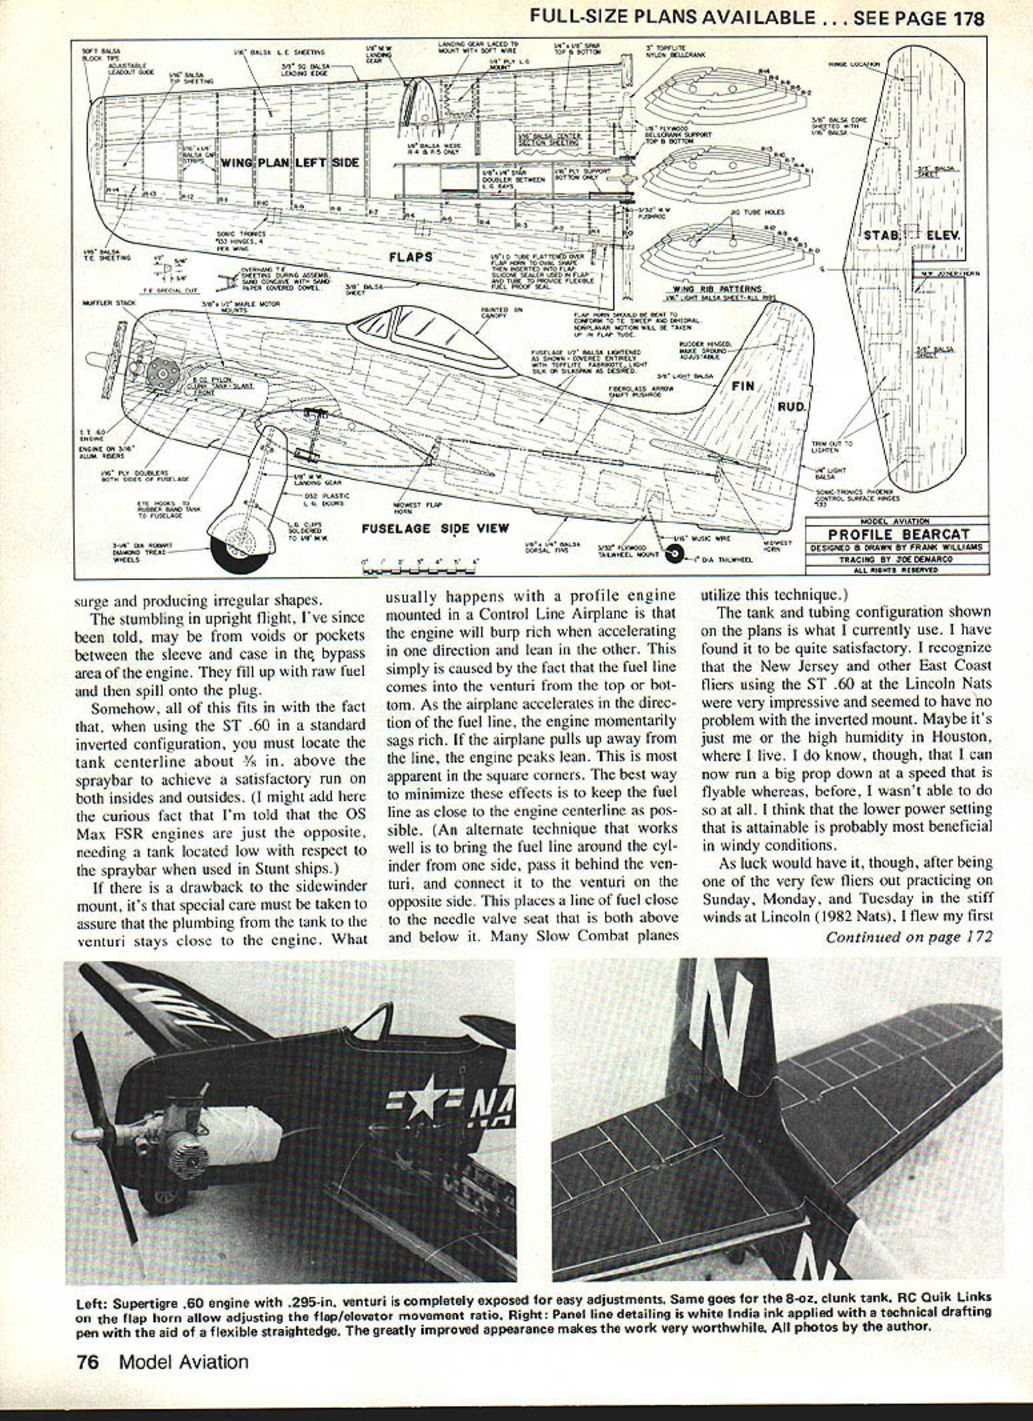
The Profile Bearcat is basically a copy of the Rabe Bearcat, though I pumped up the profile view to full vertical scale (if you're going to have a profile fuselage that big, you might as well add in the extra inch to make the scale correct). The stabilizer and elevator are slightly increased as per information from Ron Harding (Model Aviation, 1974). Also used were Harding's suggestions for airfoil, trailing-edge sweep, and flap size. A modest wing area—about 600 sq. in.—is enough to do the job; a larger wing area is greatly affected by wind. The biggest benefit is a semi-scale Stunter, and it's a lot of fun to fly.
As stated earlier, the sidewinder engine mount was intended to utilize the ever-present centrifugal force to keep the plug free of oil and promote better ignition. I seem to recall reading several years back that Rich Porter found better performance in 1/2A Stunters with the jug facing inboard. I figured it might be worth trying on a .60.
Engine, propeller and idle problems
I also had a problem—something I've learned the hard way in using the ST .60: I couldn't successfully run a full 14 x 6 prop. I knew the .60 had the power to turn it, but just couldn't run the engine slowly enough to get lap times down to a flyable speed. I estimated the plane needed to be turning about 7,000 rpm to achieve the proper airspeed. However, if I backed the needle out on the ground, I would get down to about 7,500 rpm and then it would just fall off—very rough, hit-and-miss, stumbling idle. Sometimes I would get off the ground running fairly slowly and have the engine suddenly flame out and die on the bottom inside square. Consequently, for several years my best results with the .60 were with a 14 x 5 Zinger. The slightly less 5-in. pitch lets the engine run fast enough so the prop stays warm and keeps the plug lit. Although this isn't a bad engine-prop combination, it doesn't have the top-20 sound I was after. I felt it was running just fast enough to break a little less and not stay a little too long down the backside. I figured that turning the prop a little less would be better. I've also experimented with 12- and 13-in. props. Yes, they help the problem somewhat. On calm days the 12-6 Top Flite Power Prop is great.
I tried more propylene oxide in the fuel, more nitro, less oil, purer alcohol, different plugs—all with no luck. Finally, I pulled the engine out of the plane and put it in the test stand. I fired it up; to my surprise, it would idle beautifully down to 5,000 rpm. (In the plane, it wouldn't go below 7,500 rpm.) Then it dawned on me: on the test stand the cylinder was pointing up, with gravity cleaning the plug; in the plane the jug was inverted. Whether it's oil, fuel, or what fouling the plug, I'm convinced that the idle of an engine is definitely affected by the inverted-engine configuration.
Looking back, I was getting a good run in upright flight, for the most part, though it would slightly stumble every now and again. But I would take the same plane and pull it over inverted, and the engine never missed a tick all the way around the circle. I had also noticed that I was scoring better on outside maneuvers than on insides. An outside figure also develops G-forces that clean the inverted cylinder. My outside figures had that "top 20 sound" of a constant power setting all the way around. The break I was getting on the insides was causing a power loss. I felt the inverted-cylinder layout of the conventional Stunt-engine installation was hurting the run. Hence the sidewinder concept.
The stumbling in upright flight, I've since been told, may be from voids or pockets between the sleeve and case in the bypass area of the engine. They fill up with raw fuel and then spill onto the plug.
Somehow, all of this fits in with the fact that, when using the ST .60 in a standard inverted configuration, you must locate the tank centerline about 3/8 in. above the spraybar to achieve a satisfactory run on both insides and outsides. (I might add here the curious fact that I'm told OS Max FSR engines are just the opposite, needing a tank located low with respect to the spraybar when used in Stunt ships.)
Fuel plumbing considerations
If there is a drawback to the sidewinder mount, it's that special care must be taken to assure that the plumbing from the tank to the venturi stays close to the engine. What usually happens with a profile engine mounted in a control-line airplane is that the engine will burp rich when accelerating in one direction and lean in the other. This simply is caused by the fact that the fuel line comes into the venturi from the top or bottom. As the airplane accelerates in the direction of the fuel line, the engine momentarily sags rich. If the airplane pulls up away from the line, the engine peaks lean. This is most apparent in the square corners.
The best way to minimize these effects is to keep the fuel line as close to the engine centerline as possible. An alternate technique that works well is to bring the fuel line around the cylinder from one side, pass it behind the venturi, and connect it to the venturi on the opposite side. This places a line of fuel close to the needle valve seat that is both above and below it. Many Slow Combat planes utilize this technique.
The tank and tubing configuration shown on the plans is what I currently use. I have found it to be quite satisfactory. I recognize that the New Jersey and other East Coast fliers using the ST .60 at the Lincoln Nats were very impressive and seemed to have no problem with the inverted mount. Maybe it's just me or the high humidity in Houston, where I live. I do know, though, that I can now run a big prop down at a speed that is flyable whereas, before, I wasn't able to do so at all. I think that the lower power setting that is attainable is probably most beneficial in windy conditions.
Building the wing
Even though this is a profile airplane, I'm not sure that I would classify it as a novice project. This is mainly because of the wing dihedral. The wing must be built on "jig tubes." As far as I'm concerned, this method is the only way to build a wing, whether it has dihedral or not. The jig tubes assure a straight, warp-free wing, which is imperative for any Stunt ship. This plane won't work without the dihedral, either. It won't look right for one thing, and the dihedral is needed to get the lead-outs up to the CG of the airplane.
Don't be influenced by those who say that a plane with dihedral won't turn the same inside and outside. T'aint so. We're only talking about 3°. The performance is as good as any straight-wing ship.
If you can't find aluminum tubes, most hardware stores have solid 3/8-in. aluminum rod. This works just as well. The tubes are supported and leveled at both tips and also in the center section.
The wing is completely constructed on the jig tubes, including leading- and trailing-edge sheeting, center-section sheeting, landing gear installation, and installation of the bellcrank and leadouts. After the wing construction is complete, the tubes are carefully removed and the tip blocks are added. The balsa you use must be in the 4 to 6-lb. range.
The trailing-edge spar is cut from 3/8-in. sheet with a table saw or radial arm saw. The trailing-edge sheeting purposefully overhangs the back of the spar. A sandpaper-covered dowel is used to achieve the concave shape of the trailing edge. This produces a somewhat tighter and aerodynamically cleaner hinge line than is normally attained. The counterlever hinges, as noted on the plans, are the key to making this setup work correctly. The flaps are made from 1/8-in. sheet. The center of rotation of the flaps is the center of the flap leading-edge diameter. The same technique is used on the stabilizer and elevator.
Flaps, horns and hinge details
The flap horn is simply bent to the proper shape to conform to the dihedral and trailing-edge sweep. I know it seems that the motion on the arms will be too out-of-plane to be useful, but it works. The out-of-plane motion is taken up in the brass tubes that are inset in the flaps. This tube is 1/8 in. I.D., flattened over the flap horn arm to an oval shape. When the flap is assembled, I usually fill the tube with aquarium sealer as a fulcrum-proofer. The aquarium sealer will stay flexible for the life of the plane.
(Actually, for planes with only 1 in. of trailing-edge sweep and no dihedral, I just make the proper bend to the horn and solidly affix the arms in the flaps. It works fine with no bind whatsoever.)
Fuselage and weight considerations
The fuselage can get too heavy if you're not careful. The lightening holes are a must. It's a bigger chunk of wood than you might think. Be prepared, also, for the shock of that big "slab" perched atop your wing. Seldom does my wife comment about my stunt ships at all during the construction stage. Sometimes after they are completed I get a, "Oh, that's a nice shade of blue," or "Why doesn't it have a pilot in it?" My wife confronted me the morning after I cut out the profile fuselage and had mounted it atop the wing: "What in heaven's name are you doing out there this year?"
Aerodynamically, what does this tall fuselage do to the airplane's performance? Does it solve some line-incision problems when overhead? It sure doesn't hurt. You can get the plane yawed out too much though; it'll tend to block the tail somewhat and shadow the outboard wing. Also, the glide after engine shutdown will be all of one-half lap. My best performance has been with the leadouts fairly far forward. You do experience some buffeting on breezy days in level flight as a result, I assume, of vortices rolling off the relatively sharp edges of the fuselage.
Covering and finish
The entire airplane was covered with Top Flite Fabrikoat Lite. Each component was doped and sanded three times. The fuselage was sprayed about three coats, then rubbed out with fine steel wool. The final finish was two coats of Top Flite Fabrikote and a coat of LusterKote. (I have found that the LusterKote doesn't contribute much protection, but it does produce a nicer sheen.) The wing was taped with silkspan and doped. The flaps and elevators were painted with acrylic lacquer. The color scheme was a fairly standard navy blue with white and red trim. The wing tips and stabs were white with blue tips.
Parts were often covered separately before I joined them together. Top Flite Fabrikote is heat-shrinkable; it is nice for covering compound curves. The finished product, after two to three coats of K&B Superpoxy clear to fill the weave, looks like you have covered the plane with silk and dope. The nice thing about heat-shrunk materials is that, in one evening of work, you can go from raw balsa to a surface that will never fall back into the grain of the wood.
The weight of the Fabrikoat isn't that bad. The raw material to cover the top and bottom of the 600 sq. in. wing and flaps was only 1.9 oz.; after three sprayed coats of K&B clear, 3.3 oz. If I were to do it again, I might just use the regular Fabrikoat in the navy-blue color and eliminate the clear filling coats.
Why do I use epoxy paints? They produce a fine finish, for one thing, and they are quite durable. Mainly though, I'm about a mile from Galveston Bay, and there are only about four days of the year that one can use dope without terrible blushing problems.
If there is a drawback to the Fabrikoat, it's that the stuff doesn't sand at all. Therefore, all seams should be kept on the underside of the plane. Those seams that are visible, like at the tips, must be dealt with by using primer to build up a ramp from the low side. This is then feathered smooth.
The navy-blue color is a one-to-one mix of K&B blue and black. Jim Lynch, noted Bearcat builder and flier, once told me that he's never seen two Bearcats the same color. The one-to-one mix looks mighty dark when in the workshop, but when out in the daylight, the blue comes through.
The white panel lines are white India ink, drawn with drafting pens. The white ink usually doesn't want to work as well as black ink; it tends to bead up. This problem can be alleviated by adding a drop or two of liquid detergent to the ink in the pen reservoir.
Weight and performance
The plane was initially completed at a weight of 57.5 oz., including a 10-oz. battery pack; the final weight of my Profile Bearcat was 59 oz. Why so heavy? Actually, a profile fuselage really doesn't have much less material than a built-up one. So far, no one ever accused me of being a light builder, either. Mainly though, if I had used a .46 in it instead of the .60, it would have weighed 56 oz.—not a bad weight, you might say. If I had a choice between a 56-oz. plane with a .46 and a 59-oz. plane with a .60, I'll take the .60 every time. Horsepower is addictive.
Flight impressions and contest experience
As luck would have it, after being one of the very few fliers out practicing on Sunday, Monday, and Tuesday in the stiff winds at Lincoln (1982 Nats), I flew my first qualifying flight on Wednesday in conditions all Stunt fliers dread more than anything else—absolute dead calm.
The Profile Bearcat's maiden contest outing was July 4th at Ft. Worth. Semiscale model-flying Stunt pros Al Rabe and Frank McMillan were in attendance. The plane only had about a dozen test flights on it, and the day was quite windy. However, it performed beautifully. Whereas others were getting blown out of the pattern, the Profile Bearcat chugged along with very steady 5.7-sec. lap times and rock-solid line tension. I think everyone was impressed with its performance.
I've always thought that profile Stunt ships have been sold short on their flying abilities and that many intermediate and advanced-level fliers spend too much time and effort in building the "ultimate" full-fuselage Stunter, overlooking the benefits of more quickly building a profile so that there will be more time flying.
Conclusions
Will the sidewinder engine mount and semiscale profile airplanes revolutionize Stunt flying? Probably not, but it does work quite well, and it is a lot of fun to fly. If you feel like you're in a rut with your usual year-after-year classic Stunter and you want to try something a bit out of the ordinary, then consider the Profile Bearcat. It may be just the plane you need.
Transcribed from original scans by AI. Minor OCR errors may remain.

