
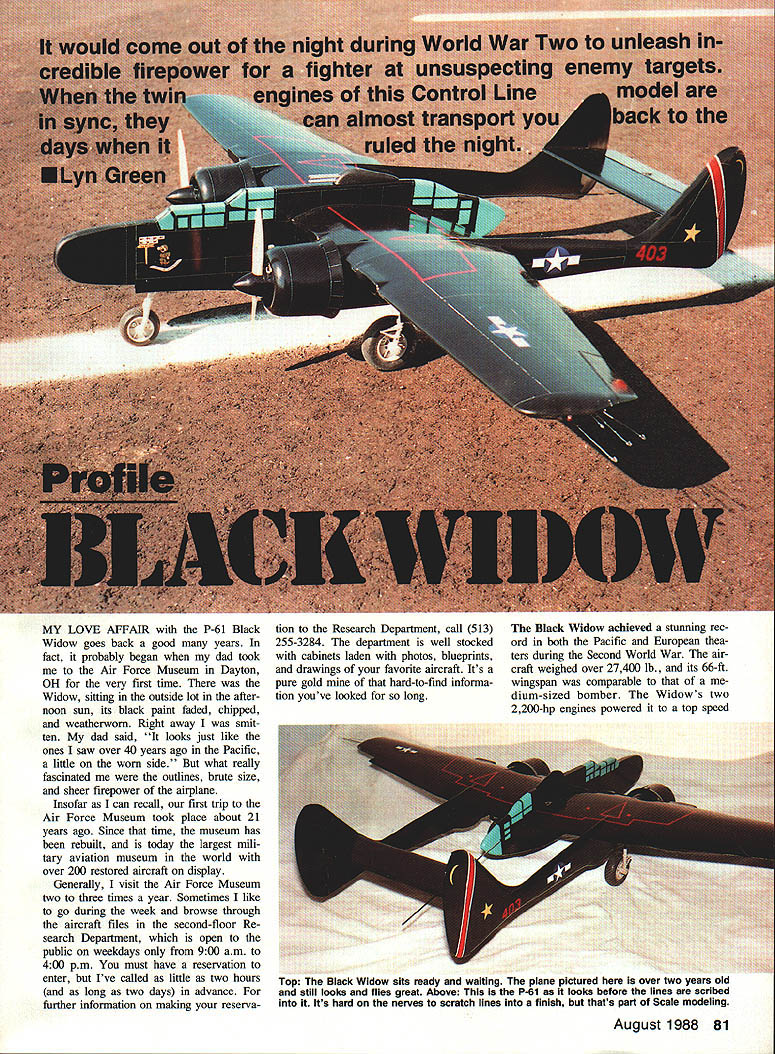
Profile: Black Widow
MY LOVE AFFAIR with the P-61 Black Widow goes back a good many years. In fact, it probably began when my dad took me to the Air Force Museum in Dayton, OH for the very first time. There was the Widow, sitting in the outside lot in the afternoon sun, its black paint faded, chipped, and weatherworn. Right away I was smitten. My dad said, "It looks just like the ones I saw over 40 years ago in the Pacific, a little on the worn side." But what really fascinated me were the outlines, brute size, and sheer firepower of the airplane.
Insofar as I can recall, our first trip to the Air Force Museum took place about 21 years ago. Since that time, the museum has been rebuilt and is today the largest military aviation museum in the world, with over 200 restored aircraft on display.
I generally visit the Air Force Museum two to three times a year. Sometimes I like to go during the week and browse through the aircraft files in the second-floor Research Department, which is open to the public on weekdays only from 9:00 a.m. to 4:00 p.m. You must have a reservation to enter, but I've called as little as two hours (and as long as two days) in advance. For further information on making your reservation to the Research Department, call (513) 255-3284. The department is well stocked with cabinets laden with photos, blueprints, and drawings of your favorite aircraft. It's a pure gold mine of that hard-to-find information you've looked for so long.
The Black Widow achieved a stunning record in both the Pacific and European theaters during the Second World War. The aircraft weighed over 27,400 lb., and its 66-ft. wingspan was comparable to that of a medium-sized bomber. The Widow's two 2,200-hp engines powered it to a top speed of over 370 mph. Its radar was capable of locating and tracking enemy aircraft up to 30 miles away in complete darkness.
Combining speed and maneuverability with fighter-plane capacity to carry four .50-caliber machine guns and four 20 mm cannons gave the warbird extremely deadly prowess. The prototype P-61B, nicknamed "Time's Wastin'," was piloted by Major Carroll C. Smith of the 418th Night Fighter Squadron stationed in the Pacific. On the single night of December 29, 1944, Major Smith and radar operator Lt. Phillip Porter destroyed four Japanese aircraft off the coast of Mindoro, Philippines. The coup earned Major Smith the distinction of being the highest-scoring U.S. night-fighter ace, with a total of seven kills.
Construction of the P-61B model is designed exactly to scale, including wing ribs and the plane-body outline. The model was originally intended as a test aircraft for the then-projected full-scale Black Widow under construction.
Building and flying a scale model is enjoyable, with two caveats:
- Keep the tail section as light as possible.
- Make sure the model is properly balanced before flying.
If you don't lose sight of those key points, flying should present no problems.
Model Construction
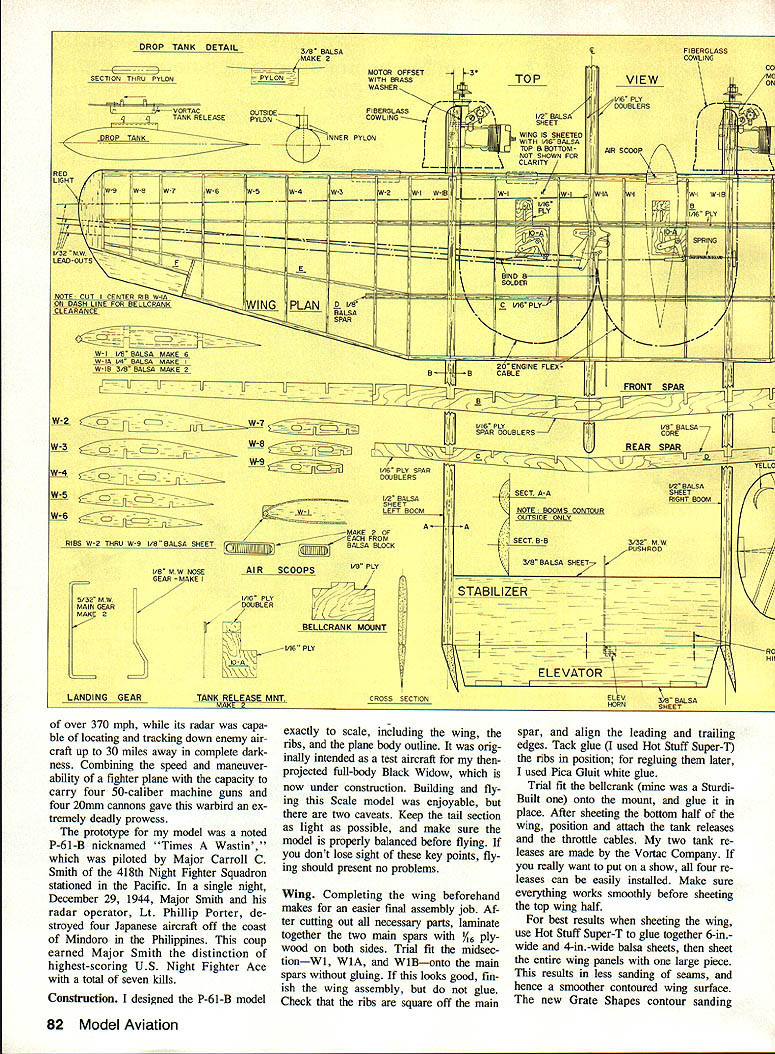
Wing
Completing the wing beforehand makes the final assembly job easier.
Steps and tips:
- After cutting out the necessary parts, laminate together the two main spars with 1/8-in. plywood on both sides.
- Trial-fit midsection pieces W1, W1A, and W1B onto the main spars; if the fit looks good, finish the wing assembly glue-up.
- Check that the ribs are square to the main spar and align the leading and trailing edges.
- Tack-glue the ribs in position using Hot Stuff Super-T; later regluing with white glue (Pica Glue) secures them.
- Trial-fit the bellcrank (mine was a Sturdi-Built one) onto the mount and glue in place.
- After sheeting the bottom half of the wing, position and attach the tank releases and the throttle cables. My two tank releases are made by the Vortac Company. If you want a show, all four releases can be installed.
- Make sure everything works smoothly before sheeting the top wing half.
For best results when sheeting the wing:
- Glue together 6-in. and 4-in. wide balsa sheets with Hot Stuff Super-T, then sheet the entire wing panel with one large piece. This results in fewer seams and less sanding for a smoother surface.
- Contour sanding blocks did a fantastic job shaping the leading edge and tail surfaces; a set of good contour sanding blocks is indispensable in every modeler's workshop.
Defer permanent installation of the air scoops and outer tank pylons until the fuselage has been constructed and glued to the wing along with the booms. After shaping and final sanding of the wing tips, drill holes for the navigation lights. I used H.O.-size colored train lights.
Fuselage
Basic materials: 1/2-in. medium-grade balsa laminated with 1/16-in. plywood.
Construction notes:
- To ensure the fuselage joint is at midwing, cut the fuselage from 4-in.-wide and 2-in.-wide sheets of balsa. Alternatively, you can use 6-in.-wide balsa and slip it over the wing, but that requires a 36-in. length and causes considerable waste and extra cost.
- Having the joint at the middle of the wing makes it easy to mount the wing in two pieces.
- Cut the openings for the wing and the landing gear blocks; do the same for the balance weight in the nose.
- Epoxy the landing gear blocks in place. When dry, drill a 1/4-in.-dia. hole into the blocks at approximately the angle shown on the plans. Make sure the nose gear wire fits snugly so it is wobble-free during landings.
- Locate the center of the wing. Using the wing center as a midpoint, mark a 1/2-in. line extending 3/4 in. to each side. Epoxy the top and bottom fuselage halves to the wing. Square the fuselage off the leading edge and the top of the wing before the epoxy sets up.
Reinforcement and finishing:
- Following the pattern on the plan side view, cut out the two fuselage sides from 1/4-in. plywood.
- Epoxy additional 1/8-in. plywood to each side to reinforce the wing saddle and landing gear blocks—this provides extra strength for hard landings.
- Add the rudders, elevators, wheels, engines, and the correct balance weight in the nose, then sheet the nose on both sides with 1/16-in. balsa.
- Finish contouring and shaping the edges and the nose.
Booms and tail surfaces
- Both left and right booms are made of 1/2-in. balsa, with 3/8 x 1/2-in. maple engine mounts sandwiched between 3/32-in. plywood and epoxied.
- For a uniform scale appearance, make the inside of both booms equidistant from the fuselage. This condition can throw off engine centers; to compensate, rout and countersink about 3/8 in. into the engine mounts on the right side of the right boom using a Dremel tool. This improves the appearance of engine offset. Only one brass washer was needed to properly offset each engine.
- Use medium-lightweight balsa for the twin booms, and the lightest grade available for the rudders and stabilizer. A 2-in. formed aileron strip was used for the elevator.
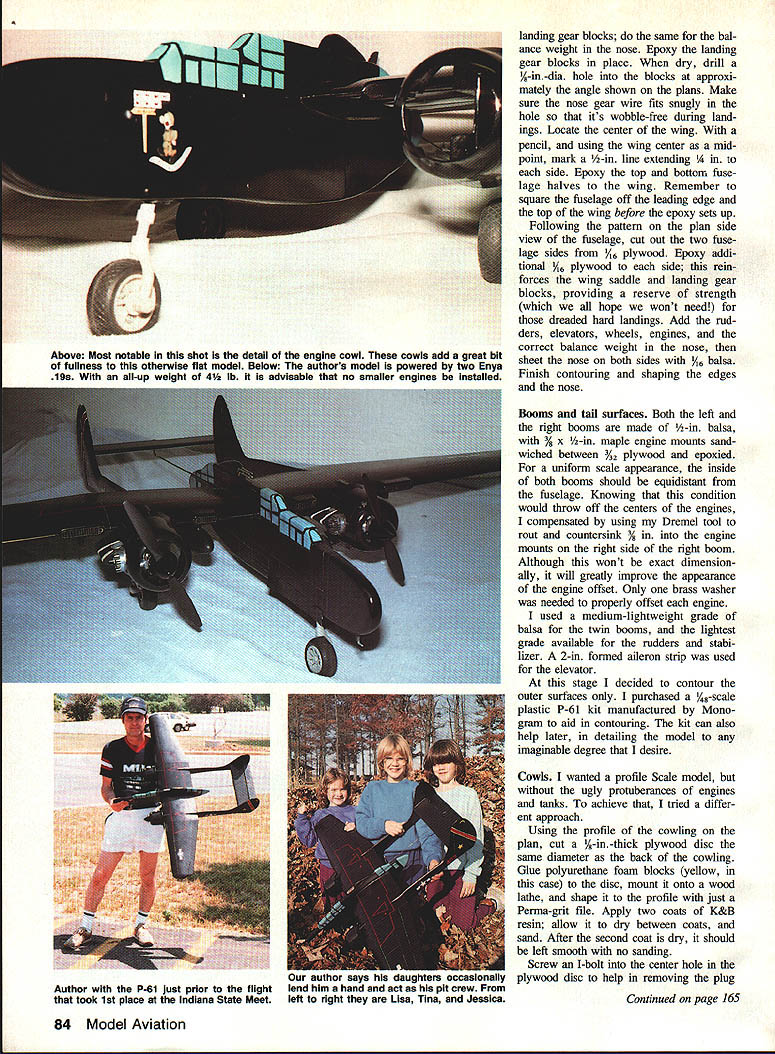
- At this stage I contoured the outer surfaces only. I purchased a 1/4-scale plastic P-61 kit manufactured by Monogram to aid in contouring and to help later in detailing the model.
Cowls
I wanted a profile-scale model without the ugly protuberances of engines and tanks. To achieve that, I used this approach:
- Using the cowling profile on the plan, cut a 1/4-in.-thick plywood disc the same diameter as the back of the cowling.
- Glue polyurethane foam blocks to the disc, mount it on a wood lathe, and shape it with a Perma-grit file to the profile.
- Apply two coats of K&B resin, allowing each coat to dry and sanding between coats. After the second coat is dry, the surface should be smooth with no sanding required.
- Screw an 8-32 nut into the center hole in the plywood disc to aid removing the plug from the lathe.
- After a light sanding, cut the opening in the cowl and seal it well with one last finish coat of resin inside and out.
Finishing and painting
- Give the model a final sanding with 400-grit sandpaper, fill dents and blend everything with Model Magic Filler.
- Apply a coat of K&B Finishing Resin; when dry, sand with 400-grit paper. Add a second light coat of resin and sand again with 400-grit.
- Apply two coats of gray NAPA auto-lacquer primer. When dry, lightly sand with 600-grit paper.
- Spray two coats of glossy black Perfect Paint (Chevron). Add trim paint and decals, then one coat of clear satin.
- I used Chevron Perfect Paint exclusively; it's easy and forgiving.
Flying
Before flight:
- Check that your model balances at the center-of-gravity shown on the plan; better yet, make the airplane a little nose-heavy.
- Before connecting the lines, be certain the plane will roll straight forward or to the outside of the circle. An adjustable nose gear is useful for this setup.
Engine starting and run-up:
- Start the outboard engine and lean it out, then start and lean out the inboard engine to match the outboard.
- When the inboard is matched to the outboard it creates a beautiful, hypnotic sound.
Flight impressions:
- From that day on, the P-61 has been a terrific flier with never a letdown. It's very stable and smooth in the wind. Touch-and-go maneuvers are great, as are the wing tank drops.
- My .19 engines provide adequate power, but if anything, go for something bigger—don't go for less.
Whether flown in competition or purely for fun, the Black Widow has consistently been a winner. A modeler can't ask for more than that.
Transcribed from original scans by AI. Minor OCR errors may remain.

