
Project Snapshot
By Luther Hux
These aerial photographs were taken by the author's camera planes. "Behind the scenes" is an extraordinary story: the concept, the aircraft, the cameras and their installation and operation, the techniques, the special art of how to fly a camera plane, public relations aspects and, biggest of all, putting the act together.
I imagine most modelers have a dream project in the back of their minds that waits for the right opportunity to be taken off the shelf of ideas and become a reality. An article on the Sparrow Teleplane (American Aircraft Modeler, Sept. 1973) started several years of daydreaming about building a camera-carrying model like it.
Aerial photography began as early as 1858, when photos were taken from a hot-air balloon. Kites were also used successfully; one photographer suspended an 18½" by 48" camera from a bank of kites and produced spectacularly clear photos of San Francisco after the great earthquake of 1906. Modelers have been putting still and movie cameras in models for years and many have enjoyed the view of their flying field from "up there."
Now that it was my turn to try aerial photography, I wanted something a little different than the typical overhead or mapping shots. I preferred oblique, postcard-type views. Initially most of my photos were of RC flying fields, but the search for more interesting scenery led me to fly at an international airport and other varied locations. Magazines for full-scale aircraft often ran photos of aircraft in flight; duplicating those by shooting scale models in flight from a model became a major goal. From over 200 frames taken in pursuit of such shots, only a few were close enough to print; setting up these frames is part luck, part guesswork, and all fun.
Camera selection
After obtaining plans for the Sparrow Teleplane project, I began "Snapshot I" by searching for an ideal camera. Requirements were: light enough for an average-size model, automatic exposure, automatic film advance, and affordable. That eliminated most SLRs with power winders. Ron Zuehl showed me a half-frame Canon Dial 35: 25-frame automatic film advance and only 14 ounces — perfect. The winder had been damaged in a fall, but the repair was simple and the camera worked well after testing.
Later, for Snapshot II I used an Olympus RC which provides full-frame 35-mm negatives but does not have an automatic film advance. The larger negatives were preferable, so I devised an external servo winder solution for the Olympus.
Snapshot I — design and construction
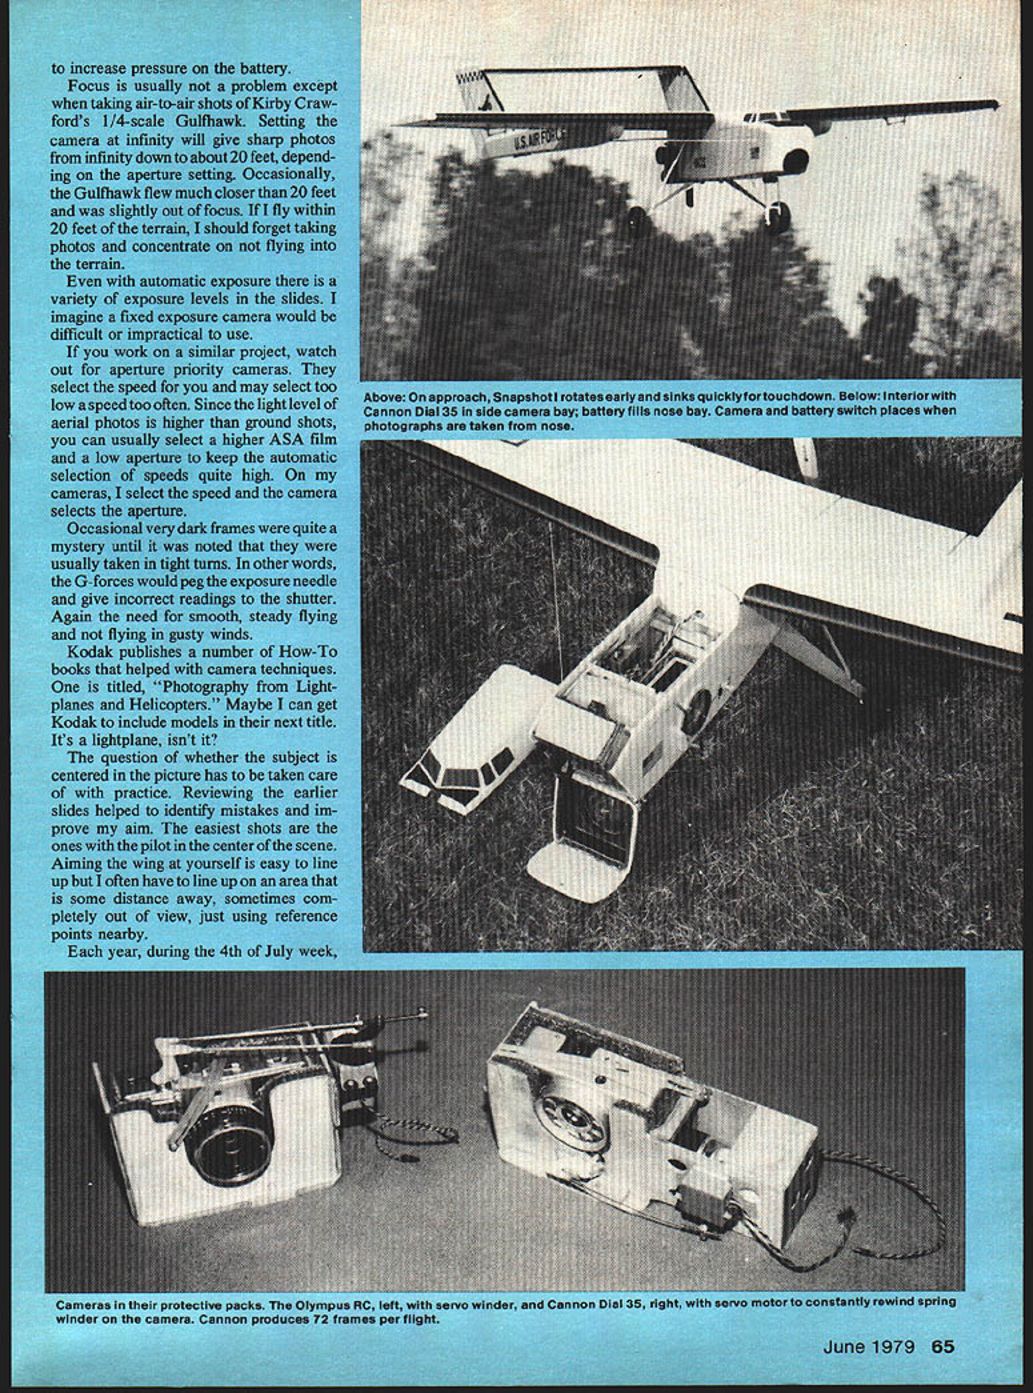
Snapshot I was designed to carry its camera in the nose, aimed 30 degrees down, to produce oblique postcard shots in level flight. Bill Winter later suggested photographing part of the model in each scene to prove the model took the photos, so I built a camera bay on the left side to photograph the wingtip with every scene.
The model had a 64-inch span to provide enough wing area for an expected nine-pound model and to fit in my car with wing and tail as one piece. The completed model weighed 12 pounds at takeoff. I probably overbuilt the plywood compartment around the camera and fuselage: with about a 3 lb/ft² wing loading the Snapshot I required a lot of power for takeoff, but once airborne it was very stable. Flying speed was high; landing speed was reasonable though the sink rate was rapid.
Two design points were crucial for the camera bay:
- Crash protection — I constructed a separate plywood camera box instead of using fuselage bulkheads. In a crash the box can leave the fuselage intact, preserving the padding around the camera. The box is installed with nylon bolts that will strip or break on impact.
- Vibration proofing — I shock-mounted the camera using foam-backed carpet samples. The short-nap carpet fabric lets the camera slip in and out easily and accommodates knobs and panels; the foam backing provides insulation and resists compression better than standard foam. Silicone rubber attached the carpet to the plywood box because white or acetate glues would penetrate the foam and make it rigid.
The camera lens was protected by a UV filter; the filter alone could break without harming the camera. The lens aperture and opening were exposed, but only a pointed object could reach the camera past the plywood opening.
Snapshot I was powered by a Hirtenberger HP .61 in a pusher configuration. I rotated the front plate 90 degrees counterclockwise so the carburetor intake was suitable for clockwise operation and rotated the crankcase front to rear to provide down exhaust on the right side when the carburetor was on top. One pusher-related hazard: the prop's draw can pull glow-plug clips, air filters and other detachable items into the prop, so secure everything.
I learned a lot about control surfaces the hard way. On one flight I lost ailerons to flutter and landed using rudder only. The single rudder worked well — perhaps too well; a sharp low-speed approach turn led to a very precise (and unintended) spot landing. The plywood construction limited damage.
Film advance and camera modifications
Because the Olympus RC lacks an automatic advance, I designed a winder using a 180-degree servo:
- The servo advances the film lever on the CCW throw and trips the shutter on the CW throw.
- The transmitter's auxiliary channel retract switch was replaced with two snap-action switches and a ten-turn potentiometer. The pot sets the servo center; one switch shorts out the pot for one direction, the other brakes the pot for the other direction, giving the required throw to each side of center.
Many cameras lock the trip release if the exposure would be too high or too low. The Olympus RC required modification so the servo could attempt to wind regardless of light conditions without stalling and damaging the servo. I disabled the final stage of the locking device; if it attempts to lock out, the camera instead exposes at f/2.8. This ensured the servo winder could operate every time.
Potential RF noise and vibration sources had to be considered. An exposure battery could vibrate, so I placed a strip of saddle foam under the contact arm to reduce vibration. In some cases I increased pressure on the battery contacts to ensure reliable electrical connection during flight.
Flying technique and photographic considerations
For several months I photographed local flying fields to learn how to aim the camera and become familiar with aircraft behavior. I discovered many causes of blurred photos:
- Motor vibration is often blamed but more commonly the way the model is flown is the culprit. The model must be steady during the second of exposure. If the aircraft is bouncing or undergoing multiple axes of motion, photos blur—much like handheld camera shake.
- Gliders can use lower shutter speeds since there is no engine vibration, but any motorized camera plane must be flown smoothly. A shutter speed of 1/250 will yield an acceptable number of good shots; I prefer 1/500.
- Aperture-priority cameras can be problematic because they may select too low a shutter speed. A higher ASA film and low aperture can help force higher shutter speeds; on my cameras I select the speed and let the camera choose the aperture.
- Focus is usually not a problem with landscape and airport shots if the lens is set to infinity. Infinity focus will be sharp from infinity down to about 20 feet depending on aperture. For air-to-air close formation shots, occasionally an aircraft flew closer than 20 feet and was slightly soft.
- G-forces in tight turns can peg the exposure needle and yield very dark frames. Smooth, steady flying and avoiding gusty winds help prevent that.
Practice and review of earlier slides improved aim and composition. Using nearby reference points helped when the desired subject was out of the camera's direct sight.
Safety, planning and public relations
All picture-taking missions were meticulously planned to ensure safety. Methods were developed to provide "no-closer-than" margins in both distance and altitude. Having an organized approach helped obtain cooperation from authorities such as airport operations.
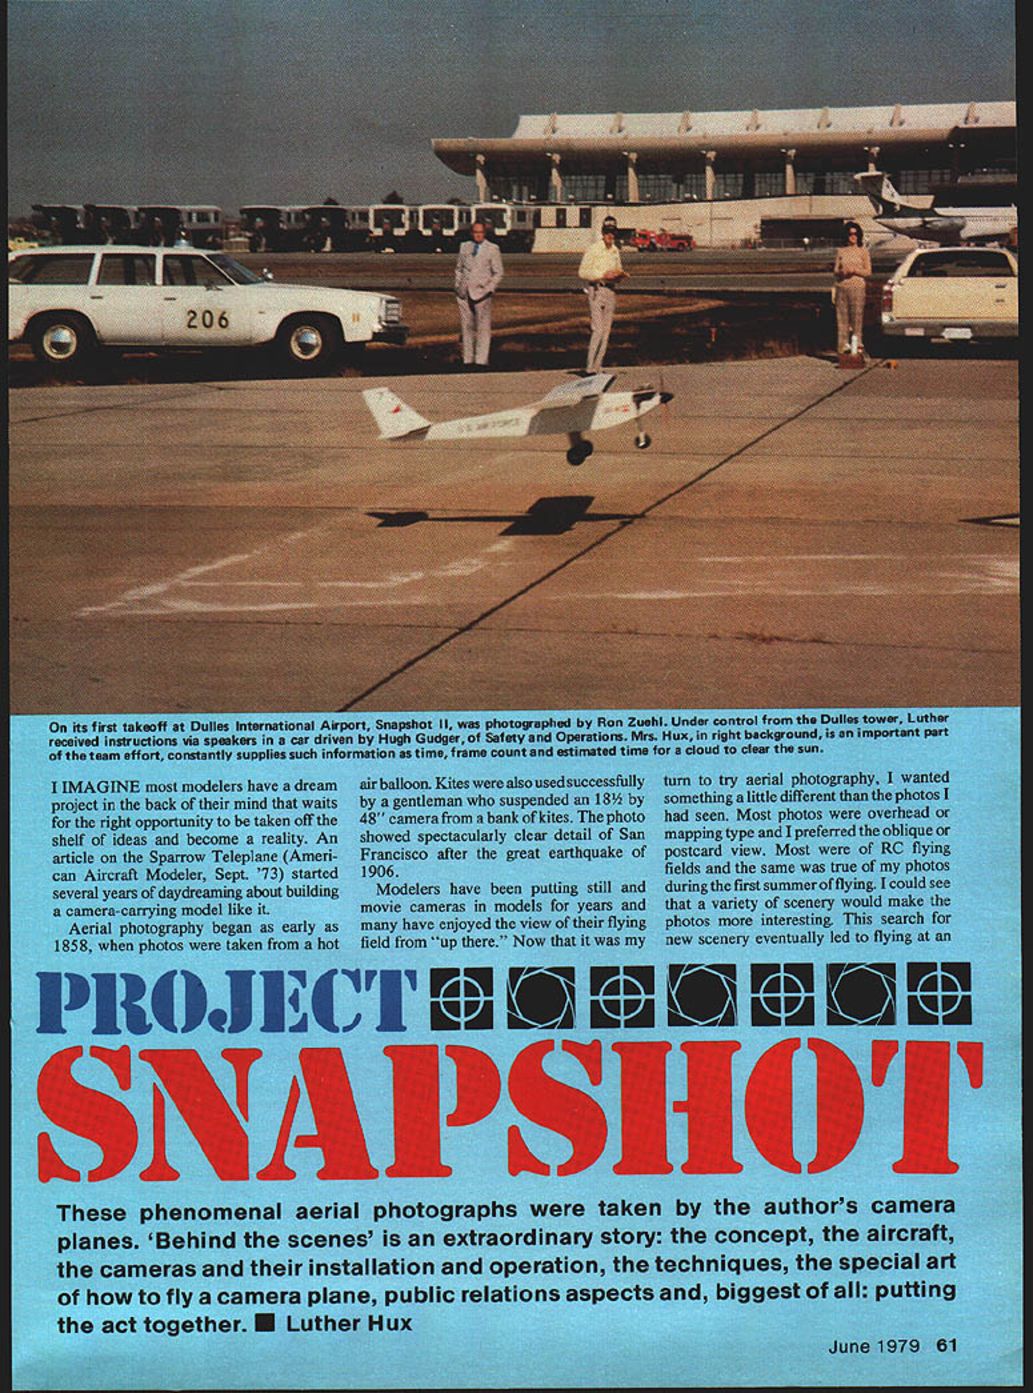
At Hutchinson Elementary School, about a mile from Dulles Airport, I took early-morning photos because the light between 8 and 10 a.m. is best. After seeing the slides, I called Dulles to thank them and mentioned my interest in flying at the airport. Tower personnel asked questions and suggested coordinating with Safety & Operations. After discussing the project with Hugh Gudger in Safety & Operations and agreeing to daily scheduling calls, I arranged a flight. On one weekend the tower cleared a flight; Hank Cloudier from operations coordinated the day and escorted our setup.
During the Dulles session:
- We set up a checklist and followed it closely.
- Tower communications were relayed via speakers mounted on the car so we heard everything clearly.
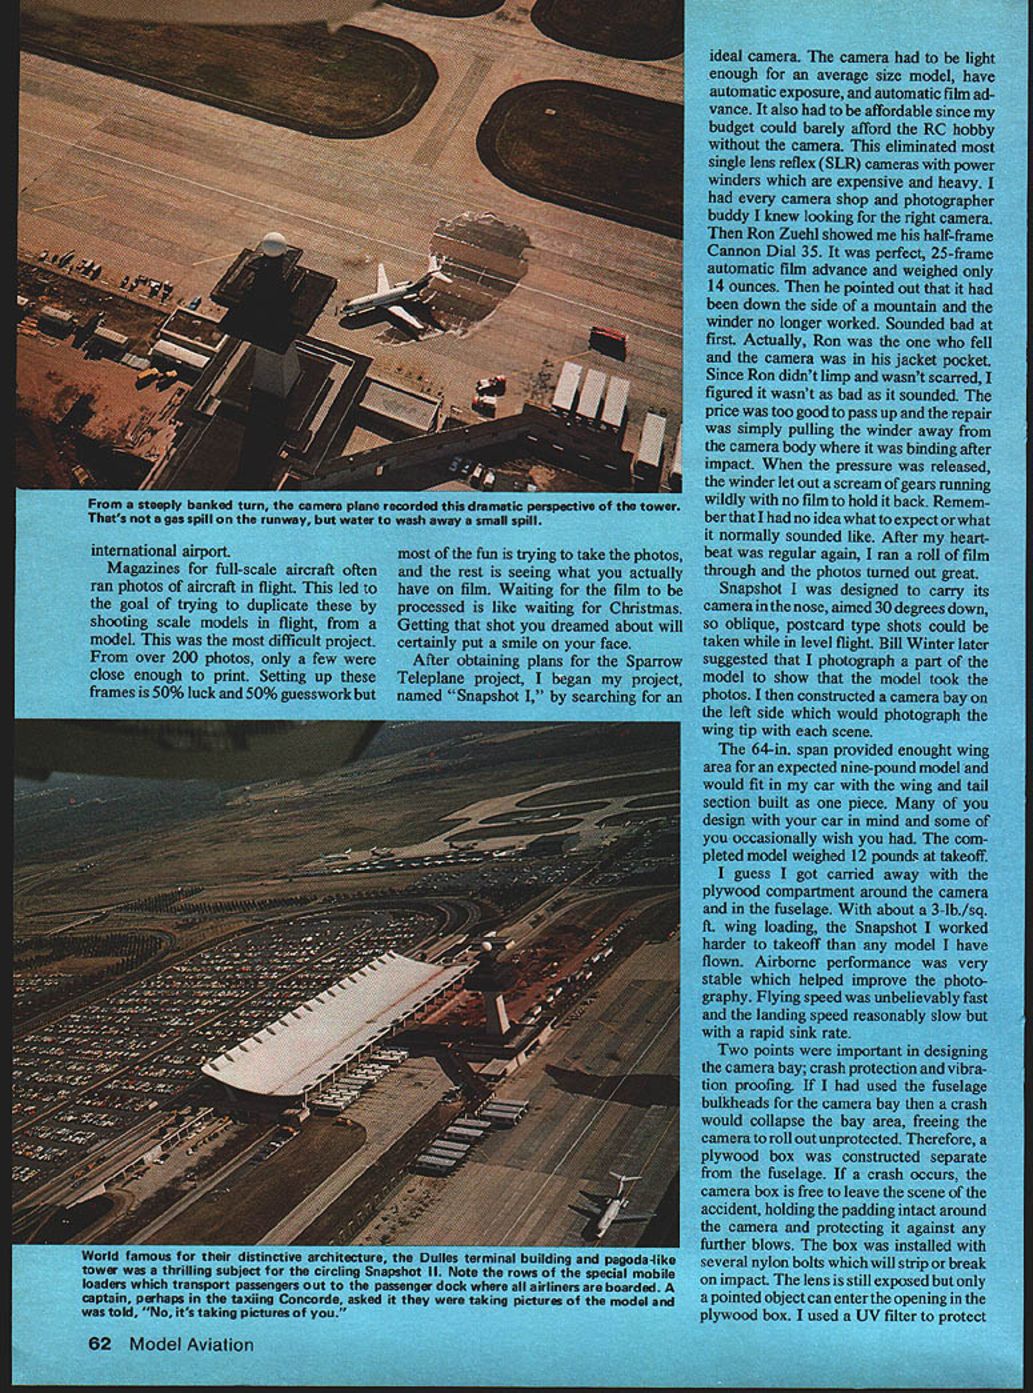
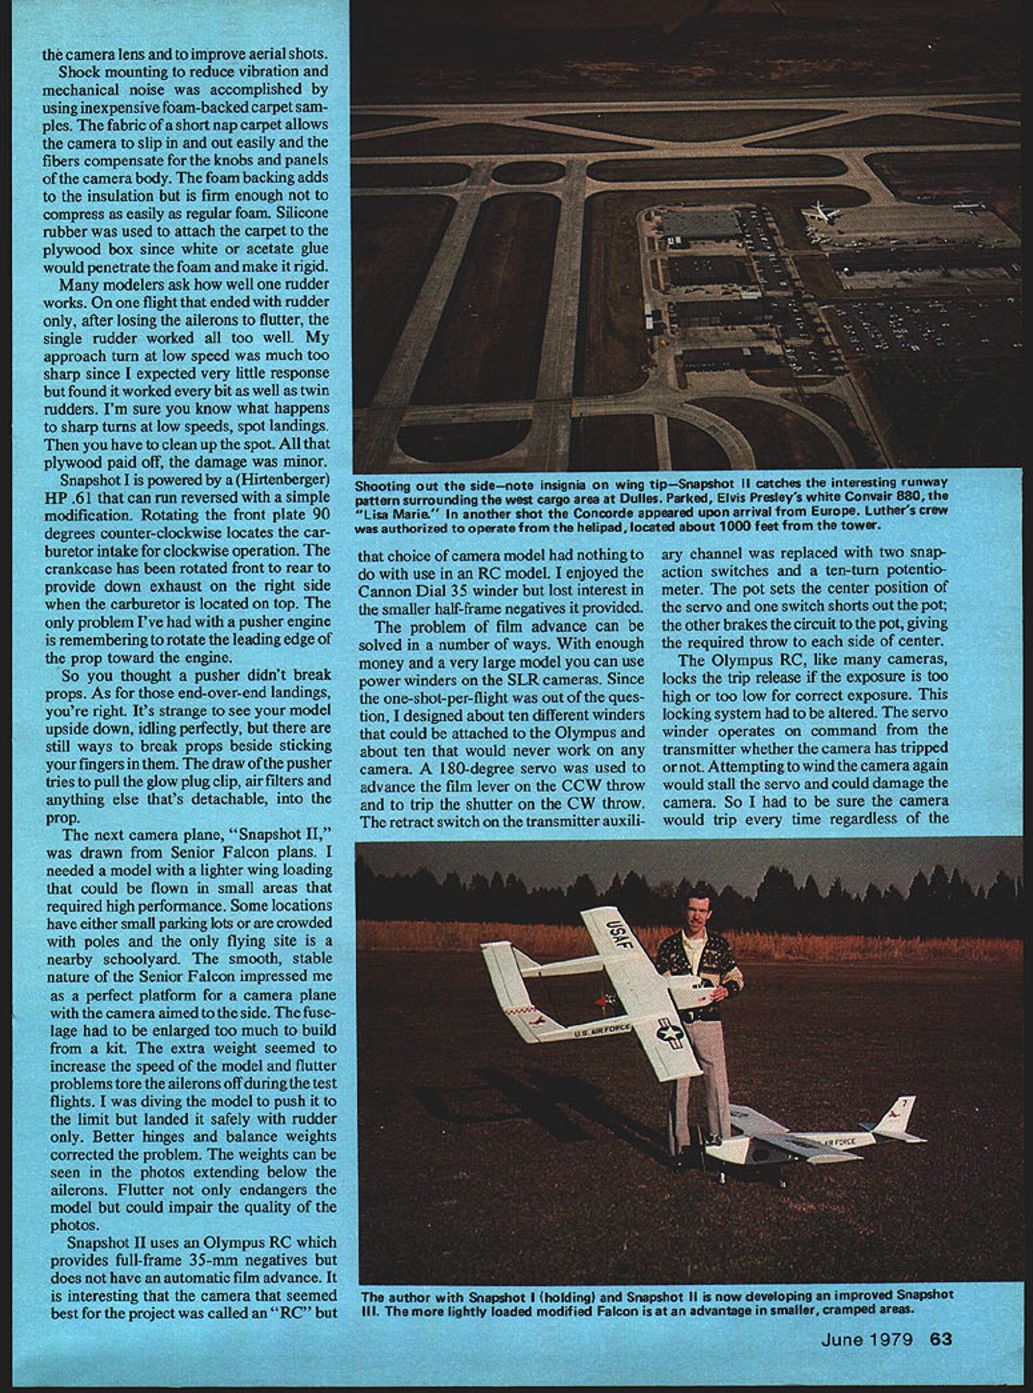
- Snapshot II climbed smoothly on takeoff, and we photographed the tower, terminal building and other targets. On one flight we even caught a white Convair 880 and photos of the Concorde taxiing back.
- The tower personnel appreciated the accuracy and safety of our operations. Their positive recollection of the AMA Show Team's professionalism (Transpo '72) helped secure cooperation.
Cooperation was also arranged with other venues:
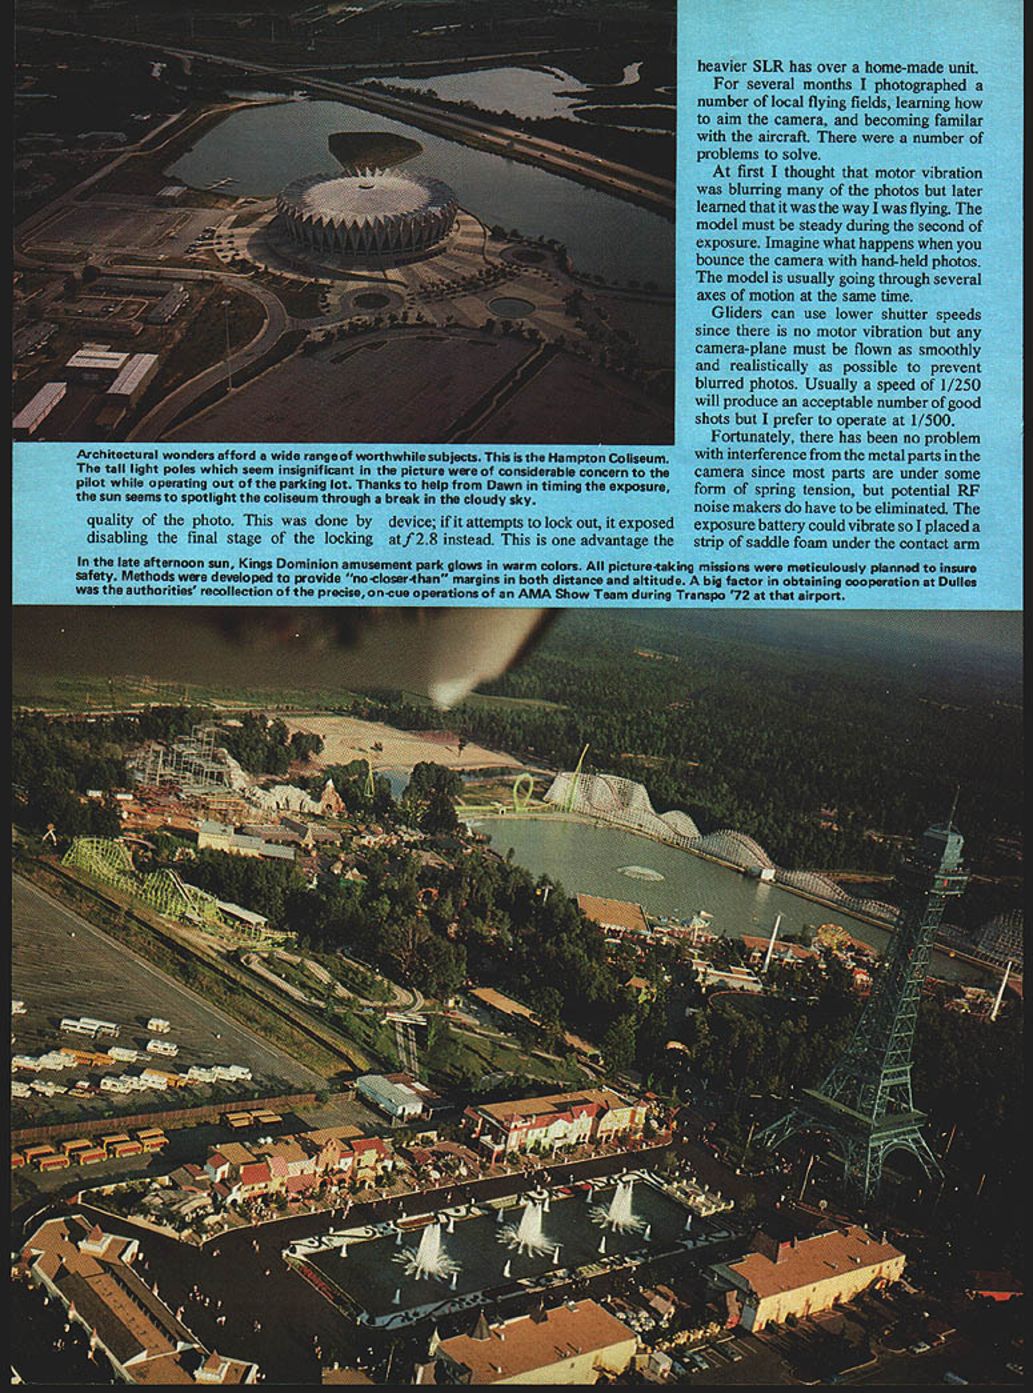
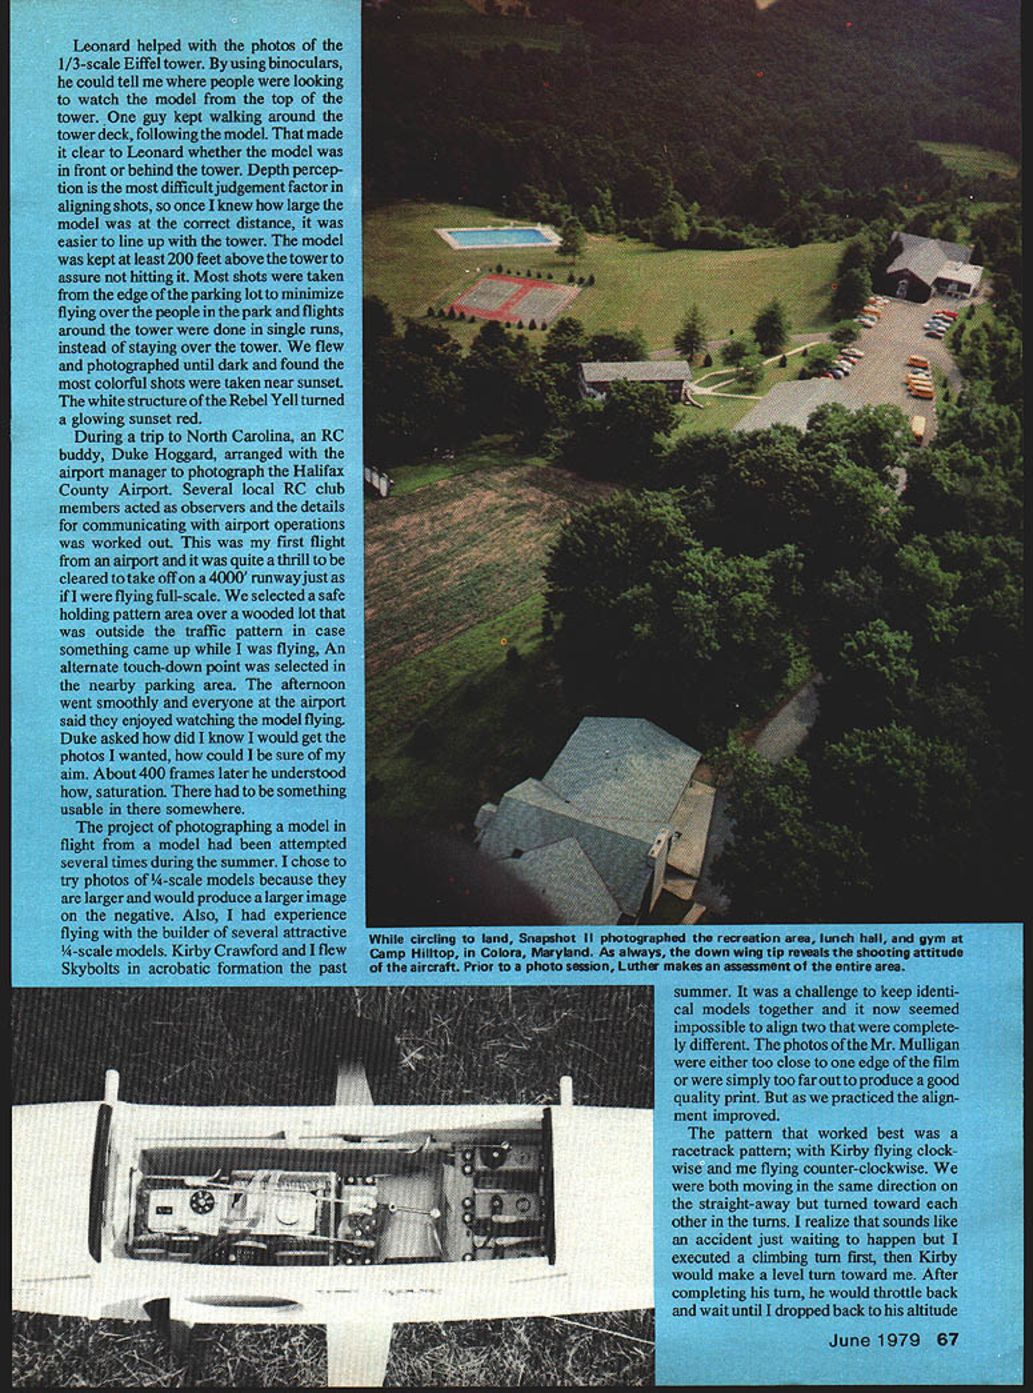
- Kings Dominion amusement park — I coordinated with the PR office and the park's security and parking personnel. We kept a safe distance between the public and landing area, kept flights around the park edge, and photographed the 1/3-scale Eiffel Tower at a minimum of 200 feet above the structure.
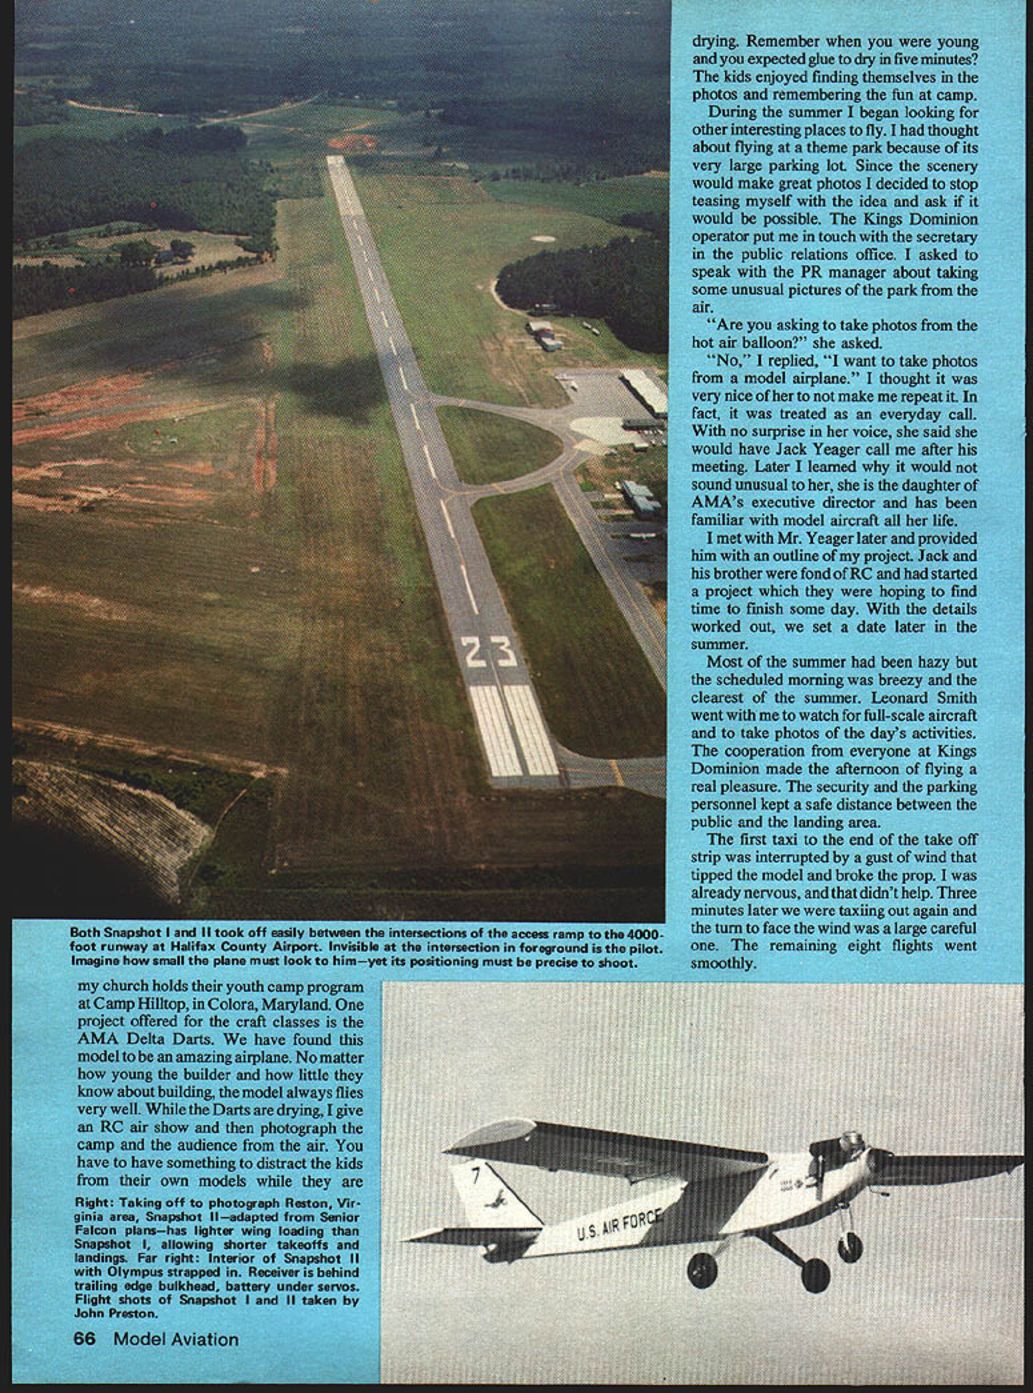
- Halifax County Airport (North Carolina) — local RC club members acted as observers and we worked details for communicating with airport operations. We flew from a 4,000-foot runway and selected safe holding patterns outside the airport traffic pattern.
- Camp Hilltop (Elora, Maryland) — I photographed the youth camp during craft classes; children enjoyed finding themselves in the photos.
- Williamsburg and Hampton, Virginia — some locations were unsuitable due to safety or distance from subjects; in Hampton we flew from school parking areas while my wife, Dawn, supervised children and helped with timing and frame counts.
Observers and helpers were invaluable. Leonard Smith, Duke Hoggard and Ron Zuehl assisted with spotting, photographing from the ground, and coordinating airport arrangements. My wife, Dawn, kept an eye on the public, counted frames, timed flights, and helped time cloud breaks for the best lighting.
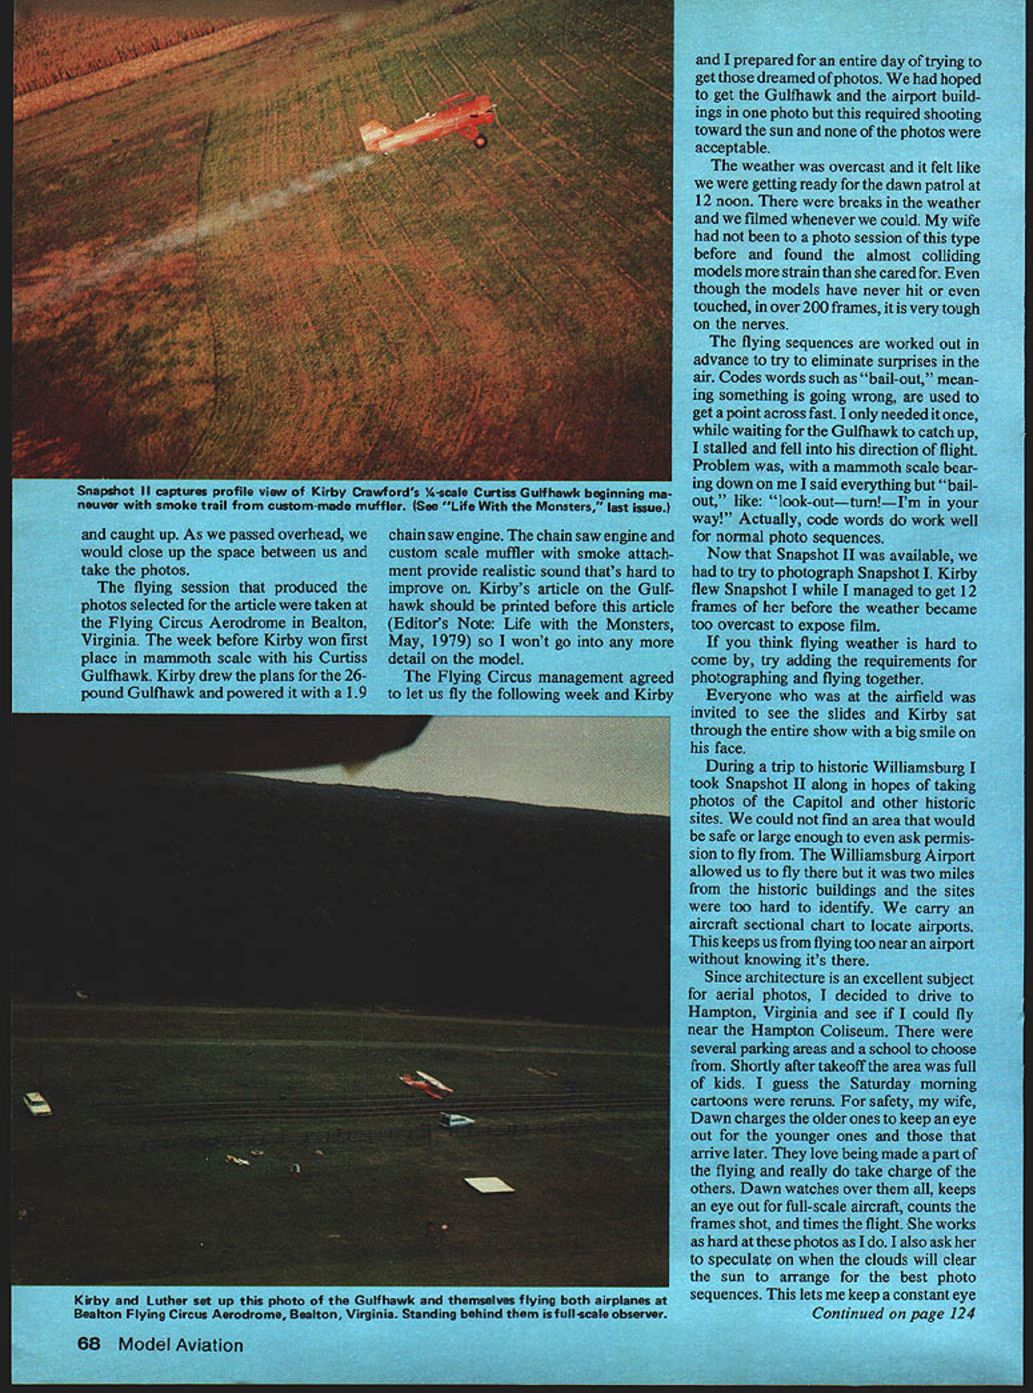
Formation and air-to-air work
Photographing a model in flight from another model is challenging. I focused on 1/4-scale models because their larger size made them more visible on the negative. Flying formation with Kirby Crawford's 1/4-scale Gulfhawk and other models required careful choreography. The racetrack pattern worked best: Kirby flew clockwise, I counter-clockwise; on the straightaway we were in the same direction, and in turns we turned toward each other. Our sequence involved a climbing turn from me, a level turn from Kirby toward me, then throttling back to rejoin for the pass-over shot. Code words (for example "bail-out") helped communicate quickly when something went wrong. Over 200 frames shot in a session can produce a few excellent images after sorting.
Results, lessons and future plans
The project produced many memorable images and taught important lessons about aircraft design, camera mounting, electrical reliability, vibration isolation, flight technique and public relations. A heavy, well-mounted SLR offers advantages over homemade light units, particularly for image size and handling, but it demands careful installation and power/winder solutions.
Dulles was the last photo flight of the year; aerials taken before the end of fall tend to be most attractive. Plans for Snapshot III were already underway, with ambitions including the Wright Brothers Memorial, flights from the deck of the USS Yorktown in Charleston, SC, and perhaps something even larger like the Grand Canyon.
I hope my search for new places to view from "up there" gives you ideas and encouragement to try aerial photography with your own models.
Transcribed from original scans by AI. Minor OCR errors may remain.

