
PT
By Dick Sarpolus
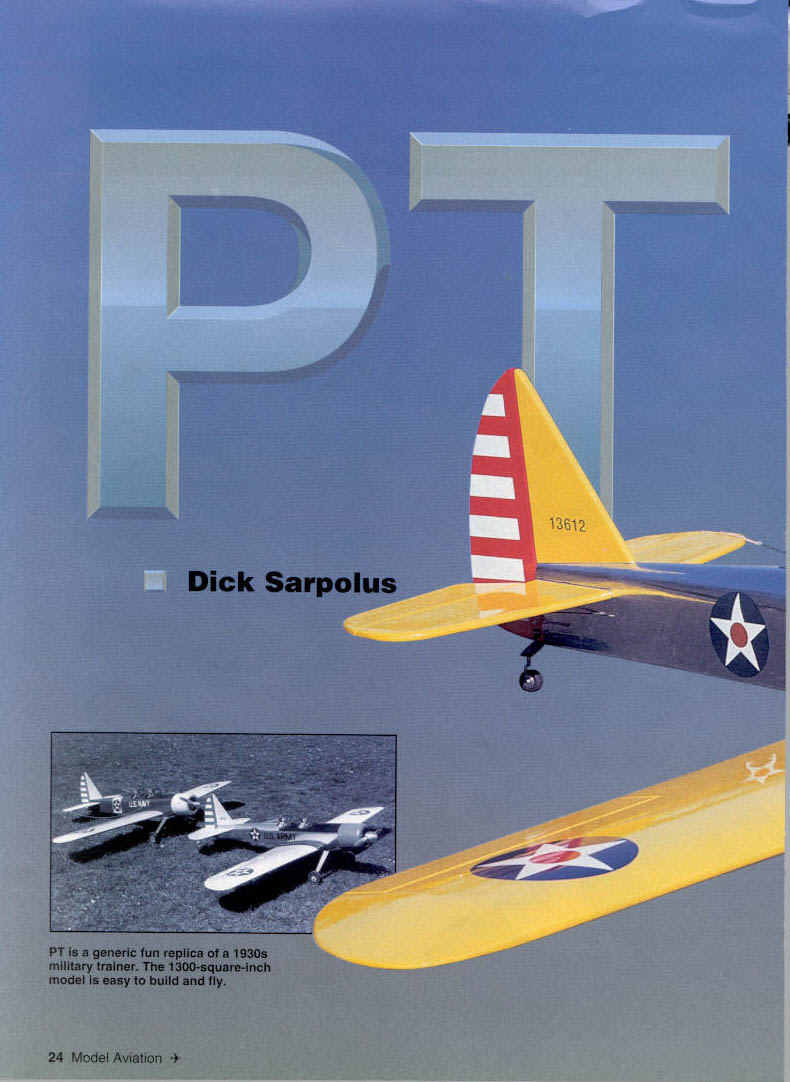
Full-scale training aircraft have always been popular modeling subjects. Kits are available for PT-19s, Chipmunks, T-6s, T-28s, etc. The models aren't just suitable for training or mild flying; like the full-scale versions, they can be very aerobatic if desired.
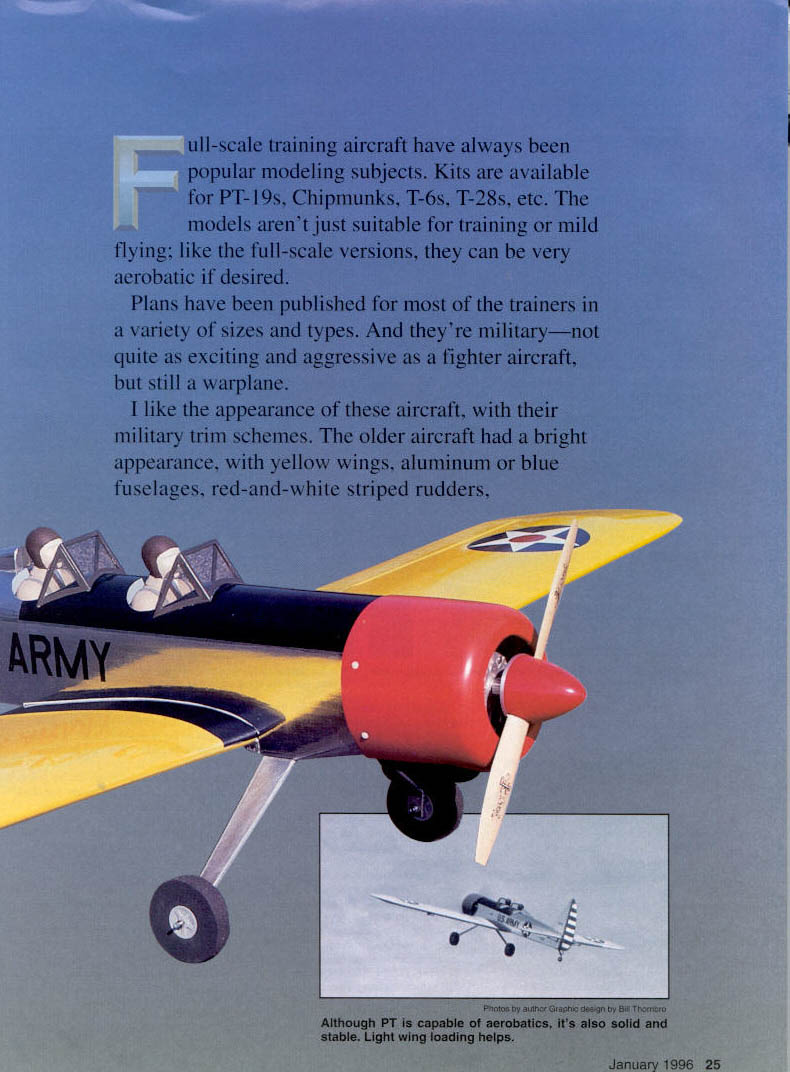
Plans have been published for most of the trainers in a variety of sizes and types. They're military—not as aggressive as a fighter aircraft, but still warplanes. I like the appearance of these aircraft with their military trim schemes. The older trainers had a bright appearance: yellow wings, aluminum or blue fuselages, red-and-white striped rudders, and the older military insignia. Many of these trainers ended up in the hands of private owners and were sometimes modified for aerobatics, so even more finishing schemes are available for the scale modeler.
I looked at the Fairchild PT-19 and PT-26, with their inline engines, and figured a Quadra Q-42 just couldn't be made to fit in that narrow cowl. I didn't want to try to duplicate the exposed cylinders of a radial installation. For a fun scale-model project, I decided to go with a round cowl that would easily contain a Quadra or other large gas engine.
The result is a stand-off, sort-of-scale generic copy of the PT-19, -20, -21, -22, -23, and -25. Total them, and it's a PT-146. Works for me! At the field modelers ask whether it's a PT-22, -23, or whatever. Obviously, it's not strictly scale: the fuselage has slab sides; there are no rigging wires; the landing gear is mounted to the fuselage rather than the wings; etc. But it does have two pilots behind windshields, a nice round cowl, a familiar trim scheme with old-style insignia, it builds fast and easy, and it flies great.
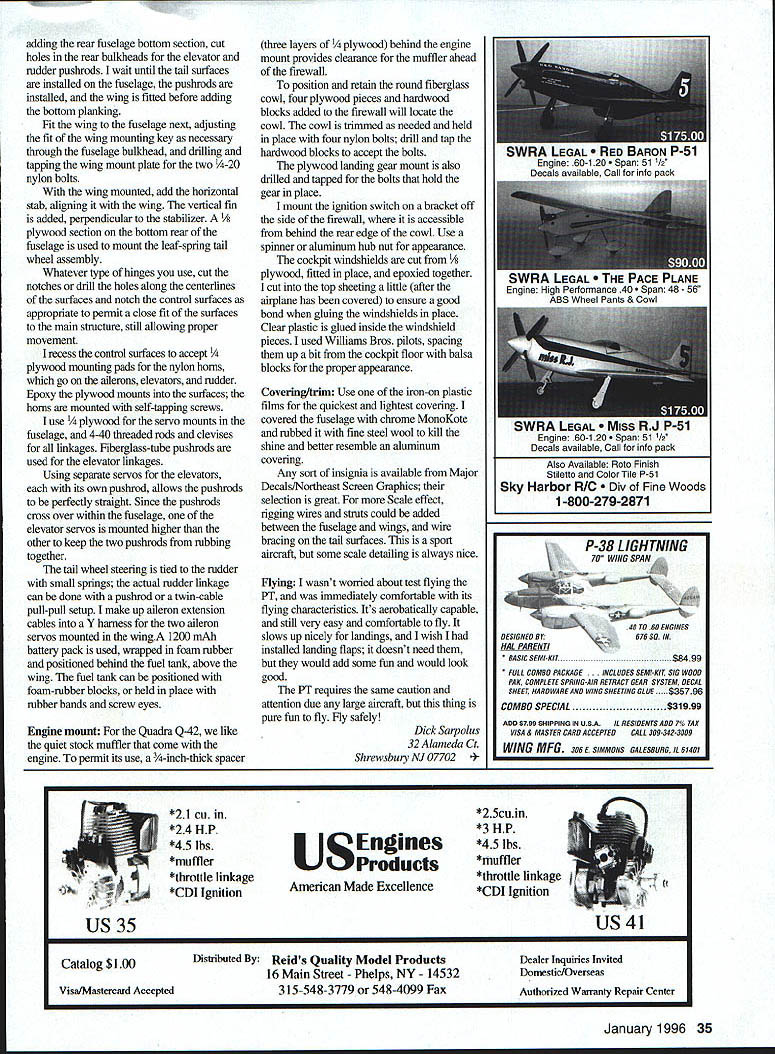
My friend Lou McGuire built one alongside me; the only differences were trim schemes. I used chrome MonoKote for an aluminum finish with yellow wings and tail surfaces and US Army markings; Lou used a blue fuselage with US Navy markings. For variety, the fiberglass cowl from another design can simulate the inline-engine look, a formed plastic canopy will replicate the PT-26, and if you want to tackle the PT-22 type landing gear and exposed cylinders, you can go that route.
Specifications
- Type: RC Sport / Aerobatic
- Wingspan: 96 inches
- Engine: Quadra Q-42 or similar
- Functions: Throttle, rudder, elevator, ailerons
- Flying weight: 15 lb. 12 oz. (with Q-42, stock muffler, 1200 mAh battery, six servos, plastic-film covering)
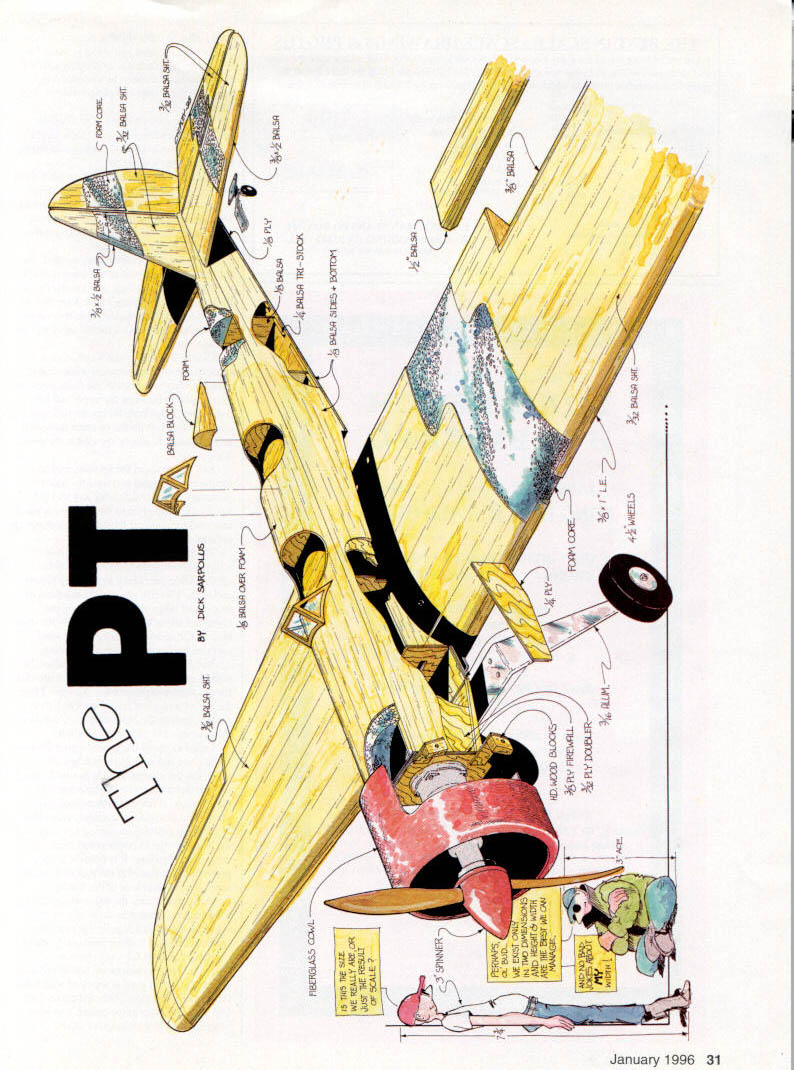
- Construction: Sheeted foam cores (foam-core wings, tail surfaces, and fuselage top blocks)
- Covering: Heat-shrink film (chrome MonoKote used on fuselage)
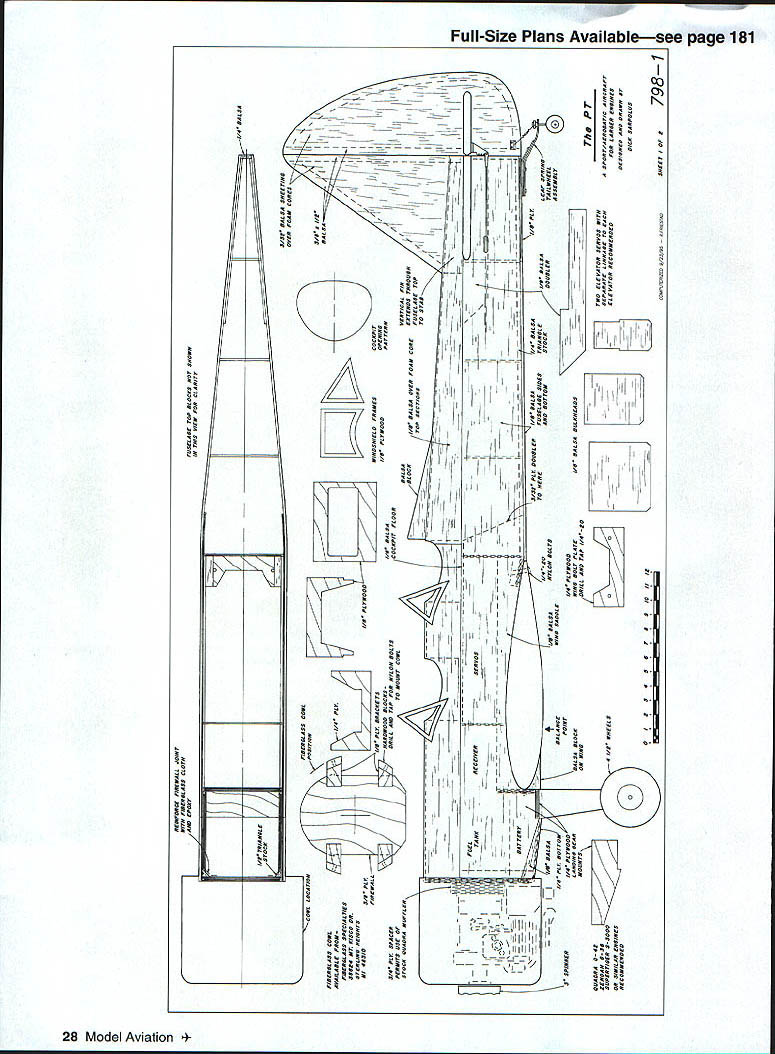
No continuing article text appears on the original page; the full-size plan drawing and diagram labels are on the plan sheet.
Plan labels / notes (from plan sheet)
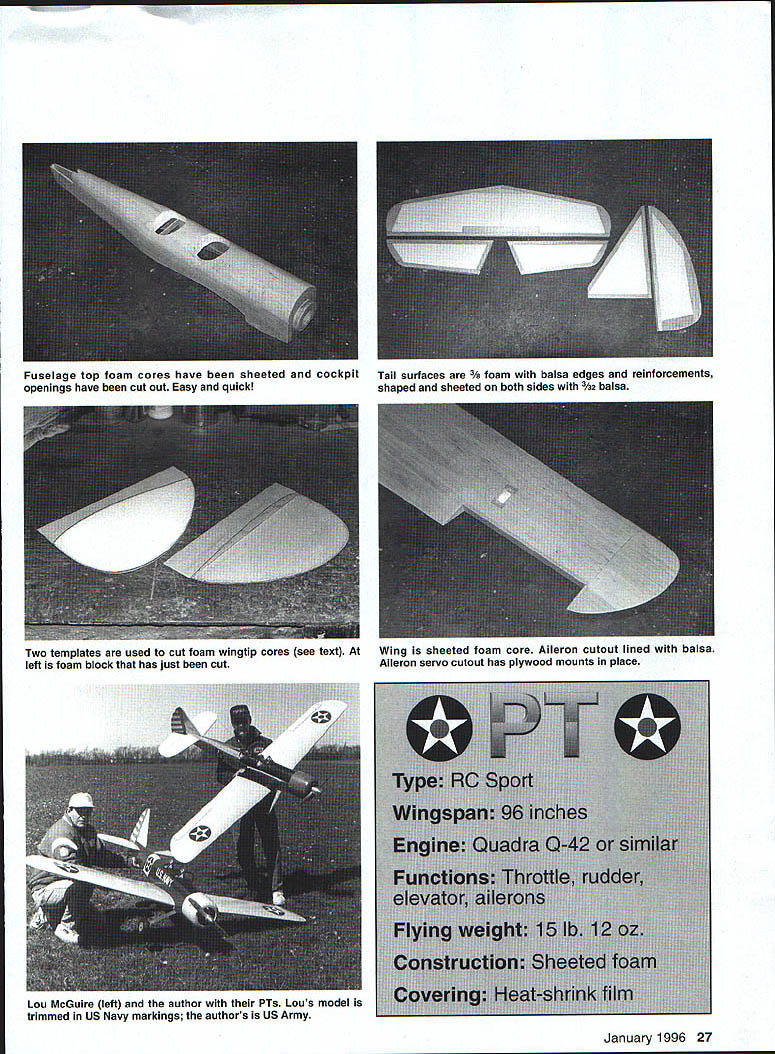
- Fuselage top foam cores
- Cockpit openings (cut out)
- Sheeted foam core
- Wing sheeted foam core
- Aileron cutout (lined balsa)
- Aileron servo cutout (has plywood mounts in place)
- Firewall joint with fiberglass cloth
- Fiberglass cowl (available from Fiberglass Specialties, 38624 Mt. Kisco Dr., Sterling Heights, MI 48310)
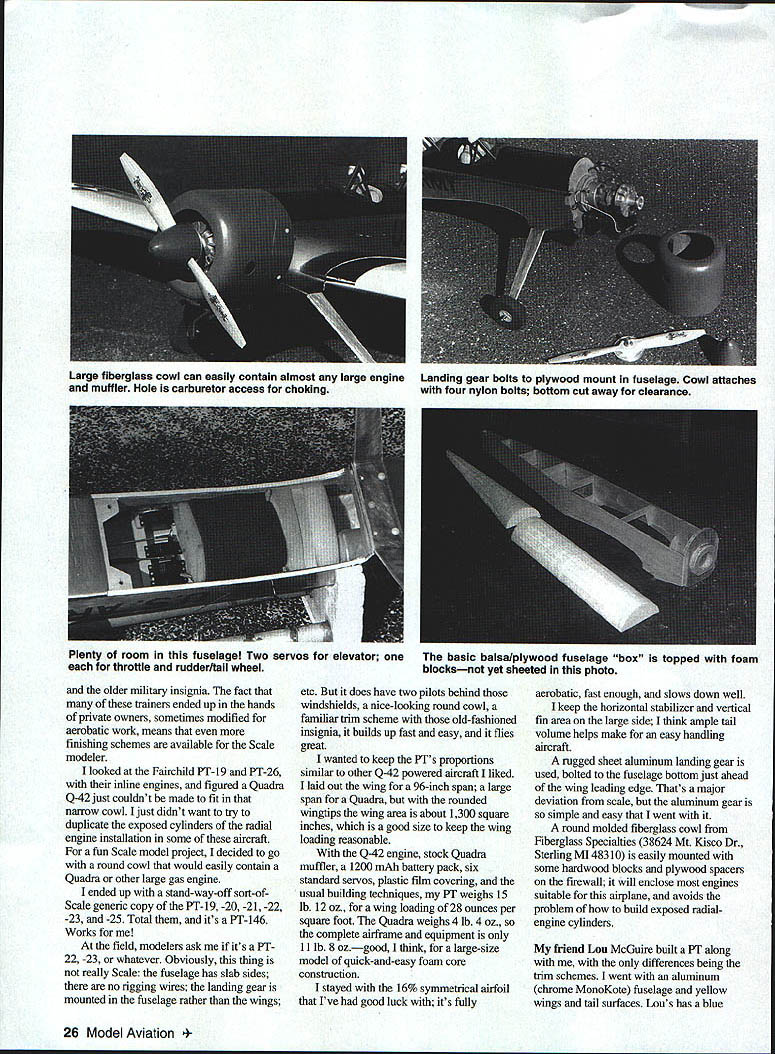
- Fiberglass cowl can easily contain almost any large engine; muffler hole and carburetor access/choke
- Cowl attaches with four nylon bolts; bottom cut away for clearance
- Plywood spacer (permits use of 3/4" balsa)
- 1/8" balsa doubler
- 1/8" balsa bulkheads
- 1/4" plywood — drill and tap 1/4-20 for spinner
- Two elevator servos with tie linkage to each
- Servos mount on wing
Construction
If you've scratch-built large projects before, you'll have your own techniques and may be comfortable building directly from the plans. If not, don't hesitate to try this project: have someone cut the cores, order balsa and plywood from a reliable supplier, get the cowl and aluminum gear, cut out the wood parts, and assemble your "kit."
PT uses foam-core construction for wing cores, tail surfaces, and fuselage top blocks. Foam-core construction is quicker and easier than building a rib-and-spar structure.
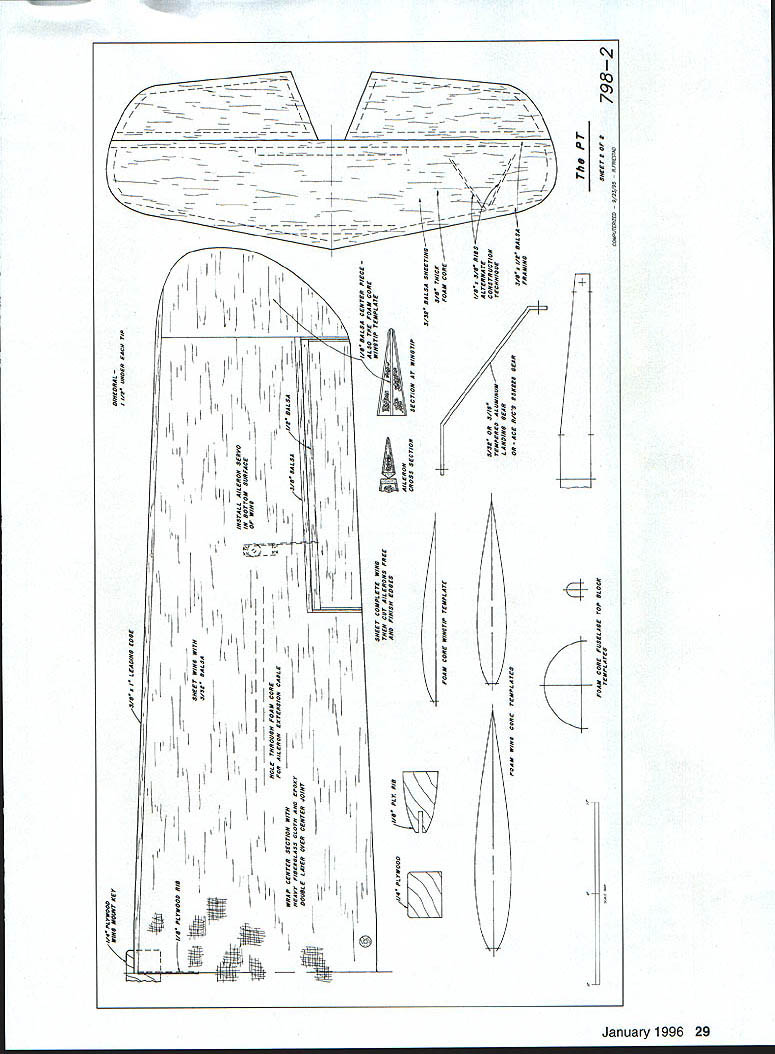
Wing
- Cores are sheeted with 3/32" medium balsa. Sheets are edge-glued to achieve the required width by taping joints with masking tape.
- The challenge in edge-gluing is getting tight fits between individual sheets; most balsa sheets don't have straight edges. Use a long sanding straightedge (aluminum right-angle stock works well) to dress edges until they fit.
- Flip the wood over, open the taped joint over the workbench edge, and apply glue. I prefer aliphatic-resin glues for ease of sanding. Scrape excess glue off with a putty knife, weight the wood until dry, peel off the tape, and use the taped side as the outer surface of the sheeting.
- Sand the inside surface with rougher paper and finish the outer surface with finer paper.
- Contact cement (Dave Brown's Southern Sorghum was used for years) or epoxy can be alternatives—be sure the adhesive is safe for foam (some contact cements can dissolve foam).
- Trim the leading edge, block-sand it square, add an oversized leading-edge strip, then plane and sand to final shape.
Wingtip construction:
- Cut tip section in upper and lower halves and join to get tapered foam-core tips.
- Make two plywood templates: one for planform layout from the end of the main panel to the tip, and one at the root of that template representing the upper half of the airfoil. Make mirror images for both wingtips.
- Reduce the hot-wire temperature when cutting to avoid melting foam excessively. Use a balsa stiffener between upper and lower foam cores for alignment until sheeted.
- Trial-fit the sheeted tip to the main panel, sand for a good fit, epoxy the sheeted tip to the main panel, and sand/shape the outer edge.
Ailerons:
- Cut ailerons from the sheeted wing, allow balsa edging, glue edging to wing and ailerons, plane and sand to shape.
- Hinge ailerons along the centerline with large, sturdy hinges.
- Cut recesses into the lower wing surface for aileron-servo mounting.
- Make holes through the foam cores for aileron-servo extension cables before joining wing halves. I heat the end of a heavy steel rod and push it through the foam core from root to servo location.
- Servos can be mounted visibly on the wing surface for accessibility; alternatively, install servos within the wing with removable hatches.
Wing join and reinforcement:
- A plywood wing-mounting key at the leading edge positions and retains the wing in the fuselage. Reinforce with a plywood rib at the root of the wing cores.
- Butt-glue the wing halves with epoxy, then wrap the center joint with heavy (six-ounce) fiberglass cloth and epoxy. Use a double layer at the center and wrap strips at 45 degrees (e.g., nine-inch-wide strips overlapped in the center to create a five-inch-wide double layer).
- Squeegee off excess epoxy to leave a smooth, saturated cloth; Hobbypoxy's Smooth 'n' Easy epoxy is ideal. Add small fillets at the root and along joints for strength.
Tail surfaces
- Tail surfaces are flat-plate sections using hot-wire-cut 3/8" foam panels as cores inside balsa frames sheathed with 3/32" balsa.
- Build tail surfaces flat on the bench: cut foam cores to shape, add 3/8 x 1/2 balsa framing and reinforcements, sheath with 3/32" balsa, shape edges.
- Leave trailing edges of stabilizer and vertical fin square. Bevel leading edges of elevators and rudder for centerline hinging.
Fuselage
- Use firm-to-hard balsa for the two sides, edge-gluing and splicing as needed. Glue 3/32" plywood doublers, 1/4" plywood landing-gear block doublers, balsa wing-saddle pieces, stab-saddle doublers, and balsa lower edge strips to the two fuselage sides before adding bulkheads.
- Laminate 1/4" and 1/8" plywood to make a 3/8" firewall.
- With one fuselage side flat, add the firewall and next three bulkheads, then glue the second side to those bulkheads. Sides should be parallel from the firewall to the wing trailing-edge position.
- Add triangle stock and heavy fiberglass cloth behind the firewall to reinforce the junction. Add the 1/4" plywood wing-bolt plate and balsa cockpit floor.
- Pull the tail end together, installing rear bulkheads. Check alignment over a centerline to ensure straightness and correct taper so the straight-cut foam top block fits.
- Sheet the foam top blocks as with the wing cores. Trim sheeting, check fit, and cut cockpit openings before gluing the top block in place.
- Optionally carve a recess in the foam top block behind the firewall for additional room (fuel tank, smoke tank). I line cockpit openings with thin plywood epoxied in place. Cut a slot in the rear fuselage top block for the vertical fin and glue the top block in place.
- Add plywood landing gear mount and forward bottom section to the fuselage. Cut holes in rear bulkheads for elevator and rudder pushrods.
- Fit the wing, adjust the wing-mounting key, and drill/tap the wing-mount plate for two 4-20 nylon bolts. Once the wing is mounted, add the horizontal stab aligned with the wing and the vertical fin perpendicular to the stab.
- Use a 1/8" plywood section on the bottom rear fuselage to mount the leaf-spring tail-wheel assembly.
Controls and linkages:
- Recess control surfaces to accept 1/4" plywood mounting pads for nylon horns. Epoxy plywood mounts into surfaces; mount horns with self-tapping screws.
- Use 1/4" plywood for servo mounts in the fuselage. Use 4-40 threaded rods and clevises for linkages; fiberglass-tube pushrods for elevator linkages work well.
- Use separate servos for the two elevators with independent pushrods to keep each pushrod straight. Because pushrods cross inside the fuselage, mount one elevator servo higher to prevent rubbing.
- Tail-wheel steering can be tied to the rudder with small springs; use a pushrod or twin-cable pull-pull for rudder linkage.
- Make up aileron extension cables into a Y harness for two aileron servos in the wing.
- Use a 1200 mAh battery pack wrapped in foam rubber positioned behind the fuel tank and above the wing. Secure the fuel tank with foam blocks or rubber bands and screw eyes.
Engine mount and cowl
- For the Quadra Q-42, the stock muffler is quiet and preferred. Provide clearance for the muffler by adding a 3/4" thick spacer behind the engine mount (three layers of 1/4" plywood).
- To position and retain the round fiberglass cowl, add four plywood pieces and hardwood blocks to the firewall. Trim the cowl as needed and hold it with four nylon bolts; drill and tap the hardwood blocks to accept the bolts.
- Drill and tap the plywood landing-gear mount for the gear bolts.
- Mount the ignition switch on a bracket off the side of the firewall where it is accessible from behind the cowl. Use a spinner or aluminum hub nut for appearance.
- Cockpit windshields: cut from 1/8" plywood, fit and epoxy together. After covering the airplane, cut into the top sheeting a bit to ensure a good bond when gluing the windshields in place. Glue clear plastic inside the windshield pieces. Use pilot figures mounted on balsa blocks for proper appearance.
Fiberglass cowl source:
- Fiberglass Specialties, 38624 Mt. Kisco Dr., Sterling Heights, MI 48310.
- The cowl can contain most large gas engines and mufflers. Provide a hole for carburetor access and choke. The cowl attaches with four nylon bolts; the bottom is cut away for clearance.
Covering and trim
- Use iron-on plastic film for a quick, light covering. I covered the fuselage with chrome MonoKote and rubbed it with fine steel wool to dull the shine and better resemble aluminum.
- Insignia: Major Decals / Northeast Screen Graphics have a wide selection.
- For more scale effect, add rigging wires and struts between fuselage and wings and wire bracing on the tail surfaces, though the PT is intended as a sport aircraft.
Flying
- The PT is aerobatically capable yet easy and comfortable to fly. It slows nicely for landings. Landing flaps would be a fun addition and would look good, though they aren't necessary.
- The PT requires the same caution as any large model, but it is pure fun to fly. Fly safely!
Fiberglass cowl. Fiberglass Specialties, 38624 Mt. Kisco Dr., Sterling Heights, MI 48310.
Two servos: elevator and throttle; rudder/tailwheel. Basic balsa/plywood fuselage box topped with foam blocks (not yet sheeted in some photos). Two templates are used to cut foam wingtip cores. Left foam block has just been cut.
Lou McGuire (left) and the author's PT. Lou's model trimmed in U.S. Navy markings; the author's is U.S. Army.
THE PT — Sport/Aerobatic aircraft for larger engines. Designed and drawn by Dick Sarpolus.
Dick Sarpolus 32 Alameda Ct. Shrewsbury, NY 07702
Transcribed from original scans by AI. Minor OCR errors may remain.

