
PUSHRODS & keepers
IVAN MUNNINGHOFF
It's obvious: if you can't keep the pushrods connected at the servo end or at the control-surface end, there's going to be a nasty mishap. There are nearly as many ways to secure a pushrod as there are ways to finish a model. Some of those methods work very well, while others are less than satisfactory.
Let me start off with a disclaimer: an article such as this one may conceivably offend manufacturers of pushrod keepers and accessories. Please keep in mind that the following comments are my personal opinion and therefore do not necessarily represent the last word in the use or suitability of any particular product—they simply reflect my experience.
With that said, let's cover some of the ways to secure the end of a pushrod. It's important to note that it's possible for a pushrod with a threaded device on both ends to rotate under just the right vibration conditions and slowly unwind from one of the fittings. Admittedly, it's a remote possibility, but I've seen it happen. The conclusion, then, is to not use threaded fittings on both ends of the same pushrod unless there is some positive means to prevent pushrod rotation. A small jam nut, while better than nothing at all, isn't necessarily foolproof.
Best method: Z-bend
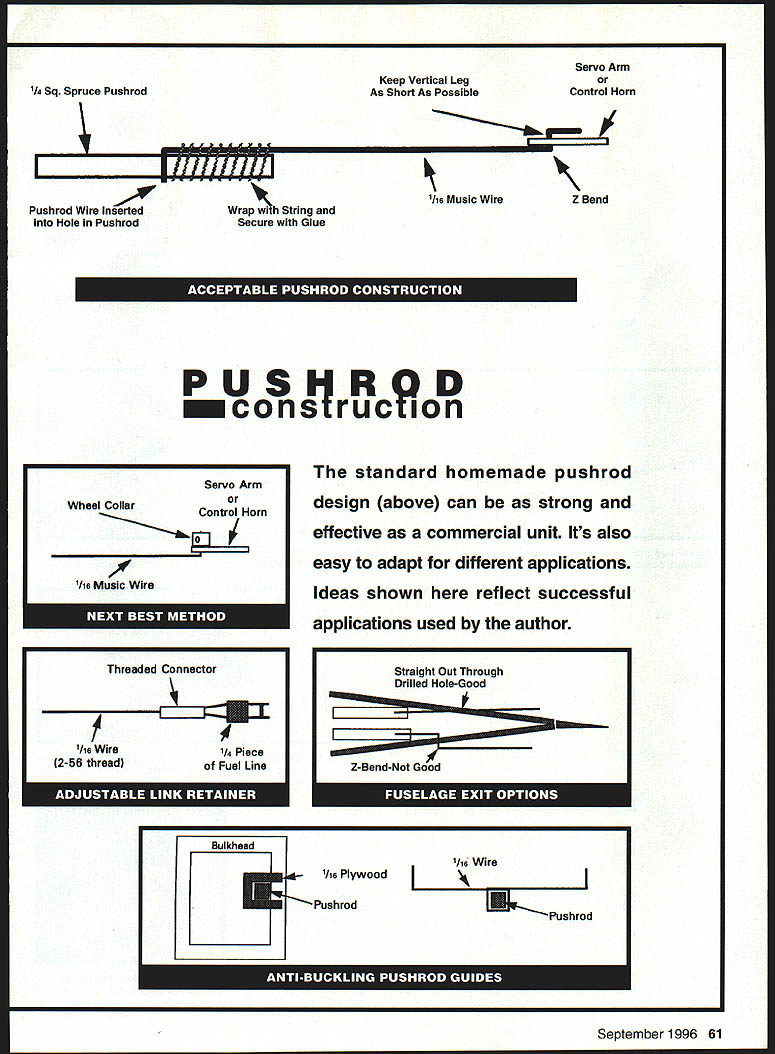
Overall, the best pushrod end is the old-favorite Z-bend. It can't unwind, and unless the wire breaks, there is no conceivable failure mode. It just works great. The bends can be created with a small pair of sturdy pliers, or with one of the commercially available devices designed to make such bends. Just keep the vertical (right-angle) section as short as possible.
Alternative: 90° bend with a collar
Perhaps the next-best method is a 90° bend in the wire with a small wheel collar to secure it. Most of the wire used for pushrods is 1/16-inch music wire; it is sturdy enough for most installations. The most important thing is to make absolutely certain that the collar is tight. If the servo arm is short enough, bring the wire through from the servo side of the arm. This will capture the wire between the arm and the servo; should the collar fall off, the wire stays in place.
ACCEPTABLE PUSHROD CONSTRUCTION
The standard homemade pushrod design can be as strong and effective as a commercial unit. It's also easy to adapt for different applications. Ideas shown here reflect successful applications used by the author.
Threaded couplers
The next method involves threaded couplers. Most of these work very well. There are a few precautions to take, however.
- Always use some sort of retaining device to keep the legs of the fitting from springing open under load or vibration. Some of these come with little clips and these seem to work well.
- For fittings that don't come with clips, a 1/4-inch piece of fuel line slipped over the end of the coupler can help. Make sure that the fuel line doesn't interfere with the control horn.
- Don't spring the legs open too far; that can lead to problems.
- Plastic can become brittle in very cold temperatures, increasing the chance of failure.
- With all threaded links (and all movable connections, for that matter) watch for wear, either in hole enlargement or pin wear.
Concentric-tubing pushrods
For those who use the concentric-tubing-type pushrods: once a 2-56 rod is threaded approximately 1/2-inch into the end of the inside tubing, a nuclear blast won't pull it out. They are really secure!
Avoid snap-on retainers
Another item I'll never use is any sort of retainer that merely snaps in place over the end of a piece of wire. Most of them (either metal or plastic) will fall off at the slightest provocation.
Material caution: bicycle spokes
There's also the possibility for a big-time problem when using threaded links. In an effort to save money, some modelers buy bicycle spokes to use as the pushrod wire. Although the spokes aren't as hard or springy, they look like the standard 2-56 threaded rods that usually come with the links. The two different kinds of rods can be easily mixed up if they're thrown together in the same pile. The links even seem to thread onto the spokes fairly easily. Unfortunately, the thread is some obscure metric version that does not properly engage the threads on the links. The link will come off when it's subjected to heavy loads. Do not use spokes or metric threaded wire with standard 2-56 links.
Plastic threaded links
The plastic versions of the threaded links also work well, but they have limitations.
- When the legs are spread, the connecting pin is vulnerable to damage—use them gently.
- In very high temperatures the plastic can soften, leading to possible problems.
- In very cold temperatures the plastic becomes brittle, increasing the likelihood of failure.
Avoid solder-only joints
I recommend that you never use any type of pushrod connection that involves soldering as the primary mechanical bond. Many modelers just aren't skilled enough at soldering to make a reliable joint. Besides, most of us use small soldering irons intended for minor electrical projects. They're good for making electrical connections, but not for mechanical bonding.
Any shop instructor will tell you that even with electrical work, solder is only supposed to make a good electrical connection; the wire should have a good mechanical connection on its own. The same applies to pushrods. I've witnessed numerous crashes that were directly attributable to soldered pushrods. If you insist on using these links, use some form of mechanical crimping so that the link is secure before you start soldering.
Pushrods & keepers
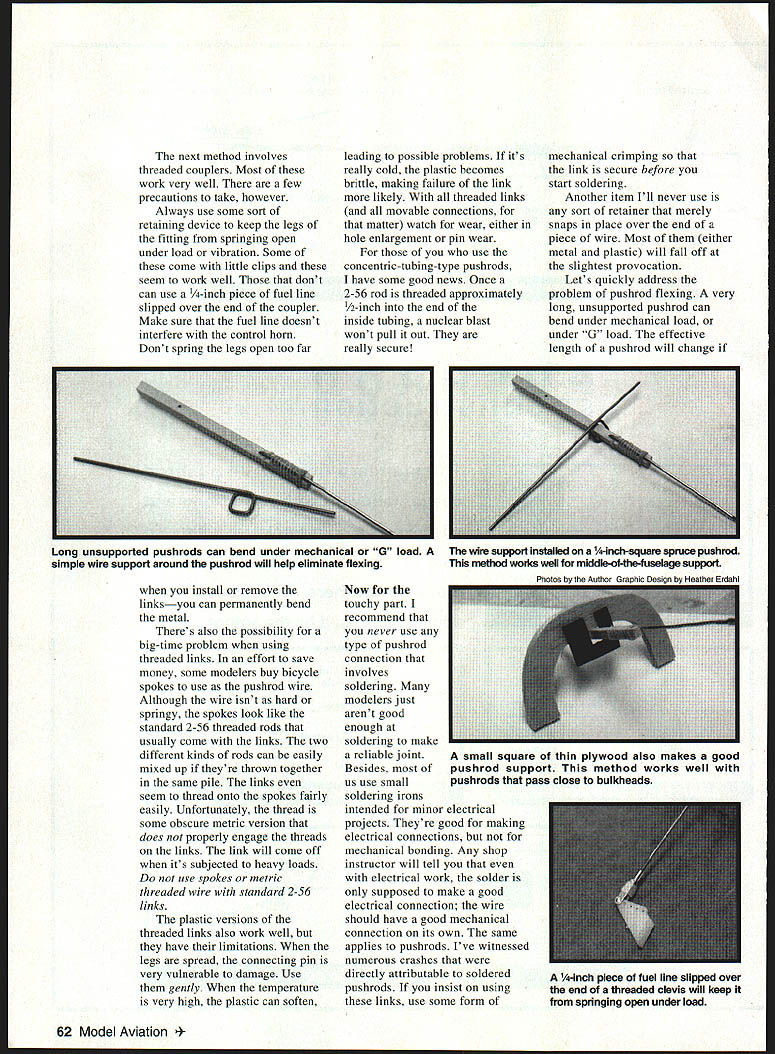
A very long, unsupported pushrod can bend under mechanical or "G" load. The effective length of a pushrod will change if you install or remove the links—you can permanently bend the metal.
For a pushrod made of 1/4-inch-square spruce (as suggested above) there are two reasonable ways to support it in the middle to prevent flexing. The method you choose will be determined by the pushrod's location with respect to a bulkhead or another suitable mounting point.
- Use a small square of thin plywood to support the pushrod if it's near a bulkhead.
- Use a bent piece of wire if it's in the middle of the fuselage.
Many modelers use (and many plans call for) a wide Z-bend where the pushrod exits the aft end of the fuselage. This is an extremely bad idea; that pair of bends causes the pushrod to be misaligned with the centerline of the fuselage. That can lead to unwanted flexing. Either of the two guides mentioned above can help reduce this bending tendency. However, the better solution is not to use the Z-bend at all. Drill a long hole through the side of the fuselage and install a straight pushrod.
Radio and servo compatibility
One last watch-out: if you use more than one brand of radio, keep all of your equipment separated by brand. If you don't, problems can arise. For example, the outputs on units from Futaba and Airtronics are not interchangeable; the splines are slightly different. On top of that, the small black screws that secure the arms to the servos aren't the same, either. If the wrong arm is mounted on the wrong servo, the arm can slip, resulting in loss of control. Find a brand you like and stick with it exclusively.
These opinions are based on 30 years of experience; evaluate them on your own. I hope I haven't offended too many manufacturers.
Transcribed from original scans by AI. Minor OCR errors may remain.

