

Quick and Easy Radial Cowls
Dee B. Mathews
Got a scale project that needs a good-looking front end? Here's a simple, step-by-step method for molding epoxy-glass cowls from foam forms. It looks great and is durable. There's also information on making the engine cylinders look the way they're supposed to.
Scratch-builders often reject a potential scale subject solely because the engine cowling seems beyond their building skills. This is particularly true of prototypes with exposed radial engines. We, like you, have a long list of scale subjects we would love to scratch-build, since no kits are available for them. In the past, the complexity of carving a cowl from a balsa block—coupled with the frequently substandard appearance of dummy cylinders—discouraged us from attempting those dream ships.
Therefore, we describe a technique for constructing scale cowlings that is quick, easy, and nearly foolproof.
The use of cloth-and-epoxy over a Styrofoam plug (form) is not new, having been introduced to modeling as part of the Hobbypoxy EZ Duz It technique several years ago. Our variation improves on the older technique by substituting heavy-gauge boat-repair fiberglass and utilizing a jig for accurately installing Williams Brothers cylinders.
It is important not to use Dynel or the fiberglass cloth commonly sold for model aircraft purposes with this technique. The cloth required is the type sold for boat hull repair and auto body work; it is available in most Sears and similar stores. We have had dismal luck using Dynel and similar materials.
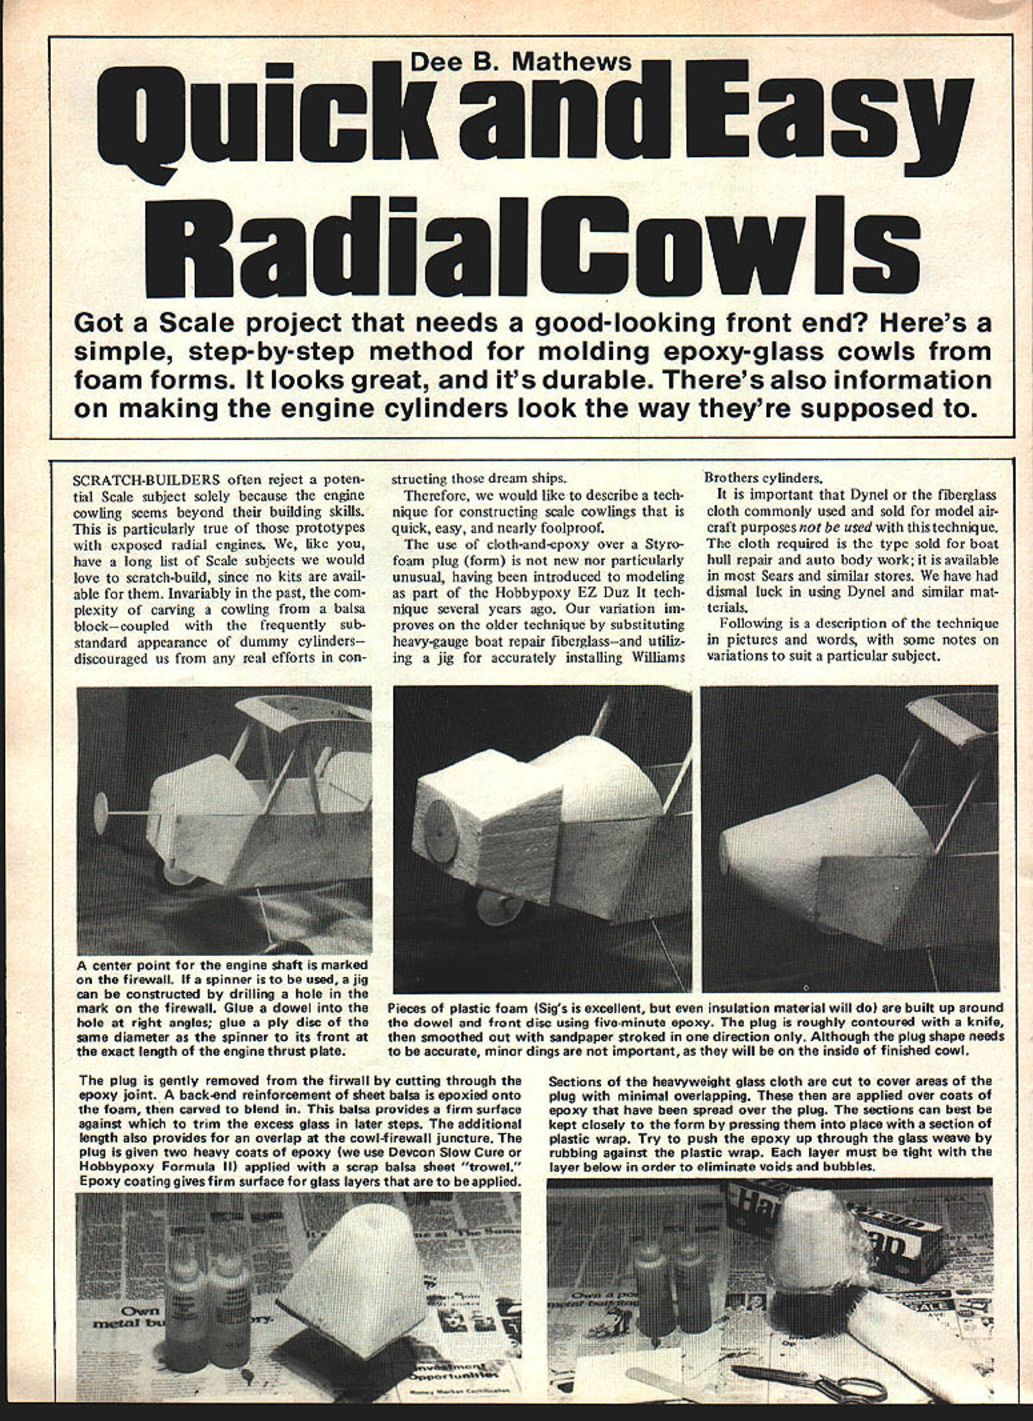
Pieces of plastic foam (Sig's is excellent, but even insulation material will do) are built up around the dowel and front disc using five-minute epoxy. The plug is roughly contoured with a knife, then smoothed with sandpaper stroked in one direction only. Although the plug shape needs to be accurate, minor dings are not important, as they will be on the inside of the finished cowl.
The plug is gently removed from the firewall by cutting through the epoxy joint. A back-end reinforcement of sheet balsa is epoxied onto the foam, then carved to blend in. This balsa provides a firm surface against which to trim the excess glass in later steps. The additional length also provides for an overlap at the cowl/firewall juncture. The plug is given two heavy coats of epoxy (we use Devcon Slow Cure or Hobbypoxy Formula II) applied with a scrap balsa sheet "trowel." Epoxy coating gives a firm surface for the glass layers that are to be applied.
Sections of the heavyweight glass cloth are cut to cover areas of the plug with minimal overlapping. These are applied over coats of epoxy spread over the plug. The sections can be kept close to the form by pressing them into place with a piece of plastic wrap. Try to push the epoxy up through the glass weave by rubbing against the plastic wrap. Each layer must be tight with the layer below to eliminate voids and bubbles.
A large (at least 12-in.) balloon is used in the next step. Apply a thick coat of epoxy over the surface, particularly the nose; the balloon will tend to roll some epoxy toward the back. Inflate the balloon, then push it down over the plug now wet with epoxy. The inner face of the balloon should extend below the bottom of the plug. Slowly deflate the balloon and push down, making certain it pulls under the bottom edge of the plug. When inflated, the balloon spreads the epoxy evenly and gives a smooth surface. After the epoxy completely cures, remove the balloon, stripping it off. If areas of glass are only partially covered with epoxy (unlikely unless too little was used), repeat the previous step.
Minor holes and voids can be filled with Hobbypoxy P.F.C. filler and sanded smooth. At this stage you will have a surprisingly satisfactory cowl. If your subject has exposed cylinders, the cowl is ready for painting with epoxy polyurethane dope—completely fuel-proof, remarkably strong yet very light.
Cut away the ply front disc and the balsa back plate with a carbide cutter in a Dremel Moto-Tool, or with a knife and file.
Fill a coffee can (or similar) with gasoline, then immerse the cowl into it. The foam will dissolve into a liquid and can be flushed out with additional gasoline.
WARNING! The residue from this step is toxic. It should be discarded in a sealed container at a landfill, AND THE PROCESS SHOULD BE DONE OUTDOORS. Under no circumstances should the foam be dissolved in a closed space, and disposable rubber gloves should be used to avoid skin contact. After dissolving the foam, the interior of the cowl may be rough and spongy. It can be sanded and smoothed after the gasoline vaporizes.
Cut a section of foam board or cardboard large enough to clear the perimeter of the cowl by several inches. Mark a center, then using a 180-degree protractor, divide the circumference into the number of required sections. In other words, if a three-cylinder engine is to be used, divide the plate into three 120-degree slices. If five cylinders, 72 degrees (360 degrees divided by five equals 72 degrees), etc. Draw a line from the center mark through the outer marks. These lines are to be used to align the cylinder halves.
Cylinders
The installation of dummy cylinders can be a most frustrating experience. Attempting to eyeball their positions is virtually impossible—producing cylinders that are out of position and unsightly. The fact that Williams Brothers cylinders are supplied in halves can be converted into an advantage. Here's how.
Cut out the center of the plate to allow it to pass over the cowl front. Position the plate with blocks so it is level with the midline of the cylinders. It is important that the plate be parallel with the cowl back so that the cylinders are all on the same vertical plane. Check this position with a ruler and use shims if needed. Position the unassembled cylinder halves so they are in line with the marks in their long axis. Mark a half-circle for each cylinder onto the fiberglass using a Magic Marker or pencil. Remove the cowl and cut out half-moons for each cylinder half. A carbide cutter is extremely handy here, but a knife and file will suffice.
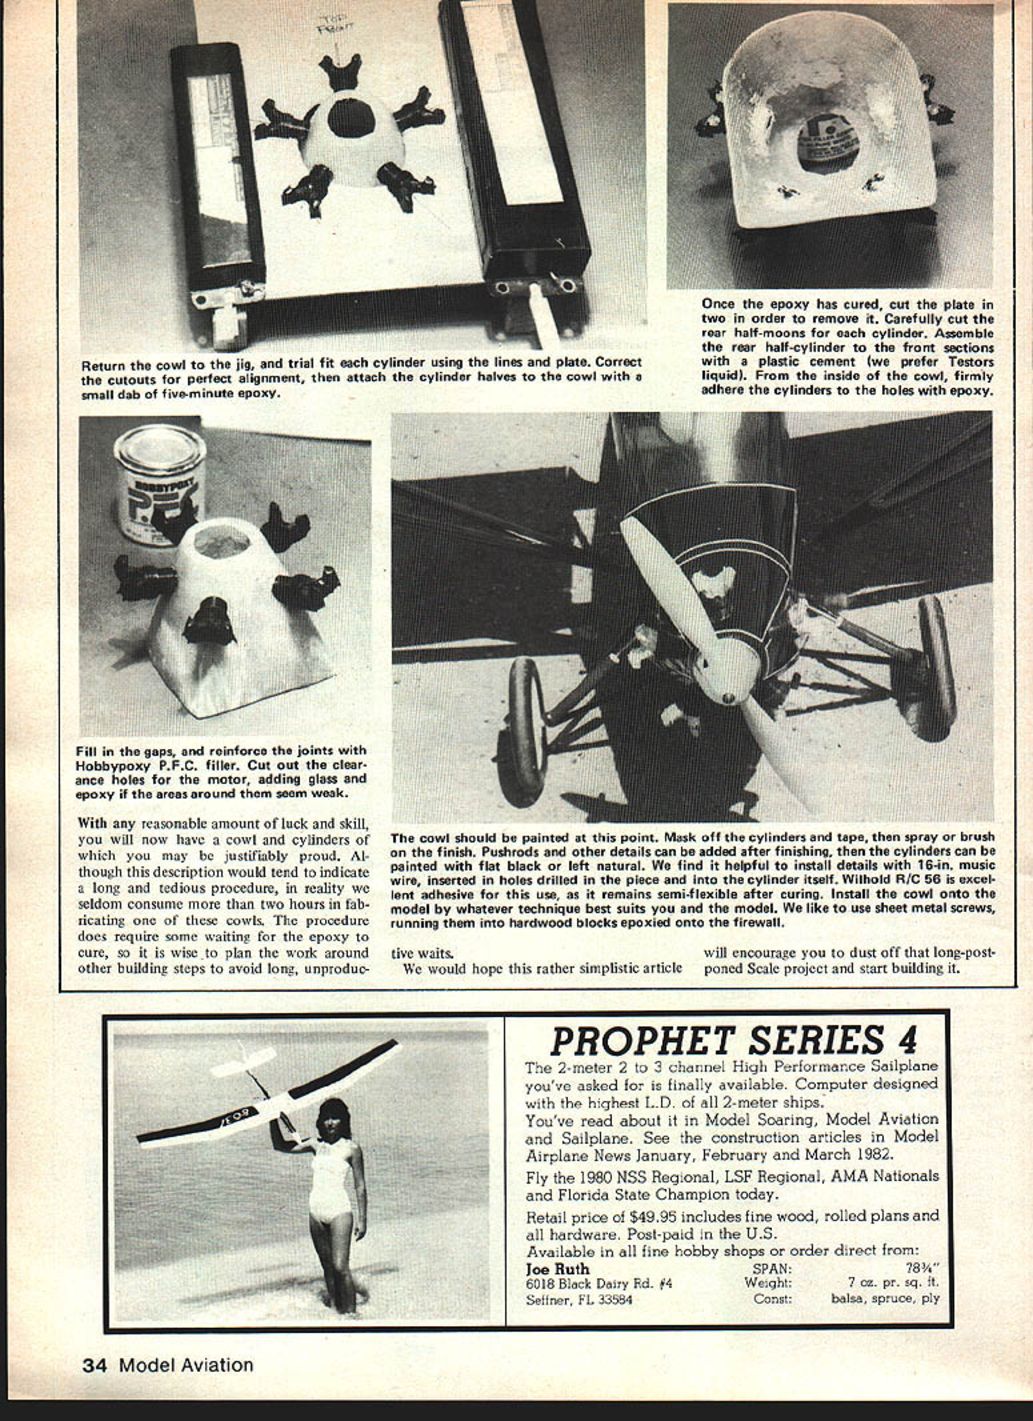
Return the cowl to the jig and trial-fit each cylinder using the lines and plate. Correct the cutouts for perfect alignment, then attach the cylinder halves to the cowl with a small dab of five-minute epoxy.
Fill in the gaps and reinforce the joints with Hobbypoxy P.F.C. filler. Cut out the clearance holes for the motor, adding glass and epoxy if the areas around them seem weak.
With any reasonable amount of luck and skill, you will now have a cowl and cylinders of which you may be justifiably proud. Although this description might indicate a long and tedious procedure, in reality we seldom consume more than two hours fabricating one of these cowls. The procedure does require some waiting for the epoxy to cure, so plan the work around other building steps to avoid long, unproductive waits.
The cowl should be painted at this point. Mask off the cylinders and tape, then spray or brush on the finish. Pushrods and other details can be added after finishing; the cylinders can then be painted flat black or left natural. We find it helpful to install details with 16-in. music wire, inserted in holes drilled in the piece and into the cylinder itself. Willhold R/C 56 is an excellent adhesive for this use, as it remains semi-flexible after curing. Install the cowl onto the model by whatever technique best suits you and the model. We like to use sheet-metal screws, running them into hardwood blocks epoxied onto the firewall.
We hope this rather simplistic article will encourage you to dust off that long-postponed scale project and start building it.
Transcribed from original scans by AI. Minor OCR errors may remain.

