

RADIO CONTROL ELECTRICS
Bob Kopski, 25 West End Drive, Lansdale PA 19446
This month's topics
- The Electric Connection Service (ECS)
- A new electric product
- A battery installation story
- An incidental note
It worked before, so Tyler West has requested it again. Tyler was among the earlier modelers to try out this column's ECS. Tyler has moved to 219 Bay Road, Hadley MA 01035 and is anxious to continue "hooking up" with other E-modelers in the area.
New product: NC-55 Pinion Gear Puller Set
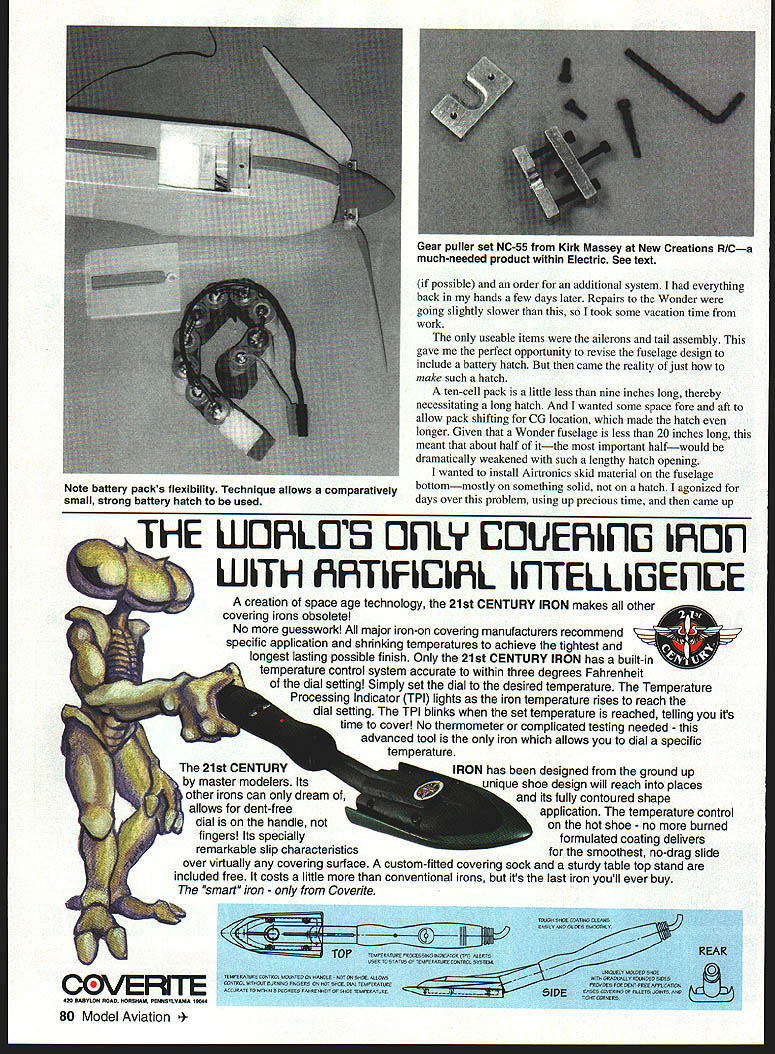
A much-needed electric product showed up at KRC '95 in the hands of Kirk Massey of New Creations R/C (Box 496, Willis TX 77378; Tel.: [409] 856-4630): the NC-55 Pinion Gear Puller Set. I know how difficult it can be to remove pressed-on pinion gears; I'm glad to see a product directed at this task. The NC-55 is priced at $22.95 and is well worth it.
New Creations offers a rather extensive catalog of electric goodies, as well as custom motor reworking and other services for the E-modeler. In fact, it's become routine for Kirk's reworked Astro motors to be in the winner's circle at all major meets.
Background: the Wonder and previous columns
The March 1995 column had a photo of my Sig Wonder—a wet-power kit E-conversion that seems to enjoy increasing popularity. Several flyers have told me that the E-Wonder is very convincing to die-hard wet-fliers in their own clubs. The June 1995 column offered generalized discussion about motor/battery pack installation, including cooling considerations and options. The October 1995 column combined those topics, with some discussion about the difficulties of battery cooling in my own Wonder (the pack was nested tightly with no efficient cooling air passage, and no hatch for pack removal).
A more recent "something not to do" resulted in a unique battery installation and hatch.
The incident: rushed installation and failure
The January 1996 column described the vertical performance of my E-Motion and Sig Wonder with the Aveox 1409-2Y power systems. The E-Motion experience occurred first, and that made me want to test that power system in my Wonder. It was already late in August, and if it worked out I wanted to get a second power system quickly so I'd have both airplanes comparably powered for KRC in mid-September.
I hastily removed the Aveox power system from my E-Motion and readied the Wonder for it. This included substituting a 10-cell pack for the seven-cell pack in place — a tight squeeze. It also required installing a new receiver pack and harness because the Wonder was previously flown with BEC (Battery Eliminator Circuit). After carefully rechecking the center of gravity (very important with a Wonder) I hastily headed for the field.
In all this haste I installed a receiver pack from among several I'd been cycling. I picked the wrong pack — one that was cycled down but not back up.
I prepared the Wonder for flight and launched the model. It was immediately clear that it sizzled with its power system installation. I was much too nervous (shaking, actually!) to continue very long, so I set it down after about three minutes. While the motor pack was recharging I flew a Revolt! I was also thinking about the speed and climb rate I had just experienced, and what seemed like sluggish controls.
The pack recharged and at relaunch time... seconds later there was a glitch — two frantic gyrations — instant rumble — and my singular, precious Aveox system (an evaluation system — not really mine) was trashed. An on-field test confirmed that the receiver pack I had hastily installed was dead. I should have wondered more about the sluggish controls: slow servos are often a giveaway for a low receiver pack. I did have what I wanted: the knowledge that the heavier, Aveox-equipped Wonder flew superbly. But now I had neither a Wonder nor an Aveox system.
I overnighted the system to Aveox with a letter requesting repairs (if possible) and an order for an additional system. I had everything back in a few days. Repairs to the Wonder were taking slightly longer, so I took some vacation time from work.
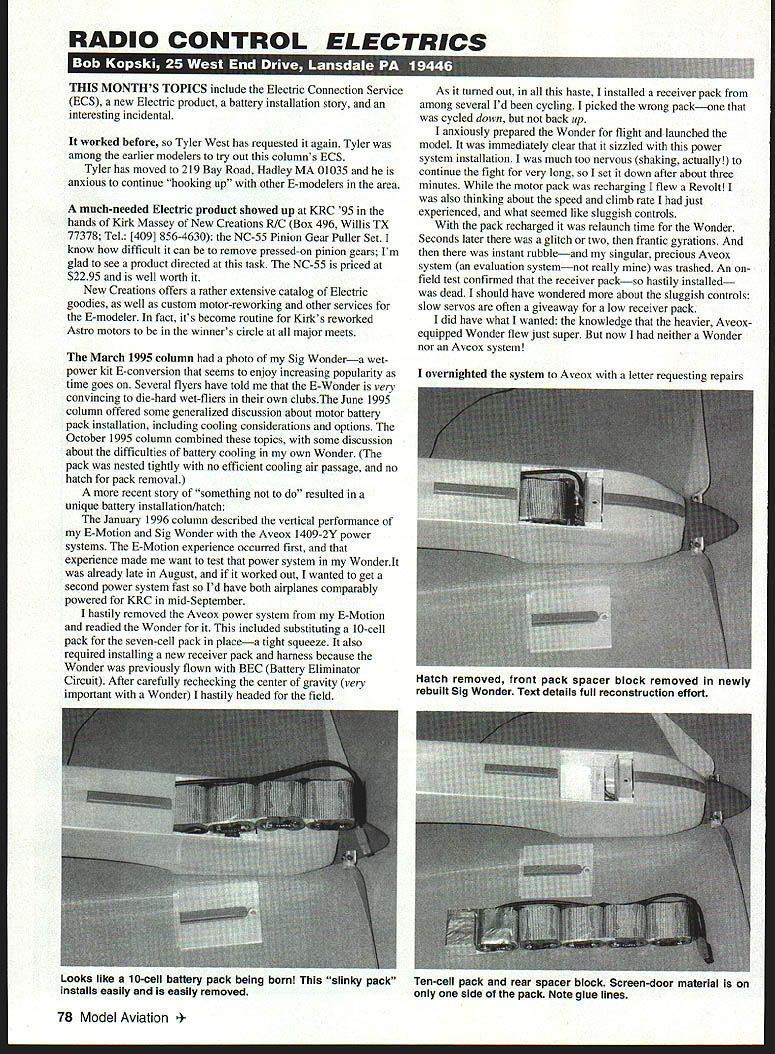
The only useable items from the damaged Wonder were the ailerons and tail assembly. This gave me the perfect opportunity to revise the fuselage design to include a battery hatch. But then came the reality of how to make such a hatch.
The design problem
A ten-cell pack is a little less than nine inches long, thereby necessitating a long hatch. I wanted some space fore and aft to allow pack shifting for CG location, which made the hatch even longer. Given that a Wonder fuselage is less than 20 inches long, this meant that about half of it — the most important half — would be dramatically weakened with such a lengthy hatch opening.
I wanted to install Airtronics skid material on the fuselage bottom — mostly on something solid, not on a hatch. I agonized for days over this problem, using up precious time, and then came up with what looked like a brilliant solution (as depicted in the photos).
I wanted to minimize the hatch opening for strength and durability, but still have the ability to easily remove the pack for cooling and recharging. The pack gets quite hot at 40 amps with no effective cooling airflow.
The trick was to configure a battery pack that was flexible or "slinky" and not rigid as packs normally are. A slinky pack could snake through a relatively small hatch/opening. The new 10-cell pack was made from five two-cell subpacks.
Building the "slinky" 10-cell pack
- Lay out all ten cells on the bench with the cell polarities alternating so the appropriate terminals can be interconnected.
- Form each subassembly by wrapping two cells at a time with Scotch plastic tape 1/2-inch wide. Use a full wrap with some overlap on each cell pair.
- Solder one jumper of flat braid in place for each two-pack — one cell "negative" to the other "positive."
- Lay the five two-packs side-by-side to look like a single 10-cell assembly and reconfirm adjacent sub-pack polarities. Place all interconnect braids along the same side of the total pack.
- Lay a 1/2" wide strip of fiberglass window-screen material over the five two-cell packs, and flow gap-filling cyanoacrylate (CyA) through the screen onto the plastic tape underneath at the cell high points.
- Allow some extra fiberglass strip at the front end of the pack, fold the end over, and glue it to the opposing side of the first cell. Glue it twice to the same front-end cell with about an inch extra overhang to provide something to grip when pulling the pack from the airplane.
- Stand the "slinky" pack assembly on the braided interconnect cell ends and install slightly longer jumpers of #12 silicone-insulated high-flex wire between the cell pairs to wire all ten cells in series.
- Install the pack output leads (same silicone-insulated wire) with Sermos connectors.
- One output lead is relatively short; the other runs the length of the pack from the "last" cell past the "first" cell and then out to the connector set. Care in lead dress will preclude unnecessary growth in pack width; neatness here pays off.
Fuselage, hatch and installation
The Wonder fuselage bottom is hard 1/16" balsa laid crossgrain, except for the hatch, which is 1/16" plywood. The balsa bottom is wrapped with iron-on cloth reinforcement. The "top" or ceiling of the battery compartment is really a fuselage sub-floor when viewed from the wing opening. It is 1/16" balsa cross-grained and supports the speed controller and the 250-mAh receiver pack on top.
The fuselage sides in the battery compartment area are doubled with 1/8" balsa strip about an inch high to provide more glue surface for the bottom sheeting and a place on which to rest the inner fuselage subfloor balsa. Thus the pack is installed between floor and ceiling and doubled fuselage sides, in a long rectangular-cross-section "tube." The fuselage dimensions are adjusted slightly from the plan to allow for a non-sloppy fit of the completed wired pack; it's a slightly snug slide in and out.
The total battery compartment length is 10½ inches between front and aft formers. Foam blocks are used to fill the extra space fore and aft to prevent the pack from moving. In my case the front foam block is about 1/2" thick. It's a separate removable "plug" for easy battery removal and is replaced after battery installation so the pack does not move forward. The aft foam block is taped to the last cells.
The plywood hatch is just three inches long and constitutes minimal weakening of the bottom. This hatch approach has worked out very well, and I encourage you to consider it. However, the next time I use it I'll look to see if I can configure the same idea in an aft location. I think it would be better to slide the pack in forward from the rear (rather than from front to back).
An aft hatch location would allow a more "solid" (uninterrupted) fuselage bottom forward, resulting in a stronger assembly. Only a single piece of skid material — one solid fuselage structure — would be needed.
I'll try not to fly with a dead receiver pack, and to otherwise control the drive and enthusiasm that fueled the haste that got me into all this trouble, frenzy, and expense in the first place!
Performance and closing incidental
The new Wonder flies extremely well and is even more of an attention-getter than the original. It flew at KRC '95, along with the E-Motion — both with Aveox 1409-2Ys.
The Wonder still has me shaking; it's downright thrilling to fly! The high speed, touchy controls, tight-cornering ability, and unconventional appearance tend to "gang up" on me.
I'm told that a "wet" Wonder will go unlimited vertically with a hot .20 at 38 to 40 ounces. This high-powered E-Wonder is 54 ounces, and I'm now trolling for wet fliers interested in a climb contest! Please don't tell me electrics don't fly — I just might lose it!
A closing incidental: All of the electrics that flew at the 1995 Nats used Sermos connectors with 12-gauge wire. John Sermos — the Chief Interconnector himself — has a new higher-current version of his famous connector in the works. This new product uses a heavier metal contact pair but the same housing. John plans to continue the original version as well.
Here's wishing you many happy, safe, and silent E-landings. Please enclose a SASE with any correspondence for which you'd like a reply.
Transcribed from original scans by AI. Minor OCR errors may remain.

