
RADIO CONTROL: ELECTRICS
Bob Kopski, 25 West End Drive, Lansdale PA 19446
This month's topics include some new E-products, the missing Mega motor, and some charger/charging discussion.
New products and suppliers
- Harris Design, 2000 NW 84th Ave., Ankeny, IA 50021; Tel.: (515) 965-5942 — Offering a new covering material called ThermalSpan, a fabric with the look and feel of silk and silkspan. It should interest E-OT modelers and others who appreciate the classic look. ThermalSpan is direct-mail-marketed in 14-inch widths, 16 feet long for $10 + $3 S&H.
- Wise Owl Worldwide Publications, 4314 W. 238th St., Torrance CA 90505-4509; Tel.: (310) 375-6258 — North American subscription agency for a number of British publishing companies. Silent Flight magazine includes full-size plans. Wise Owl can supply back issues, books, and some kits, simplifying ordering foreign publications since you can pay in US currency or by credit card.
- Hobby Supply South, 5060 Glade Road, Acworth GA 30101; Tel.: (770) 974-0843 — Carries an extensive kit and modeling supplies inventory, including many E-kits, kits suitable for E-conversion, and E-supplies. The catalog is $4.
- Hobby Lobby, 5614 Franklin Pike Circle, Brentwood TN 37027; Tel.: (615) 373-1444 — Catalog #28 is available for $2.50 and again includes an expanded Electric products section. Many E-models featured are available pre-built, and some can be purchased in "complete outfits" that include airplane, motor, battery, charger, speed control, and instructional video.
- Timothy McDonough, 127 S. Oaklane Rd., Springfield IL 62707; Tel.: (217) 523-8625 — Supplies laser-cut motor mount plates for the popular Speed 400 ferrite motors. Plates are cut from 1/16" plywood, 1-1/2" square, with accurately located holes and sharp openings for motor bell air intakes. Three plates plus metric mounting screws per pack for $5. Workmanship is very good. (Tim also supplies the No Noise T-shirts described in the 5/96 column.)
E-Motion and the missing Mega motor
I discussed my E-Motion design several times in recent columns and mentioned the Kyosho Mega 360 Reverse motor and Leisure gear drive combination used in the plane. Two glitches crept into those discussions.
- "Mega" appeared as "MCGA" several times in the 9/96 column.
- More troublesome: the specified motor has been discontinued and is no longer carried by Tower. I did not know this when I wrote the earlier references and only found out when others tried to order it.
I've received reader input reporting the same finding and asking for alternatives. I regret this circumstance — I wanted to buy more myself. My understanding is that replacement motor types will become available, but I won't recommend any until I try them in the same application. I will report results in a future column.
I continue to fly the E-Motion with the Mega motor, Leisure drive, Sonic-Tronics 13 x 7-1/2 prop, and a 10-cell system as described, with continuing satisfaction. Honestly, I'm experiencing a new sensation: flight times that are too long — unending 15+-minute flights are getting tiring!
Chargers and charging (general)
Charging motor batteries generates a lot of reader mail and varied field experiences. Topics include charger products, usage, and battery quirks. A few notes follow.
- The Astro 110D: I described my then-new Astro 110D in January '96 and have recommended it frequently since. It is a peak-detecting charger rated up to 18 cells and about 5 amps charge current. Mine continues to work great.
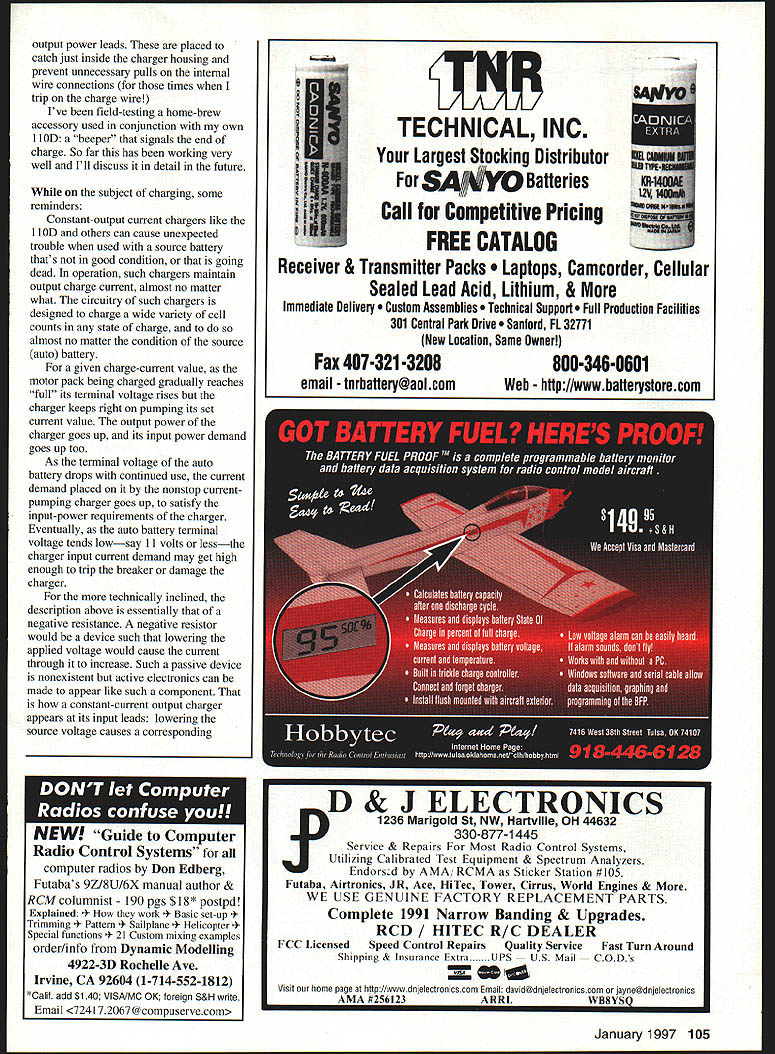
- Two disappointments with the 110D were noted: it lacks an audible "beep" to signal charge completion and lacks an on power switch. I keep chargers internally wired in my minivan instead of clipping them to the battery under the hood; a switch would help prevent dangerous sparking when clips are connected.
Modifications to my Astro 110D
I made two modifications to my 110D:
- Front-panel on/off power switch — I installed a 20-amp "auto" switch found at most auto-parts stores. It fits nicely alongside the breaker reset button. Installation requires only a drilled mounting hole and rerouting the positive (red) input power wire through the switch. Use heavy-gauge wire similar to the original and work carefully when drilling and soldering to avoid metal or solder particles inside the unit.
- Longer output lead — I replaced the charger output lead with about eight feet of 18-gauge lamp cord for field convenience. My charger sits inside the rear of my minivan while the airplane is on the ground outside. I also installed Ty-Wraps as strain reliefs on the input and output leads to prevent unnecessary pulls on internal connections.
I have been field-testing a home-brew "beeper" accessory that signals the end of charge. It has been working well and I'll discuss it in detail in a future column.
Constant-current chargers and source battery issues
Constant-output (constant-current) chargers like the 110D can cause unexpected trouble when used with a source battery that is not in good condition or is going dead. Such chargers maintain a set output current almost regardless of the source condition. As the pack being charged approaches "full" its terminal voltage rises but the charger keeps pumping the set current. The charger's input power demand then increases.
If the source (auto) battery terminal voltage drops with continued use, the charger will draw more input current to satisfy its input-power requirements. Eventually, as the source voltage falls (say to 11 volts or less), the input current demand can become high enough to trip a breaker or damage the charger.
For the more technically inclined: this behavior is analogous to a negative resistance — lowering the applied voltage causes the device to draw more current. Active electronics can exhibit this effect at the charger input, and over some range the associated input current can reach damaging levels.
Some field users power chargers from a separate car battery. If that battery's state of charge becomes low, the charger can cause MOSFETs or other parts to fail. I know a modeler who has replaced power MOSFETs in his charger three times before realizing the source battery was the problem.
Recommendations:
- Be wary of the state of charge of any separate auto battery used on the flightline.
- If you use your vehicle battery, monitor its state of charge to avoid punishing your charger and jeopardizing your ride home.
One charger designed to reduce these problems is the SR Smart Charger/Cycler; it can be programmed to shut down at a chosen source battery voltage. I use two of these and find the feature very helpful.
Vehicle installation (preview)
In a future column I'll detail the E-installation in my vehicle. I recently replaced my minivan and reinstalled my E-flying support system: a heavy cable routed from the vehicle battery to the inside rear of the van, terminating in a bank of Sernos connector pairs for plugging in chargers and other accessories. I photographed the details and will share specifics and time-proven conveniences that are applicable to most vehicles.
Peak-detecting charging vs timed charging
Longtime readers have noticed my change in view: in recent years I've adopted peak-detecting charging after previously favoring timed charging.
- Why I was slow to change: earlier peak chargers were unreliable and could not be trusted. Timed charging was dependable as long as I began with an "empty" pack and used a safe charge amount controlled by the timer.
- Why I now prefer peak chargers: peak chargers have improved and are reliable, and batteries (especially matched-cell packs) have improved as well. Peak-detecting chargers are now almost all I use.
- Exceptions — "false peaks": Some very depleted or long-unused packs can display terminal-voltage behavior that "tricks" peak-detecting chargers. Such packs may show a terminal voltage depression early in the charge (minutes after starting) — the same type of depression that follows a full charge. This causes a peak charger to shut down prematurely, a "false peak."
My procedure for these packs:
- Use a timed charger for the first 10 minutes to recover the pack from the depressed state.
- Switch to a peak-detecting charger to complete the charge.
This two-step approach avoids repetitive false peaks and repeated restarts of the peak detector.
Please enclose a SASE with any correspondence for which you'd like a reply. Enjoy your wintertime (or anytime) E-flying!
Transcribed from original scans by AI. Minor OCR errors may remain.

