
Radio Control: Electrics
Bob Kopski
Charge! — Timer care and charger maintenance
CHARGE! Even the "lowly" charger can benefit from some tender loving care (TLC). Here are some tips.
Timer problems and checkout
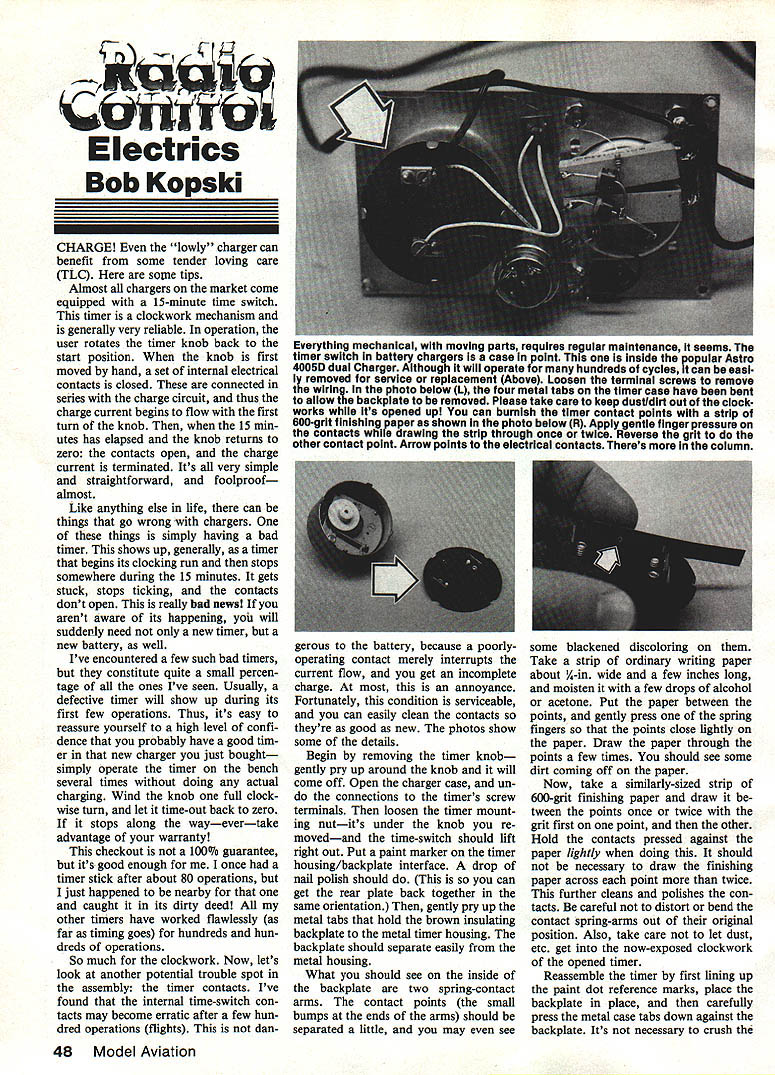
Almost all chargers on the market come equipped with a 15‑minute time switch. This timer is a clockwork mechanism and is generally very reliable. In operation, the user rotates the timer knob back to the start position. When the knob is first moved by hand, a set of internal electrical contacts is closed. These are connected in series with the charge circuit, and thus the charge current begins to flow with the first turn of the knob. Then, when the 15 minutes has elapsed and the knob returns to zero, the contacts open, and the charge current is terminated.
Like anything else in life, things can go wrong. A common failure mode is a bad timer: it may begin its clocking run and then stop somewhere during the 15 minutes. If the timer gets stuck and the contacts don't open, charging will continue and a battery can be ruined. Usually a defective timer will show up during its first few operations.
To check a new charger:
- Operate the timer on the bench several times without a battery attached.
- Wind the knob one full clockwise turn and let it time out back to zero.
- If it stops along the way, use the warranty.
This checkout is not a 100% guarantee, but it gives a high level of confidence. Most timers work flawlessly for hundreds or thousands of operations, though a few will fail later.
Servicing the timer contacts (step‑by‑step)
Internal time‑switch contacts may become erratic after a few hundred operations. This usually just causes interrupted current and incomplete charges (an annoyance rather than immediate danger), and it is serviceable.
Materials needed:
- Ordinary writing paper (about 1/2‑inch wide)
- 600‑grit finishing paper
- 800‑grit finishing paper
- A few drops of alcohol or acetone
- Paint marker or a drop of nail polish
- Small screwdriver or pry tool
Procedure:
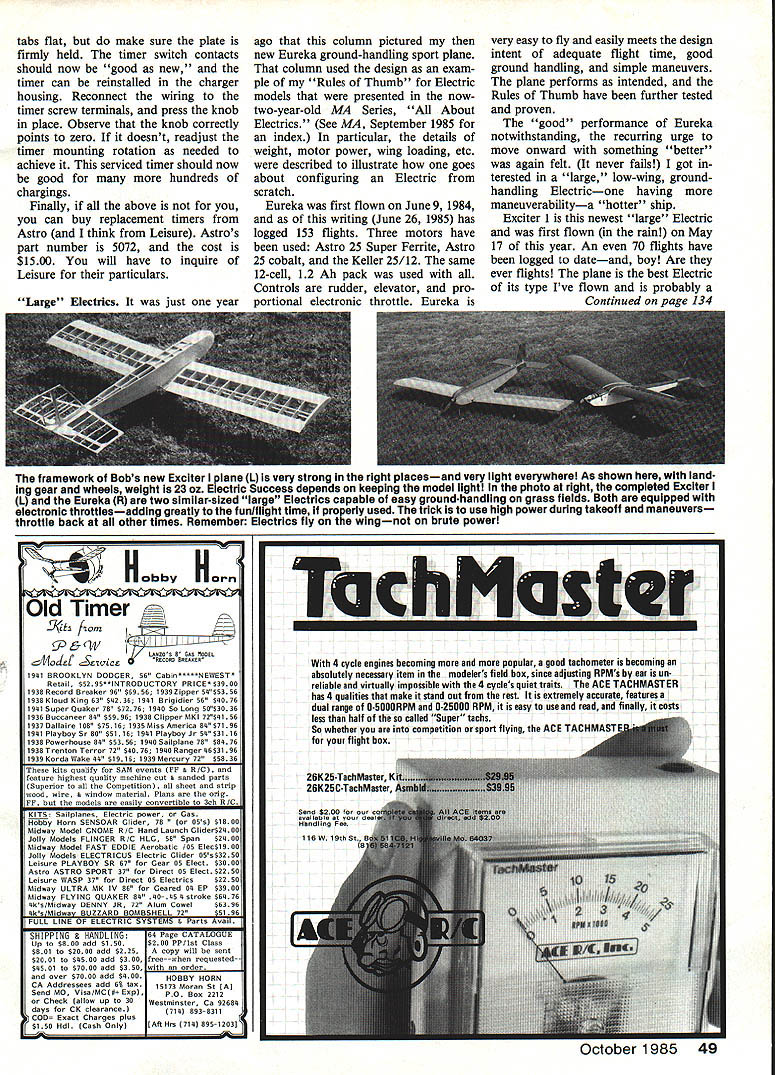
- Remove the timer knob — gently pry up around the knob and it will come off.
- Open the charger case and undo the connections to the timer's screw terminals.
- Loosen the timer mounting nut (it's under the knob) and lift the time switch out.
- Mark the timer housing/backplate interface with a paint marker or nail polish so you can reassemble in the same orientation.
- Gently pry up the metal tabs that hold the brown insulating backplate to the metal timer housing. The backplate should separate easily from the housing.
- Inspect the inside of the backplate. You should see two spring‑contact arms with small bumps at the ends; they may show blackened discoloration.
- Take a strip of ordinary writing paper (about 1/2‑inch wide, a few inches long), moisten it with a few drops of alcohol or acetone, put it between the contact points of one spring finger, press lightly, and draw the paper through a few times to remove dirt.
- Use a similarly sized strip of 600‑grit finishing paper and draw it between the points once or twice to remove heavier grime. Hold the contacts pressed together lightly while doing this. Reverse the paper and repeat on the other contact.
- Use a strip of 800‑grit finishing paper to polish the contact points once or twice. Be careful not to distort or bend the spring arms out of position, and avoid letting dust or dirt get into the exposed clockwork.
- Reassemble the timer by aligning the paint‑dot reference marks, placing the backplate in position, and carefully pressing the metal case tabs down against the backplate. It's not necessary to crush the tabs flat; make sure the plate is firmly held.
After reassembly the timer switch contacts should be restored.
Replacement timers
If you prefer not to service the timer yourself, replacement timers are available. Astro sells replacement timers (Astro part no. 5072) for about $15.00; Leisure may also supply replacements — inquire for details.
Large Electrics
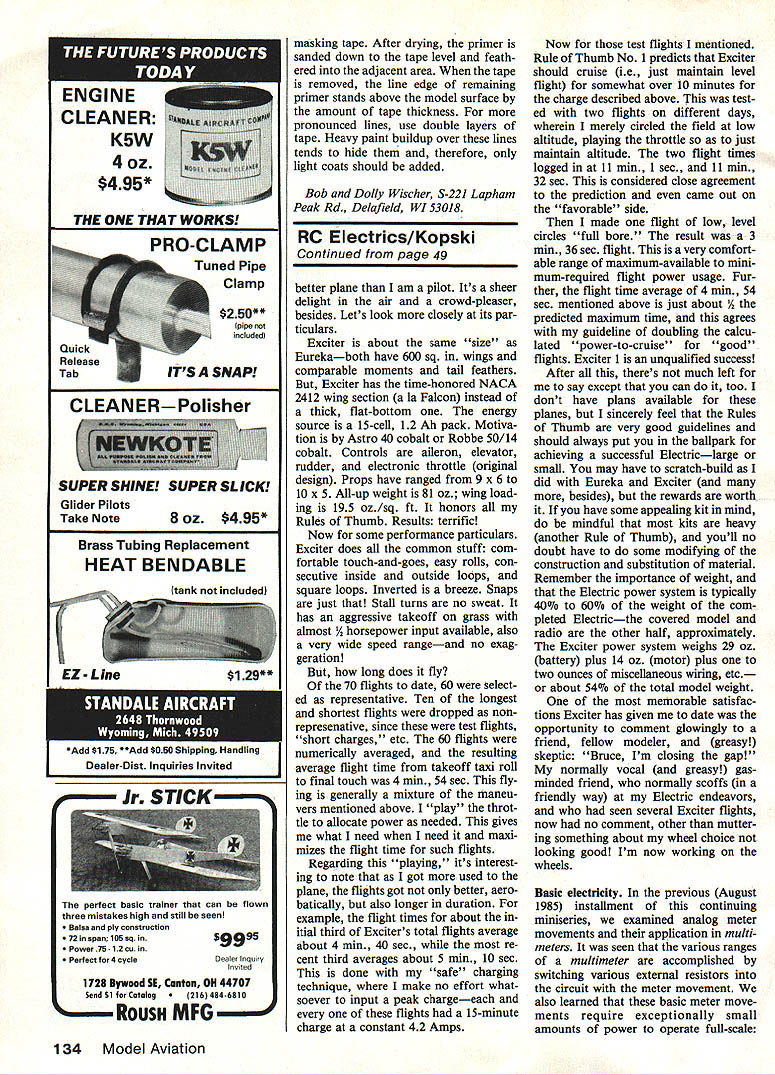
It was just one year ago that this column pictured my then‑new Eureka ground‑handling sport plane. That column used the design as an example of my "Rules of Thumb" for electric models, presented in the M.A. series "All About Electrics." Eureka was first flown on June 9, 1984, and as of June 26, 1985 had logged 153 flights. Three motors have been used: Astro 25 Super Ferrite, Astro 25 cobalt, and the Keller 25/12. The same 12‑cell, 1.2‑Ah pack was used with all. Controls are rudder, elevator, and proportional electronic throttle. Eureka is very easy to fly and meets the design intent: adequate flight time, good ground handling, and simple maneuvers. The Rules of Thumb were further tested and proven.
The recurring urge to move onward with something "better" led to a new, larger, low‑wing ground‑handling electric with more maneuverability — a "hotter" ship.
Exciter I
Exciter I is this newest "large" electric and was first flown (in the rain!) on May 17 of the year described. An even 70 flights have been logged to date. The plane is the best electric of its type I've flown and is probably a better plane than I am a pilot — a sheer delight in the air and a crowd‑pleaser.
Specifications:
- Wing area: about 600 sq. in. (same as Eureka)
- Airfoil: NACA 2412 (instead of a thick, flat‑bottom section)
- Battery: 15‑cell, 1.2‑Ah pack
- Motors: Astro 40 cobalt or Robbe 50/14 cobalt
- Controls: aileron, elevator, rudder, electronic throttle
- Propellers used: 9 x 6 to 10 x 5
- All‑up weight: 81 oz.
- Wing loading: 19.5 oz./sq. ft.
Results: terrific. Exciter does touch‑and‑goes comfortably, easy rolls, consecutive inside and outside loops, square loops, inverted flight, snaps, and stall turns. It has an aggressive takeoff on grass with almost 1/2 horsepower input available and a very wide speed range.
Performance particulars:
- Of 70 flights, 60 were selected as representative (dropping ten of the longest and shortest test flights).
- The average of the 60 representative flights (from takeoff taxi roll to final touch) is 4 minutes 54 seconds. These flights mixed aerobatics with throttle management to allocate power and maximize time.
- Flight times improved with pilot familiarity: the initial third of flights averaged about 4 minutes 40 seconds, the most recent third averaged about 5 minutes 10 seconds. All flights used a "safe" charging technique: a constant 4.2 A charge for 15 minutes (no attempt to peak charge).
- Cruise test: Rule of Thumb No. 1 predicted cruise (just maintaining level flight) of somewhat over 10 minutes on the described charge. Two test flights circling at low altitude logged 11:01 and 11:32 — close agreement and slightly favorable.
- A low, level "full bore" test flight lasted 3 minutes 36 seconds.
- The representative average (4:54) is about 3/4 of the predicted maximum, matching the guideline of doubling the calculated "power‑to‑cruise" for good flights.
Exciter is an unqualified success.
Design, weight, and rules of thumb
You can do this too. I don't have plans available for these specific planes, but the Rules of Thumb are good guidelines for achieving a successful electric — large or small. You may have to scratch‑build as I did, or modify kits (most kits are heavy and often require material substitution).
Remember:
- Weight is crucial. The electric power system typically averages 40% to 60% of the completed model weight (depending on design); radio gear is roughly the other half of the remainder.
- Exciter power system weights: battery 29 oz., motor 14 oz., plus 1–2 oz. wiring — roughly 54% of total model weight.
A memorable satisfaction was hearing a formerly skeptical, gasoline‑minded friend acknowledge the performance: "Bruce, I'm closing the gap!"
Basic electricity
In the previous (August 1985) installment of this continuing miniseries we examined analog meter movements and their application in multimeters. We saw that the various ranges of a multimeter are accomplished by switching external resistors into the circuit with the meter movement and that these basic meter movements require exceptionally small amounts of power to operate full scale.
Almost every charger on the market comes equipped with a 15‑minute time switch (timer). The clockwork mechanism is generally very reliable: rotate the timer knob back to the start position, the internal electrical contacts close and connect in series with the charge circuit, and the charge current begins to flow. After 15 minutes the knob returns to zero, the contacts open, and the charge current is terminated. It's simple, straightforward, and almost foolproof.
As noted above, things can go wrong — a bad timer may stop ticking partway through and fail to open the contacts. Most defective timers show up during their first few operations; check a new charger by running the timer several times on the bench. Internal timer‑contact assemblies can also become erratic after a few hundred operations; cleaning the contacts usually restores service.
Procedure reminders for cleaning timer contacts:
- Remove the knob and timer from the charger.
- Mark the housing/backplate orientation.
- Separate the backplate and clean the spring‑contact arms using alcohol‑dampened paper, then 600‑grit and 800‑grit finishing paper as needed.
- Avoid distorting the spring arms and keep dirt out of the clockwork.
- Reassemble, aligning the reference marks and pressing the case tabs back into position so the plate is firmly held.
Inside popular chargers (for example, the Astro 4005D dual charger) the timer will operate for hundreds of cycles but can be removed for service or replacement. Loosen the terminal screws, remove the wiring, lift the timer out, open the case via the metal tabs, clean the contacts with 800‑grit paper if needed, and reassemble carefully.
Please forward all questions (include a SASE, please) to: Bob Kopski 25 West End Dr. Lansdale, PA 19446
— and may many happy electric landings be yours!
Transcribed from original scans by AI. Minor OCR errors may remain.

