
RADIO CONTROL ELECTRICS
Bob Kopski — 25 West End Dr., Lansdale, PA 19446
This Month's Topics:
- Great news!
- The Electric Connection Service
- Meet announcements
- NATS Electric info
- Measuring current — more
- Landing gears for electric
Tom Atwood, editor-in-chief of Model Airplane News, has just confirmed what I've been hearing for a few weeks — Mitch Poling and Keith Shaw will join forces to bring electric coverage to the pages of MAN! I know many of you have missed Mitch's writing in recent months because you wrote to tell me so.
Mitch has been an electric author longer than anyone I know; he's been writing in several magazines nearly continuously since the early '70s. He also wrote the book Building and Flying Electric-Powered Model Aircraft. Many of you are also familiar with the name of Electric Grand Master Showman Keith — the superb pilot behind the finest, most inspiring, most winning electrics. Keith has also written feature articles in MAN.
Tom told me that their coverage will necessarily be monthly for starters, and that other qualified electric modelers may possibly "write in" along the way. But the key thing here is that this is a new beginning by ranking electric specialists, and I think it's simply great news. Personally, I've just sent in my subscription!
The Electric Connection Service (ECS)
This month's ECS has three folks eager to connect with others of the electric persuasion.
- Carlo Quasco
Via San Martino, 14, 15029 Solero (AL), Italy. Carlo wrote expressing his interest in RC electrics — especially OTs — and requesting help getting in contact with American and other electric modelers. This should be a good test of the effectiveness of the ECS. Let's show Carlo that it does work.
- Leon Raesly
7900 Old Branch Ave., #208, Clinton, MD 20735. Leon has been trying to organize an electric group in the Washington, D.C., area through local hobby shops and "wet" clubs and hopes the ECS listing will help. He invites interested persons to call or write, but notes his work schedule is such that you can only reach him by phone between 3 a.m. and 6 p.m. (Yes — you read that right — no evening calls, please, on any day, including weekends and holidays.) His telephone number is (301) 599-7530.
- Tony Turley
229 Pine Circle, Dunbar, WV 25064. Tony recently wrote to thank me for an earlier listing but explained that electric activity in his area continues to be spread out, with no focused group — and many persons not even belonging to the AMA. Tony would like to see electrics in his area get more organized and maybe even get a meet going in the future, so we're trying this listing again. He also tells me he's recently given up on "wet" power and now flies electric exclusively — despite being all alone at it. Readers, let's change that for Tony!
Meet announcements
One weekend — two meets are coming this June 12 and 13.
- Lehigh Valley RC Society Electric Fun-Fly
Saturday, June 12 (one day only), at the club field near Easton, Pennsylvania. There will be fun events plus open flying throughout the day. For more info call Dale Hart at (215) 821-0977 or Ellis Grumar at (908) 859-0969.
- 1993 Mid-America Electric Fly (two meets by two clubs, one each day)
Sponsored by the Ann Arbor Falcons and the Electric Flyers Only of Michigan. Keith Shaw will be CD for the Falcons; Ken Myers will be CD for the EFO. These clubs have shared the unified meet responsibility for several years and the annual affair is steadily growing. Last year brought 110 entrants over both days. More info: Keith Shaw, 2736 Elmwood, Ann Arbor, MI 48104-6624; Tel.: (313) 973-6309, or Ken Myers, 1911 Bradshaw Ct., Walled Lake, MI 48390; Tel.: (313) 669-8124.
My best wishes to all involved!
NATS / Nationals Electric info
Unlike last year, this year's Nationals will include scheduled electric activity — three days' worth. The electric activity will be held at Vincennes High School in Vincennes, Indiana, on July 17, 18, and 19. Scheduled events include AMA 610, 612, 618, and F3E Limited (T/C) and Unlimited (30C). Final details are still being planned; for up-to-date info write the CD, Frank Korman, at 5934 Goodwin, Dallas, TX 75206.
Measuring motor current — more
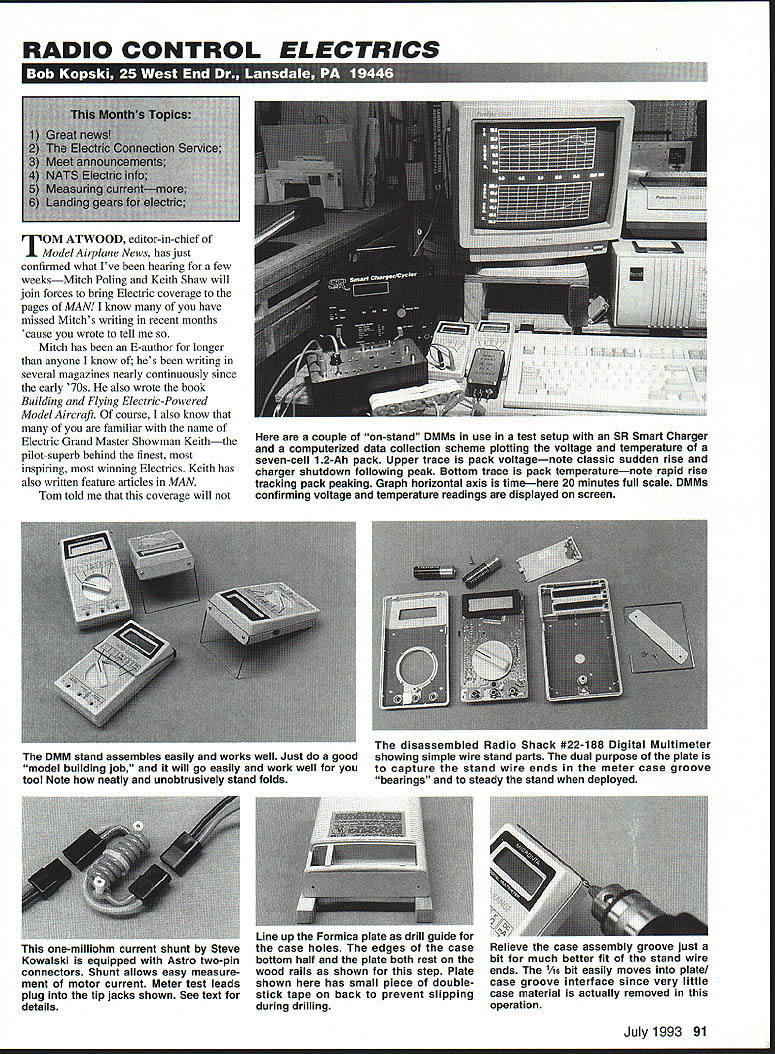
Measuring motor current as discussed in the January '93 column got lots of reader response. Steve Kowalski, the modeler who makes the neat little shunt included in that issue, tells me he sold nearly 100 of them after the column appeared — including several abroad from as far away as Australia!
Because of reader requests, Steve has come up with an additional version of his shunt that features Astro two-pin connectors instead of Sermos connectors. It works the same way: the shunt is simply inserted in the motor circuit and a digital multimeter (DMM) is plugged into the two test point jacks on the shunt. Motor current is then read as a voltage on the lowest scale. The shunt is easily installed and removed from plane to plane in the field or on the bench — very nice for test purposes. Refer to the January '93 column for complete operational info, including how-to photos.
The cost of this "Astro"-ized version is $16 — higher because the Astro connectors are more expensive than Sermos connectors. This price is still inexpensive by any standard. You can order either version by writing Steve at: Steve Kowalski, 32 Hollow Dr., Holbrook, NY 11741.
Coincidentally, I'll be seeing Steve at the upcoming LVRCS meet — which is where I first saw his shunt idea a year ago!
Personal note — model wire and landing gear
The February column offered a bit of personal philosophy: "In the long-term average, everything tends for the worse." What's this got to do with electrics? Actually, what follows is applicable to all modeling.
I've been a modeler for a long time. I have free-flight trophies from the '53 Nationals, and I was flying some years before that. In those days, one could go to the hobby shop and buy music wire and make a molded landing gear (and many other fittings) that had real character and substance. The wire then was one tough piece of stuff! It took real strength to form a gear, but when it was formed, it stayed formed. Not so anymore, it seems.
Since I hate to bend over, my choice is the Tall Boys series, which folds up for easy travel and storage.
I've left Puyallup with many new projects in mind, a sense of wonderment, and a quiet pledge to return. It was nearly impossible to spend quality time at every booth and display in just two days; however, we did manage to pick up catalogs, brochures, and other materials at each booth where provided. I plan to spend many quiet hours reviewing these.
I am no stranger to trade shows. Before I entered semi-seclusion, for many years I was the national sales manager for two sporting goods companies and was responsible for trade and consumer shows in Syracuse, New York; New York City; Chicago; Harrisburg, Pennsylvania; and Seattle.
I have some ideas for both modelers and exhibitors that should be passed on.
- For the average model enthusiast: Go to any model exposition you can attend. Your input to manufacturers is vital. Any show vendor worth his entry fee wants to hear from you. Go with an open mind and spend most of your time listening. By all means take in the swap meet if one is offered, and be sure to say thanks to the manufacturers, the host club, and the staff. It won't go unnoticed. Take your wife, family, or friends — there is no better way to show how big and interesting our hobby is than to show it off at a Puyallup. Certainly my wife came away amazed at all the friendly hobbyists she met and was totally enamored with her first close-up of giant scale.
- For the manufacturer, particularly the smaller, new, or cottage-type business: Exhibit! Exhibit! Exhibit! I can't think of a more exciting way to show off your wares. If it's cost-effective with a captive audience, it's a positive reinforcement of printed advertising and can be lucrative. One minor suggestion — if you plan to use visual aids such as a VCR monitor, place them well above eye level in your booth, perhaps at about eight feet. This will provide a viewable platform for your product and still allow showgoers to get to your display. In several cases at Puyallup I found it impossible to talk with exhibitors because of the gridlock at their booths.
Finally, my personal thanks to all who took the time to talk with me. I'll be doing my best to return to Puyallup in future years.
Back to landing gear wire: I've found that today's hobby shop wire is "wimpy" — no struggle to form and easily deformed on almost every landing, no matter how well executed. Also, the old wire was shiny and bright and tended to stay that way. Today's wire is dull and gray and tends to rust relatively easily. Definitely a trend toward the worse.
I know "good" wire does exist — some kits include it. Where is it sold? Does any manufacturer still provide good old-fashioned music wire to hobbyists rather than only to manufacturers? Is anyone in the business of custom-making formed wire landing gear with good material? Please let me know and I'll share the info with readers in an upcoming column. Thank you!
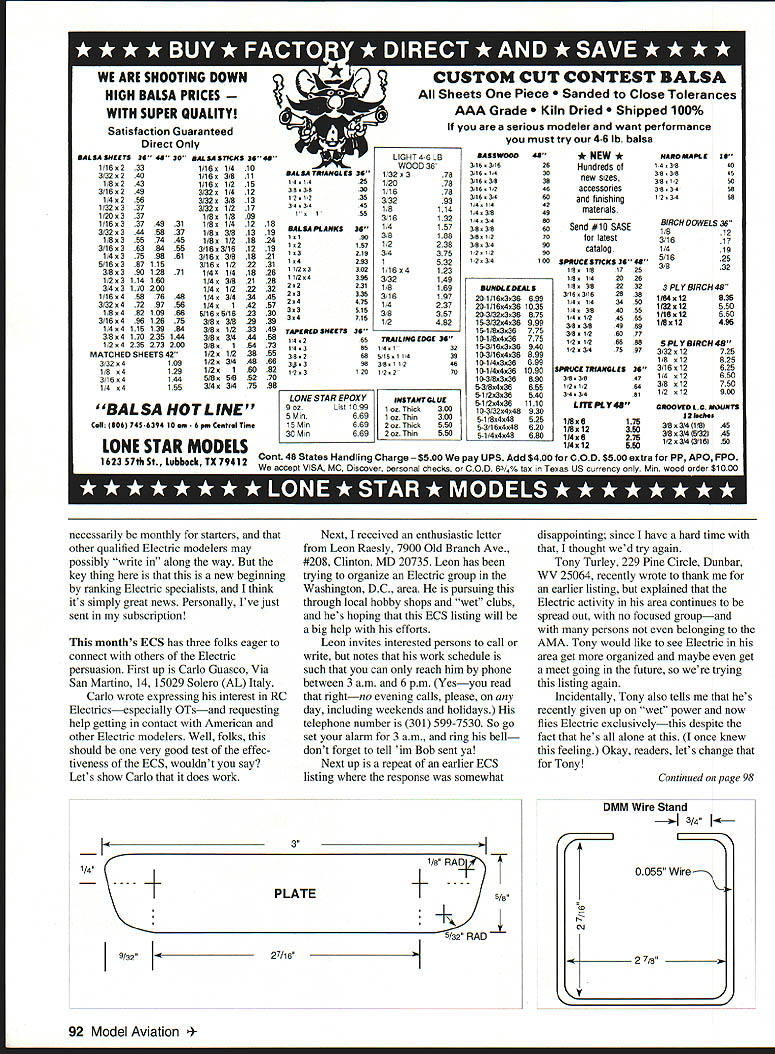
Digital multimeters and a fold-up stand
Digital multimeters (DMMs) are common wherever electrics are flown. Many modelers use them to monitor charging and for general purposes. The shunts discussed above are used with DMMs. Many brands and models are readily available and many are low cost. One convenient source is Radio Shack; the best way to get one there is to watch for sale prices.
One popular DMM model — based on the large numbers I've seen in use — was Radio Shack 22-188. This model has been discontinued and replaced by catalog #22-166. I have several of the former and none of the latter; however, I examined the newer model carefully and I'm convinced it is nearly directly applicable — except as noted.
Modelers who use either meter know its shortcoming — the lack of a fold-up stand. Often it's difficult to read the meter when it's lying flat and I frequently use several at a time on the bench. This annoyance led me to develop a convenient, workable stand, and I share the method here.
Note: photos and sketches referenced in the original column are not included here, but the following steps provide the essential procedure.
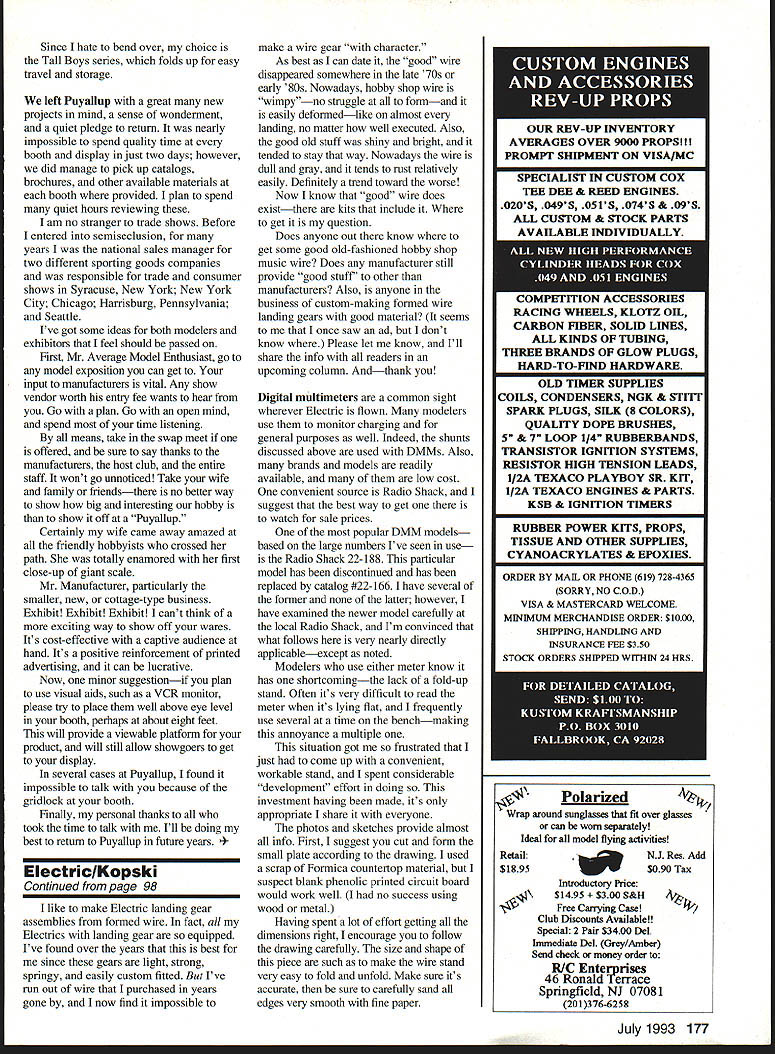
- Materials and plate fabrication:
Cut and form the small plate according to the drawing (use accurate dimensions). I used a scrap of Formica countertop material; black phenolic printed circuit board material would also work. Wood or metal were not successful for me. Carefully sand all edges smooth with fine paper.
- Drill pilot holes:
Drill 1/16-inch holes at the mounting screw locations on the plate. If you have the newer Radio Shack meter, confirm the mounting hole locations before drilling to ensure nothing inside the meter case will be damaged. These plate holes are first used as reference centers and will be enlarged later.
- Disassemble the meter:
Remove the battery cover and cells and a single case screw. Carefully separate the case halves and printed circuit board assembly. Handle the circuit board assembly by the edges only.
- Position the plate and mark the case:
Use temporary wood rails (1/4- to 3/8-inch square balsa is OK) to rest the edges of the inverted case bottom and press the plate against the case. Ensure the plate is right side up and flush with the bottom edge of the case. Double-stick tape on the back of the plate can prevent slipping during drilling.
- Drill case holes:
Using a 1/16-in. bit and the two plate pilot holes as guides, drill into the case end about 1/4 inch. Remove the plate and enlarge the two holes in the plate (not in the case) to 3/32 inch. Trial-attach the plate using #2 x 1/4-inch sheet metal screws. The screws will bite the 1/16 case holes. Remove the plate and reassemble your meter.
- Form the wire stand:
Form the wire stand carefully. For the older meter you can follow the original dimensions; for the newer meter I estimate the stand must be about 3/32-inch wider and about 1/8-inch shorter because the newer case is slightly wider near the alphanumeric display and the original stand length could hit the raised selector switch when folded. Confirm these suggestions with the actual meter.
It may take several attempts to get the wire formed just right. I used .055-inch steel wire from the hobby shop — good enough since this is not a landing gear. Smooth any burrs on the cut wire ends.
- Assemble and adjust:
Assemble the wire with the short ends resting in the case groove "bearing" and attach the plate to hold the wire in place. Test fold and open the stand; it will be snug at first, especially with the newer case design which appears to have a smaller groove formed by the case top and bottom interface. The case groove can be opened up by running a 1/16 bit into it with the plate tightly in place — this removes very little plastic but improves the bearing surface for the wire ends. You may need some touch-up bending on the wire ends to get them just right. Reinstall the wire stand and plate.
- Operation:
With the stand deployed in the open position, squeeze the wire verticals near the case to press the wire against the case and engage the rear stop plate. To stow it, fold the stand back on the meter top surface. Routine use should be easy and convenient.
If you're like me, you'll soon wonder how you ever got along without it. This accessory makes these meters much more pleasant and easy to use.
So ends yet one more column! Please be sure to enclose an SASE with any correspondence for which you'd like a reply.
Happy, quiet electric landings, everyone!
Transcribed from original scans by AI. Minor OCR errors may remain.

