

Radio Control: Giant Scale
Bob Beckman
Stupid—stupid—stupid. Getting a new plane checked out and flying is always a bit of a hassle, but sometimes you run into one where nothing you do seems to come out right. And when it's all over, it usually turns out to have been your own fault all along.
I finished my two Piper Tomahawks several months ago, and I was anxious to get flight photos for my book. I finally got all the pictures I needed, but it wound up taking almost four months. Like most of you, I have to do my flying on the weekends, and the first thing that got in my way was the weather. For a while it seemed that no matter how nice it was during the week, it always rained on the weekends. If the weekend weather was nice, for a change, you could bet on it that I had to be out of town on business. I was beginning to think that I would have to quit my job and camp out at the field in order to catch a good day.
Then, one week somebody goofed and it rained on Wednesday and Thursday. This was it, I said to myself, and I got out to the field bright and early on a beautiful Saturday morning with the Jim Messer version of the Th'awk. I got a couple of fellow club members to run through the safety checklist for me, made a range check of the radio, and got ready to start the engine. Although the engine, a Magnum II, had not been run in the plane yet, I had run it on the test stand for the Big Bangers series. I really wasn't expecting a problem with it, but after half an hour of cranking without a pop we reached the conclusion that we weren't getting any spark from the ignition module. I packed up and went home, where I confirmed that, no matter how fast I spun the flywheel, I had no spark at the plug. The electronic ignition module had apparently gone bad.
That kind of thing doesn't happen often, and I had no doubt that Contempo would replace it for me, but I could see two or three good weekends going down the drain while I waited. On Monday, however, I found out firsthand what Contempo's deal with Homelite means to the modelers using the Magnum II. The engine is based on a Homelite chainsaw unit, and Homelite's service centers all over the country will do warranty and other maintenance on it. I pulled into the Homelite service center in Alexandria, Va., explained the problem, and within 10 minutes they had a new module in place. By the time I was on my way home the spark-plug problem was out of the way and it looked like I might get back to the field in time.
Between some health problems and trying to get a few major Giant Scale fly-ins organized, weekends started slipping away fast. About the time I was ready to pull the engine out of the plane and make test runs — I'll report on that in the next installment — Big Bangers/Big Birds finally got the act together. The engine and, you guessed it, the radio started giving trouble.
I first noticed some glitches when the transmitter was close to the plane. Starting the engine can sometimes overload the receiver, but it cleared up soon. We moved a few feet away and made a range check. The antenna had collapsed since the last check several weeks ago. Since time wasn't good, I used the same equipment as in other aircraft and extended the antenna; I found an increased range of six feet. No way was I going to fly under the conditions, so I changed over to another set of frequency modules and tried again. Things looked good, so I put the aircraft back together, made another range check, relinquished the pin to the other fliers, fueled the bird and relaxed a bit in the nice warm sunshine.
About half an hour later I got the pin again and prepared to start the engine. Immediately it was painfully obvious that the radio was absolutely dead. A few quick checks determined the batteries were right and the transmitter was putting out, but the receiver was inoperative. I packed up and went home again. It was beginning to be very embarrassing since people at the field were starting to say things like, "Oh—brought it out again."
During the next week I found and replaced a heat-sensitive transistor in the second receiver and checked the tuning operation of both sets of frequency modules. The next weekend I went confidently to the field only to have the same sequence of events take place. Changing receivers didn't make much difference; the receiver didn't quit completely, although at times it seemed to continue to operate at an unacceptably low range. I tried re-orienting the receiver antenna; some slight changes in operation were enough to make things usable. I began to think I might be getting zapped by rudder/elevator drive cables and/or long servo leads. The aileron servos were on a split-battery system and shielded servo leads have never had that kind of trouble before, but there is always a first time.
In one last, desperate effort I pulled the receiver out of another plane and tried it. Same problem: insufficient range. That same receiver had been giving solid performance in my Sig Kavalier for the past three years. Why did it die when I put it in a Giant Scale aircraft? Well, just for the heck of it, let's see what the transmitter I use with the Kavalier does. The controls aren't set up the same (for example, rudder worked the elevator), but I could at least see if the radio was working. And, of course, now I had perfectly adequate range. Control was solid a block away with the antenna down. (By this time I was doing my range checking at home. I wasn't about to go to the field again until it worked.) It finally got through my thick skull that the problem was in the transmitter, not the receiver. This was on Thursday evening, so I still had a chance to fix things by Saturday, which was being forecast as a beautiful day.
On Friday I took both transmitters to work, where I have some useful test equipment available. I set up a spectrum analyzer to look at the transmitted output of the "good" transmitter and noted the power output with the antenna extended. Then, with the first one off, the "bad" one was turned on, and sure enough, it was bad. The power output was 40 dB down. In other words, it was putting out less than 1/100th of the power of the other transmitter. No wonder it didn't have good range! Now all I had to do was find out why.
Just as I was getting ready to start tearing into the transmitter, it occurred to me that I should stop Easter-egg hunting and use my head. My problem was an RF condition. It always had been. I had finally gotten it pinned down to the transmitter, but I already knew that changing the RF modules in the transmitter didn't make any difference. It was possible, but not very probable, that both modules had the same defect. On the other hand, it was more likely that the fault was in something that was in use no matter which module was used. The batteries were in good shape, and power was being delivered to the RF module. The only thing left was the antenna, but antennas don't go bad. After all, it's just a length of metal. Well, it's easy enough to find out. I swapped antennas on the two transmitters, and just like the song says, everything bad is good again.
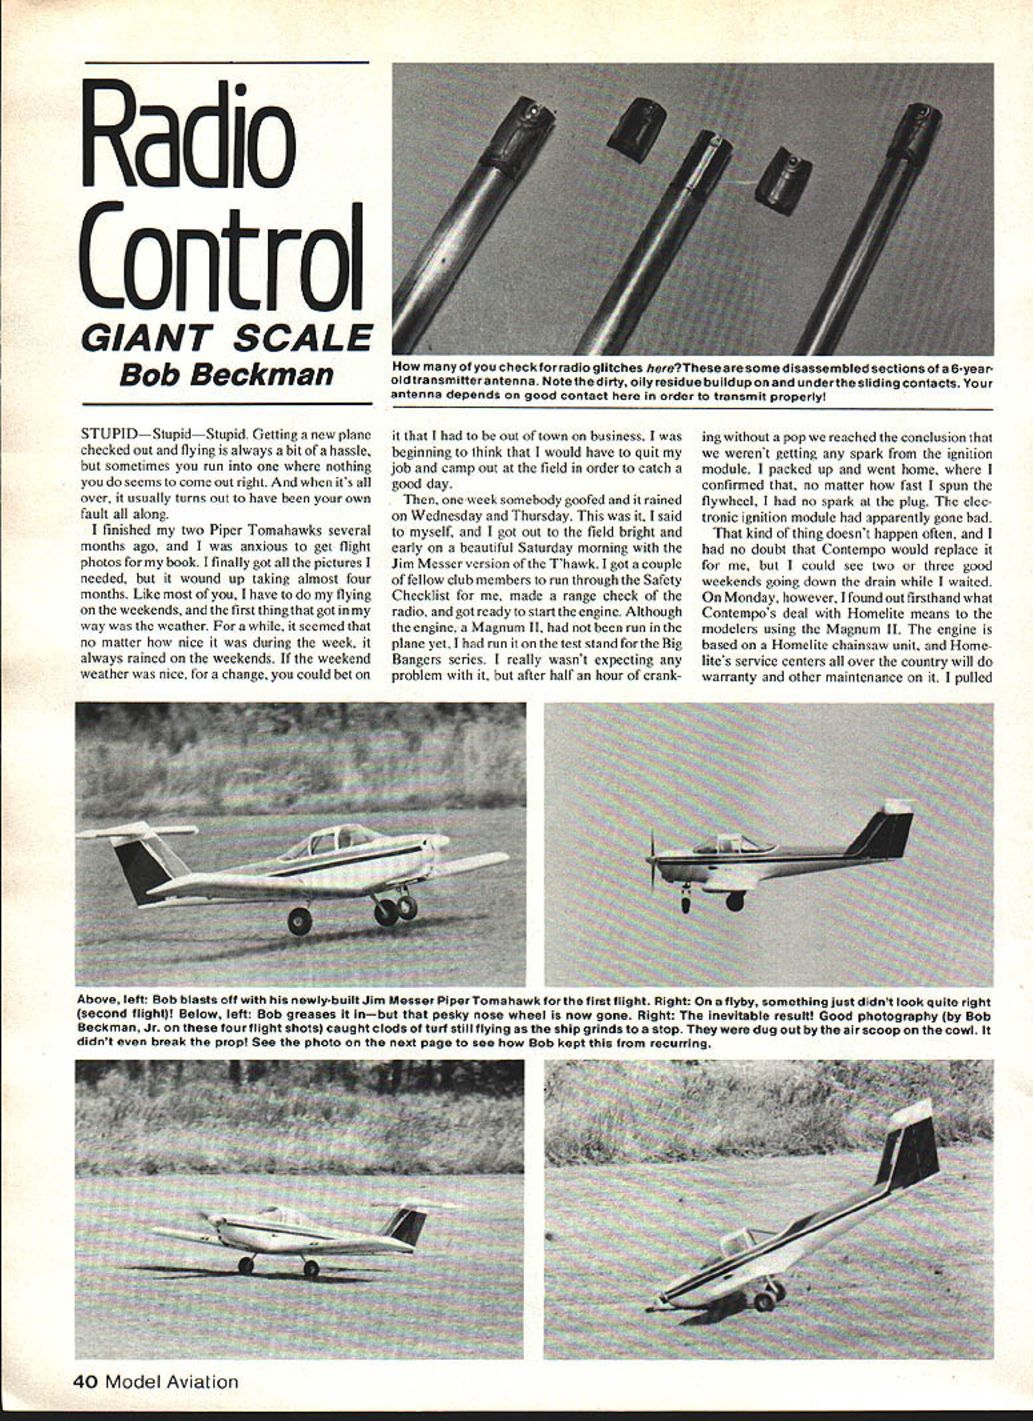
Hindsight being perfect, it is now obvious. Although the transmitter was fairly new (an Ace Silver Seven that I built last year), I had installed a UHF connector for the antenna and used an antenna that was already five or six years old. Just recently, I had noticed a bit in one of the magazine columns about how collapsible antennas can get dirty and deteriorate. Although at the time I said to myself, "Yeah, that can happen," it never had happened to me — so it didn't really register. Now, all of the inconsistent symptoms were explained: fairly good range with the antenna down, but poor with it up; good range sometimes, then extend or collapse the antenna and everything changes. (The heat-sensitive transistor was the additional trouble.) A new antenna was put on the transmitter, and the old one was disassembled and inspected. I was amazed at the amount of dirt and oily crud on the sliding contacts that make the connections between the telescoping sections of the antenna. I now carry a small bottle of alcohol in my toolbox, and I am trying to develop the habit of always wiping the antenna clean before ever collapsing it.
On Saturday everything checked out perfectly. The radio was solid, and the Magnum II purred like a kitten. The bird handled even better on the ground than I had expected it to, and a high-speed taxi run down the runway indicated that it was ready to fly. After the months of stumbling around, the first flight was almost anticlimactic. My Tomahawk flew, and flew well. As expected, she was a bit nose-heavy, but I always like to start out that way. During the next week I took a little weight out of the nose, made some trim changes, and looked forward to another beautiful Saturday.
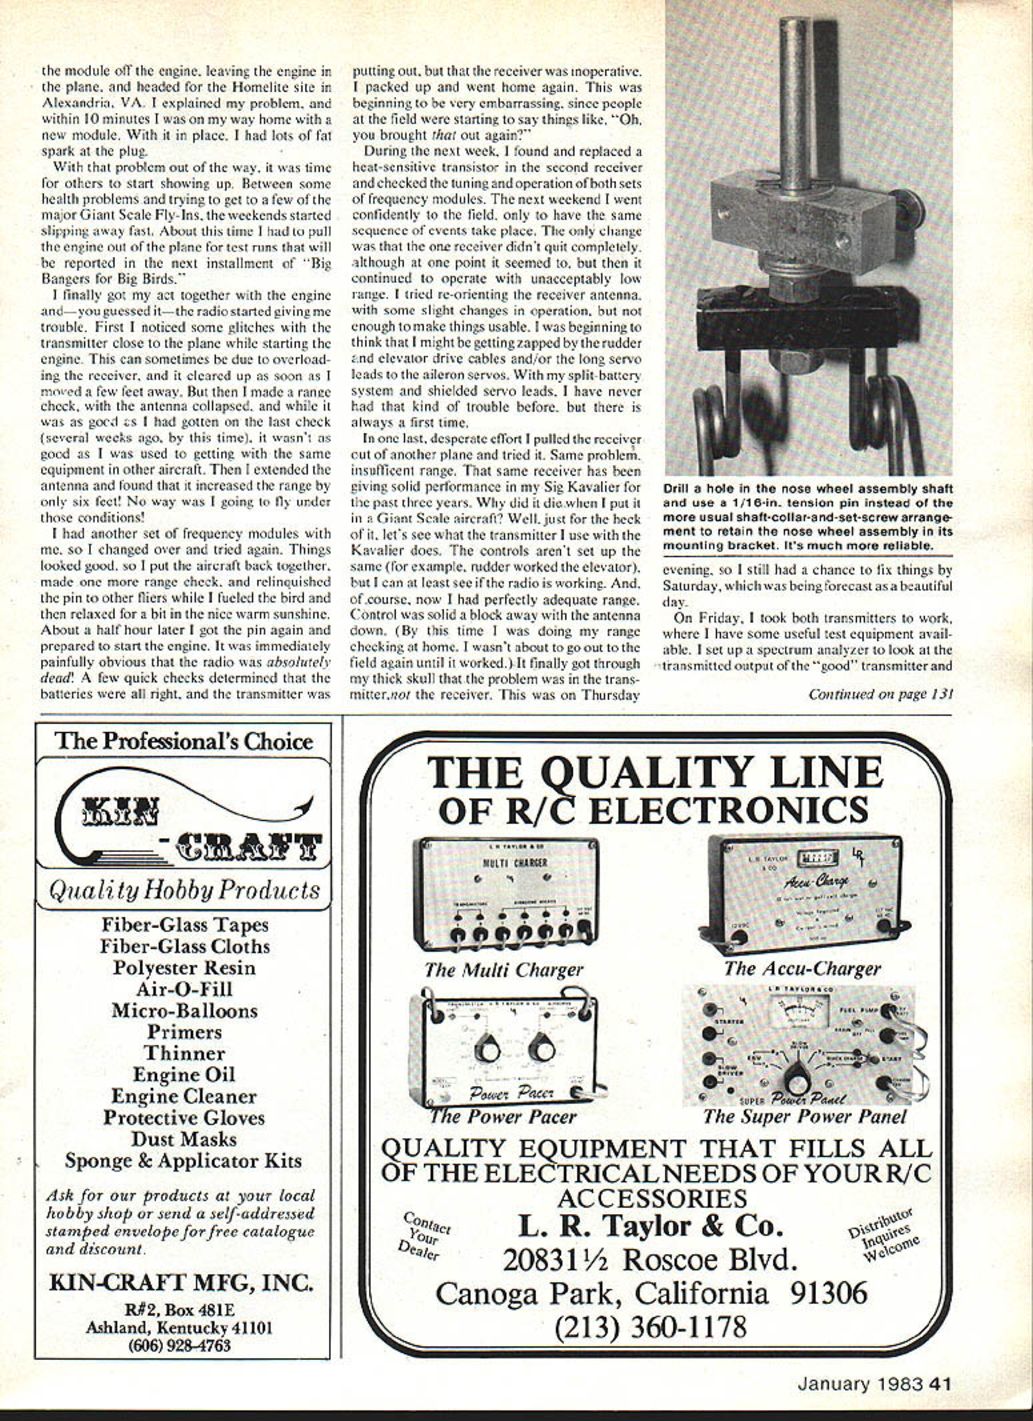
The Tomahawk's second flight started as well as the first one had, but before it was over I had proven that I still had some stupidities in reserve. After the takeoff, I flew around for a bit getting the feel of the bird, and then started making some low passes for pictures. On the second pass everyone began hollering, "The nose wheel's turned." Sure enough, the nose wheel was turned 90 degrees to the fuselage. I immediately set up for landing, planning a long final and a slow, nose-high touchdown. Just after turning on final, the nose wheel dropped away from the plane. I continued the approach, and the bird touched on the main gear, rolled a ways, and then started digging divots with the air scoop on the cowl. It was only then that I realized that the whole nosewheel strut had parted company, not just the wheel. Except for a few dings in the cowl, there was no damage, not even a broken prop, but the whole nosegear was way out in the weeds off the end of the runway. With help from a half-dozen club members, and a lot of luck, the gear was found. This meant I had half a chance to get it back on so I could fly again on Sunday.
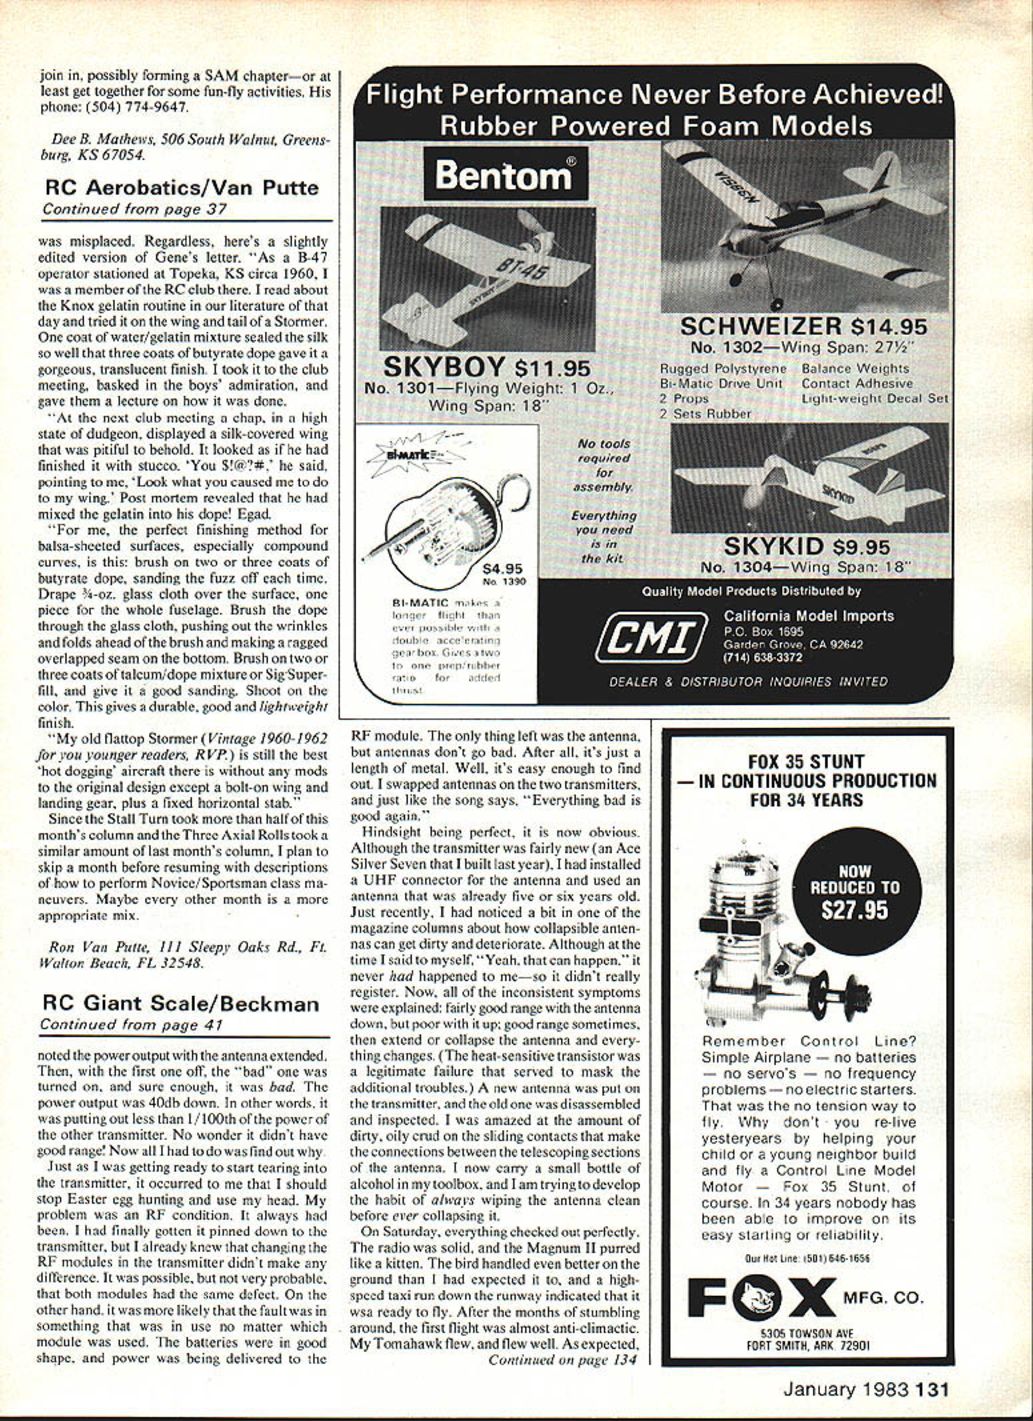
It was already obvious to me what had happened. The nose wheel assembly is a double-strut unit that comes in the kit, already assembled. The upper end is a 5/16-inch steel rod that turns in two aluminum mounting blocks bolted to the firewall. It is held in by shaft collars, just like the nosegear on smaller models. In my particular installation, only one collar was used, and when the gear slid down, it disengaged the steering arm. At the time I installed the unit I didn't think anything of it except to try to take measures (obviously unsuccessful) to keep the set screw and collar from coming loose. Since I was lucky enough to be able to reinstall the unit, I also had a chance to recognize my latest stupidity. Time and time again I have said that we must treat our Giant Scale birds like real aircraft, not models. Yet I casually accepted a technique that is the usual practice in small RC models only because there isn't anything better. With a 5/16- or even a 1/4-inch steel shaft, it is a simple matter to drill a small hole and insert a tension pin which cannot loosen and slip off.
I was lucky on that one; my Tomahawk flew again the next day. But don't you do as I do; do as I say right from the start: in every little way, treat your Giant Scale aircraft as a full-scale aircraft.
Bob Beckman 8248 Holly Grove Ct. Manassas, VA 22110
Transcribed from original scans by AI. Minor OCR errors may remain.

