
Radio Control GIANT SCALE
Bob Beckman
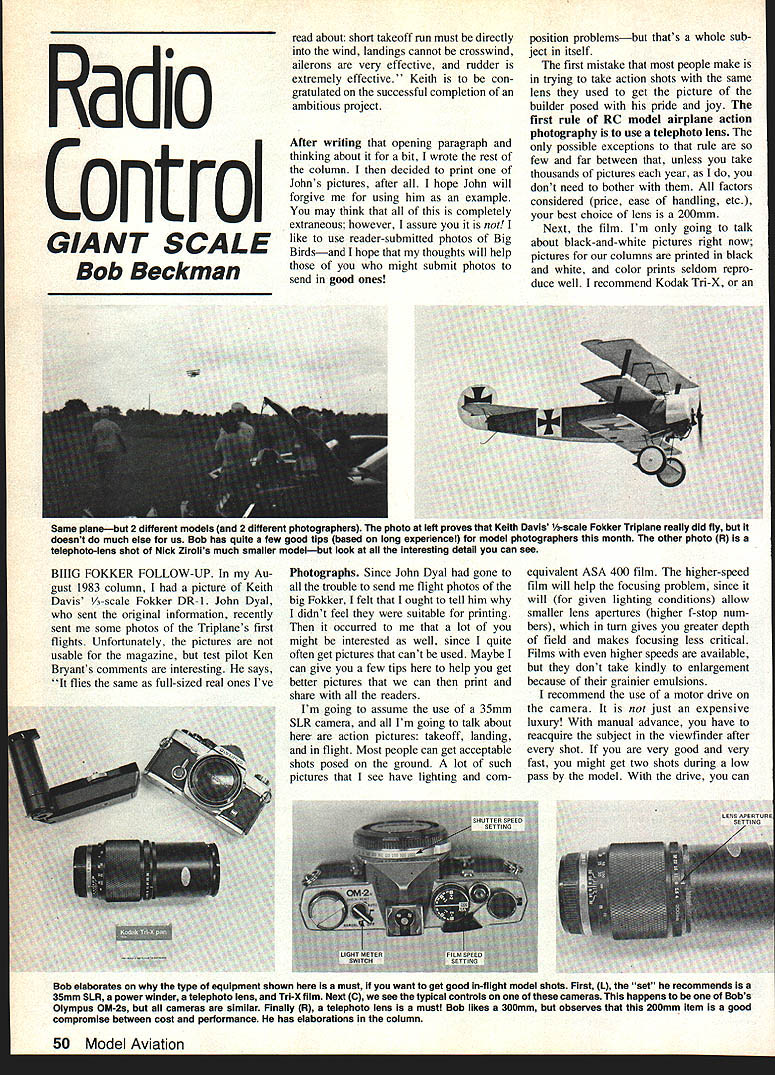
Big Fokker Follow-up
BIG FOKKER FOLLOW-UP. In my August 1983 column I had a picture of Keith Davis' 1/4-scale Fokker DR-1. John Dyal, who sent the original information, recently sent me some photos of the Triplane's first flights. Unfortunately, the pictures are not usable for the magazine, but test pilot Ken Bryant's comments are interesting. He says, "It flies the same as full-sized real ones I've read about: short takeoff run must be directly into the wind, landings cannot be crosswind, ailerons are very effective, and rudder is extremely effective." Keith is to be congratulated on the successful completion of an ambitious project.
After writing that opening paragraph and thinking about it for a bit, I wrote the rest of the column. I then decided to print one of John's pictures after all. I hope John will forgive me for using him as an example. You may think that all of this is completely extraneous; however, I assure you it is not! I like to use reader-submitted photos of Big Birds—and I hope that my thoughts will help those of you who might submit photos to send in good ones.
Action photography: basic rules
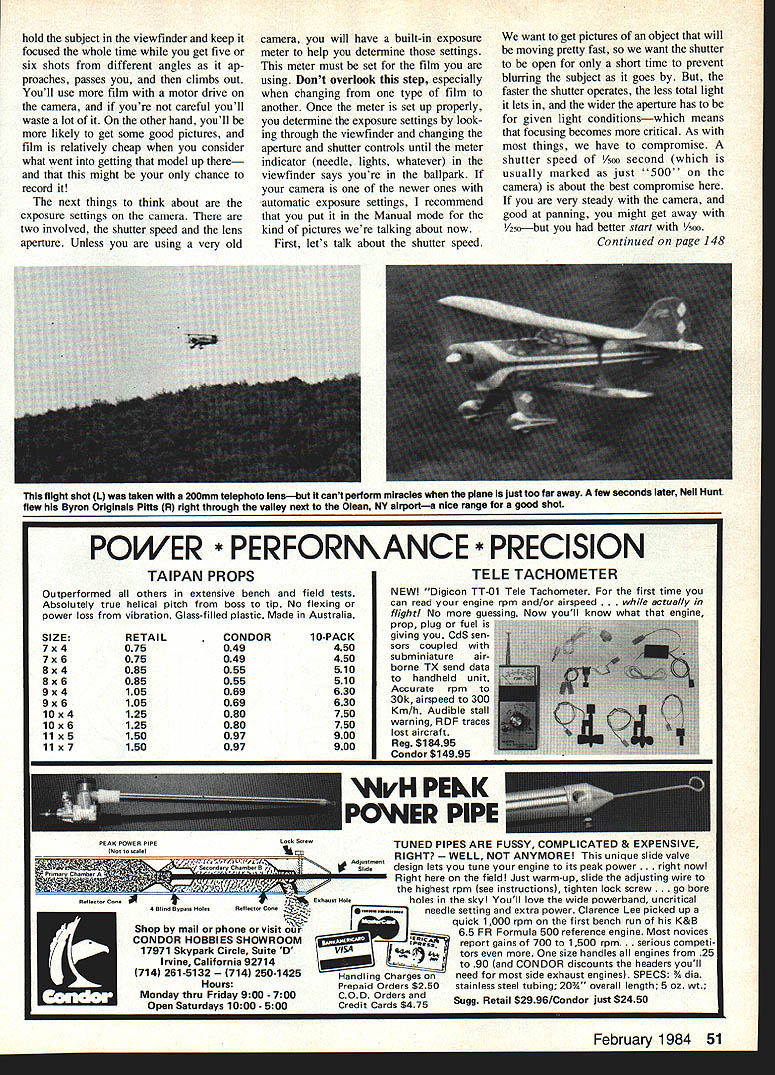
The first mistake most people make is trying to take action shots with the same lens they used to get the picture of the builder posed with his pride and joy. The first rule of RC model airplane action photography is to use a telephoto lens. The only possible exceptions to that rule are so few and far between that, unless you take thousands of pictures each year, you don't need to bother with them. All factors considered (price, ease of handling, etc.), your best choice of lens is a 200mm.
Next, the film. I'm only going to talk about black-and-white pictures right now; pictures for our columns are printed in black and white, and color prints seldom reproduce well. I recommend Kodak Tri-X, or an equivalent ASA 400 film. The higher-speed film will help the focusing problem, since it will (for given lighting conditions) allow smaller lens apertures (higher f-stop numbers), which in turn gives you greater depth of field and makes focusing less critical. Films with even higher speeds are available, but they don't take kindly to enlargement because of their grainier emulsions.
I recommend the use of a motor drive on the camera. It is not just an expensive luxury! With manual advance you have to reacquire the subject in the viewfinder after every shot. If you are very good and very fast, you might get two shots during a low pass by the model. With the drive you can get five or six shots of different angles, approaches, passes, climbs out.
I'm going to assume the use of a 35mm SLR camera, and all I'm going to talk about here are action pictures: takeoff, landing, and in flight. Most people can get acceptable shots posed on the ground. A lot of such pictures that I see have lighting and composition problems—but that's a whole subject in itself.
Exposure settings: meter, shutter, aperture
Next things to think about are exposure settings; there are two involved: shutter speed and lens aperture. Shutter speed must be short to prevent blur.
Unless you are using a very old camera, you will have a built-in exposure meter to help you determine those settings. This meter must be set for the film you are using. Don't overlook this step, especially when changing from one type of film to another. Once the meter is set up properly, determine the exposure settings by looking through the viewfinder and changing the aperture and shutter controls until the meter indicator (needle, lights, whatever) in the viewfinder says you're in the ballpark. If your camera is one of the newer ones with automatic exposure settings, I recommend that you put it in the Manual mode for the kind of pictures we're talking about now.
#### Shutter speed We want to get pictures of an object that will be moving pretty fast, so we want the shutter to be open for only a short time to prevent blurring the subject as it goes by. But the faster the shutter operates, the less total light it lets in, and the wider the aperture has to be for given light conditions — which means that focusing becomes more critical. As with most things, we have to compromise.
- Recommended shutter speed: 1/500 second (marked "500" on the camera). This is about the best compromise.
- If you are very steady and good at panning, you might get away with 1/250, but start with 1/500.
With the shutter speed set, make the final exposure setting by changing only the aperture until the meter indication is correct. There is, however, one more hidden trap. The meter is made to measure the light in relation to an assumed "average" picture. Since we're talking about models in flight, we're going to have much more sky in the picture than that "average," and the meter is going to think there is lots of light. The result is a perfectly exposed picture of some sky with a dark, underexposed model in the middle of it. Do not despair; there are ways around this.
- Easiest fix: set the aperture so that the meter says you are overexposing. The sky portion will be overexposed, but the model will be properly exposed. How much to overexpose you will learn by experience.
- Another method: set the meter for a lower-speed film than you are actually using. This fools the meter into thinking it needs more light and compensates for the bright background. (This is what the backlighting compensation control on an automatic camera does.)
If you have an automatic camera and can't—or don't want to—put it on Manual, you'll have to keep other things in mind. Most automatic cameras are "aperture-preferred." That means you set the aperture you want, and the camera automatically sets the shutter speed. The shutter is just the opposite of what we want to control, so unless your camera is "shutter-preferred," you'll have to fudge it. The viewfinder display should show you what shutter speed the camera is setting itself for. By watching this and changing the aperture, the camera can get set up for the 1/500 shutter speed you want. (Now you know why I recommend the Manual mode of operation.)
Distance, framing, and composition
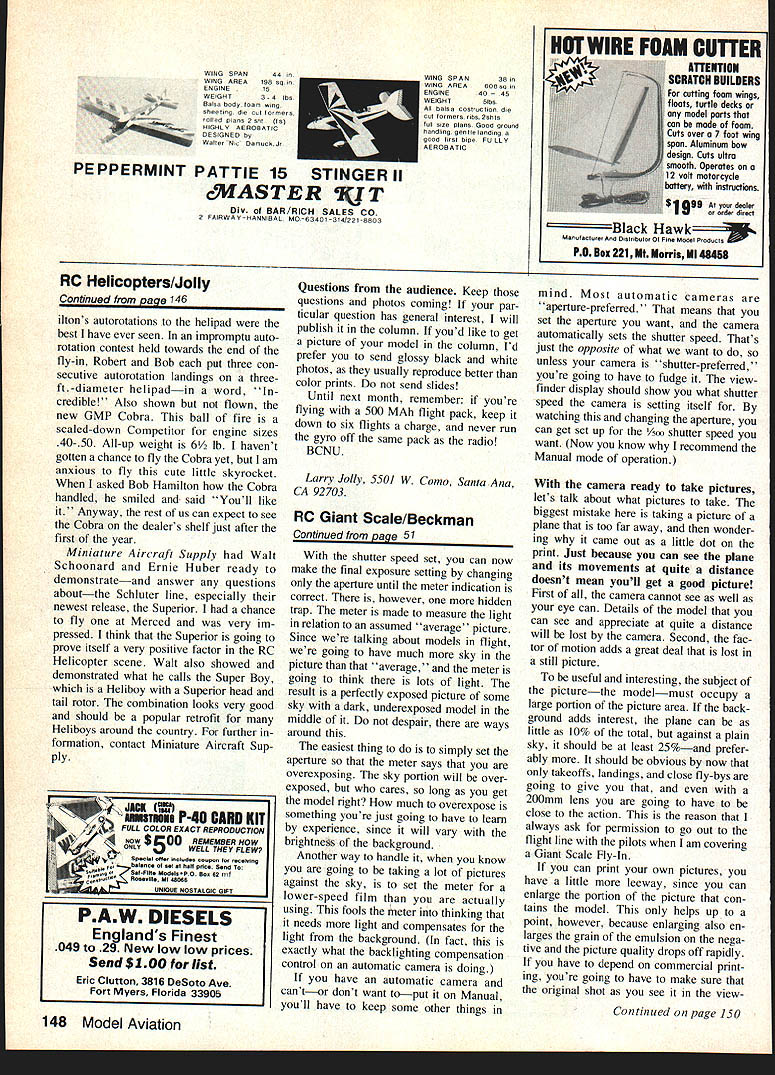
The biggest mistake is taking a picture of a plane that is too far away, and then wondering why it came out as a little dot on the print. Just because you can see the plane and its movements at quite a distance doesn't mean you'll get a good picture. First, the camera cannot see as well as your eye. Details of the model that you can see and appreciate at quite a distance will be lost by the camera. Second, the factor of motion adds a great deal that is lost in a still picture.
To be useful and interesting, the subject of a picture — the model — must occupy a large portion of the picture area.
- If the background adds interest, the plane can be as little as 10% of the total.
- As a general rule, the model should be at least 25% — and preferably more.
It should be obvious by now that only takeoffs, landings, and close fly-bys are going to give you that, and even with a 200mm lens you are going to have to be close to the action. This is the reason I always ask for permission to go out to the flight line with the pilots when I am covering a Giant Scale Fly-In.
If you plan to print your own pictures, you will have a little more leeway, since you can enlarge the portion of the picture that contains the model. This only helps up to a point, however, because enlarging also enlarges the graininess of the emulsion on the negative and the picture quality drops off rapidly. If you have to depend on commercial printing, you're going to have to make sure that the original shot as you see it in the viewfinder contains a large percentage of the model.
Once you've got all these previously named factors under control, you can start thinking about the composition of the final picture. Here again, doing your own printing is an advantage because you can enlarge and crop to improve composition. If you're restricted to commercial photo lab prints, your print will only give the size, composition, and contrast that's on your negative.
Composing the picture consists of choosing the background for the model within the frame. Sometimes you won't have much control over background, but getting some cloud formations instead of a drab sky can help a lot. Getting some trees or other ground-level objects into flight shots makes them much more interesting.
You also have a lot of control over the positioning of the model within the frame. Centering the model horizontally and vertically is not the thing to do. You want to get across the feel of the action of the model, so leave more room in front of it within the frame.
- If the model is climbing (or you want to give the impression it is climbing), position it below the horizontal center of the frame.
- If it's descending, put it above the center.
- Even if it's flying straight and level, avoid having it right on the horizontal centerline.
All of these things are easier to do if you make your own prints, but they can be done when the picture is taken if you keep them in mind.
Final notes
Obviously, I'm just scratching the surface on the subject of photography. It should, however, be a deep enough scratch for the majority of you who just want to get some usable pictures out at the flying field. And now, class, I'm going to expect some good pictures from you in the near future!
Correction
In my article about the 1983 IMAA Fun Fly Festival (December 1983 Model Aviation), I included a picture and some information about Jack Fortney's model of the 1909 Antoinette. The information about the source of the plans for that model was as Jack had reported to me at the time. Shortly after I got home, I received a note from Jack correcting that data. The plans from which the model was built were by Vern Zundel and appeared in the September 1970 issue of American Aircraft Modeler. My apologies to you and to Jack for overlooking his note when writing the article.
Bob Beckman 8248 Holly Grove Ct. Manassas, VA 22110.
Transcribed from original scans by AI. Minor OCR errors may remain.

