

Radio Control: Giant Scale
John A. de Vries Colonel, USAF, Ret. 4610 Moffat Ln. Colorado Springs, CO 80915
Dedication
The magic word for this month is "dedication." When any of us undertakes to build a Giant Scale model, the big idea is that we're full of it—dedication, that is. With plan or kit at hand, we embark on a project that will never be completed without it—total dedication. We may be diverted from our task from time to time, but with dedication we will produce a model that flies under radio control.
Admittedly, being dedicated to a particular model takes a lot of time, patience, and money. Oftentimes we may be sidetracked for a host of reasons—too many to enumerate here. But through sheer grit, most of us will see the model through to completion.
The Kit Designer
Take the extreme case of the model designer who intends to kit his effort. He starts out with a clean piece of drafting paper, a pencil, a stack of documentation, and a desire to produce a commercially viable model airplane. To bring his project to fruition will require more dedication than many of us can even contemplate.
The kit designer must decide the ultimate scale and size of his model, calculate its probable flying weight, engineer the model's structure, and choose an appropriate power plant. Even as he prepares his drawings, he must ensure that all the parts of the model fit. When the drafting is finished, he must build a test model to verify the plan's accuracy. The test model (or models) must be flown and the test findings incorporated in both drawings and models.
Finally, with a good flying model at hand, the kit designer must go through all the machinations that will result in a box full of compatible parts on the shelf of the hobby shop or in the hands of the model builder. Probably the most important consideration in this massive effort is that a model, built from the kit by the average model builder, will duplicate the looks and performance of the designer's test model(s).
Pat Corderman's Northrop Gamma
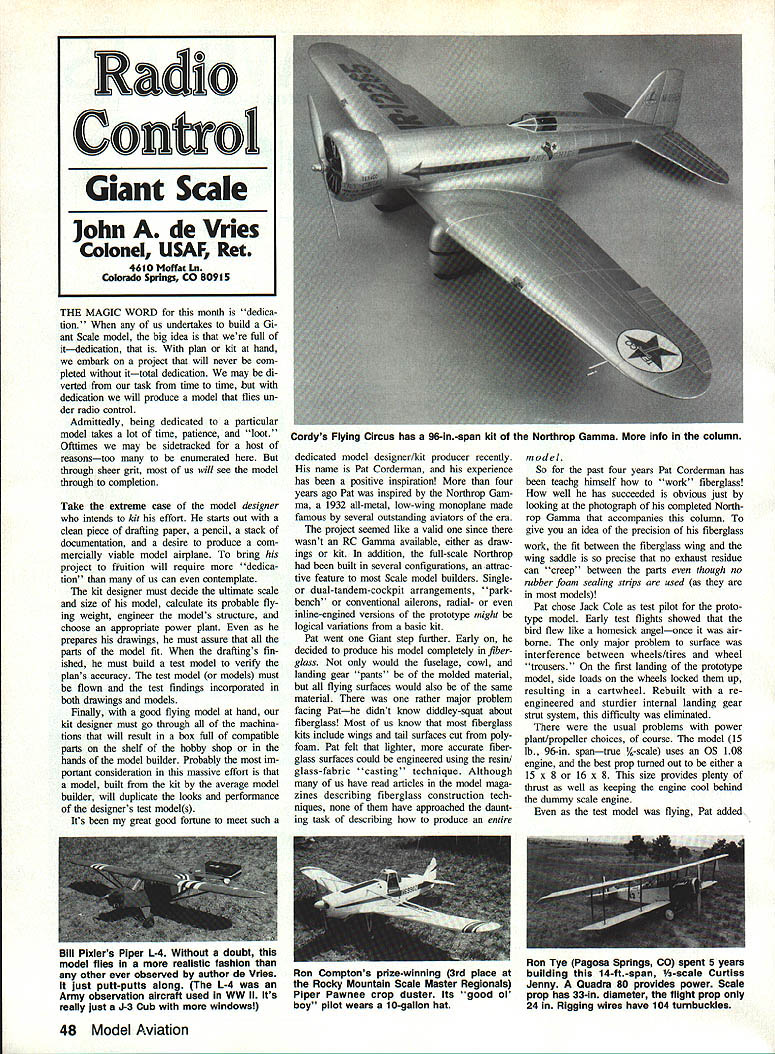
It's been my great good fortune to meet such a dedicated model designer/kit producer recently. His name is Pat Corderman, and his experience has been a positive inspiration. More than four years ago Pat was inspired by the Northrop Gamma, a 1932 all-metal, low-wing monoplane made famous by several outstanding aviators of the era.
The project seemed valid since there wasn't an RC Gamma available, either as drawings or kit. In addition, the full-scale Northrop had been built in several configurations—an attractive feature to most scale model builders. Single- or dual-tandem-cockpit arrangements, "park bench" or conventional ailerons, radial- or even inline-engined versions of the prototype might be logical variations from a basic kit.
Early on, Pat decided to produce his model completely in fiberglass. Not only would the fuselage, cowl, and landing gear "pants" be molded, but all flying surfaces would also be of the same material. There was one major problem facing Pat—he didn't know diddley-squat about fiberglass. Most of us know that fiberglass kits include wings and tail surfaces cut from polyfoam. Pat felt that lighter, more accurate fiberglass surfaces could be engineered using the resin/glass-fabric casting technique. Although most of us have read articles in the model magazines describing fiberglass construction techniques, none of them have approached the daunting task of describing how to produce an entire model.
So for the past four years Pat Corderman has been teaching himself how to work fiberglass. How well he has succeeded is obvious just by looking at the photograph of his completed Northrop Gamma. To give you an idea of the precision of his fiberglass work, note the fit between the fiberglass wing and the wing saddle: there is no gap—not even enough for exhaust residue to creep between the parts, even though no rubber foam sealing strips are used (as they are in most models).
Pat chose Jack Cole as test pilot for the prototype model. Early test flights showed that the bird flew like a homesick angel—once it was airborne. The only major problem to surface was interference between wheels/tires and wheel trousers. On the first landing of the prototype model, side loads on the wheels locked them up, resulting in a cartwheel. Rebuilt with a sturdier internal landing gear strut system, this difficulty was eliminated.
There were the usual problems with power plant/propeller choices, of course. The model (15 lb., 96-in. span—true 1/6-scale) uses an OS .108 engine, and the best prop turned out to be either a 15 x 8 or 16 x 8. This size provides plenty of thrust as well as keeping the engine cool behind the dummy scale engine.
The fiberglass castings of the Gamma model include all of the raised paneling of the prototype. Scale rivets (precise blobs of glue) must be added by the builder to duplicate the round-headed rivets of the real bird. Pat chose to duplicate Frank Hawks' Texaco Sky Chief version of the Northrop, with conventional ailerons (the scale "park bench" aileron versions proved to be too prone to flutter). Thus, the kit includes the colorful red, white, black, and green pinstripe stick-on decals to duplicate Hawks' coast-to-coast record-setter.
Kit Details and Ordering
If you're interested in getting one of these kits, you can contact Pat at:
- Cordy's Flying Circus
- 1502 N. Prospect
- Colorado Springs, CO 80907
- Phone: (719) 473-7195
The kit is in the $300-plus range.
Other Designs: Supermarine S6B
Still on the subject of dedication—have you seen what L.F. "Doc" Pepino has designed? Doc has produced a set of drawings for the Supermarine S6B Schneider Trophy-winning seaplane that'll take your breath away. From them you can produce either a 100% scale bird or a 90-in. span sport-scale "floater" that's truly impressive. There are six large sheets to the drawing set, and Doc can provide accompanying photo packs featuring the full-scale airplane as displayed in the Science Museum, London, England, in color or black-and-white.
- Folded and sent parcel post: $57
- Rolled and mailed "Priority": $60
From: Scale Plans & Photo Service, 3209 Madison Ave., Greensboro, NC 27405.
It makes me wish there were a suitable body of water locally—for RC flying! Giant Scale water-planes sound like a lot of fun.
Propeller-Related Accidents
There seems to be a rash of propeller-related accidents among us Giant Scalers. Bob McLeod's great Curtiss P-40, pictured in last month's column, was the victim of just such a situation, as was Brian O'Meara's Scale Master P-47.
While thumbing through my old model magazines recently, I came across the following (Air Trails, November 1943): "The Allison engine has only 720 parts, compared to 2,300 for the Merlin." Isn't that mind-boggling?
In Bob's case, his initial test flight was going very well. The retracts worked, and the bird was very stable. Making a pass down the club field runway, he heard a sharp "crack" and the ominous sound of an unbalanced engine. The Curtiss wouldn't answer the controls and assumed a 15° nose-down attitude. There was nothing Bob could do but watch his Giant P-40 "powder" itself. Post-mortems determined that part of the multi-bladed flight prop had given way, and the resulting major vibration had rendered the servos powerless. The offending blade parted well outboard of the propeller hub—conclusions point to a failed glue joint.
Brian O'Meara's propeller problems were a bit different. The cowl on the Thunderbolt came adrift and slipped forward into the prop. Pieces were seen leaving the model. They turned out to be hunks of the razor-backed "Jugs" windshield and canopy, apparently sliced off by propeller fragments. Skillful pilot O'Meara did have some control over the bird, and it wasn't totally destroyed in the crash. But the sound that the engine made indicated that at least part of the propeller was still attached to its drive shaft.
In both instances, however, the results were similar: a pair of Giant Scale models was destroyed by disintegrating propellers. The moral here is to check your props and cowling before every flight. It's cheap insurance, even if you have to replace a $10 prop. It's even less expensive to check and replace overstressed and aging cowling mounting pads and bolts.
Closing
Gonna have to skip next month's column because of the annual coverage of the Nats. See you all in the December issue!
Transcribed from original scans by AI. Minor OCR errors may remain.

