
Radio Control: Giants
John A. de Vries, 4610 Moffat Ln., Colorado Springs, CO 80915
STICK-and-tissue scale Giants? When the idea was first proposed to me, I was skeptical as heck. After all, Giant Scale models usually follow full-scale construction methods rather than those that have been traditional for model airplanes over the years. Rugged, heavy, strong—big birds are first and foremost miniature aircraft.
After receiving a bunch of letters (four of them, which is a bunch on any given subject) requesting information about Giant Scale stick-and-tissue models, I got to thinking. The first letter described a superlightweight P-47 Thunderbolt that made the writer wonder how it had been built. My first reaction was to aim him at John Pond and Ed Packard (of Cleveland Models) as sources for enlargeable scale drawings for rubber-powered designs that could be adapted to Giant Scale construction. I finished off my response by admonishing my correspondent to reengineer the enlarged drawings to strengthen the model against the engine and aerodynamic stresses that the stick-and-tissue Giant would experience.
My answers to the other letter writers were essentially the same. Over the months that followed, I pondered the matter further and came to some interesting conclusions. Experience in enlarging rubber-powered models has taught me that the reengineering exercise is a bit more complex than it sounds. So, instead of simply recommending that you do it, I'm offering a few hints on how to do it.
Choosing a model and drawings
- The first step is to choose your model and drawings. There are literally thousands from which to choose.
- Remember that most stick-and-tissue designs were drawn to produce inherently stable models. To accomplish that desirable trait, tail surfaces—and dihedral angles—usually have been enlarged from true scale.
- The drawings that are closest to scale—and therefore provide the best basis for a big RC model—are available from Cleveland, Peerless, and Megow (in its more expensive kits).
- Many of the drawings from the British-based Aeromodeller plans service, available through Bob Holman, are also suitable.
Scale and material considerations
- Consider the scale of the original drawings. If your plans are drawn to a scale of 1 inch to the foot, they'll need to be blown up three times for a quarter-scale model. Instead of the 1/16-sq. balsa you'd normally use for the original, you'll be using 3/16-sq. balsa. Since that will be kind of light, consider using 1/4-in.-sq. spruce for the major structural parts of the RC fuselage.
- Many good subjects are drawn to a scale of 3/4 inch to the foot. These plans will need to be enlarged four times for a quarter-scale bird. Again, use 1/4-in.-sq. spruce for the primary structure.
- To assure fuselage strength, gusset each fuselage joint with 1/4- or 3/32-inch plywood bits; this does the job without a substantial weight penalty.
- If the subject you chose requires fuselage formers, consider 1/8-in. flat stock—or, better yet, 3/16-in. stock.
- If the full-scale prototype is built of metal, consider using sheeting that's at least 1/8 in. thick, and make sure you trim any formers to allow for the thickness of the sheeting. Otherwise, you're going to have one fat fuselage!
Fuselage strengthening
- Use gussets at joints and strong formers as noted above.
- Reinforce the firewall and nose area structurally, since you'll probably add weight to the nose for balance.
Wing structure
- Beefing up the wing structure will require your most diligent attention. Use spruce for the spars, and don't be reluctant to add shear webbing from root to tip.
- Make sure your plywood center-section wing joiners are good and sturdy; reinforcing them with carbon fiber adds strength while keeping weight low.
- Leading and trailing edges also need substantial, traditional strengthening. One way of strengthening the leading edge is to design in a D-section; you'll have to trim the front portion of the ribs to allow for the sheeting.
- Gusset each rib at the trailing edge to promote a warp-free wing.
- Design in subspars to support the ailerons; most stick-and-tissue birds merely simulate ailerons with strips of black tissue on the wing covering.
Tail surfaces
- The tail feathers won't pose many redesign problems. You may want to reduce them to true scale dimensions using your scale documentation as a reference.
- Use spruce spars and heavy-duty leading and trailing edges.
- Most designs feature flat tail sections. If you want to duplicate tail feathers having thicker cross sections, cut the stab/elevator and fin/rudder from sheet stock. Add leading and trailing edges and balsa ribs, sanded to the appropriate cross sections.
- Use sturdy hinges (do the same with the ailerons), and use enough of them to prevent flutter.
Landing gear and wheels
- You'll probably use a lot of music wire, trying to get the landing gear right. Wire bending isn't the easiest task, particularly in the sizes needed to support a Giant Scale model. Take your time with the bender, have a good supply of wire available, and check the wire's shape often against your enlarged drawing.
- Obtaining wheels of the proper size may pose a scale problem. Check my January "RC Giants" column for a neat way to acquire rollers of the correct dimensions.
Powerplant selection and firewall
- Select an appropriate power plant for your lightweight Giant. For goodness' sake, don't overpower the beastie.
- Consider a .120, particularly for the smaller, lighter birds (under 15 lb.). Even the biggest of the big probably won't require anything more potent than a Quadra 40 or a Zenoah G-38.
- Use 1/2-in. plywood for the firewall, and reinforce it heavily—especially if you're using one of the larger engines. You're probably going to have to add weight to the nose anyway, so you might as well make it structural stiffening.
- Using one of the commercially available vibration-absorbing engine mounts is a must.
Nonstructural parts and covering
- Nonstructural parts such as cowlings, wheel pants, and scale details can be made of balsa.
- Use the covering of your choice. The textured iron-ons are a good option for old-timey fabric-covered birds. You can also use the traditional silk-and-dope covering, if you're comfortable with the technique.
Servos
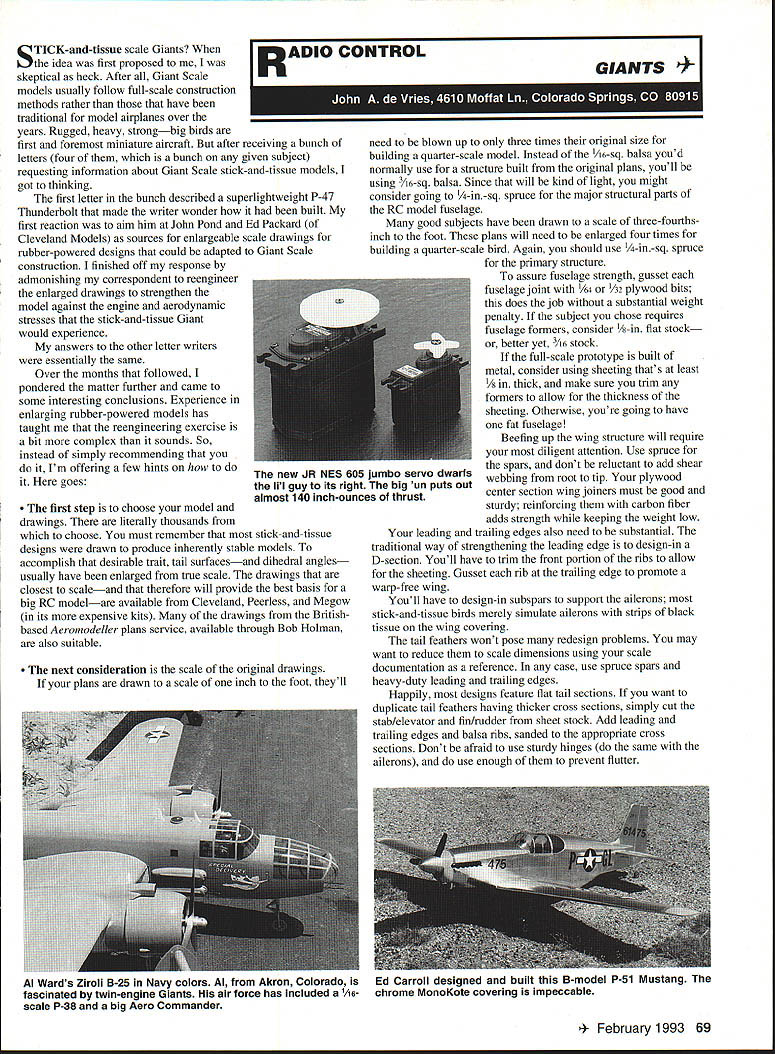
- Here's some big news in servos: Chris Mikosvsky, the new public relations man at Hobby Dynamics, sent me one of the new JR NES 605 monster servos to check out. This is one strong surface-mover, with 139.1 inch-ounces of torque.
- Most Giant Scaleers are inclined to double up with the standard-size servos (each generating 40 to 50 inch-ounces of torque) to control their ailerons. The usual complement is a servo for each aileron and a couple for both the elevators and rudder. This sort of installation requires Y connectors between the RC receiver and the servos, so that each pair drives the appropriate control in the same direction.
- With the JR NES 605, you won't need Y connectors. This servo is plenty strong enough to handle ailerons or movable tail feathers all by itself. It'll move 60° in 0.28 seconds, which is fast enough for most big birds.
- The servo case looks big enough to hold four standard-size servos, yet it weighs only 4-3/4 ounces. The four field-effect transistors inside the case make for a very reliable device.
- Although my evaluation was limited to bench checks, I was impressed by the servo's smooth operation. I hooked it up to my JR MAX receiver, and attached one of the pointers to the 1-3/4-in.-dia. servo wheel. The pointer returned to the index point every time, with only a tiny deviation of a degree or less from one try to the next.
- I've ordered three of the 605 servos for the big Ryan. With one of JR's standard servos on the throttle channel, they should handle the 10-footer easily.
Scale wheel technique
- Use brass or aluminum stock, and turn its exterior diameter to 1/8 in. larger than the diameter of your axle wire.
- Round off one end of the stock to a slightly convex cross section.
- Slice off 1/8 in. or 3/16 in. from the turned stock.
- In the flat end, carefully drill a hole the diameter of the axle. Control the depth of the hole so that you don't go all the way through the disk.
- Drill a hole into the side of the "cup," and tap it for a 4-32 screw. Scrounge a setscrew from a standard wheel collar, and place it in the tapped hole.
- Now you have a scale wheel hub that works just like a wheel collar but doesn't expose the "googly" end of the axle wire. A super-scale touch would be to take your hubs to an engraver and have him or her duplicate the appropriate company logo on the rounded end of the hubs.
Back with you next month with news about some precision landing gear retract valves that'll boggle your mind!
Transcribed from original scans by AI. Minor OCR errors may remain.

