
RADIO CONTROL GIANTS
John A. de Vries 4610 Moffat Lane, Colorado Springs, CO 80915
The man who says "I'll give you a dollar for every Giant Scale model that comes out nose heavy if you'll give me a nickel for every one that comes out tail heavy" would make a fortune.
Despite the fact that the engines in our models are proportionately heavier than those in the little ones, there's much battery-pack shifting and firewall/tire weight bolting to get the CG in the desired range for our big RC models. Many solid-brass prop spinners are sold for the express purpose of adding nose weight to Giant Scale models.
Model designers are forever writing in their how-to articles, "keep the tail surfaces of the model light." Then they proceed to design rudders and stabilizers to be made with big chunks of balsa or (even worse) tail feathers made from solid balsa sheet. That type of construction is almost guaranteed to produce a tail-heavy model that will require lead up front to balance the model properly.
It's a given that an RC model's structure should be strong enough to handle anticipated flight and landing loads, but still be as light as possible. Balancing weights don't meet these criteria.
LAMINATING TAIL SURFACES
During World War I, full-scale aircraft designers used wire for wing and tail-surface trailing edges to keep structural weight down. While that material isn't suitable for models, there are ways to keep the back ends of our models light and strong. It's no secret — I'm talking about laminating.
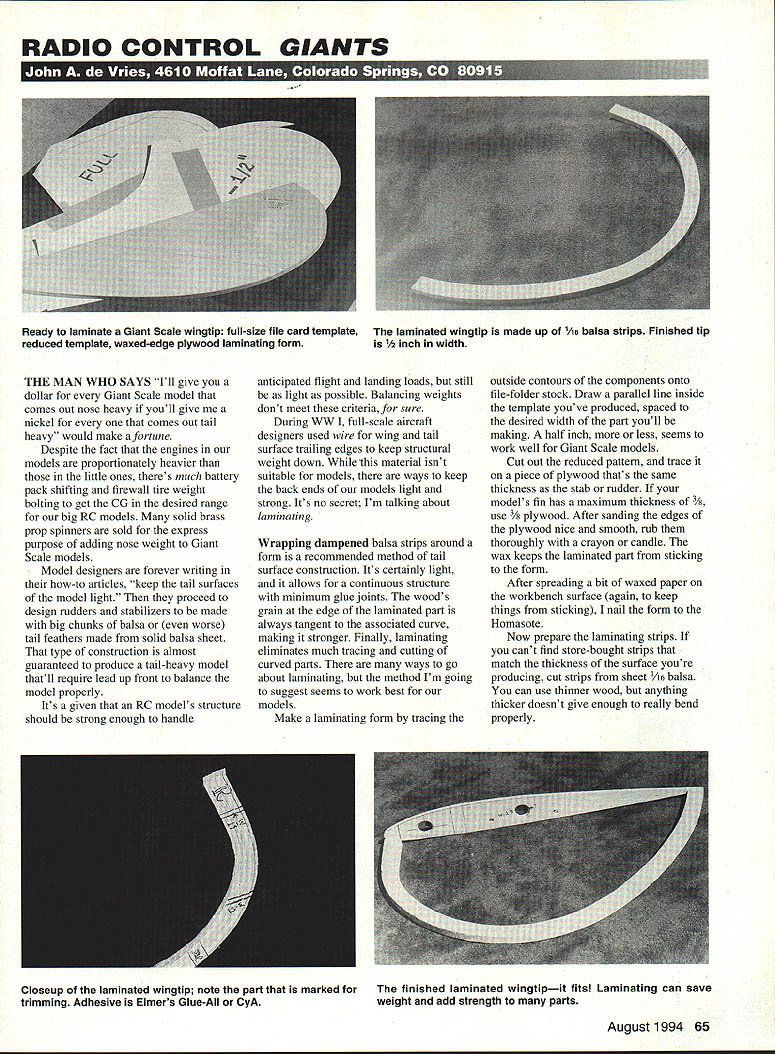
Wrapping dampened balsa strips around a form is a recommended method of tail-surface construction. It's light, and it allows for a continuous structure with minimum glue joints. The wood's grain at the edge of the laminated part is always tangent to the associated curve, making it stronger. Finally, laminating eliminates much tracing and cutting of curved parts.
There are many ways to go about laminating, but the method below seems to work best for Giant Scale models.
Making the laminating form
- Trace the outside contours of the component onto file-folder stock.
- Draw a parallel line inside the template, spaced to the desired width of the part. A half inch, more or less, seems to work well for Giant Scale models.
- Cut out the reduced pattern and trace it onto a piece of plywood that's the same thickness as the stabilizer or rudder. If the fin's maximum thickness is 3/8", use 3/8" plywood.
- Sand the plywood edges smooth and rub them thoroughly with a crayon or candle. The wax keeps the laminated part from sticking to the form.
- Spread a bit of waxed paper on the workbench surface (again, to prevent sticking) and nail the form to Homasote.
Preparing and laminating the strips
- If you can't find store-bought strips that match the thickness you need, cut strips from 1/16" balsa sheet. Thinner wood can be used, but anything thicker doesn't bend properly.
- Soak the strips in warm water. Adding a little household ammonia helps; the bathtub is the easiest place for this because it may stink up the bathroom. When the strips are thoroughly soaked and bendy, it's laminating time.
At this point you have two choices for glue: cyanoacrylate (CA) — the old standby — or Elmer's Glue-All. I prefer the thin, fast CA.
- Bend the strips around the form and apply thin CA, making sure the whole work is thoroughly saturated. If using Elmer's, lay a bead of white glue in the middle of each strip before fitting it around the form.
- After the first course, use sturdy T-pins at the ends of the laminations; move and add pins as you add strips.
- Use the lamination width the part calls for; compress the entire layup on the form.
- Pins and extra lamination may leave indentations; these can be sanded off later to give the part a smooth exterior contour.
- Run laminations well beyond the ends of the form; the laminations will be trimmed to fit the drawings later.
Laminating need not be limited to tail feathers. Curved parts generally can be made this way instead of using straight parts—the outlines work well. For really big RC models, consider 1/32" plywood laminating strips for added strength. This produces a curved part that will hold its shape and tighten the model covering.
FINISHES AND LEGALITIES
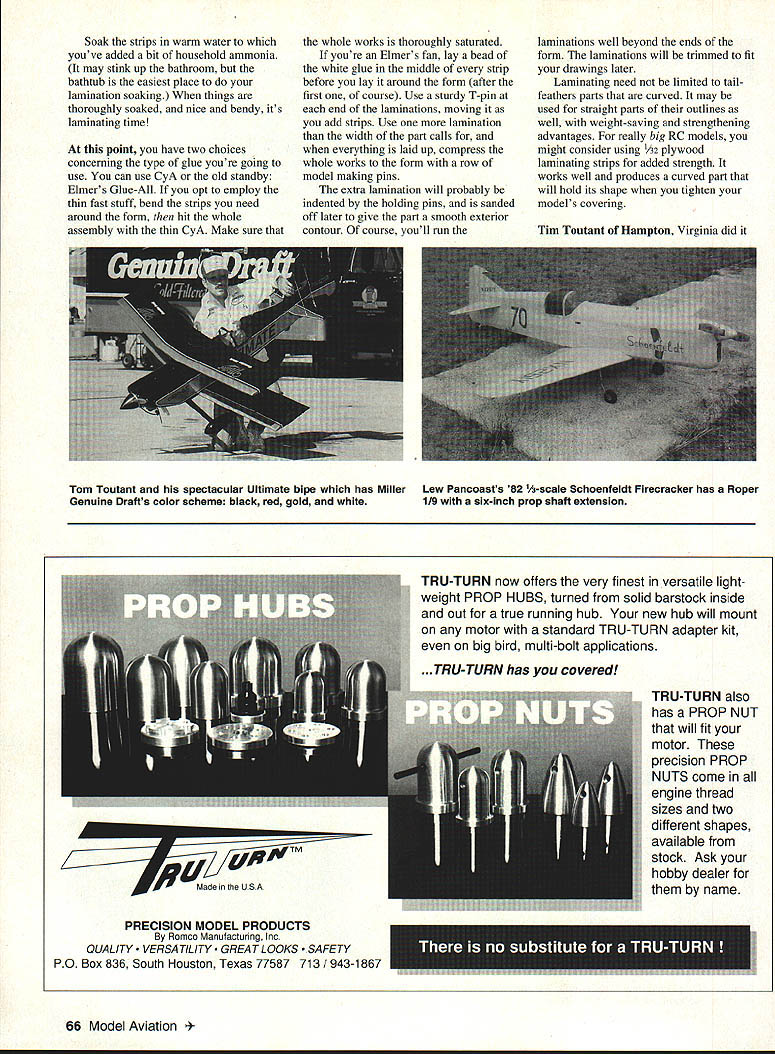
Tim Toutant of Hampton, Virginia did just that. When it came time to apply the finish to his 28% scale Ohio R/C Ultimate biplane, he went to the experts for help and permission.
Big companies pay big bucks to consultants to design their logos and color schemes, and those elements are guarded jealously. Tim wanted to duplicate the Miller Genuine Draft beer color scheme and logo on his biplane, but he didn't want trouble with Miller. So before he purchased his first roll of MonoKote, Tim contacted Miller and received permission. They required that he sign a disclaimer, absolving the company from any liability resulting from the flight of the model.
With permission in hand, Tim covered his model in Miller colors. He had a local sign company produce the scale-sized logos from TrimKote. Things came out beautifully, and he had the satisfaction of knowing that he did things right legally.
SCALE HARDWARE AND UPCOMING DETAILS
Curvin Eisenhart of York, Pennsylvania—whose stunning Giant Waco model has graced these pages—has shared his technique for producing scale piano hinges. He even sent a steel jig and the necessary sheet-aluminum and wire stock so I could try his method. I'll report how it comes out next month and will detail the process in the October issue.
GOLDEN AGE RACING
In the May 1991 Giant Scale column, I suggested that it might be nifty if a Golden Age series of races could be organized. Scale representations of the Gee Bees, Wedell-Williams, Folkerts and Chesters would provide a colorful addition to the currently popular Unlimited and AT-6 Reno-type pylon scrambles. Although there is apparently a move afoot to realize such a race series, details are unclear at the moment.
When and if it happens, one Giant Scale model builder wants to be ready with a model of Tony LeVier's Schoenfeldt Firecracker. Lewis Pancoast of Spokane, Washington has been ready since 1982.
His home-designed-and-built 1/3-scale Rider R-4 spanned 72 inches, weighed 15 pounds, and was powered by a Roper 1.9 engine. Lew used a six-inch prop-shaft extension to move the engine back in the cowling to avoid nose-heavy problems, but he still had to add four ounces of lead in the tail of the model to get the CG right. The original model was flown for five years and still exists. Lew plans to design and build a new version of the Firecracker, but he is waiting for a definitive set of rules before putting pencil to paper.
It would be refreshing to add a Big Bird model Golden Age racer event to the present refurbished-warbird Reno-type pylon races.
Transcribed from original scans by AI. Minor OCR errors may remain.

