
Radio Control: Giants
John A. de Vries 4610 Moffat Lane Colorado Springs, CO 80915
It's a fine state of affairs when an old, but not too moldy, fighter pilot can't remember which rudder to push! That's what Yours Truly did in a recent column. Thanks to Paul Crabtree of Norman, Oklahoma (and several others!), I've been gently corrected. To quote Paul, "As an old Throttle Jockey, I can never forget overcoming the rudder offset in a dive. The plane wants to go to the right, so you push the left rudder to compensate."
Of course Paul's right, and I got things a bit backwards. My only defense: it's been 45 years since I dived a P-40N with its built-in fin offset.
Camouflage Challenges
Finishing off a Giant Scale model with a camouflage paint scheme often poses interesting problems. The "sand and spinach" British WWII paint scheme, with "duck-egg blue" undersides, is tricky to duplicate if you want to get it right. Camouflaging a German fighter with its black-green and dark-green uppers and "hellblau" (sky blue) lowers may be just as intricate. To really be in scale, neither scheme can be applied in a random fashion, although it may appear so in your documentation. Most military aircraft, from whatever nation and era, have had to comply with standard camouflage patterns. Sometimes the standard paint job concerned only a single aircraft type. French camouflage in WWI was standardized for practically all aircraft types, fighters as well as reconnaissance birds.
The standard camouflage pattern was frequently applied at the factory. In use, however, the standard was often modified by local combat conditions. Winter weather often dictated that an overall white paint job be applied over the summer's dunkelgrün und hellblau. Desert operations would need a tan/brown camouflage scheme that would be accomplished on the spot by squadron painters. Standards would go down the drain when conscientious, albeit artistically untrained, mechanics got a spray gun in their hands. This standard/nonstandard camouflage situation gives scale modelers fits. Two choices are available to us:
- Duplicate a factory-fresh example and reproduce the standard patterns — being careful to spray those places where a spray gun was used and mask those patterns that had hard edges. This limits how much we can weather the model, because the standard scheme would deteriorate after a few weeks on operations.
- Finish the model after a very specific prototype. This approach demands a good stack of documentation photos if we're to get it right. Some vestiges of the original paint job may have survived, but the tender attentions of squadron maintenance people, under pressure to keep the craft in commission, will have resulted in some strange and wonderful paint jobs. In the extreme, sponges may have been used to even out the colors after patches to repair combat damage had been applied.
Invasion stripes weren't all that standard. Some of them were painted at night, with black paint! My Mustang only had them on the underside of the wing. Why they were there at all has always puzzled me. My P-51K had spent its entire operational life in the Pacific theatre.
The chance of the average modeler acquiring a copy of the actual military specification (the standard) that spells out in detail just how to paint his RC creation is rather remote. We'll just have to depend on the best of the available second-hand documentation (photos, three-views) in order to get it "right."
Engines and Carburetors
It's no secret that many of the gas burners (engines) we use to power our Giant Scale models are equipped with the fine Walbro carburetor. That complex metal cube has baffled a lot of modelers. Thanks to Scott Shaw, Field Service Supervisor of the Walbro Corporation, the internal mysteries of the ubiquitous carb have been completely illuminated. Scott has recently completed a carburetor service manual that will knock your socks off. It's in color and contains several interesting illustrations of the innards of the Walbro carb. Better still, Scott told me that to get a copy you only have to drop him a line:
Scott R. Shaw Field Service Supervisor, c/o Walbro Corporation 6242 Garfield, Cass City, MI 48726-1937
Scott's an R/Cer whose preference is sailplanes.
Olen Rutherford — Needle Valve Mechanism
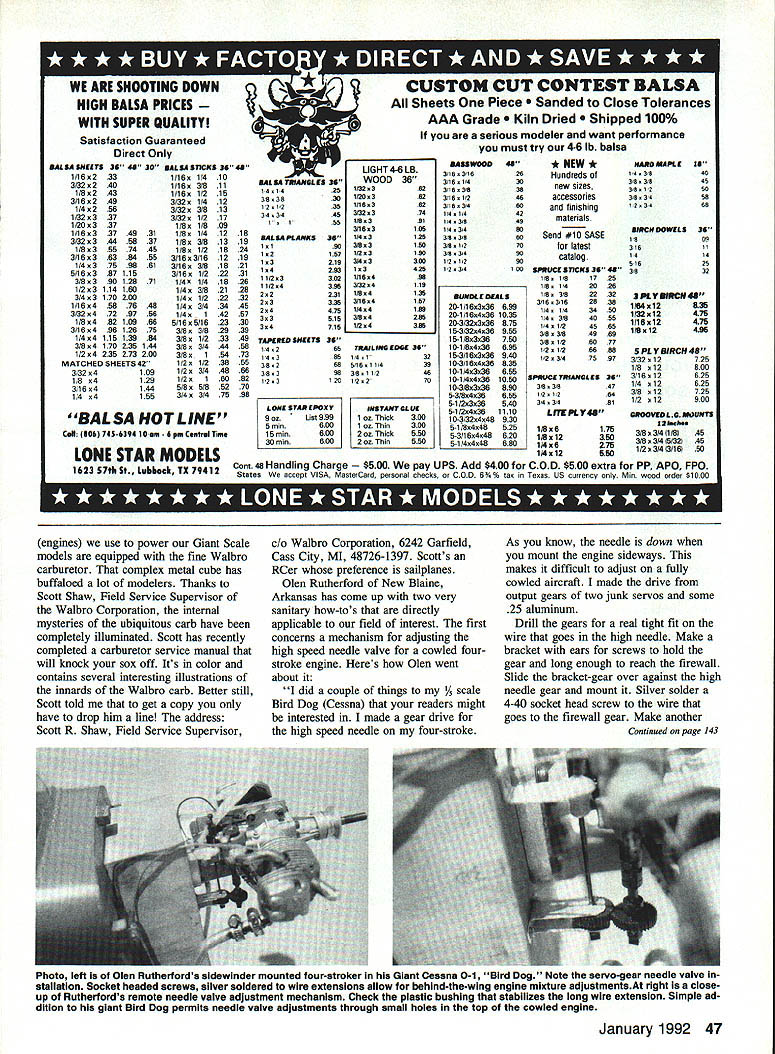
Olen Rutherford of New Blaine, Arkansas has come up with two very sanitary how-to's that are directly applicable to our field of interest. The first concerns a mechanism for adjusting the high-speed needle valve for a cowled four-stroke engine. Olen's approach:
- Make a gear drive for the high-speed needle on a four-stroke. The needle is down when you mount the engine sideways, making it difficult to adjust on a fully cowled aircraft. Olen made the drive from output gears off two junk servos and some 0.25-inch aluminum.
- Drill the gears for a real tight fit on the wire that goes in the high needle. Make a bracket with ears for screws to hold the gear and long enough to reach the firewall. Slide the bracket-gear over against the high needle gear and mount it.
- Silver-solder a 4-40 socket head screw to the wire that goes to the firewall gear. Make another gear out of two gears and make another shaft that goes to a small brass turnbuckle. Solder another 4-40 socket head screw to the end of the wire so you can adjust with a 3/32 hex key through the cowl.
The other job was a behind-the-wing remote needle valve:
- Use a short length of pushrod housing and a short length of brake cable.
- Solder the brake cable end to the needle and pass it through the pushrod housing. The cable is held by set screws in the pushrod housing.
- A small sprung clip holds the pushrod housing to the wing. That way you can change needles without removing the cowl.
Bracket with a plastic bushing on it to hold the top of the wire-screw in place. Silver-solder a 4-40 socket head to your choke wire, also.
With all of this mounted, you have three small holes in the top of your engine cowl just big enough for a 4-40 ball wrench. This lets you adjust the high and low needles and choke the engine from behind the wing where it's much safer.
Check the photos for Olen's geared needle valve mechanism. His other modeling "how-to" concerns the use of a pizza cutter (!) that we'll save for next month.
Scale Video / Closing
Dick Hansen's latest scale video showed up in my mailbox the day after I mailed last month's column. He really gets around the country in search of fascinating subjects. Dick's tape No. 11 ranges from Idaho to Alabama to New Mexico and back to Oregon. The 41-minute episode that details the 23rd Annual N.W. Seaplane Championships in Wamic, Oregon is unbelievable!
Hansen Scale Video 10807 S.E. Stacy Ct. Portland, OR 97266 Tape No. 11 — $19.95
Back with you Giant Scalers next month. 'Til then, I hope that Santa Claus fills your stockings with big engines and that your living room floor is strewn with monstrous kit boxes!
Transcribed from original scans by AI. Minor OCR errors may remain.

