
RADIO CONTROL: GIANTS
John A. de Vries, 4610 Moffat Lane, Colorado Springs, CO 80915
Fabric coverings and rib stitching
Back in the "good old days" practically every full-scale airplane was covered with fabric. Fighters, bombers, transports, racers, and even homebuilts had doped muslin or linen to give them shape and aerodynamic substance. Speeds were 200 mph and below, so the cloth covering was more than adequate. Besides, it was light, cheap, and looked great when it was painted.
However, the aeronautical state of the art progressed apace and it became necessary to stitch the fabric in place, particularly on control and support surfaces. Just doping the fabric to ribs and spars was clearly inadequate, because at speed the fabric would "balloon" and destroy the airfoil shape.
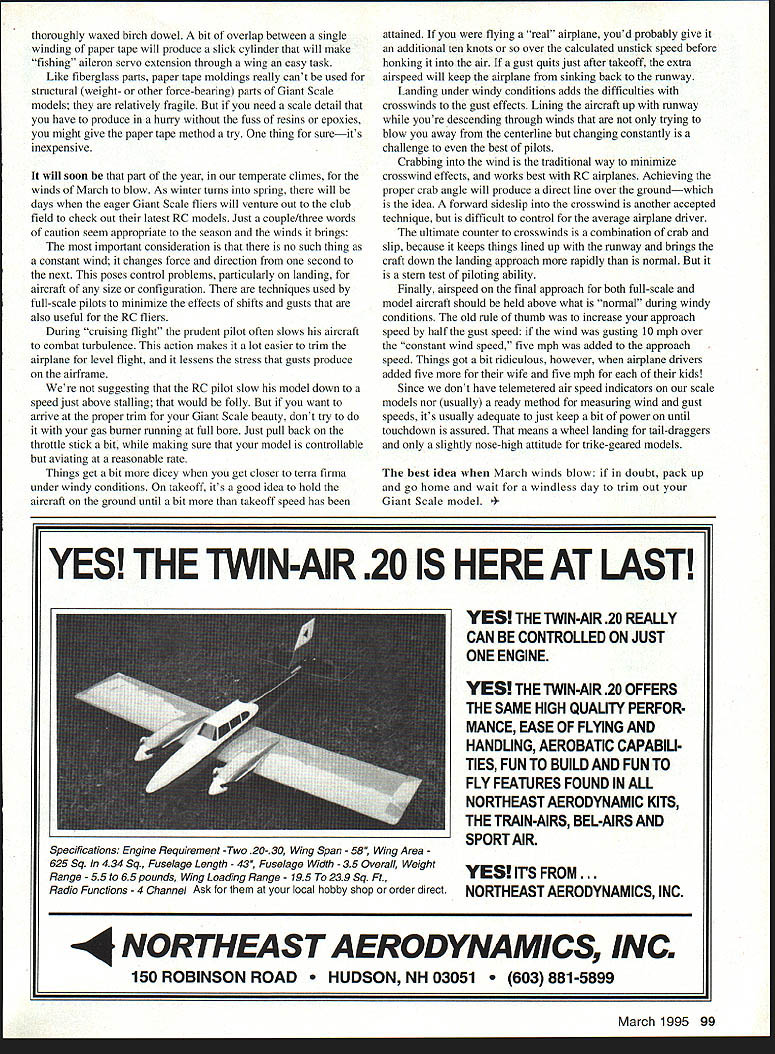
It soon became necessary to specify the number of stitches per rib as a function of anticipated airspeeds. This poses an interesting problem from a scale-model viewpoint. To be truly detailed, the covering on a fabric-covered model should display rib-stitching at a scale spacing. But most research information seldom includes this sort of nit-picking detail. Fortunately, Neil Griffin of Belleville, Michigan, has come up with an official specification sheet that spells out rib-stitch spacing. By simply applying the scale of your Giant model, you can come darn close to correct stitch locations.
Don't forget that practically all of the WWI warbirds featured fabric-covered control surfaces in their early incarnations, despite their "all-metal" construction. The tail feathers (rudders and elevators) on Spitfires, Warhawks, Cobras, Mustangs, and Me 109s were fabric covered and rib-stitched, as were their ailerons. Then, of course, the stitch lines were covered by doped-on rib tapes to secure the stitches and reduce parasitic drag.
Mustang resource: Mustang Modeler and Enthusiast
Speaking of Mustangs (P-51s), old friend Chuck Neely is still hard at work, putting out issues of his Mustang Modeler and Enthusiast newsletter four times a year. It's almost a given that, along with the ubiquitous J-3 Cub, the North American fighter is the most-modeled prototype among scale RC builders. For the dedicated P-51 model builder, a subscription to Chuck's quarterly documentation is practically mandatory.
For $16 a year, you'll get Mustang facts, detailed scale drawings of the 51's components, and reviews of kits, plans, and books concerned with the Mustang. An example of the sort of highly detailed info that Chuck provides: a recent issue included a completely dimensioned drawing of the cutouts in the P-51B, C, and D spinner for Hamilton Standard propellers! If you want to build a dead-on scale version of the popular WWII fighter, contact Charles L. Neely at 4142 W. Cambridge Ave., Visalia, CA; Tel.: (209) 625-3011.
Gene Falada and Sea-Clusion Aeronautics
Prolific Giant-scale model designer Gene Falada is retiring—fortunately from his "day job"—which will give him a lot more time to produce his stunning drawings of seaplanes, flying boats, and amphibians.
Gene allows that he has five pages of potential modeling subjects that he wants to "bring back to life." He already offers nine or so maritime aircraft drawing sets, including subjects ranging from the Aeronca LD to the three-engined Blohm & Voss BV-138C.
Our uncertainty about how many aircraft Gene has drawn is a result of the fact that some of his designs allow construction of either the float-equipped or landplane versions—two subjects for the price of one. His Northrop Gamma drawings and their supplements detail twelve different incarnations/versions of John Northrop's all-metal low-wingers!
Gene's designs are true scratch-builders' projects—no foam. A big #10 SASE will get you a listing of the available aircraft plans from Sea-Clusion Aeronautics, 22W070 Byron, Addison, IL 60101.
"Poor man's fiberglass": paper-tape molding technique
Unless you've been building models for more than 50 years or so, you've probably never heard of "poor man's fiberglass." Back in the dim days of yore, when modelers produced their own glue by dissolving celluloid in acetone, common paper tape was used to make slick cowlings, fuselages, and wheel pants. We're talking about the tape that had to be licked and stuck—the brown stuff that came (and is still available) in rolls at your favorite variety or stationery store.
It's still a necessity if you want to wrap up a registered package, because the Postal Service requires its use (the paper will accept rubber-stamping ink). We're not talking about the new, improved "packaging tape" with its slick plastic surface.
Like the current technique using fiberglass cloth, the thoroughly dampened paper tape was applied over a carved form or master. Strips were wound neatly around the smoothly clear-doped, waxed forms (usually made of balsa). Two or three layers of tape were used, and when it dried out, the form was removed and the exterior of the paper part was sanded smooth.
The big idea was to have the tape stick to itself and not to the form. Then, too, the part being made couldn't have any undercuts that would keep the balsa master from being easily removed.
Thoroughly primed and painted, the paper-tape parts rivaled other techniques for producing smooth, multi-coated model accessories. Properly reinforced, paper-tape parts might be an inexpensive way to make scale details for Giant-scale models. The technique certainly has application in making protected aileron servo-wire runs through our thick wing ribs. The form can be a doped or thoroughly waxed birch dowel. A bit of overlap between a single winding of paper tape will produce a slick cylinder that will make "fishing" aileron or servo extensions through a wing an easy task.
Like fiberglass parts, paper-tape moldings really can't be used for structural (weight- or other force-bearing) parts of Giant-scale models; they are relatively fragile. But if you need a scale detail that you have to produce in a hurry without the fuss of resins or epoxies, you might give the paper-tape method a try. One thing for sure—it's inexpensive.
Notes
- If original rib-stitch spacing cannot be determined, use spacing indicated in these curves.
- Lacing to be carried to leading edge when velocity exceeds 275 M.P.H.
- Placard: NEVER EXCEEDS SPEEDS—MPH (INDICATED). Curves presume leading-edge support reinforcement such as plywood or metal.
Spring winds: tips for flying Giant-scale models
It will soon be that part of the year, in our temperate climes, for the winds of March to blow. As winter turns into spring, there will be days when the eager Giant-scale fliers will venture out to the club field to check out their latest RC models. Just a couple of words of caution seem appropriate to the season and the winds it brings:
The most important consideration is that there is no such thing as a constant wind; it changes force and direction from one second to the next. This poses control problems, particularly on landing, for aircraft of any size or configuration. There are techniques used by full-scale pilots to minimize the effects of shifts and gusts that are also useful for the RC flier.
During cruising flight the prudent pilot often slows his aircraft to combat turbulence. This action makes it a lot easier to trim the airplane for level flight, and it lessens the stress that gusts produce on the airframe.
We're not suggesting that the RC pilot slow his model down to a speed just above stalling; that would be folly. But if you want to arrive at the proper trim for your Giant-scale beauty, don't try to do it with your gas burner running at full bore. Just pull back on the throttle stick a bit, while making sure that your model is controllable but aviating at a reasonable rate.
Things get a bit more dicey when you get closer to terra firma under windy conditions. On takeoff, it's a good idea to hold the aircraft on the ground until a bit more than takeoff speed has been attained. If you were flying a "real" airplane, you'd probably give it an additional ten knots or so over the calculated no-stall speed before honking it into the air. If a gust quits just after takeoff, the extra airspeed will keep the airplane from sinking back to the runway.
Landing under windy conditions adds crosswind difficulties to the gust effects. Lining the aircraft up with the runway while you're descending through winds that are not only trying to blow you away from the centerline but changing constantly is a challenge to even the best pilots.
Crabbing into the wind is the traditional way to minimize crosswind effects, and it works best with RC airplanes. Achieving the proper crab angle will produce a direct line over the ground—which is the idea. A forward sideslip into the crosswind is another accepted technique, but is difficult to control for the average airplane driver.
The ultimate counter to crosswinds is a combination of crab and slip, because it keeps things lined up with the runway and brings the craft down the landing approach more rapidly than is normal. But it is a stern test of piloting ability.
Finally, airspeed on the final approach for both full-scale and model aircraft should be held above what is "normal" during windy conditions. The old rule of thumb was to increase your approach speed by half the gust speed: if the wind was gusting 10 mph over the "constant wind speed," five mph was added to the approach speed. Things got a bit ridiculous, however, when airplane drivers added five more for their wife and five mph for each of their kids!
Since we don't have telemetered airspeed indicators on our scale models nor (usually) a ready method for measuring wind and gust speeds, it's usually adequate to just keep a bit of power on until touchdown is assured. That means a wheel landing for tail-draggers and only a slightly nose-high attitude for trike-geared models.
The best idea when March winds blow: if in doubt, pack up and go home and wait for a windless day to trim out your Giant-scale model.
Transcribed from original scans by AI. Minor OCR errors may remain.

