
Radio Control: Giants
John A. de Vries 4610 Moffat Lane Colorado Springs, CO 80915
Tail skids vs. tail wheels
We're going to start this month's column at the back end of the Giant-Scale model. Don't know if you've noticed, but a majority of our Big Birds drag tails. Except for the occasional warbird with tricycle gear, tricycle-geared models are few and far between. That leaves a couple of ways to keep the rudder from getting ground off: a tail skid or a tail wheel.
In general, tail skids were used during the era when airports were nothing more than grass fields. Skids worked well on grass and even served as brakes on early birds that didn't have wheel brakes. When paved runways came into use, tail wheels became popular. Pilots found that concrete tended to wear tail-skid shoes rapidly and made takeoffs difficult because the rear ends of planes would slip and slide on hard surfaces. From the late 1930s on, most aircraft had tail wheels.
Giant-Scale modelers have a big advantage when duplicating tail supports: scale parts are large enough for detailed reproduction, so you can copy full-size arrangements almost to the last nut and bolt.
World War I tail skids were little more than pivoted devices made of hardwood. A metal pivot bar was mounted across the lower longerons; the upper end of the skid was attached to a bungee (rubber) cord for spring action, and the lower end was shod with a metal shoe. Some skids were made from leaf spring steel and gained shock absorption from the skid itself.
Ground maneuverability with a fixed skid was marginal; often a couple of wing walkers were needed to help the pilot taxi. A lone pilot had to blast the throttle with elevator neutral and rudder full over in the desired direction. Too much throttle and the propeller suddenly got a lot closer to the ground. As skids improved in the 1920s, rounded cast-metal shoes that could be edged right or left were used, and later steerable tail skids attached to rudder cables greatly improved ground maneuverability.
Solutions for models on paved runways
Tail skids and paved runways don't mix. Fixed skids make takeoffs dicey because you have little directional control until airspeed is high enough for the rudder to be effective; too much throttle early in the roll can produce a ground loop. If your model needs a tail skid, consider these remedies:
- Split the scale tail skid and insert a small tail wheel. Done properly, the wheel will be almost invisible, with only its lower edge projecting, preserving scale appearance while improving takeoff control.
- Build two tail-skid modules that bolt into a steering mechanism inside the fuselage. This creates a plug-in arrangement: use the scale skid for grass fields and swap in a tail wheel for paved runways by loosening a setscrew. The steering mechanism can include shock absorption.
For shock absorption use either heavy-duty rubber bands or, preferably, a metal spring. Screen-door springs work well, singly or in dual installations, and can be cut to length with wire cutters.
Photographs and reader inquiries
Believe it or not, two-thirds of the letters I receive about this column concern photographs. The beautiful Giant-Scale models we picture generate a lot of interest; writers usually want to contact the model’s builder to learn whose drawings were used, what special building problems were solved, or which building techniques were involved. In most cases I keep the builder’s name and address on file to provide a contact. Other readers' questions sometimes require a bit of research; happily, I have a rather complete library to back up my answers.
Book: Flying Model Warplanes
Recently I reviewed John C. Fredriksen’s book Flying Model Warplanes (Air Age Publishing, 251 Danbury Rd., Wilton, CT 06897; (800) 243-6685). The book has more than 8,000 individual entries covering plans and kits for military aircraft models worldwide — from peanuts to Giant Scale — and covers the entire history of aviation. It includes prices for many drawings, kits, and accessories, and a comprehensive listing of suppliers. Fredriksen intends to update the book every three years.
The book is well worth the $14.95 price (plus $3 S&H). It puts a lot of valuable and interesting data at your fingertips.
Aerodrome '92
For Giant-Scale builders who like WW I machines, there will be a big show at the Lake Guntersville Aerodrome in Alabama on September 5–7. Aerodrome '92 is expected to gather over 150 full-scale WW I aircraft, complemented by many Giant-Scale models of the Great War era. Daily flying exhibitions will include Fokkers, Albatrosses, SE-5s, and other period fighters and reconnaissance craft. It should be a memorable event — World War I in the air with the original cast.
Aeromaster 150 — reverse-scale by Nicholas Madonia
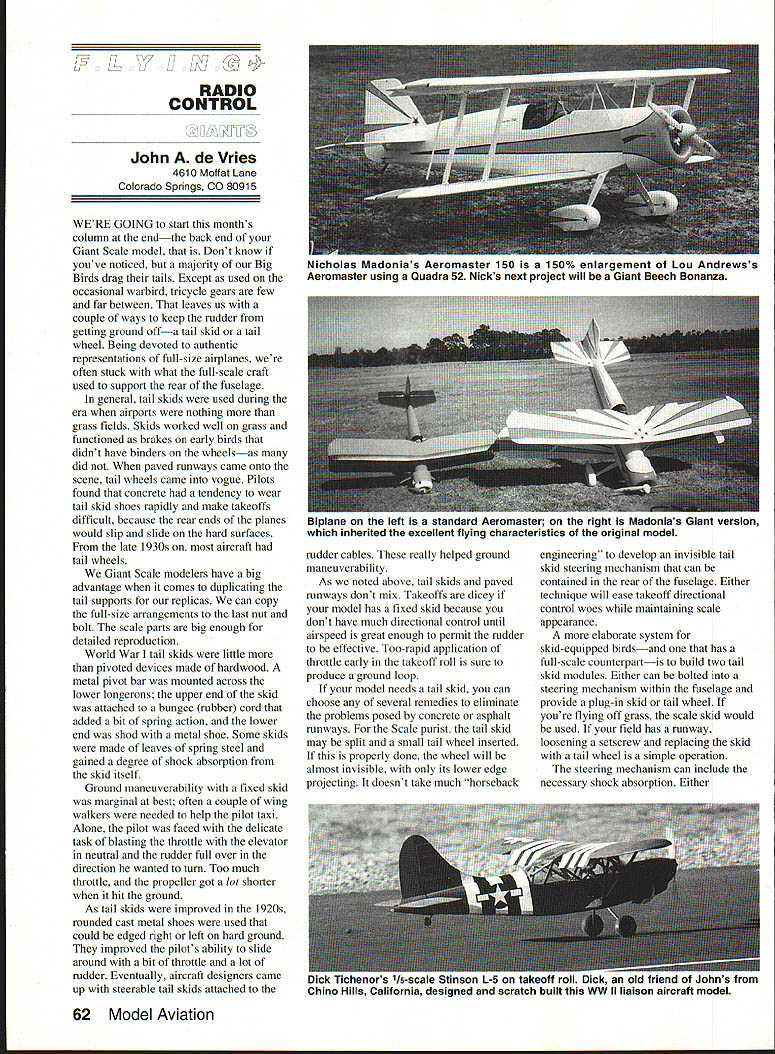
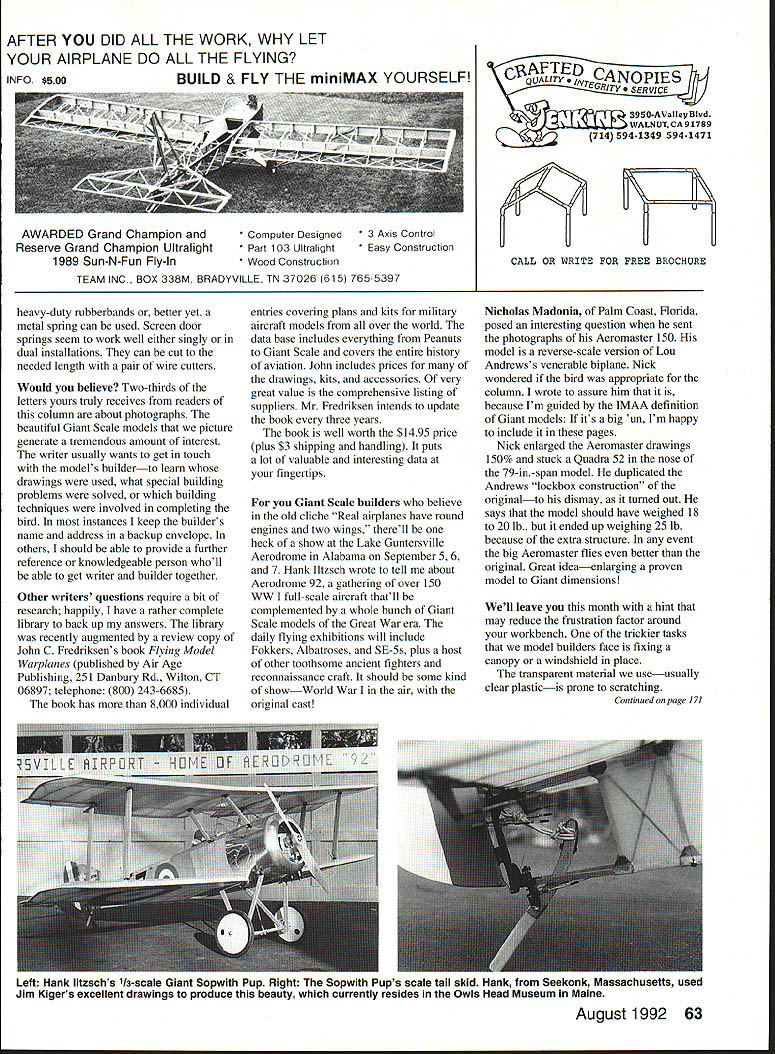
Nicholas Madonia of Palm Coast, Florida, sent photos of his Aeromaster 150, a reverse-scale version of Lou Andrews’s plane. I reassured him that the model belongs in this column — the IMAA definition of Giant models is simple: if it’s big, it’s a Giant.
Nick enlarged the Aeromaster drawings to 150% and installed a Quadra 52 in the 79-inch-span model. He duplicated Andrews’s “lockbox construction,” but the enlargement added structure and weight: the model was expected to weigh 18–20 lb but ended up at 25 lb. Despite the extra weight, the big Aeromaster flies even better than the original. Enlarging a proven model to Giant dimensions can be a great idea.
Canopy and windshield repair
One of the trickier tasks in model building is fixing a canopy or windshield. Clear plastic scratches easily, and glue globs can ruin a transparent panel. Here’s a practical technique to remove glue globs and polish out scratches:
- Remove as much glue as possible before it sets. Then let any residue dry.
- Attack the remaining glob or scratch with 400-grit sandpaper. Even out the area while minimizing the size of the sanded patch. Work slowly and carefully.
- Follow with 600-grit sandpaper to smooth the scratches made by the coarser paper.
- Use a very soft cloth (old T-shirts work well) and jeweler’s rouge (stick form) to polish the surface.
- Finally, use the soft cloth and firm rubbing to apply Brasso brass polish and restore clarity.
Depending on the severity, you might be able to start at a later step. With conscientious effort you should be able to restore clear plastic parts to near-pristine condition.
Keep the big 'uns flying!
---
Wing finishing tips (excerpt)
- Use a water-based filler such as Red Devil One Time Spackling (available at Home Depot). This filler dries white and can leave fine white lines in the wood grain; to avoid this, mix some color into the filler before application. Craft-store pigments (for example, Ceramcoat by Delta) work; a flesh tone often matches obeche well. Use a coloring compatible with water-based paints.
- Spread the filler on thinly and let it set for a few minutes. Then scrape off the excess at a 45° angle with a credit card. Let dry completely, then wet-sand back to the wood with 150–250 grit. You should be left with just enough filler to fill the grain; repeat if necessary. Make sure the sanded surface is completely dry before proceeding.
- Use a paper towel to wipe on thin coats of sealer or Varathane. Let dry, then wet-sand and wipe off with a wet towel; let dry again. Repeat as many times as desired — thin, light coats are best. Four coats often work well and add minimal weight (example: on one Falcon 600, four coats added 1.25 oz; covering with film would have added about 3 oz).
- Some builders add color pigment to Varathane with good results. Others use fluorescent film on strips and flaps, and a reflecting silver strip along the leading edge for a sun flash.
Cautions:
- Do your sanding and finishing where you have adequate ventilation. Work in a garage with the fan running and doors/windows open when possible. Protect your lungs when sanding wood.
- Always test adhesives and finishing materials on scrap wood and foam before use — confirm compatibility and that materials won’t discolor or damage the substrate.
- If you use epoxy to adhere wood skins (obechi) to cores, consider placing wax paper between the obechi and core ribs to prevent epoxy bleed-through and unwanted adhesion.
(Note: test combinations of conditioners and pigments on scrap material to ensure compatibility before applying to the model.)
---
Trim, launch and catapult technique (excerpt)
- Begin trimming with hand glides under a mentor's guidance. Balance the model at the CG indicated on the plan or test-glide and add small amounts of clay on the nose as required.
- Aim for a tight, streaking spiral climb that rolls out on top. You may need to bend a small amount of down elevator in the rear wing opposite the glide circle. Typical starting trim might be:
- 1/32" right rudder for the glide turn
- 1/32" down elevator in the right rear wing for starting trim
These adjustments should give a safe left bank on launch and a right glide circle.
- If the model comes down off the top in a steep dive, add a bit of up elevator on one or both sides. If it is too loopy and lacks altitude, try down elevator on both sides. Prefer adjusting the main (rear) wing and rudder. Use soda-can adjuster strips for fine trim changes that hold.
Prelaunch catapult technique:
- Make a catapult matched to the flier's arm length. Small kids need about a 7-inch loop of 1/8-inch FAI tan rubber on a 9 x 14-inch dowel or on 1/4-inch-square balsa. Longer arms can use a 9-inch loop on a 9-inch stick or a 10-inch loop on a 10-inch stick.
- If the loop is too long, the model will catch and flop; select loop length to match the flier and the model for a clean launch.
Transcribed from original scans by AI. Minor OCR errors may remain.

