
RADIO CONTROL GIANTS
John A. de Vries, 4610 Moffat Lane, Colorado Springs, CO 80915
Only 10 of them were built by the factory, but counting every replica from Peanut to Giant Scale, thousands have been reproduced. If you figure in the long-wing versions, thousands more have been built by modelers around the world.
I'm talking about the sleek high-winged Monocoupe in its clipped-wing form and the rest of the breed. Of the many Monocoupes manufactured, the Model 90 and 90A were the definitive versions. The aircraft have always fascinated me, and my first published radio-control (RC) design was the Model 113 Velie-powered prototype. Its appearance in Radio Control Modeler in 1978 generated a friendship that has endured.
Another Monocoupe enthusiast, A. Lynn Lockrow (of Classic AirPlans), 321 Camellia Dr., Auburn, AL 36830, wrote to advise me that he'd designed a 1/4-scale model of the clipped-wing Monocoupe. It was loosely based on Vern Clement's definitive set of drawings for a rubber-powered 43-inch-span "clipper," and included all sorts of great scale detail. When Lynn's sporty drawings were finished, he sent me a set. At the time, I was thrashing with a Berliner-Joyce P-16, so I imposed upon another friend to build the big quarter-scaler.
I finally met Lynn face-to-face at the Toledo show. He'd brought his clipped-wing model and entered it in the competition. It won first place in its class! Although I appreciated and delighted in the model, one construction feature really blew me away: Lynn had built the model with full cockpit detail, including a functioning entrance door. That sort of construction allowed him to provide hidden bolts to hold the wing in place. He reversed the usual procedure and glued hardwood threaded blocks into the removable wing's trailing edge and bolted them to the fuselage from inside the cockpit. It was a very sanitary installation.
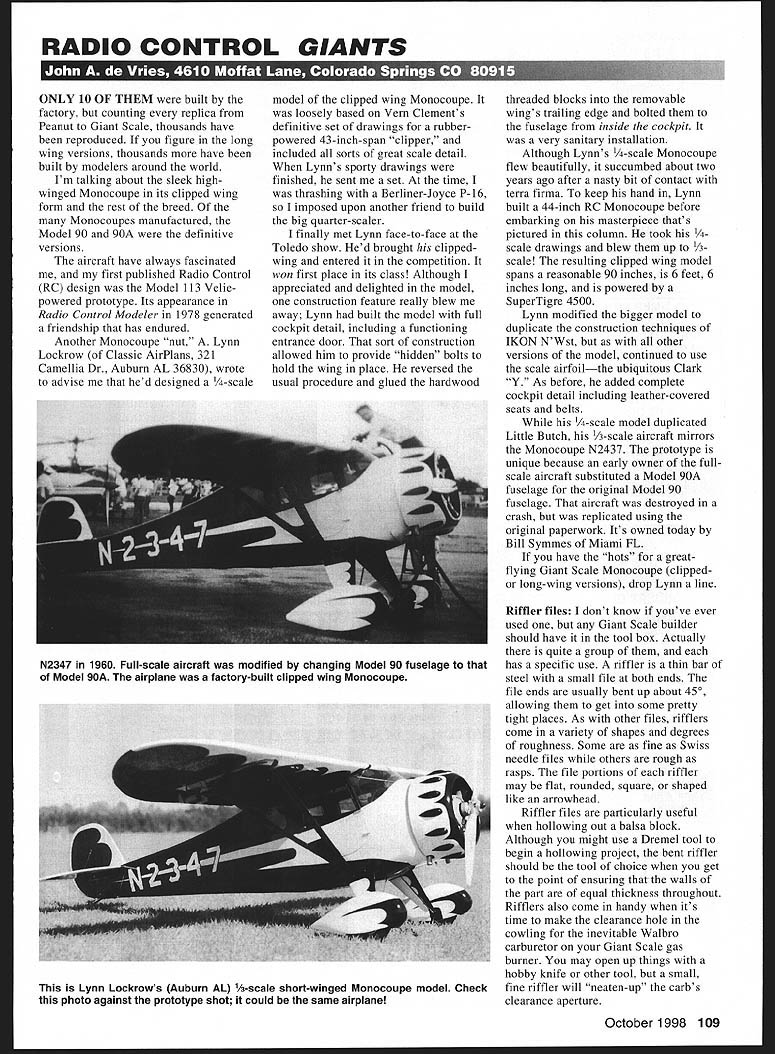
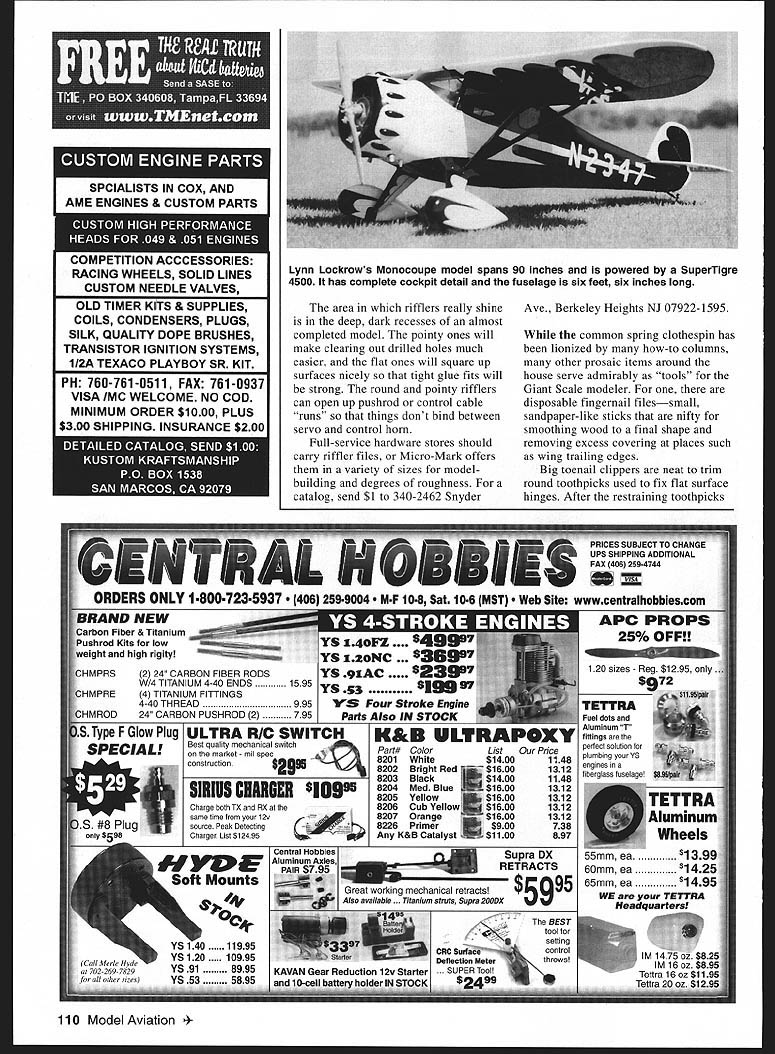
Although Lynn's 1/4-scale Monocoupe flew beautifully, it succumbed about two years ago after a nasty bit of contact with terra firma. To keep his hand in, Lynn built a 44-inch RC Monocoupe before embarking on his masterpiece pictured in this column. He took his 1/4-scale drawings and blew them up to 1/3-scale. The resulting clipped-wing model spans a reasonable 90 inches, is 6 feet 6 inches long, and is powered by a SuperTigre 4500.
Lynn modified the bigger model to duplicate the construction techniques of IKON N'Wst, but as with all other versions of the model, he continued to use the scale airfoil—the ubiquitous Clark Y airfoil. As before, he added complete cockpit detail including leather-covered seats and belts.
While his 1/4-scale model duplicated Little Butch, his 1/3-scale aircraft mirrors the Monocoupe N2437. The prototype is unique because an early owner of the full-scale aircraft substituted a Model 90A fuselage for the original Model 90 fuselage. That aircraft was destroyed in a crash, but was replicated using the original paperwork. It's owned today by Bill Symmes of Miami, FL.
If you have the "hots" for a great-flying Giant Scale Monocoupe (clipped- or long-wing versions), drop Lynn a line.
Riffler files
I don't know if you've ever used one, but any Giant Scale builder should have a riffler in the toolbox. A riffler is a thin bar of steel with a small file at both ends. The file ends are usually bent up about 45°, allowing them to get into some pretty tight places. As with other files, rifflers come in a variety of shapes and degrees of roughness. Some are as fine as Swiss needle files while others are rough as rasps. The file portions of each riffler may be flat, rounded, square, or shaped like an arrowhead.
- Best uses:
- Hollowing out balsa blocks and ensuring uniform wall thickness after initial shaping with a Dremel.
- Neatening the clearance hole in cowlings for carburetors (for example, Walbro carbs on Giant Scale gas engines).
- Clearing and squaring surfaces in deep recesses so glue joints are tight and strong.
- Opening up pushrod or control-cable runs so things don't bind between servo and control horn.
Full-service hardware stores should carry rifflers, or Micro-Mark offers them in a variety of sizes and roughnesses for model building. For a catalog, send $1 to Micro-Mark, 340-2462 Snyder Ave., Berkeley Heights, NJ 07922-1595.
Household tools and shop tips
While the common spring clothespin has been lionized by many how-to columns, many other prosaic items around the house serve admirably as tools for the Giant Scale modeler.
- Disposable fingernail files:
- Small, sandpaper-like sticks that are great for smoothing wood to a final shape and removing excess covering at wing trailing edges.
- Big toenail clippers:
- Neat for trimming round toothpicks used to secure flat-surface hinges. After the restraining toothpicks are removed, sand the hinge area flush for a nearly invisible hinge line.
- Great for trimming cyanoacrylate (CyA) flush; trim to about 1/16 inch above the surface, then use the rounded edge to smooth.
- Bulldog paper clips:
- Inexpensive clamps that come in several sizes. Larger ones are great for holding wing sheeting in place. Clamp marks can be removed with moisture and a bit of sanding.
- "Magic wands":
- Alligator clips (available at Radio Shack or other suppliers) CyA'ed to the end of thin dowels. Use them to hold small parts while gluing, stick thin plywood gussets inside stick-built fuselages, or hold screws while starting them through servo mounts.
- Serrated steak knives:
- Good for forming Styrofoam chunks and faired fuselage parts. Use a sawing action to taper turtledecks, prepare areas for fiberglass and epoxy, and form scale details such as wheel pants and streamlined landing-gear struts.
- Old artificial sponges:
- Glue a piece of sandpaper to a used sponge (white glue, rubber cement, or contact cement), weight it while it dries, and you'll have a flexible sanding block that won't gouge rounded surfaces. With hand pressure, it will conform to compound curves.
- Fixing threaded metal ends into plastic pushrods:
- Thoroughly heat the wire with a match or lighter (holding the wire in the flame while slowly counting to ten is usually long enough). Hold the warm wire with pliers and insert it into the hollow plastic rod. If it doesn't go in far enough, reheat carefully (so the end of the plastic doesn't melt) and push again. With the wire embedded two or three inches, it will be set for a long time. Note you'll have to cut the wire loose if you ever want to remove it.
I sure hope you're having a most pleasant fall flying season. I'll be back with you next month.
Transcribed from original scans by AI. Minor OCR errors may remain.

