
Radio Control: Helicopters
Larry Jolly
Welcome back! This month we continue our discussion on scale helicopters. Last month we covered choosing your subject, obtaining documentation, and procuring the fiberglass fuselage. I am purposely not discussing the actual fabrication of a plug and making a mold here; I intend to cover that tedious job in a future column.
Documentation and subject selection
I cannot impress enough the need for good documentation. When choosing your subject, pick a machine that is either based close by or one for which you can get many pictures. Remember that Scale Model Research and Repla-Tech International are at your disposal. I have both their catalogs and see that they offer many good subjects. If you are interested in scale, you should write for their catalogs — I’ve listed their addresses at the end of the column.
Bench testing the mechanics
Whenever possible, I like to assemble the intended mechanics and fly them without the fuselage shell, assuming the mechanics allow you to do this. You really can’t fly an old-style Hirobo or Kavan Jet Ranger without its shell, because these are used as structural members. But if the option is available, definitely fly the mechanics. This lets you break in the engine and mechanics and get everything adjusted properly.
When you are happy with the helicopter’s behavior, attach a two-pound weight to the bottom of the side frames. Make sure the weight is attached securely. Now readjust the machine for normal flight. You will probably have to adjust the main rotor pitch curve so that you have another couple of degrees of pitch at hover. Two pounds is usually enough to simulate the added weight of a scale fuselage.
Mounting the mechanics to the shell
Now that the mechanics are ready, think about how you are going to mount them to the shell. I prefer to build a crutch assembly out of 1/8-inch birch plywood to act as a mount. Some kits use two heavy rails mounted to the bottom of the shell for this purpose. I found this method weaker than the crutch, as it is relatively easy to delaminate the two parallel beams from the bottom of the shell.
Whatever method you use, it is advisable to tack-glue the wooden mount in place with epoxy or Super Jet and later lay in 2-ounce glass cloth with epoxy to form a fillet. Don’t try to secure the mount with a fillet of adhesive without the cloth, as the strength of such a joint is negligible.
In discussions with Robert Gorham, he advised me that he has substituted Bob Violett’s Magnalite carbon-fiber composite plywood and gained an added weight savings of 20%.
Securing the mount and installing mechanics
With the mount secure to the fuselage shell, mount the mechanics completely — screw the chassis in place and mount the tail drive. If your subject has a low tail, you can use a music wire tail drive running inside a brass tube. If it has a high tail, you will have to run a speedometer cable inside the tube. Use solid shafts and a corresponding gearbox at the base of the fin. Be sure that the tail-rotor drive is securely mounted. If the housing is loose, the tail drive will tend to whip inside the fuselage, causing vibration and eventually coming loose.
Radio, landing gear, and stabilizer
Now mount the radio and the landing gear. Plan the access holes to the engine, muffler exhaust, and general cooling air. If your model has a wooden stabilizer, sand it to shape and fiberglass it with 3/4-ounce cloth before installing it in place of the fuselage — you will find it much easier this way.
If you have followed me up to this point, you will now have your helicopter wrapped up in a translucent fiberglass shell waiting to be turned into a scale helicopter. I prefer to make sure the machine is going to function properly first and then detail it, rather than the other way around. Often you’ll see a modeler with a beautiful scale shell that won’t behave; I’m a lot more confident when the beast is already mechanically fit. Now comes the satisfying task: detailing the model.
Detailing and finishing
I’m placing detailing and finish under the same heading because they overlap; the only difference is the degree to which you dwell on detailing. If you’re building for fun, you will probably settle on a colorful paint scheme. If you’re building a Nats Scale entry, you’ll have a lot more to do. Proceed as follows:
- Disassemble all mechanics from the model.
- Fuel-proof the interior mounts in the shell. I usually use black dope; epoxy will work equally well.
- Sand the entire outside of the fiberglass fuselage. I like 240 wet-or-dry sandpaper and use it wet. Pay particular attention to the joining seam. Ideally, the surface of the fiberglass should be dull; you may feel a slight stickiness if the fuselage has been treated with PVA (a water-soluble release agent). This substance makes paint fisheye or fall off. If you don’t adequately sand and wash the shell, the paint will not lay out properly.
- Give the outside surface a good wash. After drying the shell, inspect imperfections like air bubbles, pinholes, and dings — mark them with a felt-tip pen.
- Fill the voids. Don’t miss imperfections as small as 1/16-inch deep. For small fills use Bondo Glazing and Spot Putty — it dries quickly and is easy to apply. Apply long fills thinly; don’t try to fill large depressions with it — use standard Bondo auto filler for bigger gaps. When the filler is dry, sand again with 240 sandpaper.
If you did this correctly, you now have a dull, clean fiberglass shell with the former pinholes identifiable as pinhead-size red dots.
Windows, masking, and painting
Prepare to mount the windows next. If the cockpit will be inaccessible later, now is the time to add cockpit interior detail. Glue the windows in place and mask for painting. I use Scotch green thinline tape for the actual paint line and regular masking tape to fill the open areas. The thinline tape is outstanding — it has the right amount of tack and it doesn’t leak.
Plan the paint procedure and make sure the interior of the fuselage is protected from dust. I like to either mask off all openings from the inside or fill the inside with newspaper.
Priming and final steps
Prime the model now. I like to use K&B Superpoxy primer, but use whatever you have had good experience with. If at all possible, spray the primer on. It is possible to brush on the primer and may be advisable on the fin and tailplane for the first coat, but be careful — weight will build up rapidly. After the primer is dry, sand again with 240 wet-or-dry. I like wet sanding, as it cuts faster and keeps the dust down. If you hunted down and repaired imperfections well, two sprayed coats is usually enough to give a good, even cover.
I’m running into space problems now, so I’ll leave the project at this point until next month. It’s not a bad idea to let your freshly primed model age a little before painting, anyway.
Photos and readers
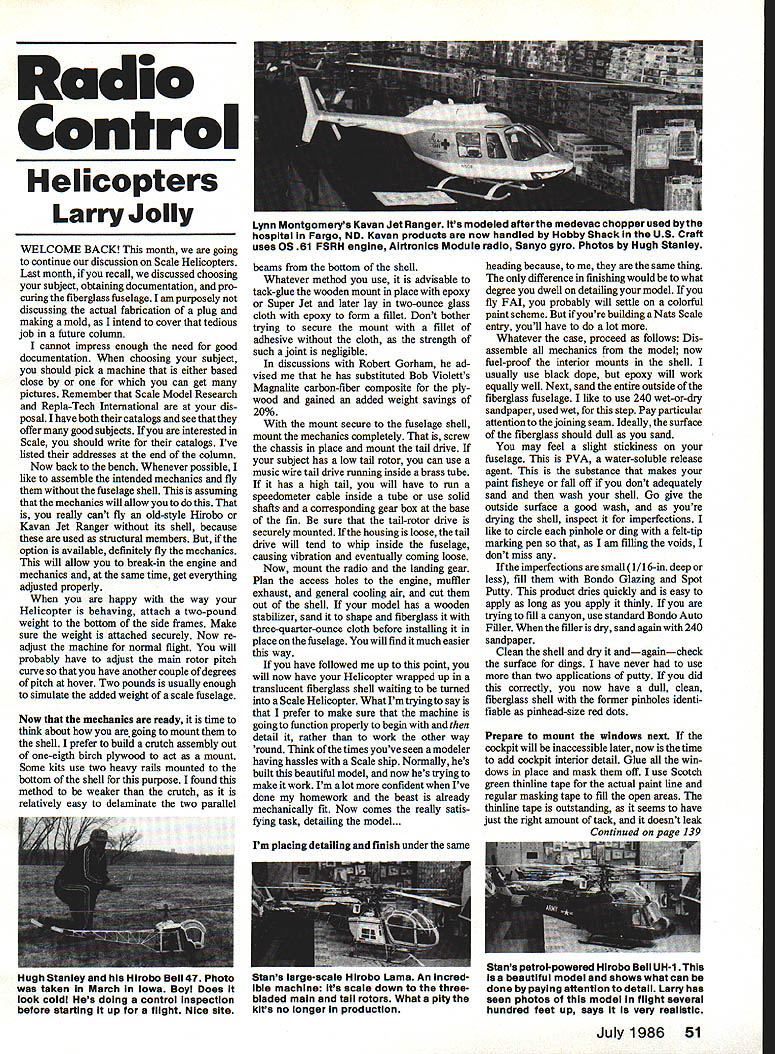
This month’s photos come from Hugh Stanley (Council Bluffs, IA). Stan’s club is the Skyhawks, and each year they put on a helicopter contest/expo at Bud’s Hobbies. From this show I’ve had good luck with Stan. This appears to be a well-rounded group of fliers who really go for scale, which I think is great. I look forward to flying with them this summer.
If you fly with a club or have just finished a new model, send me a few pictures — I’d like to use them for the column. Think: this is your best chance to get your face in Model Aviation. BCNU.
Resources
- Scale Model Research, 418 East Oceanfront, Newport Beach, CA 92661
- Repla-Tech International, Inc., 48500 McKenzie Highway, Vida, OR 97488
Contact
Larry Jolly 5501 W. Como, Santa Ana, CA 92703
Transcribed from original scans by AI. Minor OCR errors may remain.

