
Radio Control: Helicopters
Larry Jolly
Old business
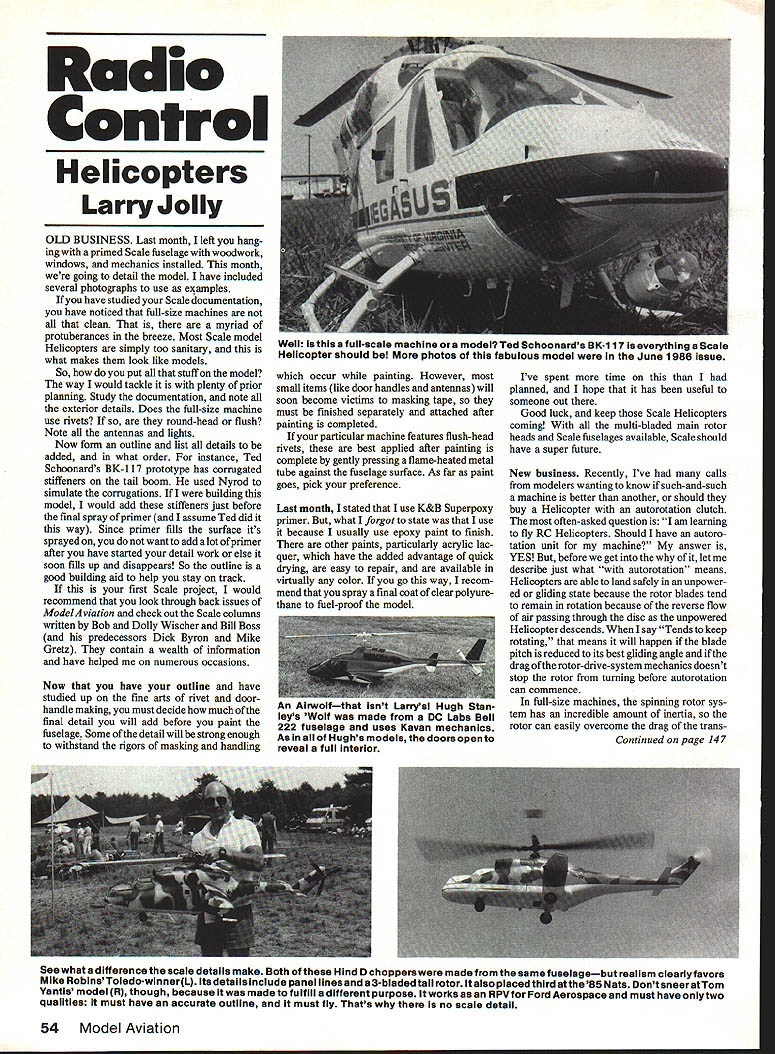
Last month I left you hanging with a primed scale fuselage with woodwork, windows, and mechanics installed. This month we're going to detail the model. I have included several photographs to use as examples.
If you have studied your scale documentation, you have noticed that full-size machines are not all that clean. That is, there are a myriad of protuberances in the breeze. Most scale model helicopters are simply too sanitary, and this is what makes them look like models.
So, how do you put all that stuff on the model? The way I would tackle it is with plenty of prior planning. Study the documentation, and note all the exterior details:
- Does the full-size machine use rivets? If so, are they round-head or flush?
- Note all the antennas and lights.
- Note stiffeners, access panels, door handles, and other protuberances.
Now form an outline and list all details to be added, and in what order. For instance, Ted Schoonard's BK-117 prototype has corrugated stiffeners on the tail boom. He used Nyrod to simulate the corrugations. If I were building the model, I would add these stiffeners just before the final spray of primer (and I assume Ted did it this way). Since primer fills the surface to which it's applied, you do not want to add a lot of detail and then spray primer over it, because subsequent primer can fill up and obscure the detail. So the outline is a good building aid to help you stay on track.
If this is your first scale project, I recommend you look through back issues of Model Aviation and check out the scale columns written by Bob and Dolly Wischer and Bill Boss (and his predecessors Dick Byron and Mike Gretz). They contain a wealth of information and have helped me on numerous occasions.
Now that you have your outline and have studied the fine arts of rivet and door-handle making, you must decide how much of the final detail you will add before you paint the fuselage. Some of the detail will be strong enough to withstand the rigors of masking and handling which occur while painting. However, most small items (like door handles and antennas) will soon become victims to masking tape, so they must be finished separately and attached after painting is completed.
If your particular machine features flush-head rivets, these are best applied after painting is completed by gently pressing a flame-heated metal tube against the fuselage surface.
As far as paint goes, pick your preference. Last month I stated that I use K&B Superpoxy primer. What I forgot to state was that I use it because I usually use epoxy paint to finish. There are other paints, particularly acrylic lacquer, which have the added advantages of quick drying, ease of repair, and availability in virtually any color. If you go this way, I recommend that you spray a final coat of clear polyurethane to fuel-proof the model.
I've spent more time on this than I had planned, and I hope that it has been useful to someone out there. Good luck, and keep those scale helicopters coming! With all the multi-bladed main rotor heads and scale fuselages available, scale should have a super future.
New business
Recently I've had many calls from modelers wanting to know if such-and-such a machine is better than another, or whether they should buy a helicopter with an autorotation clutch. The most often-asked question is: "I am learning to fly RC helicopters. Should I have an autorotation unit for my machine?" My answer is YES! But before we get into the why of it, let me describe just what "autorotation" means.
Helicopters are able to land safely unpowered in a gliding state because the rotor blades tend to remain in rotation due to reverse flow of air passing upward through the disc when unpowered. The unpowered helicopter descends, yet the blades tend to keep rotating. What happens is the blade pitch is reduced to its best gliding angle and the drag of the rotor-drive-system mechanics doesn't stop the rotor turning. A full-size machine's spinning rotor system has an incredible amount of inertia, so the rotor can easily overcome the drag of the transmission and safely autorotate.
Miniature helicopters, on the other hand, have much less inertia stored in their spinning discs and must make concessions to enhance the chances of making a safe autorotation. The method (or "concession") I most often use in model helicopters is the addition of a Torrington bearing supporting the main rotor shaft where it attaches to the main drive gear. The Torrington looks somewhat like a needle bearing with spring-loaded ramps in the center. The ramps make the unit act as a one-way clutch when rotated in the rotor direction and as a freewheeling unit when rotated in the opposite direction. When this unit is mounted in the main reduction gear, it allows the rotor to freewheel if the engine stops or if the tail-rotor drive is lost. The rotor will keep turning long enough for the pilot to make an autorotative landing.
I know that it takes great skill to autorotate a machine to a prescribed pad from altitude with the motor out; but experience has also shown me that if you experience an engine failure in hover or drag the tail rotor in the grass, the damage to the machine is always less when a freewheel device is fitted. For this reason, I believe it is mandatory for the model helicopter to be fitted with autorotation, regardless of the flier's skill level.
One of the most common crashes for a beginner occurs when he has started hovering and the model turns its nose slightly toward him. The flier becomes confused and, if he was a former fixed-wing pilot, invariably gives up elevator in panic. The helicopter promptly backs up and drags its tail rotor into the ground. If the model has autorotation, the main rotor simply runs away from the problem and usually doesn't stress the tail rotor gear box or tear all the teeth out of the main reduction gear.
If you are thinking of purchasing a model helicopter and can afford the extra cost of autorotation, by all means get it — I think it will save you time and money in the long run.
BCNU.
Larry Jolly 5501 W. Como, Santa Ana, CA 92703
Transcribed from original scans by AI. Minor OCR errors may remain.

