
Radio Control: Helicopters
Larry Jolly
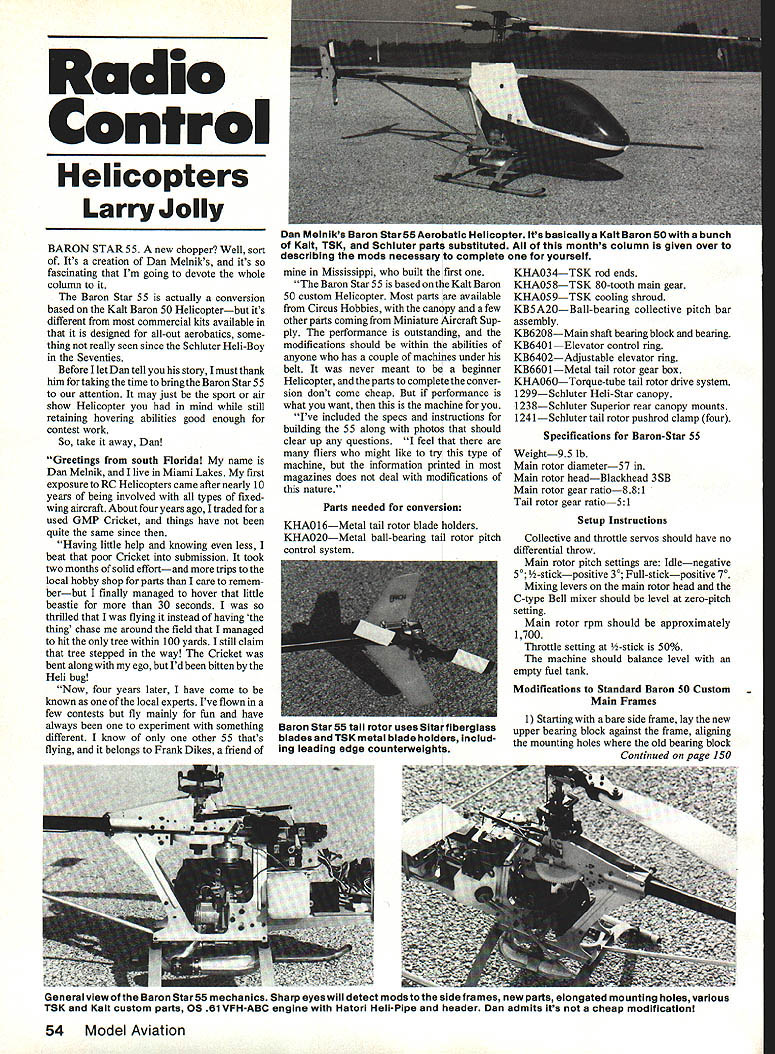
BARON STAR 55. A new chopper? Well, sort of. It's a creation of Dan Melnik's, and it's so fascinating that I'm going to devote the whole column to it.
The Baron Star 55 is actually a conversion based on the Kalt Baron 50 helicopter — but it's different from most commercial kits available in that it is designed for all-out aerobatics, something not seen much since the Schluter Heli-Star in the Seventies.
Before I let Dan tell his story, I must thank him for taking the time to bring the Baron Star 55 to our attention. It may just be the sport or air-show helicopter you had in mind while still retaining hovering abilities good enough for contest work.
So, take it away, Dan!
From Dan Melnik
Greetings from south Florida! My name is Dan Melnik, and I live in Miami Lakes. My first exposure to RC helicopters came after nearly 10 years of being involved with all types of fixed-wing aircraft. About four years ago, I traded for a used GMP Cricket, and things have not been quite the same since.
Having little help and knowing even less, I beat that poor Cricket into submission. It took two months of solid effort — and more trips to the local hobby shop for parts than I care to remember — but I finally managed to hover that little beastie for more than 30 seconds. I was so thrilled that I was flying it instead of having "that thing" chase me around the field that I managed to hit the only tree within 100 yards. I still claim that tree stepped in the way! The Cricket was beat along with my ego, but I'd been bitten by the heli bug.
Now, four years later, I have come to be known as one of the local experts. I've flown in a few contests but fly mainly for fun and have always been one to experiment with something different. I know of only one other 55 that's flying, and it belongs to Frank Dikes, a friend of mine in Mississippi, who built the first one.
The Baron Star 55 is based on the Kalt Baron 50 custom helicopter. Most parts are available from Circus Hobbies, with the canopy and a few other parts coming from Miniature Aircraft Supply. The performance is outstanding, and the modifications should be within the abilities of anyone who has a couple of machines under his belt. It was never meant to be a beginner helicopter, and the parts to complete the conversion don't come cheap. But if performance is what you want, then this is the machine for you.
I've included the specs and instructions for building the 55 along with photos that should clear up any questions. I feel that there are many fliers who might like to try this type of machine, but the information printed in most magazines does not deal with modifications of this nature.
Parts needed for conversion:
- KHA016 — Metal tail rotor blade holders
- KHA020 — Metal ball-bearing tail rotor pitch control system
- KHA034 — TSK rod ends
- KHA058 — TSK 80-tooth main gear
- KHA059 — TSK cooling shroud
- KBSA20 — Ball-bearing collective pitch bar assembly
- KB6208 — Main shaft bearing block and bearing
- KB6401 — Elevator control ring
- KB6402 — Adjustable elevator ring
- KB6601 — Metal tail rotor gear box
- KHA060 — Torque-tube tail rotor drive system
- 1299 — Schluter Heli-Star canopy
- 1238 — Schluter Superior rear canopy mounts
- 1241 — Schluter tail rotor pushrod clamp (four)
Specifications for Baron-Star 55
- Weight — 9.5 lb.
- Main rotor diameter — 57 in.
- Main rotor head — Blackhead 3 SB
- Main rotor gear ratio — 8.8:1
- Tail rotor gear ratio — 5:1
Setup Instructions
- Collective and throttle servos should have no differential throw.
- Main rotor pitch settings:
- Idle — negative 5°
- ½-stick — positive 3°
- Full-stick — positive 7°
- Mixing levers on the main rotor head and the C-type Bell mixer should be level at zero-pitch setting.
- Main rotor rpm should be approximately 1,700.
- Throttle setting at ½-stick is 50%.
- The machine should balance level with an empty fuel tank.
Modifications to Standard Baron 50 Custom Main Frames
- Starting with a bare side frame, lay the new upper bearing block against the frame, aligning the mounting holes where the old bearing block was removed. It will be necessary to remove approximately 1-1/8 in. of material from the top of the frames so that the new-style bearing block will fit.
- Assemble the upper bearing block, adjustable elevator ring, and elevator control ring. With the assembly bolted to the side frame, file the frame so that the elevator control ring can move free and be at the proper position when installed. When you reassemble the frame you will have to re-locate the rear of the frame; only a little will have to be taken from the front.
- Extend the slot in the frame that the collective assembly runs in by removing approximately 3/16 in. of material from the top and bottom of the slot.
General Notes
- When assembling the mechanics, take care aligning the engine and clutch assembly. It may be necessary to file a bit more on the mounting holes.
- Use the ball-bearing collective pitch bar assembly from TSK in place of the standard collective-pitch setup. This pitch bar is much more precise and will prevent the machine from de-pitching itself and overspeeding the rotor.
- One of the problems with the Baron 50 or 60 is in the tail-rotor drive setup that comes standard with the kit. Kalt uses a small drive wire (.062 in.) with only one support in the tail boom. This wire will twist when a load is placed in the drive system, causing the drive to alternately load and unload. This is very noticeable when running a high main rotor rpm.
Kalt now makes a tubular tail-rotor drive system which can be fitted on the Baron helicopters. It consists of a stainless steel torque tube, two bearing blocks, and a ball-and-socket U-joint for the mechanics. When using this drive system, press one of the bearings into the tail boom until it is firmly in place. Wrap the other bearing block with tape so that it will not slide as far into the boom as the first block, and press it firmly into place.
After fitting the U-joint to the mechanics and to one end of the torque tube, slide the tube into the tail boom, install the boom onto the mechanics, and — making sure that the U-joint is fully engaged — measure the length of tube which must be cut off. The easiest way I have found for doing this is to install the coupler and tail rotor gear box onto the torque tube, then measure the distance from the mounting face of the gear box to the end of the tail boom. This measurement is the amount which must be cut from the torque tube. Make certain that the U-joint is fully engaged and the tail boom is slid all the way into its mounting socket in the mechanics before you measure this! Be very careful when cutting the tube, since replacement tubes are very expensive!
I have used all types of drive-wire setups on my machines, and this setup works extremely well. The difference between this and the stock setup is like the difference between night and day.
- Staying with the tail section of the machine, use the metal gear box which comes as standard equipment with the Baron 60, with TSK metal blade-holders and the TSK ball-bearing tail rotor pitch-control system.
- The tail rotor pushrod is 2 mm wire and runs through four plastic Schluter tail-boom clamps of the type now used on all Schluter machines. The clamps can be stretched to fit the Kalt tail boom by pulling them around the boom while heating the clamps with a heat gun. Take care not to stretch them too far or burn your fingers.
- Use a GMP ball-bearing I-lever mounted on the right rear of the side frames as an intermediate attachment point for the pushrod. This allows the tail boom to be removed easily for service and makes for a very slope-free system.
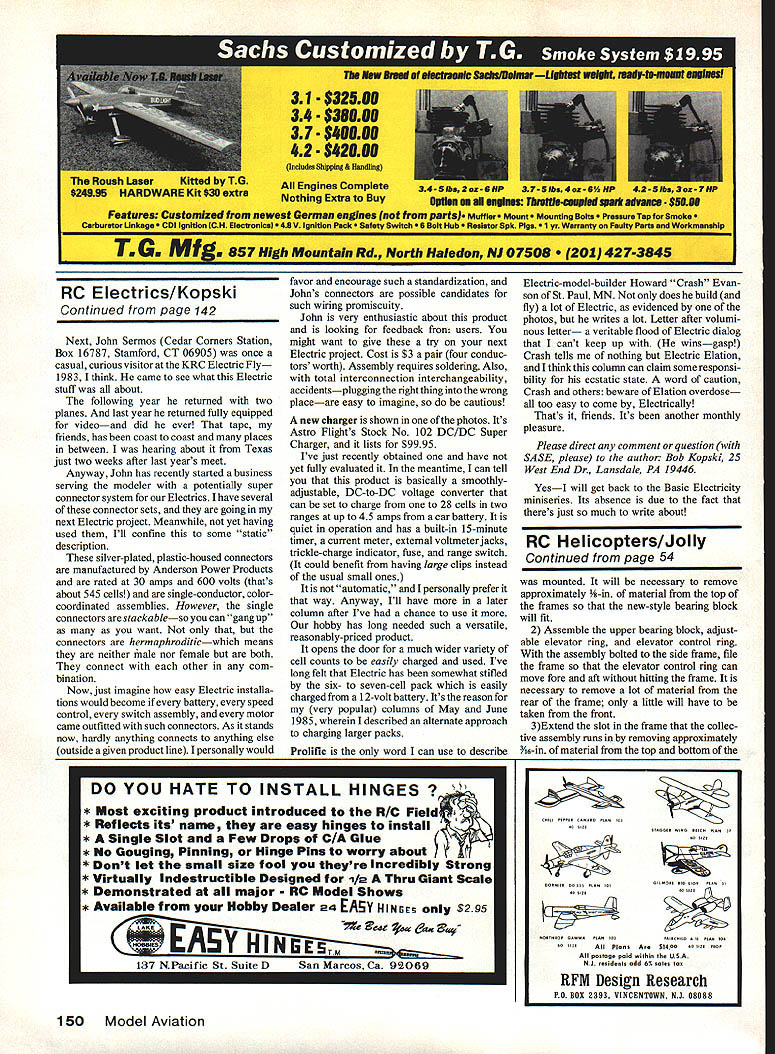
- I have experimented with different tail-rotor blades and am now using fiberglass Sitar blades with a reflexed airfoil. These blades have a well-defined CG and leading-edge root extension that brings the chord-wise CG of the blade forward. The tail rotor control is very smooth and powerful. I use a Futaba G-152 rate gyro and can run with the sensitivity wide open with no tail wag.
- Kalt rotor heads are very sensitive to tall-heavy main rotor blades. Do not use blades which are not CG-corrected. Tall-heavy blades will cause tracking problems and will make the machine extremely sensitive in fast forward flight. I have had the best results with the Kalt fiberglass and Kalt H rotors. Symmetrical blades seem to work best for overall flying.
- The main rotor rpm on my machine is 1,600 in hover and 1,750 in flight. The change in gearing allows this high rpm without screaming the engine. With the stock gearing, the head has a tendency to overspeed when a load is taken off. The 8.8:1 gearing used on the Baron-Star 55 keeps an even load on the engine.
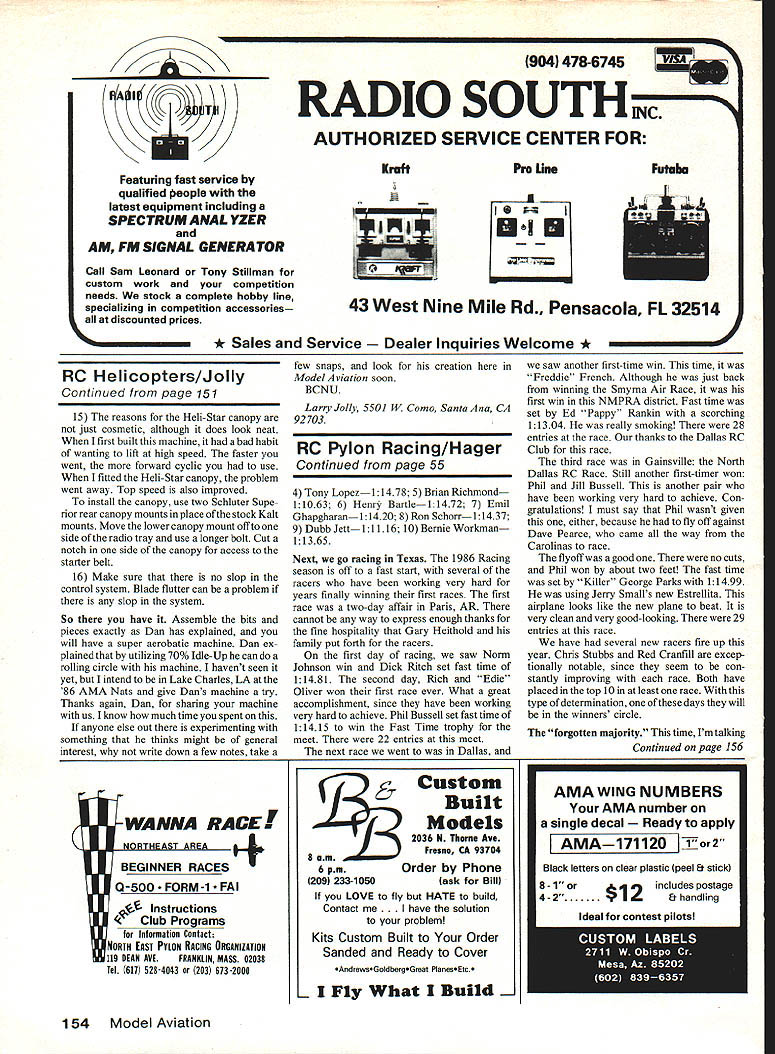
- Power for my machine comes from an OS .61VFH-ABC with Hatori Heli-Pipe and header.
- The TSK cooling shroud helps a lot in hot weather.
- Please do not use the stock white plastic links for any rods used on the main rotor head. These links have an alarming tendency to break at the most inopportune time, causing the immediate destruction of the pride and joy. Use the TSK, Rocket City, or Schluter links. The stock ones are fine for pushrod connections from the servos.
- Flybar paddles and weights are a matter of personal choice. I use the Kalt white paddles and one set of Schluter Heli-Star weights.
- On the four-way clutch, use the No. 3 damper, and install the clutch shoes so that they trail the clutch bolts.
- The reasons for the Heli-Star canopy are not just cosmetic, although it does look neat. When I first built this machine, it had a bad habit of wanting to lift at high speed. The faster you went, the more forward cyclic you had to use. When I fitted the Heli-Star canopy, the problem went away. Top speed is also improved.
To install the canopy, use two Schluter Superior canopy mounts in place of the stock Kalt mounts. Move the lower canopy mount to one side of the radio tray and use a longer bolt. Cut a notch in one side of the canopy for access to the starter belt.
- Make sure that there is no slop in the control system. Blade flutter can be a problem if there is any slop in the system.
So there you have it. Assemble the bits and pieces exactly as Dan has explained, and you will have a super-aerobatic machine. Dan explained that by utilizing 70% Idle-Up he can do a lot of rolling circles with his machine. I haven't seen it yet, but I intend to be in Lake Charles, LA at the '86 AMA Nats and give Dan's machine a try. Thanks again, Dan, for sharing your machine with us. I know how much time you spent on this.
If anyone else out there is experimenting with something that he thinks might be of general interest, why not write down a few notes, take a few snaps, and look for his creation here in Model Aviation soon.
BCNU, Larry Jolly, 5501 W. Como, Santa Ana, CA 92703.
Transcribed from original scans by AI. Minor OCR errors may remain.

