
Radio Control: Helicopters
Larry Jolly 5501 W. Como Santa Ana, CA 92703
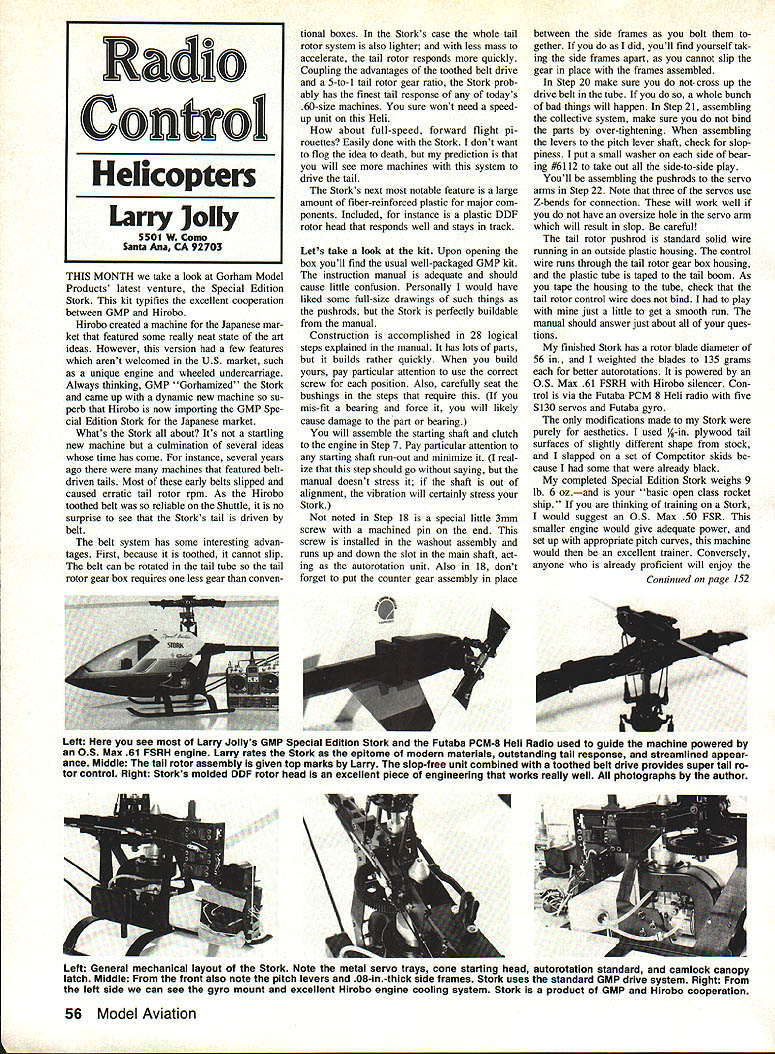
This month we take a look at Gorham Model Products' latest venture, the Special Edition Stork. This kit typifies the excellent cooperation between GMP and Hirobo.
Hirobo created a machine for the Japanese market that featured some really neat state-of-the-art ideas. However, that version had a few features which aren't welcomed in the U.S. market, such as a unique engine and wheeled undercarriage. Always thinking, GMP "Gorhamized" the Stork and came up with a dynamic new machine so superb that Hirobo is now importing the GMP Special Edition Stork for the Japanese market.
What's the Stork about? It's a startling new machine but a culmination of several ideas whose time has come. For instance, several years ago there were many machines that featured belt-driven tails. Most of those early belts slipped and caused erratic tail rotor rpm. As the Hirobo toothed belt was so reliable on the Shuttle, it is no surprise to see that the Stork's tail is driven by belt.
The belt system has some interesting advantages. First, because it is toothed, it cannot slip. The belt can be rotated in the tail tube so the tail rotor gearbox requires one less gear than conventional boxes. In the Stork's case the whole tail rotor system is also lighter, and with less mass to accelerate the tail rotor responds more quickly. Coupling the advantages of the toothed-belt drive and a 5-to-1 tail rotor gear ratio, the Stork probably has the finest tail response of any of today's 60-size machines. You sure won't need a speed-up unit on this heli.
How about full-speed forward-flight pirouettes? Easily done with the Stork. I won't flog the idea to death, but my prediction is that you will see more machines with this system to drive the tail.
The Stork's next most notable feature is a large amount of fiber-reinforced plastic for major components. Included, for instance, is a plastic Dual Damping Flapping (DDF) rotor head that responds well and stays in track.
Kit and construction Upon opening the box you'll find the usual well-packaged GMP kit. The instruction manual is adequate and should cause little confusion. Personally I would have liked some full-size drawings of such things as the pushrods, but the Stork is perfectly buildable from the manual.
Construction is accomplished in 28 logical steps explained in the manual. It has lots of parts, but it builds rather quickly. When you build yours, pay particular attention to use the correct screw position for each part. Also carefully seat the bushings in the steps that require them. If you mis-fit a bearing and force it, you will likely damage a bearing or part and have to replace it.
You will assemble the starting shaft and clutch to the engine in Step 7. Pay particular attention to any starting-shaft run-out and minimize it. (I realize this step should go without saying, but the manual doesn't stress shaft alignment — vibration will certainly stress the Stork.)
Step 18 includes a special little 3 mm screw with a machined pin end. This screw is installed in the washout assembly and runs up and down the slot in the main shaft, acting as the autorotation unit. Also in Step 18, don't forget to put the counter gear assembly in place between the side frames as you bolt them together. If you don't, you'll find yourself taking the side frames apart — you cannot slip the gear in place with the frames assembled.
In Step 20 make sure you do not cross the drive belt in the tube. If you do so, a whole bunch of bad things will happen. In Step 21, assembling the collective system, make sure you do not bind the parts by over-tightening when assembling the levers to the pitch lever shaft. When assembling the pitch lever shaft, check for sloppiness; put a small washer on each side of bearing #6112 to take out all the side-to-side play.
You'll be assembling the pushrods to the servos in Step 22. Note that three of the servos use Z-bends for connection. These will work well if you do not have an oversize hole in the servo arm which will result in slop. Be careful!
The tail rotor pushrod is standard solid wire running in an outside plastic housing. The control wire runs through the tail rotor gearbox housing, and the plastic tube is taped to the tail boom. As you tape the housing tube to the boom, check that the tail rotor control wire does not bind or play — allow just a little play to get a smooth run. The manual should answer just about all of your questions.
Specifications and flight impressions The finished Stork has a rotor blade diameter of 56 in., and I weighted the blades to 135 grams each for better autorotations. It is powered by an O.S. Max .61 FSRH with Hirobo silencer. Control is via the Futaba PCM-8 heli radio with five S130 servos and a Futaba gyro.
The only modifications made to my Stork were purely for aesthetics. I used 1/8-in. plywood tail surfaces of slightly different shape from stock and I slapped on a set of Competitor skids because I had some that were already black. The completed Special Edition Stork weighs 9 lb. 6 oz. and is your basic open-class rocket ship. If you are thinking of training on a Stork, I would suggest an O.S. Max .50 FSR. This smaller engine would give adequate power, and set up with appropriate pitch curves, this machine would then be an excellent trainer. Conversely, anyone who is already proficient will enjoy the Stork with all the power a .60 has to offer.
The Stork has no bad habits. Mine hovered perfectly on the first lift-off. A good flier will really enjoy the hovering shenanigans that are possible with this model; I've never flown a machine like it.
The Stork doesn't seem to care if it's flying sideways, backwards, or pirouetting in forward flight. Because the rotor head type is DDF, you cannot make the model respond in a jerky or abrupt manner. This means that all maneuvers will be smooth. Loops will be large, and rolls will be a little on the slow side.
I really like the feel of my Stork. The stability and tail rotor power are unsurpassed. I noticed that my Stork really smokes when you throw in the power and pitch. Robert Gorham told me his Stork was clocked at 70 mph by a friend with a radar gun, and that seems about right. I know it really gets with the program.
Looking back, when this was written I had put in 15 to 20 flights on my Stork and had no problems at all. Originally I was concerned with the large amount of plastic and use of self-tapping screws as fasteners in many key locations. The designers must have known what they were doing, as nothing has fallen off.
I would like to thank the folks at GMP for allowing me to report on the Stork and for supplying the kit tested in the article. I've since found out I'm not the only one who enjoys the Stork. In a note from Dave Youngblood, he states that Curtis is "World Champion." Youngblood is now away at college studying engineering. According to Dave, the Stork is the only machine that Curtis has with him at Austin (Texas).
Novice time
Since running the story on Curtis Sparnich, I have been literally deluged with letters from beginners. Most of them have interesting problems. Next month I'm going to discuss gyros and how to install them. If you are a novice, please tune in next month—and if Robert, Ted, Tim, Mike, or Curtis are out there, let me know if I do it right.
X-Cell update
As mentioned before I'm building an X-Cell .60 right now. The kit is excellent with unusually complete instructions. Walt Schoonard is staying on top of this project and letting me know of any new information or ideas as they come in from the field. I hope to report on this new aerobatic "rocket" ship the month after next. BCNU.
Transcribed from original scans by AI. Minor OCR errors may remain.

