
Radio Control: Helicopters
Larry Jolly
5501 W. Como Santa Ana, CA 92703
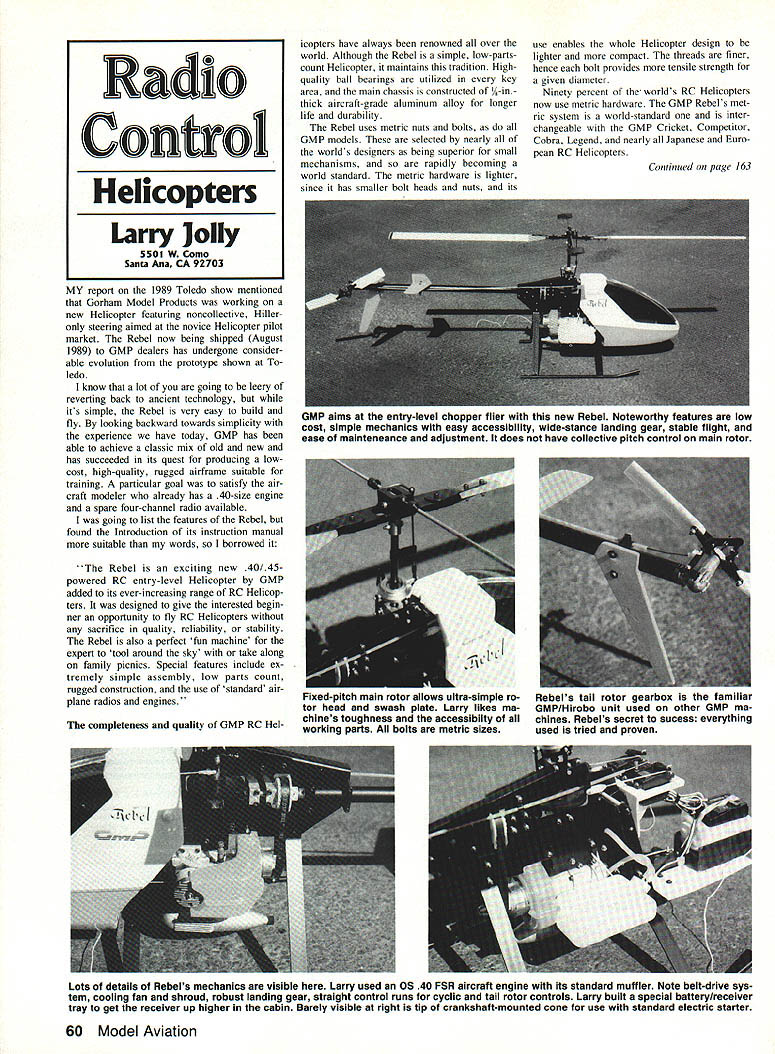
My report on the 1989 Toledo show mentioned that Gorham Model Products (GMP) was working on a new helicopter featuring noncollective, Hiller-only steering aimed at the novice helicopter pilot market. The Rebel now being shipped (August 1989) to GMP dealers has undergone considerable evolution from the prototype shown at Toledo.
I know that a lot of you are going to be leery of reverting back to ancient technology, but while it's simple, the Rebel is very easy to build and fly. By looking backward toward simplicity with the experience we have today, GMP has been able to achieve a classic mix of old and new and has succeeded in its quest for producing a low-cost, high-quality, rugged airframe suitable for training. A particular goal was to satisfy the aircraft modeler who already has a .40-size engine and a spare four-channel radio available.
Manufacturer introduction
I was going to list the features of the Rebel, but found the introduction of its instruction manual more suitable than my words, so I borrowed it:
"The Rebel is an exciting new .40/.45-powered RC entry-level helicopter by GMP added to its ever-increasing range of RC helicopters. It was designed to give the interested beginner an opportunity to fly RC helicopters without any sacrifice in quality, reliability, or stability. The Rebel is also a perfect 'fun machine' for the expert to 'tool around the sky' with or take along on family picnics. Special features include extremely simple assembly, low parts count, rugged construction, and the use of 'standard' airplane radios and engines."
The completeness and quality of GMP RC helicopters have always been renowned all over the world. Although the Rebel is a simple, low-parts-count helicopter, it maintains this tradition. High-quality ball bearings are utilized in every key area, and the main chassis is constructed of 1/16-in.-thick aircraft-grade aluminum alloy for longer life and durability.
The Rebel uses metric nuts and bolts, as do all GMP models. These are selected by nearly all of the world's designers as being superior for small mechanisms, and so are rapidly becoming a world standard. The metric hardware is lighter, since it has smaller bolt heads and nuts, and its finer threads provide higher tensile strength for a given diameter. Ninety percent of the world's RC helicopters now use metric hardware. GMP Rebel's metric system is a world-standard one and is interchangeable with the GMP Cricket, Competitor, Cobra, Legend, and nearly all Japanese and European RC helicopters.
Speed rates and speed-control notes
Given the results above, it would seem a reasonable question to ask, "How high must the high rate be?" Surely there are rates in between the low-speed frame-rate types and the SC-4 high-rate unit that produce in-between results. Also, there is probably some high-rate value above which little performance difference is obtained. This sounds like a winter project to me—for me! More to come in the future, but first...
One more speed-control matter of great interest is the matter of non-optically-coupled speed controls and glitching (see October '89 MA, page 59). I got to see and even test-fly a large number of electrics, and in the process I experienced a wide variety of flight performance results. Every so often I experience a case of motor-induced glitching, and recently I saw one case of a truly phenomenal level of it. In effect, the plane was unflyable. In fact, ground range with the motor running was measurable in tens of feet!
Substituting a different radio significantly improved the situation, and I concluded that there was "something wrong" with the first radio. I advised the pilot to send it in for warranty repair, for it was brand new. But first, I asked if I could try something. Since the speed control in this case was not optically coupled, I wanted to try to separate the speed control and the receiver at radio frequencies. To do this, I installed three small chokes in the three speed-control-to-receiver leads. This effectively broke the radio/speed-control connection at radio frequency (but not at DC and servo-pulse-signal conditions), and it worked just great! The plane was perfectly flyable, even with what I still believe was a "defective" radio.
Since that success, two other systems that performed "more normally" (meaning "somewhat glitchy but flyable") were similarly modified with good results. The "normal" glitching was reduced significantly. If this sounds like something that would be useful to you, the 10-microhenry chokes are available from Ace R/C, Inc. They are part #LL106 at 50¢ each. I cannot assure the same success with every radio, speed control, and power system, but you can find out for yourself for a few bucks and a little time.
And now one more speed-control item is the upcoming new big-motor unit soon to be announced by Jomar. This one is intended for use with 24 to 32 cells only. I don't have the release date or price as of this writing, but those of you with an interest can call or write Jomar (see their ad in this magazine) and get a prompt, reliable, accurate answer. That goes for service, too!
Electric supplies and batteries
Electric supplies are available from a little-known source: SR Batteries! It's not that SR is little-known, as it is indeed very well known—but long known for batteries. In fact, SR can supply a wide range of electric goodies including Astro, Jomar, Robbe, KSC, and other name brands (at discount prices) in addition to the popular SR batteries. The latter bring in quite a bit of reader mail, especially the high-capacity Magnums. It seems that many of my readers have really taken a liking to the L-250s, a 2-A cell specified at 1,250 mAh capacity but with the physical size and nominal weight of the familiar 800 ARs.
I've had some interesting correspondence with Larry Sribnick, chief in charge (!) at SR, and Larry tells me he won't tell me (or anyone else) just what his cell secrets are. Larry maintains proprietary info regarding his suppliers and his processes and I can't blame him. It's his secret to success.
Anyway, in case you're not aware of it, Larry will make up custom battery packs to your requirements. Check the SR ad in this issue and send a note to get the SR catalog. It tells all—except the secrets!
As a closing note, remember that electrics work great in the winter, and it's very easy to keep 'em clean at low temperatures 'cause there's no chain and sticky goo to wipe off the plane!
Happy, quiet, electric landings, everyone.
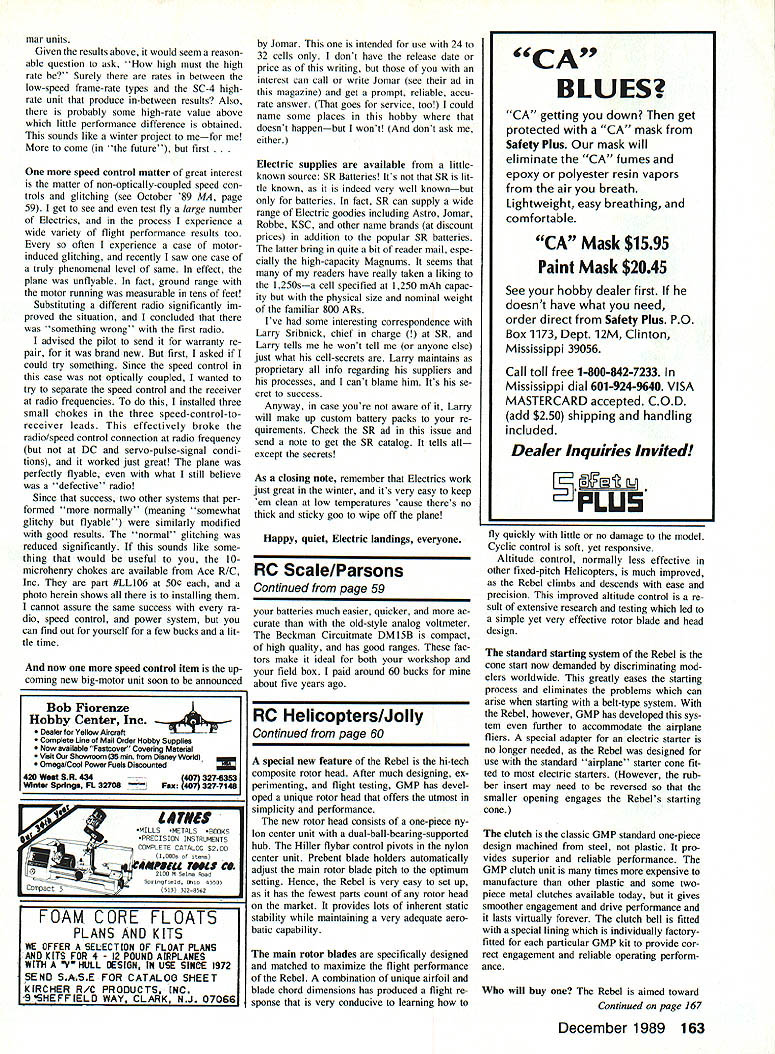
A special new feature of the Rebel is the hi-tech composite rotor head. After much designing, experimenting, and flight testing, GMP has developed a unique rotor head that offers the utmost in simplicity and performance.
The new rotor head consists of a one-piece nylon hub center unit with a dual-ball-bearing supported hub. The Hiller flybar control pivots in the nylon center unit. Prebent blade holders automatically adjust the main rotor blade pitch to the optimum setting. Hence, the Rebel is very easy to set up, as it has the fewest parts of any rotor head on the market. It provides lots of inherent static stability while maintaining a very adequate aerobatic capability.
The main rotor blades are specifically designed and matched to maximize the flight performance of the Rebel. A combination of unique airfoil and chord/length dimensions has produced a flight response that is very conducive to learning how to fly quickly with little or no damage to the model. Cyclic control is soft, yet responsive.
Altitude control, normally less effective in other fixed-pitch helicopters, is much improved in the Rebel. This improved altitude control is a result of extensive research and testing which led to a simple yet very effective rotor blade and head design.
The standard starting system of the Rebel is the one-start now demanded by discriminating modelers worldwide. This greatly eases the starting process and eliminates the problems which can occur when starting with a belt-type system. With the Rebel, however, GMP has developed this system even further to accommodate the airplane starter. A special adapter for an electric starter is no longer needed, as the Rebel was designed for use with the standard "airplane" starter cone (some electric starters may need the rubber insert reversed so that the smaller opening engages the Rebel's starting cone).
The clutch is the classic GMP standard one-piece design machined from steel, not plastic. It provides reliable and trouble-free performance. The GMP clutch is many times more expensive to manufacture than other clutches and some two-piece and plastic clutches. It gives very smooth engagement and drive performance and lasts virtually forever. The belt clutch is fitted with a special lining which is individually factory fitted for each particular GMP kit to provide correct engagement and reliable operating performance.
Who will buy one?
The Rebel is aimed toward the person who is interested in trying RC helicopters but cannot justify the expense of buying the special heli-radios and engines needed for today's more complex helicopters. Therefore, the Rebel was designed around the ever-popular .40/.45-size airplane engines and inexpensive four-channel radios already in the possession of many people. This dramatically reduces the entry cost to a level where many more people can try the RC helicopter challenge.
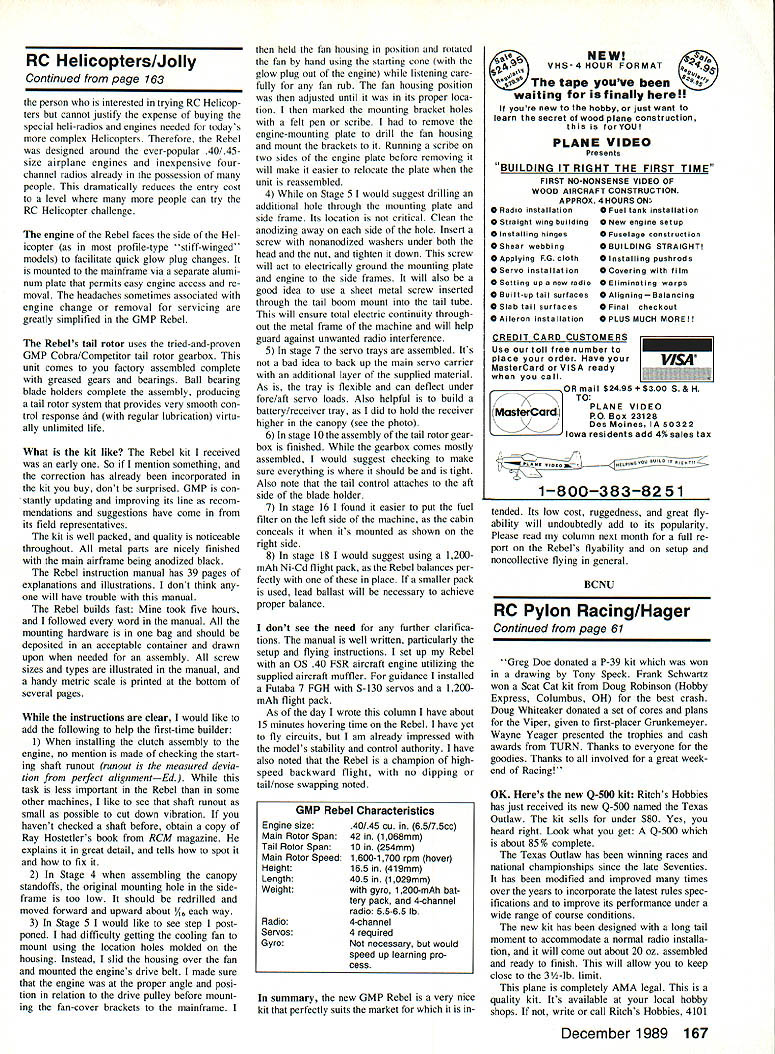
The engine of the Rebel faces the side of the helicopter (as in most profile-type "stiff-winged" models) to facilitate quick glow plug changes. It is mounted to the mainframe via a separate aluminum plate that permits easy engine access and removal. The headaches sometimes associated with engine change or removal for servicing are greatly simplified in the GMP Rebel.
The Rebel's tail rotor uses the tried-and-proven GMP Cobra/Competitor tail rotor gearbox. This unit comes to you factory assembled complete with greased gears and bearings. Ball-bearing blade holders complete the assembly, producing a tail rotor system that provides very smooth control response and (with regular lubrication) virtually unlimited life.
The kit and building
What is the kit like? The Rebel kit I received was an early one. So if I mention something, and the correction has already been incorporated in the kit you buy, don't be surprised. GMP is constantly updating and improving its line as recommendations and suggestions have come in from its field representatives.
The kit is well packed, and quality is noticeable throughout. All metal parts are nicely finished with the main airframe being anodized black. The Rebel instruction manual has 39 pages of explanations and illustrations. I don't think anyone will have trouble with this manual.
The Rebel builds fast; mine took five hours, and I followed every word in the manual. All the mounting hardware is in one bag and should be deposited in an acceptable container and drawn upon when needed for an assembly. All screw sizes and types are illustrated in the manual and a handy metric scale is printed at the bottom of several pages.
While the instructions are clear, I would like to add the following to help the first-time builder:
- When installing the clutch assembly to the engine, no mention is made of checking the starting shaft runout (runout is the measured deviation from perfect alignment). While this task is less important in the Rebel than in some other machines, I like to see that shaft runout as small as possible to cut down vibration. If you haven't checked a shaft before, obtain a copy of Ray Hostetler's book from RCM magazine. He explains it in great detail, and tells how to spot it and how to fix it.
- In Stage 4, when assembling the canopy standoffs, the original mounting hole in the side frame is too low. It should be redrilled and moved forward and upward about 1/8 in. I made the change.
- In Stage 5 I would like to see step 1 postponed. I had difficulty getting the cooling fan to mount using the location holes molded on the housing. Instead, I slid the housing over the fan and mounted the engine's drive belt. I made sure that the engine was at the proper angle and position in relation to the drive pulley before mounting the fan-cover brackets to the mainframe. I then held the fan housing in position and rotated the fan by hand using the starting cone (with the glow plug out of the engine) while listening carefully for any fan rub. The fan housing position was then adjusted until it was in its proper location.
- While on Stage 5 I would suggest drilling an additional hole through the mounting plate and side frame. Its location is not critical. Clean the anodizing away on each side of the hole. Insert a screw with nonoxidized washers under both the head and the nut, and tighten it down. This screw will act to electrically ground the mounting plate and engine to the side frames. It will also be a good idea to use a sheet metal screw inserted through the tail boom mount into the tail tube. This will ensure total electric continuity throughout the metal frame and machine and will help guard against unwanted radio interference.
- In Stage 7 the servo trays are assembled. It's not a bad idea to back up the main servo carrier with an additional layer of the supplied material. As is, the tray is flexible and can deflect under fore/aft servo loads. Also helpful is to build a battery/receiver tray, as I did to hold the receiver higher in the canopy.
- In Stage 10 the assembly of the rotor gearbox is finished. While the gearbox comes mostly assembled, I would suggest checking to make sure everything is where it should be and is tight. Also note that the tail control attaches to the aft side of the blade holder.
- In Stage 16 I found it easier to put the fuel filler on the left side of the machine, as the cabin conceals it when it's mounted as shown on the right side.
- In Stage 18 I would suggest using a 1,200-mAh Ni-Cd flight pack, as the Rebel balances perfectly with one of these in place. If a smaller pack is used, lead ballast will be necessary to achieve proper balance.
I don't see the need for any further clarifications. The manual is well written, particularly the setup and flying instructions. I set up my Rebel with an OS .40 FSR aircraft engine utilizing the supplied aircraft muffler. For guidance I installed a Futaba 7 FGH with S-130 servos and a 1,200-mAh flight pack.
As of the day I wrote this column I have about 15 minutes hovering time on the Rebel. I have yet to try cyclic autorotations, but am already impressed with the model's stability and controlled autorotations. I have also noted that the Rebel is a champion of high-speed backward flight, with no dipping or tail/nose swapping noted.
GMP Rebel Characteristics
- Engine: .40/.45 cu. in. (6.5/7.5 cc)
- Main Rotor Span: 42 in. (1,068 mm)
- Tail Rotor Span: 10.8 in. (274 mm)
- Main Rotor Speed: 1,600–1,700 rpm (hover)
- Length: 40.5 in. (1,029 mm)
- Height: 16.5 in. (419 mm)
- Weight: 4.5 lb.; with 1,200-mAh batt. pack, 5.6 lb.
- Radio: 4-channel
- Servos: 4 standard
- Gyro: Not necessary, but would speed up learning process
In summary, the new GMP Rebel is a very nice kit that perfectly suits the market for which it is intended. Its low cost, ruggedness, and great flight stability will undoubtedly add to its popularity. Please read my column next month for a full report on the Rebel's flyability and on setup and noncollective flying in general.
BCNU
Transcribed from original scans by AI. Minor OCR errors may remain.

