
Helicopters
Walt Schoonard
THIS COLUMN will not be what I had promised. The past month has been a very hectic one, and I have not been able to complete testing the tail-rotor mix set-up. I have it working but not to my satisfaction. So rather than confuse you, I'll do some more testing and then fill you in.
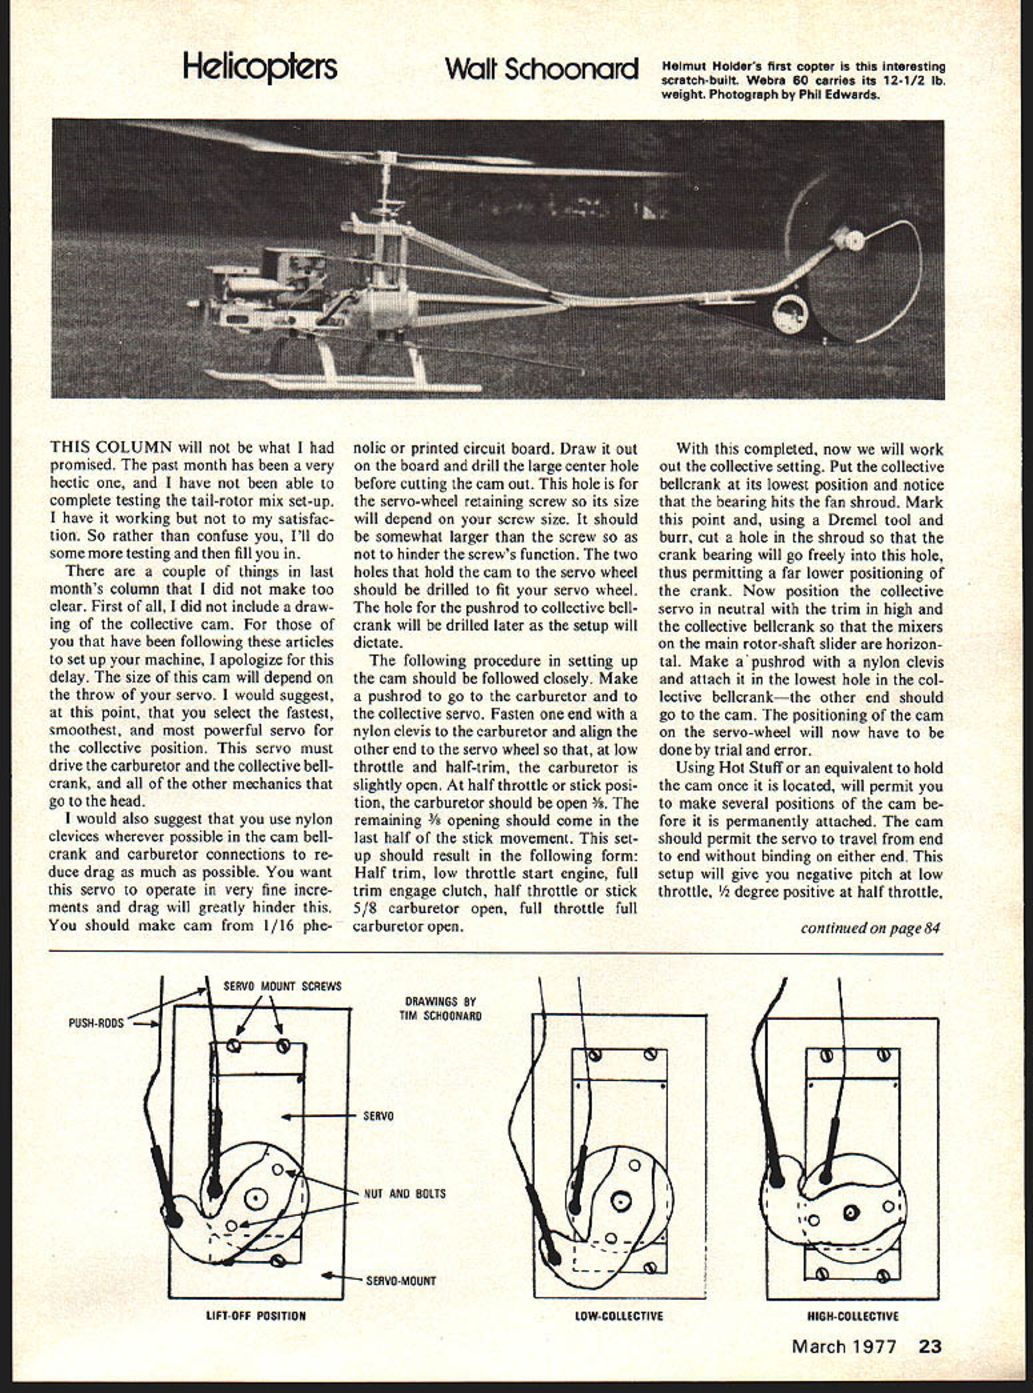
There are a couple of things in last month's column that I did not make too clear. First of all, I did not include a drawing of the collective cam. For those of you that have been following these articles to set up your machine, I apologize for this delay. The size of this cam will depend on the throw of your servo. I would suggest, at this point, that you select the fastest, smoothest, and most powerful servo for the collective position. This servo must drive the carburetor and the collective bellcrank, and all of the other mechanics that go to the head.
I would also suggest that you use nylon clevises wherever possible in the cam bellcrank and carburetor connections to reduce drag as much as possible. You want this servo to operate in very fine increments and drag will greatly hinder this. You should make cam from 1/16" phenolic or printed circuit board. Draw it out on the board and drill the large center hole before cutting the cam out. This hole is for the servo-wheel retaining screw so its size will depend on your screw size. It should be somewhat larger than the screw so as not to hinder the screw's function. The two holes that hold the cam to the servo wheel should be drilled to fit your servo wheel. The hole for the pushrod to collective bellcrank will be drilled later as the setup will dictate.
The following procedure in setting up the cam should be followed closely. Make a pushrod to go to the carburetor and to the collective servo. Fasten one end with a nylon clevis to the carburetor and align the other end to the servo wheel so that, at low throttle and half-trim, the carburetor is slightly open. At half throttle or stick position, the carburetor should be open 3/8. The remaining 5/8 opening should come in the last half of the stick movement. This set-up should result in the following form: Half trim, low throttle start engine, full engage clutch, half throttle or stick 3/8 carburetor open, full throttle full carburetor open.
With this completed, now we will work out the collective setting. Put the collective bellcrank at its lowest position and notice that the bearing hits the fan shroud. Mark this point and, using a Dremel tool and burr, cut a hole in the shroud so that the crank bearing will go freely into this hole, thus permitting a far lower positioning of the crank. Now position the collective servo in neutral with the trim in high and the collective bellcrank so that the mixers on the main rotor-shaft slider are horizontal. Make a pushrod with a nylon clevis and attach it in the lowest hole in the collective bellcrank — the other end should go to the cam. The positioning of the cam on the servo-wheel will now have to be done by trial and error.
Using Hot Stuff or an equivalent to hold the cam once it is located will permit you to make several positions of the cam before it is permanently attached. The cam should permit the servo to travel from end to end without binding on either end. This setup will give you negative pitch at low throttle, 1/2 degree positive at half throttle. and as much pitch at full throttle as you wish.
Now, in making the final adjustments, this is what should take place: At half throttle and full trim and 3/8 carburetor opening, full-blade speed should occur. At this point you should have 1/2 degree positive pitch. As the servo advances, the last 3/8 carburetor opening should come in as collective is added. As pitch increases, the carburetor will compensate the increased torque brought on by increased pitch. Also, as pitch is decreased and torque decreases, the engine speed will automatically compensate. The end result is near constant-blade speed. The negative pitch that is available will permit rapid descents, and the constant blade speed will permit quick stops.
All of this adjusting can be accomplished without running the engine. You may have to break the cam loose several times and reposition it in order to get the proper throws. When you are sure that you have it where you want it, drill the two outer retaining holes through the cam and servo wheel and use either small screws or bolts to attach permanently. Make sure that the screws do not touch the servo case.
Now I am sure that this sounds very complicated and possibly confusing. I suggest that you read this several times carefully and then proceed. After all, the hard engineering and developing has all been done for you, and now all that you have to do is copy it! The end results will be very rewarding and well worth your time. Once you get all this done, the truth will be in the flying!
The Super-Baby should sit very firmly on the ground with full blade speed. When collective is added, it should come up very sharply, and descents to landing should be precise and well defined. One last thing — in order to use a clevis on the servo-wheel, you will have to cut away the area next to the clevis so that low throttle will not be hindered.
I would like to mention a very good up-coming helicopter contest on April 23 and 24, 1977. It is the Second Annual Atlanta RC Helicopter Championships hosted by the Cobb County RC Club. The Saturday night, April 23 buffet dinner at 7:30 p.m. at the Holiday Inn Marietta, Georgia, is an included item. Proposed AMA Rules, Novice, Intermediate, and Expert, plus a beginner's event that (to qualify) you only have to start your engine. Trophies to third place. First place Novice: a 1977 Kraft 5-channel radio. For hotel reservations and further information, contact Dan Daugherty, 3761 Macedonia Road, Powder Springs, Georgia, 30073 — Phone (404) 943-6776.
Good luck, and if you're not flying, you're not trying!
Walt Schoonard, 2080 Sharon Rd., Winter Park, FL 32789.
Transcribed from original scans by AI. Minor OCR errors may remain.

