
Radio Control: Helicopters
Wall Schoonard
SINCE MY LAST column, I have been doing a lot of testing of the tail-rotor mix for the Super-Baby. Along with my efforts, I have had the help of some interested parties so the testing has been done from several points of view and on several types of helicopters. This mix, properly set up, will work all the way from idle to full collective and is totally linear.
The first thing to do is to determine the value of your tail-rotor servo pot. You can do this by asking the manufacturer or by measuring it with an ohm meter. While the servo is open, solder a wire to each terminal on the pot—red and black for the outer ones and white for the center. Run these to a female plug and then take the male side of the plug and make wire ends to match the other plug. These ends should be about 5 inches long.
Purchase a potentiometer of the same value as the tail-rotor servo. Preferably, this pot should be like the ones in the transmitter; however, any shaft-type pot will do. The three remaining wires should be soldered to this pot—white in the center with red and black on the outer pin. The three wires to the servo can exit through the grommet where the servo wires are coming out. You may have to enlarge the hole in the servo case to permit the grommet to expand. Reinstall the servo and hook up the pushrod. Note where the pitch arm is on the tail-rotor pitch plate and mark it. If you have it set in the center to hover, this is where it should be at lift off.
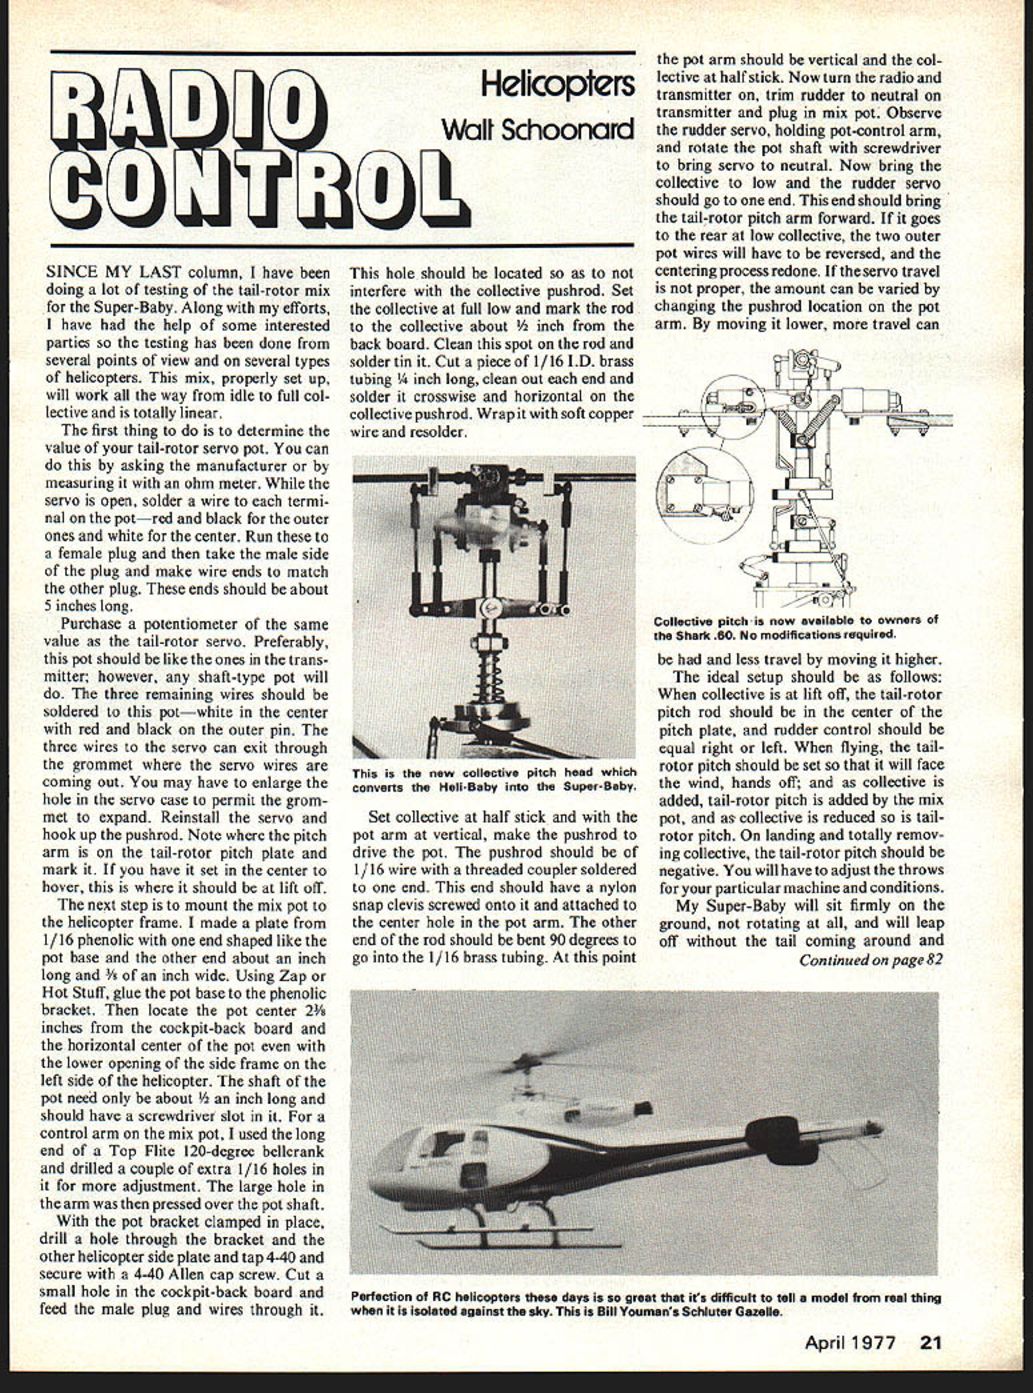
The next step is to mount the mix pot to the helicopter frame. I made a plate from 1/16 phenolic with one end shaped like the pot base and the other end about an inch long and 3/8 of an inch wide. Using Zap or Hot Stuff, glue the pot base to the phenolic bracket. Then locate the pot center 2 3/8 inches from the cockpit-back board and the horizontal center of the pot even with the lower opening of the side frame on the left side of the helicopter. The shaft of the pot need only be about 1/2 an inch long and should have a screwdriver slot in it. For a control arm on the mix pot, I used the long end of a Top Flite 120-degree bellcrank and drilled a couple of extra 1/16 holes in it for more adjustment. The large hole in the arm was then pressed over the pot shaft.
With the pot bracket clamped in place, drill a hole through the bracket and the other helicopter side plate and tap 4-40 and secure with a 4-40 Allen cap screw. Cut a small hole in the cockpit-back board and feed the male plug and wires through it.
This hole should be located so as to not interfere with the collective pushrod. Set the collective at full low and mark the rod to the collective about 1/2 inch from the back board. Clean this spot on the rod and solder tin it. Cut a piece of 1/16 I.D. brass tubing 1/4 inch long, clean out each end and solder it crosswise and horizontal on the collective pushrod. Wrap it with soft copper wire and resolder.
Set collective at half stick and with the pot arm at vertical, make the pushrod to drive the pot. The pushrod should be of 1/16 wire with a threaded coupler soldered to one end. This end should have a nylon snap clevis screwed onto it and attached to the center hole in the pot arm. The other end of the rod should be bent 90 degrees to go into the 1/16 brass tubing. At this point the pot arm should be vertical and the collective at half stick. Now turn the radio and transmitter on, trim rudder to neutral on transmitter and plug in mix pot. Observe the rudder servo, holding pot-control arm, and rotate the pot shaft with screwdriver to bring servo to neutral. Now bring the collective to low and the rudder servo should go to one end. This end should bring the tail-rotor pitch arm forward. If it goes to the rear at low collective, the two outer pot wires will have to be reversed, and the centering process redone. If the servo travel is not proper, the amount can be varied by changing the pushrod location on the pot arm. By moving it lower, more travel can be had and less travel by moving it higher.
The ideal setup should be as follows: When collective is at lift off, the tail-rotor pitch rod should be in the center of the pitch plate, and rudder control should be equal right or left. When flying, the tail-rotor pitch should be set so that it will face the wind, hands off; and as collective is added, tail-rotor pitch is added by the mix pot, and as collective is reduced so is tail-rotor pitch. On landing and totally removing collective, the tail-rotor pitch should be negative. You will have to adjust the throws for your particular machine and conditions.
My Super-Baby will sit firmly on the ground, not rotating at all, and will leap off without the tail coming around and
Radio Control: Helicopters
will make rapid descents with quick stops without the tail moving more than an inch.
Some of you may want to mount the pot by the collective servo, and I am sure that this can be done very neatly, but this is a very simple method and has permitted a great deal of experimenting without removing the canopy and seat.
You will notice that by adding this mix pot to the tail-rotor servo, it will increase the servo travel. Because of this, you will have to move the tail-rotor pushrod to get the travel you are accustomed to. The increased travel tends to make the tail rotor touchy so mix and travel will have to be adjusted to your style of flying. You may also have to recenter the tail-rotor servo pot to bring the mix and tail rotor into the proper relationship.
Next month's column will deal with a mod to the tail-rotor drive that eliminates gear shaft wear at the clutch and greatly increases power to the head.
Good luck with your tail-rotor mix. If you're not flying, you're not trying!
Walt Schoonard, 2080 Sharon Rd., Winter Park, FL 32789.
Transcribed from original scans by AI. Minor OCR errors may remain.

