
RADIO CONTROL HELICOPTERS
Paul Tradelius, 4620 Barracuda Dr., Bradenton FL 34208 E-mail: flytrade@earthlink.net
ENGINES IN MODEL HELICOPTERS have always been more difficult to adjust than engines in model airplanes. In airplanes they are mounted in the nose, where they are readily accessible and can be adjusted at all power settings: start the engine, hold onto the airplane, and advance the throttle as necessary. Idle and main needle valves are easy to reach, and the airplane can be tilted to a nose-high or nose-low position under all power conditions.
However, when trying to adjust a helicopter engine, the engine must be started at idle, the helicopter must be carried away from the starting area, then brought into a hover to check the mixture.
Some fliers have trouble with their idle mixture, transition from idle to full power, or main needle valve adjustments, but no matter what adjustments must be made, it all starts with the main needle valve; if that's not set correctly, no other adjustments will produce the desired effect.
Carburetor mixture and the power curve
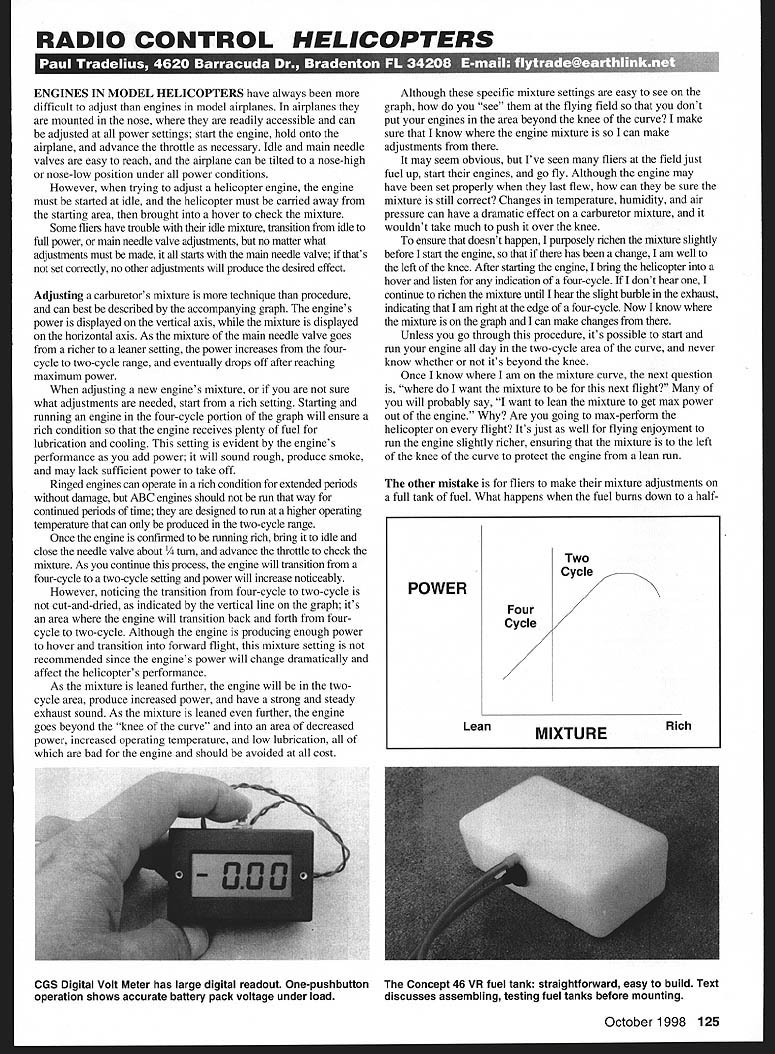
Adjusting a carburetor's mixture is more technique than procedure, and can best be described by the accompanying graph. The engine's power is displayed on the vertical axis, while the mixture is displayed on the horizontal axis. As the mixture of the main needle valve goes from a richer to a leaner setting, the power increases from the four-cycle to two-cycle range, and eventually drops off after reaching maximum power.
When adjusting a new engine's mixture, or if you are not sure what adjustments are needed, start from a rich setting. Starting and running an engine in the four-cycle portion of the graph will ensure a rich condition so that the engine receives plenty of fuel for lubrication and cooling. This setting is evident by the engine's performance as you add power; it will sound rough, produce smoke, and may lack sufficient power to take off.
Ringed engines can operate in a rich condition for extended periods without damage, but ABC engines should not be run that way for continued periods of time; they are designed to run at a higher operating temperature that can only be produced in the two-cycle range.
Adjusting a new engine
- Start from a rich setting (four-cycle area).
- Bring the engine to idle.
- Close the main needle valve about 1/4 turn.
- Advance the throttle to check the mixture and add power.
- Repeat: continue closing the needle gradually until power increases and the engine transitions toward two-cycle operation.
As you continue this process, the engine will transition from a four-cycle to a two-cycle setting and power will increase noticeably.
Finding the transition and the "knee" of the curve
Noticing the transition from four-cycle to two-cycle is not cut-and-dried; the transition is an area where the engine will toggle back and forth between four-cycle and two-cycle behavior. Although the engine may be producing enough power to hover and transition into forward flight in this area, this mixture setting is not recommended since the engine's power will change dramatically and affect the helicopter's performance.
As the mixture is leaned further, the engine will be solidly in the two-cycle area, produce increased power, and have a strong, steady exhaust sound. As the mixture is leaned even further beyond the "knee of the curve," the engine will experience decreased power, increased operating temperature, and low lubrication—conditions that are harmful and should be avoided.
Practical field procedure and tips
Although the mixture settings are easy to see on a graph, you need practical cues at the flying field to avoid running beyond the knee of the curve. I make sure I know where the engine mixture is so I can make adjustments from there.
It may seem obvious, but I've seen many fliers at the field just fuel up, start their engines, and go fly. Although the engine may have been set properly when they last flew, how can they be sure the mixture is still correct? Changes in temperature, humidity, and air pressure can have a dramatic effect on a carburetor mixture, and it wouldn't take much to push it over the knee.
To prevent that, I purposely richen the mixture slightly before I start the engine, so that if conditions have changed, I'm well to the left of the knee. After starting the engine, I bring the helicopter into a hover and listen for any indication of a four-cycle. If I don't hear one, I continue to richen the mixture until I hear the slight burble in the exhaust, indicating that I am right at the edge of a four-cycle. Now I know where the mixture is on the curve and can make changes from there.
Unless you go through this procedure, it's possible to start and run your engine all day in the two-cycle area of the curve and never know whether it's beyond the knee.
Once I know where I am on the mixture curve, the next question is, "where do I want the mixture to be for the next flight?" Many will say, "I want to lean the mixture to get max power out of the engine." Ask yourself: are you going to push the helicopter to maximum performance on every flight? It's often better for flying enjoyment and engine longevity to run the engine slightly richer, ensuring the mixture is left of the knee to protect the engine from a lean run.
Another common mistake is to make mixture adjustments on a full tank of fuel. What happens when the fuel burns down to a half-tank or less? Even with muffler pressure and a header tank, the engine will have a harder time pulling fuel to the carburetor, causing the mixture to go lean.
I take that into consideration by adjusting the mixture on a near-empty tank, which is almost the worst condition to produce a lean run. I say "almost" because there is no way to fully account for gravity (G) loading while adjusting the mixture on the ground.
As a helicopter pulls high-G maneuvers (for example, going up into a loop), the G-loading on the model and the fuel will increase from one to almost five Gs, which makes the fuel harder to get to the carburetor, thereby leaning the mixture.
I observed this effect years ago flying Quickie 500s. The other guys would set their mixture for max power on the ground with a full tank, and halfway through the race their engines would go lean. I would set my engine slightly rich, so it would really come on as theirs were going lean. It worked, and I transferred that technique to helicopters. Try it; you might like it.
Assembly notes: Kyosho Concept 46 VR
I'm progressing on the assembly of my Kyosho Concept 46 VR; I expect to have it in the air for the next column. If you decide to try this helicopter, consider a few points.
Although the instruction manual supplied with the kit is good, Horizon Hobby Distributors provided an excellent additional manual that offers insights and ideas to make assembly easier. Their ideas are presented in a step-by-step guide that you should read before starting a particular step to get the big picture, see common mistakes, and make the process smoother.
Kyosho does a decent job of packaging individual parts in clear plastic bags, but there is room for improvement. Each step calls for a specific bag (or bags) of parts to be opened; some steps require as many as four bags, and not all parts from those bags are used immediately. Open bags are kept on the workbench for later assembly, which may be several days away. For example, bag VR-B is used in assembly step 8, but pieces from that bag are not used again until step 19.
I would prefer individual bags for each step so that when I check off a completed assembly, I can confirm no parts are left. If parts remain, that signals a mistake. More individual parts bags would also reduce the chance of using the wrong screw or component. Many screws look alike, and with so many packaged together it's easy to use the wrong one.
Recommended packaging approach:
- Use a long plastic bag for each major component.
- Place parts needed for the first substep at the top and heat-seal below them.
- Add parts for the next substep and heat-seal again.
- Continue through the component so only the portion needed for a given step is opened.
Many helicopters, including the 46 VR, use lightweight materials to improve flying performance. Another advantage of these materials is that self-tapping screws can be used for assembly since they form their own threads and a nut is not required. However, use extreme care during assembly—do not use excessive force.
I've seen many people at the field making repairs or adjustments and applying the maximum amount of pressure any screw could handle. Once you have joined parts with a bolt or screw, snug it up, make sure the parts are secure, and leave it at that. Overtightening will bend or break the screw, or strip it out if used in a composite part.
Fuel tank assembly and testing
Although I don't want to give specific assembly instructions for each part of the 46 VR (which are more than adequately handled in the manuals), I want to make some general points about fuel tanks that apply to any tank.
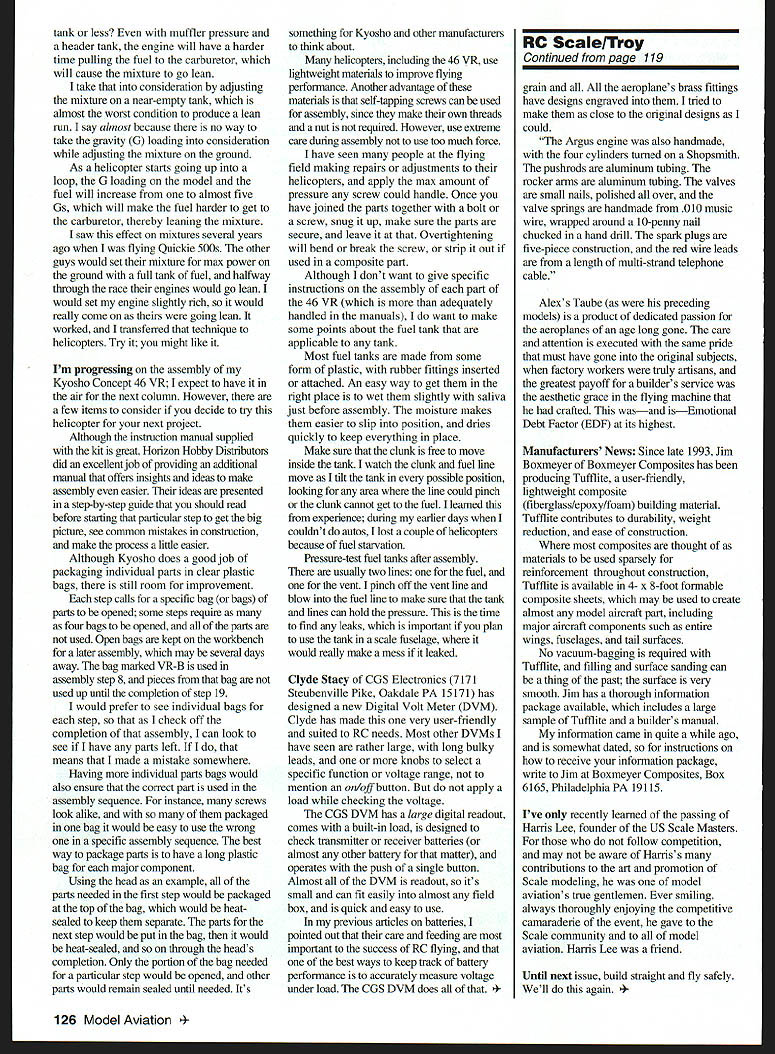
- Most fuel tanks are made from some form of plastic with rubber fittings inserted or attached. An easy way to get fittings into place is to wet them slightly with saliva just before assembly. The moisture makes them easier to slip into position and dries quickly to keep everything in place.
- Make sure the clunk is free to move inside the tank. Watch the clunk and fuel line move as you tilt the tank in every possible position, looking for any area where the line could pinch or the clunk cannot reach fuel. I learned this from experience; in my earlier days when I couldn't do autorotations reliably, I lost a couple of helicopters because of fuel starvation.
- Pressure-test fuel tanks after assembly. There are usually two lines: one for fuel, and one for the vent. Pinch off the vent line and blow into the fuel line to make sure the tank and lines hold pressure. This is the time to find any leaks, which is especially important if you plan to use the tank in a scale fuselage where a leak would make a big mess.
Transcribed from original scans by AI. Minor OCR errors may remain.

