

Radio Control: Helicopters
Dave Chesney
LAST month I said that I would continue a review of set-up procedures aimed at the beginning helicopter flier. Before I start I'll invite you to join us in pursuing this unique facet of radio-controlled flight. Helicopters are not that difficult to fly, just different.
This is a good year to start; the machines have never been better and the capabilities of those machines now approach any helicopter pilot's wildest dreams. Loops, rolls, split S's, and other acrobatic maneuvers are becoming commonplace even for those of us who would not be considered expert fliers. Don't let an occasional tip-over and the negative comments from our fixed-wing contemporaries cool your enthusiasm.
Walt Schoonard would say, "If you're not flying, you're not trying—hard enough." Some of you will argue that you are "trying hard enough" and that your helicopter is impossible to fly. Your machine may, indeed, be impossible to fly, but let's take a closer look at the machine and redirect your efforts.
Drag your machine out of the closet and have another go at it.
Much of your flying success will depend upon the initial set up of your machine and on subsequent set-up adjustments after your mishaps. I'll try to clarify some of those adjustments in this and future columns.
Since there are many different helicopters, I cannot go into detail on the specific set-up of your machine. Please refer to your construction manuals for specifics and follow those instructions.
Let's assume that your machine has not been set up properly and that you and your "impossible" machine are victims of some set-up errors. Follow me through some of the things to check as you re-check your machine. Keep in mind that your manual should take precedence if the following topics are covered in detail.
Initial checks
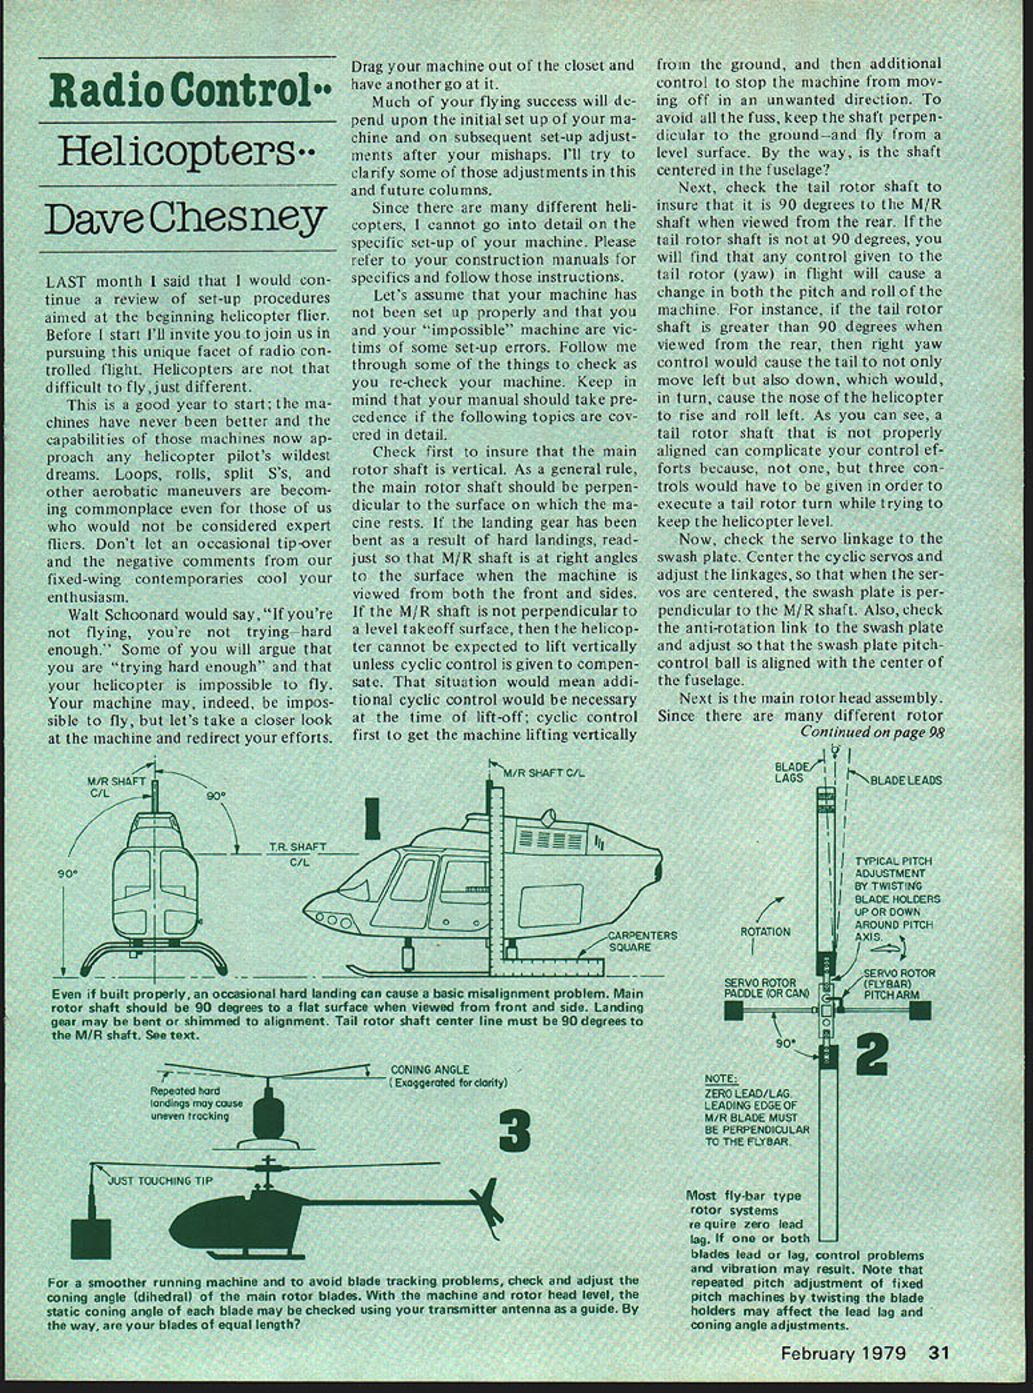
- Main rotor (M/R) shaft vertical:
- Ensure the main rotor shaft is perpendicular to the surface on which the machine rests. As a general rule the M/R shaft should be perpendicular to the ground when the machine is viewed from both the front and the sides.
- If the landing gear has been bent by hard landings, readjust or shim the gear so the shaft is at right angles to the surface. If the M/R shaft is not perpendicular to a level takeoff surface, the helicopter cannot be expected to lift vertically unless cyclic control is used to compensate. That means additional cyclic input at lift-off and again to correct motion—avoid the fuss by keeping the shaft perpendicular and fly from a level surface.
- By the way, is the shaft centered in the fuselage?
- Tail rotor (T/R) shaft alignment:
- Check the tail rotor shaft to ensure that it is 90 degrees to the M/R shaft when viewed from the rear.
- If the tail rotor shaft is not square, any yaw control in flight will cause unwanted changes in pitch and roll as well. For example, if the T/R shaft is outboard of 90 degrees, right yaw could cause the tail to move left and down, making the nose rise and roll left. A misaligned T/R shaft can force you to give multiple control inputs to execute a single maneuver.
- Servo linkages and swash plate:
- Center the cyclic servos and adjust the linkages so that when the servos are centered the swash plate is perpendicular to the M/R shaft.
- Check the anti-rotation link to the swash plate and adjust so that the swash plate pitch-control ball is aligned with the center of the fuselage.
Main rotor head and blades
Next is the main rotor head assembly. Since there are many different rotor heads for both fixed-pitch and collective-pitch helicopters, refer to your manual for specific instructions. The set-up of your rotor system should be covered in some detail in the manufacturer’s instructions. A few general points:
- Blade balance:
- Always be sure the M/R blades have been balanced.
- Coning angle (dihedral):
- For a smoother-running machine and to avoid blade-tracking problems, check and adjust the coning angle of the main rotor blades.
- With the machine and rotor head level, the static coning angle of each blade may be checked using your transmitter antenna as a guide. Are your blades of equal length?
- Coning angle improves stability and reduces bending stresses on the blades. Fixed-pitch helicopters are particularly susceptible to uneven coning caused by bending blade holders.
- Lead/lag (for fly-bar systems):
- Most fly-bar type rotor systems require zero lead/lag; that is, the main rotor blade leading edge should be 90 degrees to the fly-bar when viewed from above.
- If one or both blades lead or lag, control problems and vibration may result.
- Note that repeated pitch adjustment of fixed-pitch machines (by twisting the blade holders) may affect lead/lag and coning angle.
- Static coning check:
- After setting blade pitch per your manual, check the static level of each blade. One blade tip may appear higher than the other even though the gimbal (teeter) is level.
- You can check coning quickly by placing the helicopter on a level surface and using the transmitter antenna to just touch the center of one rotor blade tip; rotate the rotor to bring the opposite blade to that same position. If the heights differ, adjust the appropriate blade to achieve proper coning.
- Dynamic tracking and lift-off RPM:
- Once the proper coning angle is confirmed, recheck lead/lag and blade pitch and readjust as necessary. Blade pitch may require further adjustment during run-up to ensure dynamic blade tracking and correct lift-off RPM.
Fly-bar and swash plate linkage details
- Fly-bar and paddle incidence:
- With the lead/lag set and balancing complete, connect the fly-bar (servo rotor) control rod from the swash plate to the fly-bar control lever and adjust so that both paddles are set at zero degrees incidence.
- Follower and control rod alignment:
- Adjust the follower (which captures the swash plate to the fly-bar control rod) so that when the M/R blades are aligned with the center of the fuselage the control rod is correctly captured between the slot and the edge of the follower which pushes the rod around.
- The rod end that attaches to the upper part of the swash plate should be aligned so that the control-rod ball link is in line with the center line of the fuselage when the M/R blades are also aligned to the fuselage.
- If this alignment is significantly off, cyclic control inputs may be mixed (for example, forward stick could produce forward plus right or left cyclic), complicating flight control.
- Main rotor pitch:
- Now set the static pitch angle of each blade per your instruction manual and adjust accordingly.
Tail rotor and throttle
- Tail rotor pitch:
- I usually set the tail rotor blade pitch by the "eyeball method": set the T/R pitch to approximately twice the M/R pitch setting. This initial setting will be fine-tuned during run-up.
- Throttle:
- Most instructions detail throttle set-up, which can differ between fixed-pitch and collective machines. Be sure the throttle servo is free to move the full throw and that mid-stick (half throttle) on the transmitter corresponds to the barrel being about half open.
- Mixing of the throttle with collective pitch should follow your manual.
Balance and center of gravity
- Balance the machine so that it is slightly nose-heavy when balanced at the center of gravity shown on your plans. The CG is usually directly through or slightly forward of the center line of the M/R shaft.
Next month we'll start the engine and see how well those static set-ups work. In following articles I'll try to explain some of the terms used when describing the RC helicopter, cover a few basics of helicopter flight, and move to the flying field for some hints. The set-up hints may seem out of place, but I was sure you wanted to start flying immediately.
Announcements and contacts
Before I close this month, I'll pass the word that Horace Hagen is planning a meeting of RC helicopter enthusiasts for this year's Toledo show. Dates and times will follow.
Another short topic: Charlie Sjobeck, of Vermont, invites prospective RC helicopter pilots in his area to contact him for assistance. His address is:
Charles F. Sjobeck Happy Hollow Road South Royalton, VT 05068
Charlie came to our North Carolina Helicopter Association Championships and won the Sportsman Class flying his Heli-Boy. Funny how state championships are won by out-of-state contestants. Bill Youmans won and Walt Schoonard placed third, both flying Heli-Boys and both from out of state. What happened to home court advantage?
And speaking of Heli-Boys, I've just finished mine. The machine is smooth, responsive, but stable, and a joy to fly. This is a great year to be flying helicopters—join us. See you next month.
Dave Chesney Rt. 9, Box 621A, Greensboro, NC 27409.
Transcribed from original scans by AI. Minor OCR errors may remain.

