
Radio Control - Helicopters
Dave Chesney
March
MARCH may not be the best time to be attempting your first RC helicopter flights, but you may have a few days of less-than-gale-force winds. While gusty winds frustrate beginning helicopter pilots, a slight steady breeze usually helps. Be cautious in selecting flying conditions; before you attempt to fly in any conditions, there are a few more checks of the machine in addition to those covered last month.
The hints covered last month dealt with the static set-up of a typical RC helicopter. This month we'll start the engine and continue setting up the machine in its dynamic condition.
Radio check and restraint
One of the most important checks before allowing the helicopter its freedom is the radio. For the radio check I strongly recommend that your machine be restrained so that, if there is radio noise or a problem, you will not damage the machine or — more importantly — injure yourself or your helper.
Some helicopter instructions recommend restraining the helicopter during certain dynamic checks by holding the tail; I've used that technique myself, but make sure the radio works reliably before you even think about trying it. Don't grab a tiger by the tail.
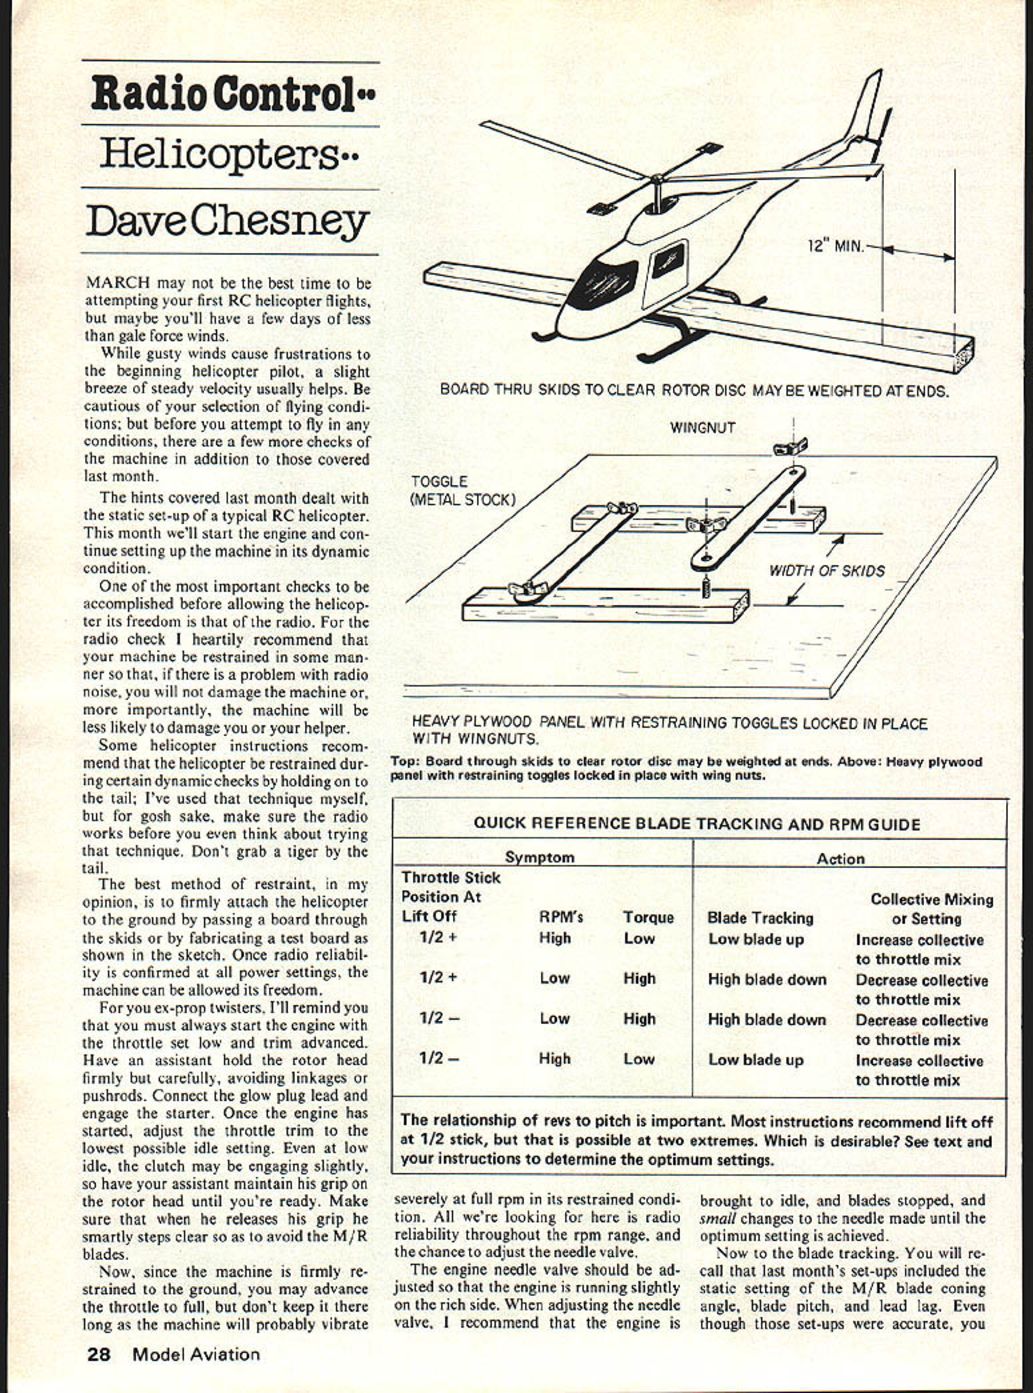
The best method of restraint, in my opinion, is to firmly attach the helicopter to the ground by passing a board through the skids or by fabricating a test board. Once radio reliability is confirmed at all power settings, the machine can be allowed its freedom.
Starting the engine
For you ex-prop twisters, always start the engine with the throttle set low and trim advanced. Have an assistant hold the rotor head firmly but carefully, avoiding linkages and pushrods. Connect the glow plug lead and engage the starter. Once the engine has started, adjust the throttle trim to the lowest possible idle setting. Even at low idle the clutch may be engaging slightly, so have your assistant maintain his grip on the rotor head until you're ready. Make sure that when he releases his grip he smartly steps clear to avoid the main rotor (M/R) blades.
With the machine firmly restrained to the ground you may advance the throttle to full, but don't keep it there long — the machine will probably vibrate severely at full rpm in its restrained condition. All we're looking for here is radio reliability throughout the rpm range and the chance to adjust the needle valve.
Needle valve adjustment
The engine needle valve should be adjusted so that the engine runs slightly on the rich side. When adjusting the needle valve, bring the engine to idle and stop the blades, then make small changes to the needle until the optimum setting is achieved.
Blade tracking
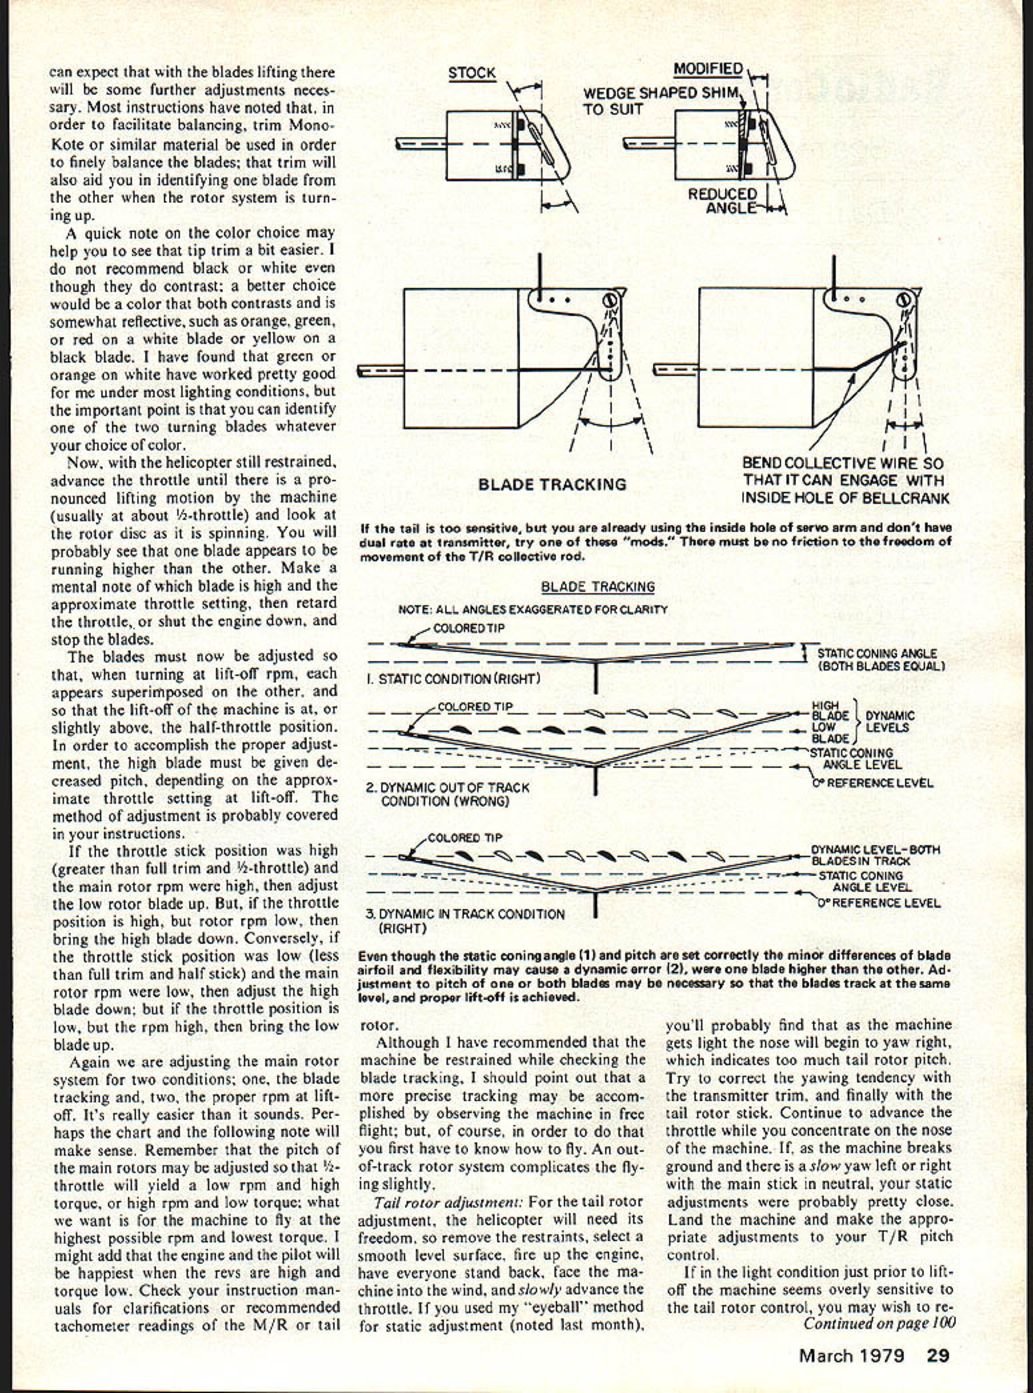
You will recall that last month's set-ups included the static setting of the M/R blade coning angle, blade pitch, and lead/lag. Even though those set-ups were accurate, you can expect that with the blades lifting there will be some further adjustments necessary. Most instructions suggest using trim MonoKote or similar material to finely balance the blades; that trim also helps you identify one blade from the other when the rotor system is turning.
A quick note on color choice: I do not recommend black or white even though they contrast. A better choice is a color that both contrasts and is somewhat reflective — such as orange, green, or red on a white blade, or yellow on a black blade. I have found green or orange on white work well under most lighting conditions, but the important point is that you can identify one of the two turning blades.
With the helicopter still restrained, advance the throttle until there is a pronounced lifting motion (usually around half-throttle) and look at the rotor disc as it spins. You will probably see that one blade appears to be running higher than the other. Make a mental note of which blade is high and the approximate throttle setting, then retard the throttle (or shut the engine down) and stop the blades.
The blades must now be adjusted so that, when turning at lift-off rpm, each appears superimposed on the other, and so that lift-off of the machine is at, or slightly above, the half-throttle position. To accomplish this, the high blade must be given decreased pitch, depending on the approximate throttle setting at lift-off. The exact method of adjustment is probably covered in your instructions.
If the throttle stick position was high (greater than full trim and half-throttle) and the main rotor rpm were high, adjust the low rotor blade up. If the throttle position is high but rotor rpm low, bring the high blade down. Conversely, if the throttle stick position was low (less than full trim and half stick) and the main rotor rpm were low, adjust the high blade down; but if the throttle position is low and rpm high, bring the low blade up.
We are adjusting the main rotor system for two conditions: blade tracking and the proper rpm at lift-off. It's easier than it sounds. Remember that the pitch of the main rotors may be adjusted so that half-throttle yields low rpm/high torque or high rpm/low torque; what we want is for the machine to fly at the highest possible rpm and lowest torque. The engine and the pilot will be happier with high revs and low torque. Check your instruction manuals for clarifications or recommended tachometer readings for the M/R and tail rotor.
Quick reference — blade tracking and RPM guide
- Throttle stick position: High (greater than trim and half-stick) — RPM high
- RPMs: High
- Torque: Low
- Blade tracking: Low blade up
- Collective-to-throttle mix: Increase collective-to-throttle mix
- Throttle stick position: High (greater than trim and half-stick) — RPM low
- RPMs: Low
- Torque: High
- Blade tracking: High blade down
- Collective-to-throttle mix: Decrease collective-to-throttle mix
- Throttle stick position: Low (less than trim and half-stick) — RPM low
- RPMs: Low
- Torque: High
- Blade tracking: High blade down
- Throttle stick position: Low (less than trim and half-stick) — RPM high
- RPMs: High
- Torque: Low
- Blade tracking: Low blade up
Most instructions have noted that, to facilitate balancing, use small tip trim pieces. That trim will also help identify one blade from the other when the rotor system is turning.
Blade tracking diagrams (descriptions)
Note: All angles exaggerated for clarity.
- Static condition (right)
- Static coning angle: both blades equal
- Colored tip identifies blade
- Dynamic out-of-track condition (wrong)
- One blade appears higher (high blade), the other lower (low blade)
- Static coning angle may appear level, but dynamic levels differ from the reference level
- Dynamic in-track condition (right)
- Dynamic level: both blades in track and appear superimposed
- Static coning angle remains level in the reference
Even though the static coning angle and pitch are set correctly, minor differences in blade airfoil and flexibility may cause a dynamic error where one blade is higher than the other. Adjustment to the pitch of one or both blades may be necessary so that the blades track at the same level and proper lift-off is achieved.
Although I recommend restraining the machine while checking blade tracking, a more precise tracking may be accomplished by observing the machine in free flight — but of course you must know how to fly first. An out-of-track rotor system complicates flying slightly.
Tail rotor adjustment and sensitivity
For tail rotor (T/R) adjustment the helicopter will need its freedom. Remove restraints, select a smooth level surface, fire up the engine, have everyone stand back, face the machine into the wind, and slowly advance the throttle.
If you used the "eyeball" method for static adjustment (noted last month), you'll probably find that as the machine gets light the nose will begin to yaw right — that indicates too much tail rotor pitch. Try to correct the yawing tendency with transmitter trim and finally with the tail rotor stick. Continue to advance the throttle while you concentrate on the nose. If, as the machine breaks ground, there is a slow yaw left or right with the main stick in neutral, your static adjustments were probably pretty close. Land the machine and make the appropriate adjustments to your T/R pitch control.
If, just prior to lift-off, the machine seems overly sensitive to tail rotor control, reduce tail sensitivity by one of these methods:
- Use the rate control on your transmitter.
- Move the tail rotor control rod in toward the center of the servo arm.
- Use one of the mechanical mods described below.
Tail rotor sensitivity should be adjusted so that response to your input is positive but not so fast as to encourage over-control. There must be no friction restricting the freedom of the T/R collective rod.
Tail sensitivity mods (figure notes)
- Stock
- Modified
- Wedge-shaped shim to suit (to reduce angle)
- Reduced angle
- Bend the collective wire so that it can engage with the inside hole of the bellcrank
You may elect to purchase a Kavan gyro to help, but keep in mind that the T/R control should never be neglected when learning to fly the RC helicopter, even with gyro assistance.
Learning advice
In my opinion the difficulty of maintaining yaw heading is largely due to bad habits developed while flying fixed-wing aircraft. Many fixed-wing sport fliers develop the habit of neglecting the left stick (Mode II throttle and rudder). In fact, many do not touch the throttle or rudder for most of an average flight and therefore feel less comfortable with the absolute necessity of those controls while flying a helicopter. Even those sport fliers with 3-channel aircraft often set rudder on the aileron stick, again neglecting left-stick activity.
My point: helicopters are not that difficult to fly, but poor habits will complicate the learning process. I recommend minimizing fixed-wing activities while you learn helicopter controls. If you must fly airplanes, concentrate on using all flight controls during those flights — get comfortable with the left stick.
Next month: more tips. I hope they're helping, so let me hear from you.
Don't forget the meeting at the Toledo Show — April 6, 7, 8. The helicopter enthusiasts will meet Saturday night; time and place to be announced at the show.
Dave Chesney Rt. 9, Box 621A, Greensboro, NC 27409.
Transcribed from original scans by AI. Minor OCR errors may remain.

