
Radio Control: Helicopters
Dave Chesney
In the February column I wrote about some of the static set-ups that should be attended to prior to flying the RC helicopter. Then in March we started to "fine tune" some of those adjustments as the engine was started and we prepared for those first hops. Now we have some further adjustments to accomplish before we commit to hover practice; continue to refer to the manual for your helicopter.
Static setup review
Looking back to the February issue and to those statements regarding main-rotor (M/R) shaft and swash plate alignments, you will recall those static adjustments were recommended to be: main rotor perpendicular to the takeoff surface, and swash plate perpendicular to the M/R shaft. Those adjustments were for the static set-up, and if you went ahead with some hover practice after reading last month's column, you probably found that your helicopter would not lift vertically without significant cyclic trim. What's happening? Lateral drift is being created by one of the compromises we must make to have the helicopter fly. Follow along as I explain and we continue trimming the machine.
Tail rotor and lateral drift
The final adjustment covered in the March column was to the anti-torque device we call the tail rotor. In order to compensate for the torque created as the main rotor is driven, the tail rotor collective pitch was adjusted so that the tail-rotor thrust would exactly cancel the spinning tendency of the helicopter. Well, we cancelled the torque, but now we have lateral drift caused by the thrust of the tail rotor to deal with.
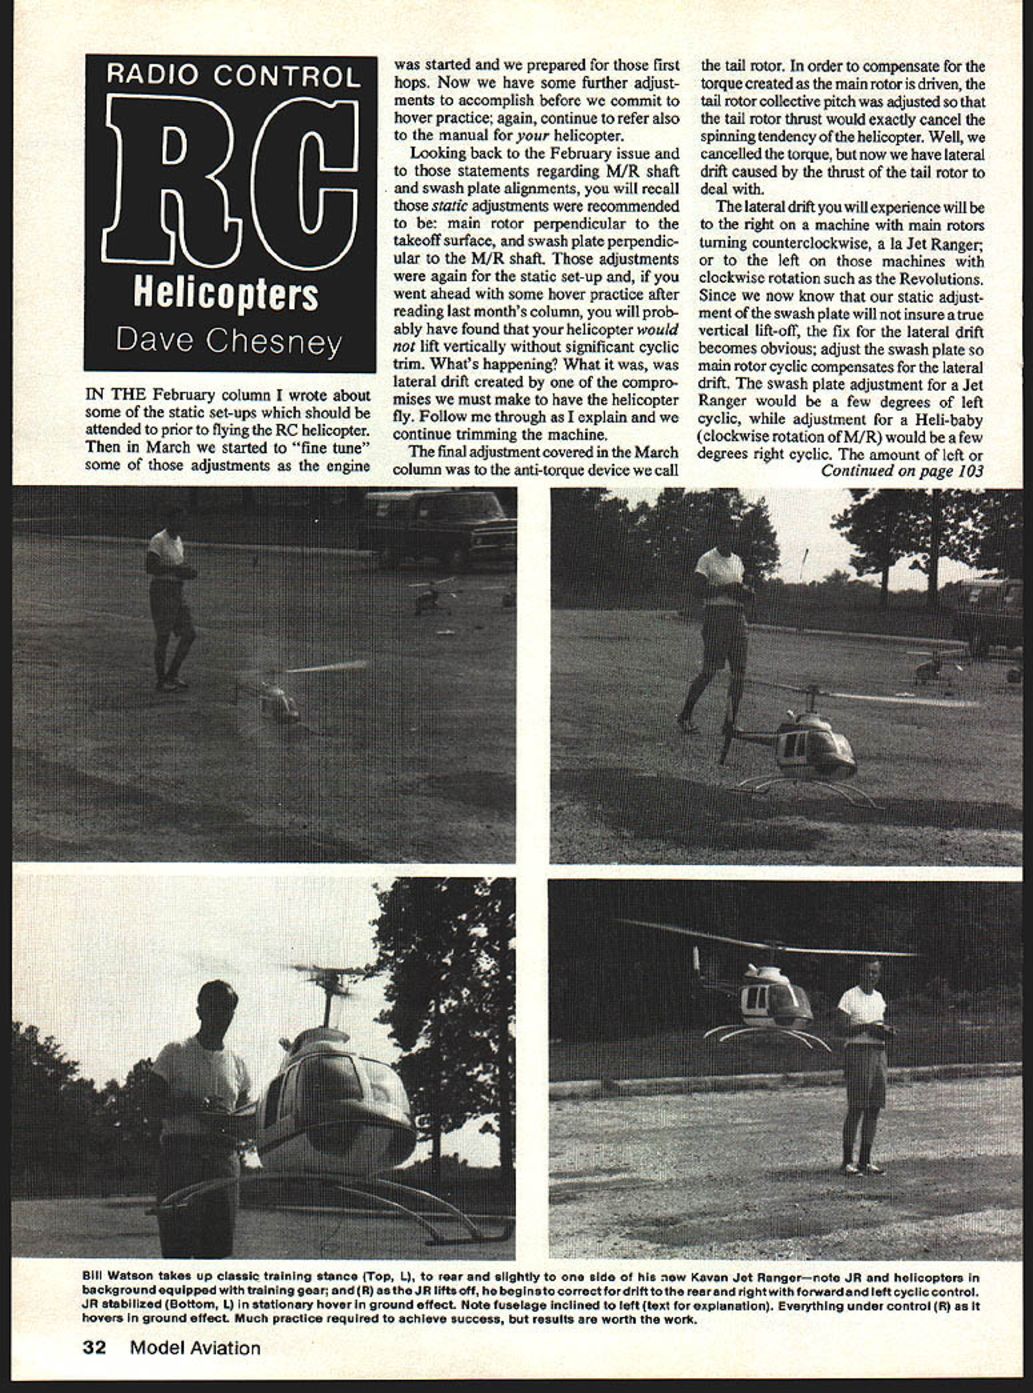
The lateral drift you will experience will be to the right on a machine with main rotors turning counterclockwise (as a Jet Ranger); or to the left on machines with clockwise rotation such as some Heli-baby models. Since our static adjustment of the swash plate will not ensure a true vertical lift-off, the fix for the lateral drift becomes obvious: adjust the swash plate so the main-rotor cyclic compensates for the lateral drift. The swash plate adjustment for a Jet Ranger would be a few degrees of left cyclic, while adjustment for a clockwise-rotating machine would be a few degrees right cyclic.
The amount of left or right cyclic will, of course, vary for individual helicopters since each copter differs in engine power, weight, and main-rotor pitch, and therefore in the amount of thrust needed to counter the torque generated by each combination. The static set-ups were a great start, but don't be alarmed if you must change them.
Fuselage attitude in hover
By compensating for drift with cyclic trim, the helicopter may appear inclined to the right or left while in a stationary hover. If RC helicopters were exactly like their full-scale counterparts, the main-rotor shaft, rather than the swash plate, would be inclined to compensate for lateral drift and the fuselage would therefore be suspended in a level attitude during hover. Our cyclic compensation produces a less-than-level attitude of the fuselage as the machine hovers, which will cause takeoffs and landings to be of the one-skid-first variety.
Hover practice — persistence required
Hover practice is frustrating for many. Like any other skill, proficiency in flying RC helicopters only comes with practice; all of the work you have done so far will not pay off unless you persevere. The helicopter will try your patience for a while. Initially your practice efforts may seem worthless as the machine appears to do anything but obey your commands, but hang in there.
The real trick is to keep the machine in one piece, or to repair it quickly so your practice sessions can be held as close together as possible.
Training gear and repairs
- Use training gear if available. The wider stance helps prevent tipping.
- If you don't use training gear, be prepared to make repairs—particularly rotor blade repairs. Keep a set of spare rotor blades ready.
- Keep other spares in stock and repair the machine quickly. Damaged equipment looks worse than it is; pull out spares, fix it, and get back to practice.
Choosing a practice site
Pick the smoothest, most level surface available. The helicopter will want to drift slightly as the throttle is slowly advanced; if the surface is rough, a skid could hang and cause a tip-over. Later, when you can rapidly lift the helicopter into a hover and descend without drifting, the choice of surface becomes less important.
Also choose a site that is free from obstructions. Buildings, trees, and other objects not only present targets but also act as turbulators for any wind present. A steady wind can help, but gusty or turbulent conditions will lead to problems.
Finally, the practice site should be away from spectators. You'll need to concentrate; spectators (even other modelers) tend to get too close and may distract you or add to your frustration with comments about obvious difficulties.
Starting, trimming, and initial hops
- After starting the engine, check blade tracking and re-trim the tail rotor.
- Set the machine down with the nose into the wind.
- Stand to the rear about ten feet and slightly to one side.
- Slowly advance the throttle. When the machine begins to get light it will probably begin slowly skidding left or right as well as rotating about its axis; it may also rock forward or back on the skids. Ease off the throttle and set your trims to help compensate and try again.
Trim adjustments while on or near the ground are not very accurate due to skid drag and ground effect, so don't expect a true vertical lift-off from ground trimming alone.
Advance the throttle until the machine is clear of the ground. You will find it will climb to a comfortable altitude at a throttle setting just beyond lift-off and will not continue to climb unless throttle is advanced further. Pay particular attention to the tail-rotor control; don't let the machine begin to spin. If it starts to move slowly in one direction or another, don't panic—move your transmitter stick to compensate, close the throttle, then try again.
Control functions
- Cyclic controls: control drift forward, aft, right, and left.
- Tail-rotor (yaw) control: controls the nose (or tail) about the yaw axis.
- Throttle (and collective): controls ascent and descent.
Control technique
It takes a lot of practice to get the amount and timing of the controls ironed out. The helicopter will not respond to control inputs the way an airplane does. Initially the tendency is to overcontrol; when that doesn't work, more is given and held too long. The machine moves some distance and may suddenly reverse; then you start over.
Try pulsing your stick movements rather than moving the stick and holding it until the helicopter stops. Move the stick quickly to compensate for drift, then return to neutral and follow up with additional quick pulses until the machine has stopped its drift.
Occasionally pulsed controls are not desirable—particularly when the machine is coming at you. In that case, move the stick and hold it until the machine has stopped its approach, then correct for the new motion as described. The amount of control and timing largely depend on the helicopter's momentum; the faster it's moving, the more control is necessary to stop it.
If things are happening too fast, try to slow the machine down enough to reduce throttle and land with a minimum of drift. Training gear will help prevent a tip-over if the machine is not drifting too fast. Be sure to close the throttle quickly once the helicopter has touched down.
Practice progression
- Begin with short hops to allow time to feel out the controls without giving the machine a chance to accelerate in unwanted directions.
- Practice landing with zero drift: lift off, stop the drift, then land.
- Continue until you are comfortable stopping a drifting helicopter, then hover a few more seconds and correct other drifting tendencies.
- Gradually lengthen your hover time as you anticipate and correct drifting tendencies. Lift-offs will become smoother with experience.
- Always watch your fuel level.
See you next month.
Dave Chesney Rt. 9, Box 621A, Greensboro, NC 27409.
Transcribed from original scans by AI. Minor OCR errors may remain.

