
Radio Control: Helicopters
Improving the Kavan Jet Ranger — Ray Hostetler
Improving the flight performance of the Kavan Jet Ranger will be the subject this month. Ray Hostetler has won several contests over the past years flying these helicopters. Those of us who have read Ray's articles in RCM have likely concluded that Ray considers the Kavan JR to be an excellent machine and well worth the effort of construction and set-up. But, like many of us, Ray also looks for ways to improve his helicopter's flight performance. He shares some of his improvement "secrets" in the following report.
Swash plate control systems in collective-pitch helicopters have always been a necessary pain. Here is a swash plate control system that was designed specifically for the Jet Ranger, although it could be easily used in other models. It features a four-point swash plate tie-down with push-pull on front/rear and left/right cyclic.
This system also eliminates the "dippity-do" of the JR in fast forward flight, provides extremely positive control, and allows up to 17 mm of swash plate throw with full cyclic control in either full high or full low collective pitch. Don Chapman, who has written numerous "Hover" columns for RCM, delivered this report: "I have tried many different swash plate control systems in the Jet Ranger, and without a doubt, this is better than anything else I've seen. It's simple, reliable, and very effective."
While we were pleased with Don's findings, we must say that if you are only hovering your JR you will feel little difference between this system and the stock setup. However, if you are flying around and have experienced the need for a better setup, this is it. And if you are presently building one, we would highly recommend that you install this setup right from the start. Since the system is very simple mechanically, it is easy to build and install. Even so, we'd like to touch upon a few points of construction.
Servo plate and layout
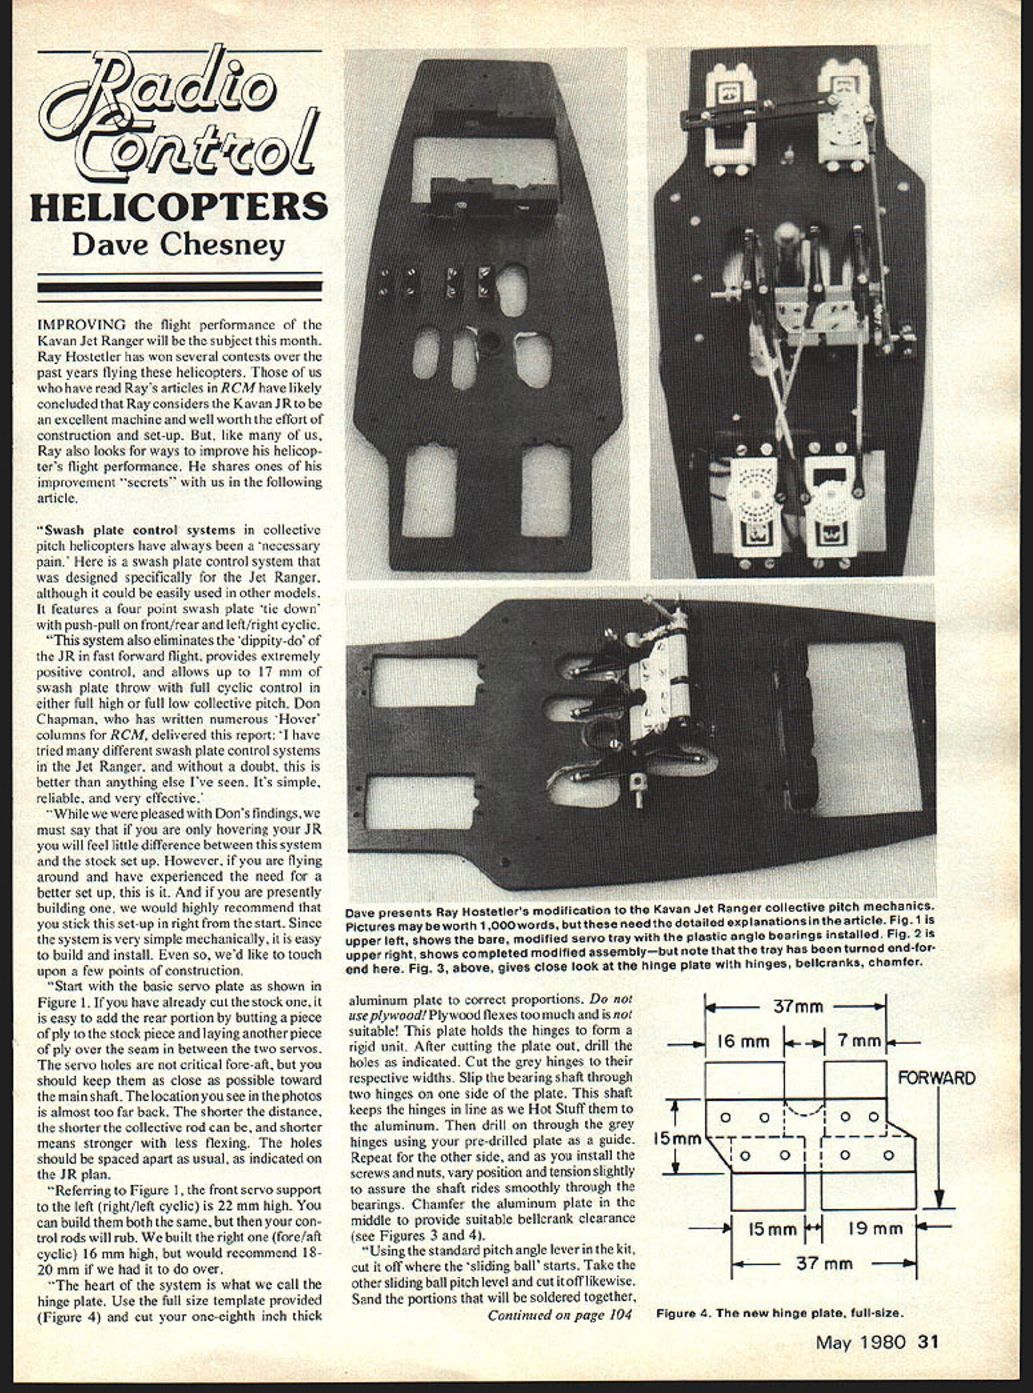
Start with the basic servo plate as shown in Figure 1. If you have already cut the stock one, it is easy to add the rear portion by butting a piece of ply to the stock piece and laying another piece of ply over the seam between the two servos. The servo holes are not critical fore-aft, but you should keep them as close as possible toward the main shaft. The location shown in the photos is almost too far back. The shorter the distance, the shorter the collective rod can be, and shorter means stronger with less flexing. The holes should be spaced apart as usual, as indicated on the JR plan.
Referring to Figure 1, the front servo support to the left (left/right cyclic) is 22 mm high. You can build both supports the same height, but then your cyclic rods will rub. We built the right one (fore/aft cyclic) 16 mm high, but would recommend 18–20 mm if we had it to do over.
Hinge plate (the heart of the system)
The heart of the system is what we call the hinge plate. Use the full-size template provided (Figure 4) and cut your 1/8-inch-thick aluminum plate to the correct proportions. Do not use plywood — plywood flexes too much and is not suitable. This plate holds the hinges to form a rigid unit. After cutting the plate out, drill the holes as indicated. Cut the grey hinges to their respective widths. Slip the bearing shaft through two hinges on one side of the plate. This shaft keeps the hinges in line as we Hot Stuff them to the aluminum. Then drill through the grey hinges using your pre-drilled plate as a guide. Repeat for the other side, and as you install the screws and nuts, vary position and tension slightly to assure the shaft rides smoothly through the bearings. Chamfer the aluminum plate in the middle to provide suitable bellcrank clearance (see Figures 3 and 4).
Using the standard pitch-angle lever in the kit, cut it off where the "sliding ball" starts. Take the other sliding-ball pitch lever and cut it off likewise. Sand the portions that will be soldered together, roughly position them and wrap with copper wire. Slide this assembly onto the hinge plate with shafts in place to get the exact spacing. Now remove the pitch lever before soldering it — melted hinges are of little value. (See right side of Figure 3 for a better grasp of this step.)
Positioning the angle bearings
To position your plastic angle bearings on the wooden plate, draw a center line down the plate. Referring to Figure 1, start at the front of the main shaft itself and go 24 mm toward the front servo mounts, then 1 mm to the left. This locates the screw hole nearest to the main shaft of the innermost angle bearing. The next hole is 18 mm over, 23 mm more locates the third hole, and 14 mm more positions the fourth. Drill the remainder of the holes and install the plastic angle bearings. Again, you must have the shaft in place as you tighten the screws so everything works smoothly. This takes a few minutes, but it must be right.
Collective direction and tail rotor mixing
Due to the geometry of this system, collective pitch is backwards compared to the standard JR hookup. That is, you pull for collective instead of pushing. This reverses tail-rotor mixing. To correct this, go back to the tail rotor and turn around the tail rotor hubs. The ball links should snap on the trailing edge of the tail rotor blades, not the leading edge as is customary. Now your tail rotor servo works backwards, so you should reverse the servo direction at your transmitter.
Assembly and final notes
At this point the system can be assembled. Make your pushrods, paying special attention to the "Y" pushrod that connects the two pitch bellcranks together. Shape as shown in Figure 2, and check for smooth operation in all ranges of collective pitch. Put an extra ball on the back of the swash plate so you can snap on the anti-rotation link. The original arrangement can be used, although we are presently using a pin-and-slot combination similar to that found on the Alouette.
A few closing notes:
- The screws holding the plastic angle bearings tend to hit the aluminum bracket on the other side of the servo plate when they are pushed through. Take a Moto-Tool and grind away the aluminum so the nuts can be installed easily.
- You need four angle bearings of the high style. Two are provided with the kit. Order part #3503 for the other two.
- The front pushrod runs straight through the lower front of the aluminum bracket. Roughly pencil the area where the rod runs, and cut this portion out with sufficient clearance for the rod to pass through to the swash plate.
- Do not bend the rods from the bellcranks to the swash plate. Everything works perfectly smooth with straight rods, and straight is strong. (This step is not illustrated in this article.)
- At hover, the hinge plate should be parallel to the wooden servo plate.
- Only bellcranks of the reinforced style should be used, and the top of the bellcranks that lead to the servo arms should be shortened 4 mm (see Figure 3).
The foregoing material will enable you to alleviate any problems you might have had with swash plate control systems in the Kavan Jet Ranger. We welcome any comments or questions you might have. My address is: Ray Hostetler, Box 136, Kidron, OH 44636. Phone: (216) 857-8393.
RC Helicopter Olympics — Vista, CA (June 6–8, 1980)
The first RC Helicopter Olympics will be held in Vista, CA on June 6–8, 1980. The Olympic theme will be the Schlueter Helicopter Party concept, so that all pilots can have fun instead of entering a grueling contest-like competition as in the past.
- Intermediate and Expert fliers will put out fires, rescue people from burning buildings, and participate in drag races and looping limbos.
- There will also be separate freestyle events for each class, with separate awards given to the winners.
- A continuous clinic will be available for any modeler who has questions about set-up and flying of the RC helicopter.
- Entertainment is planned for Saturday, June 6, in the form of a banquet dinner with a guest speaker telling about the history of the RC helicopter. Films and other enjoyable activities are also planned.
Sponsors of this event are The North County Blade Busters. Contest Director: Bob Robeson, 173 Sunset Drive, No. 2, Vista, CA 92083. Telephone enquiries are handled by Charlie Onstott at (714) 744-9605.
That's it for this month. Don't forget those preflight checks. Fly safely.
Dave Chesney Rt. 9, Box 621A Greensboro, NC 27409
Transcribed from original scans by AI. Minor OCR errors may remain.

