

Helicopters
Walt Schoonard
PRECAUTION to prevent crashes is helicopter insurance. Most crashes are the result of two things—mechanical failure and human error. We'll concern ourselves with the mechanical failure in this article.
Ball-Links
These machines incorporate a lot of ball-links, and most of these links perform very vital functions, and a failure of any one of them usually results in disaster. Why and where do they fail? The most common failure is from improper installation. When they are screwed onto the threaded rod, the end of the rod should never go into the threads more than 3/8 of the drilled hole. If the rod is screwed in further, it will rupture the ball-link, and you possibly won't know it until it fails.
The beginning of the threaded rod should be smoothed off with a file or sandpaper so that the thread is smooth at this point. This is especially true if you have cut off the threads with a Dremel disc or dykes. The sharp end of these threads literally cuts the ball-link so that it will fracture.
Another failure of the ball-link is splitting along the mold seams. This is caused from inserting too large a threaded rod, and heat and fuel fumes that attack the nylon. On the Schluter ball-link, I use a collar made from blue Nyrod. Cut a 3/4-in. length of blue Nyrod and slide it over the hex end of the ball-link, and it will never fail there.
The next failure of ball-links is that they just plain wear out. They should all be checked frequently for looseness on the ball. If they come off easily, they should be replaced. After a crash or even a hard landing, any of them that could have been strained or overloaded should be checked.
Lock-Tite, Lock Nuts, and Lock Washers:
Our helicopters have levels of vibration that always will be present. These vibrations will loosen the tightest nuts and bolts unless some strong precautions are taken. Lock-Tite should be used on all nuts and bolts unless some other locking device is used. I recommend blue Lock-Tite; it holds well enough and yet can be broken loose and removed when needed. It can be purchased at most any auto or cycle parts house. There are several types of lock nuts used on these machines. Some are the crimped type where the shape of the nut has been distorted and so it creates a bind on the threads. This type of lock nut is resistant to vibration but is not good where it will be repeatedly removed. They can damage the threads. The fiber lock nuts are very good and only need replacing when they are no longer able to create a bind on the threads.
Lock washers are designed to dig into both surfaces they are in contact with. As vibration tries to back out the screw, the sharp edges of the lock washer dig in and prevent the bolt or nut from turning. A lock washer is useless when one side is facing a flat washer. It will dig into the flat washer, but the flat washer is being held only by friction, and so it will not hold.
Fuel Lines, Fuel Fittings, and Filters:
Many people fail to take any precautions with items at all, and failures are very common. Fuel lines adhere to fuel fittings quite well when they are new and dry, but just let a little age and some very slippery fuel get involved, and the whole thing becomes a disaster. When fuel lines are installed, cut off a length of tubing about 1/8 in. long and open it up with needle-nose pliers and slide it on the fuel tubing about 1/2 in. Install the fuel tubing in the usual manner and then slide the ring over the fitting so that it is in the middle of the fitting. A tremendous amount of pressure is now being applied by the ring and will prevent the tubing from coming off, even when using a pressure system. All fuel fittings should be checked for sharp edges or burrs. These sharp edges can and will cut the best fuel tubing made. Sand off any sharp edges and then cut clean of the fittings to make sure that there are no filings in them.
A good fuel filter should be installed between the tank and the carburetor. Test the filter to make sure that it does not leak. If it is the type that can be opened and cleaned, test for leaks after each cleaning. A leaking fuel filter can cause more problems than you can imagine. When fueling your helicopter, do not fuel through the filter. It will strain the fuel to the tank alright, but the dirt will promptly go into the carburetor. Lastly, use a good fuel. I prefer K & B 500. If you want to know why, write to me and I will tell you.
Helicopter Floats:
Floats are by far the best training landing gear you can use. I don't mean for aerobatic flying but for hovering, and this is what you should be doing if you are still learning. They will slide easily on pavement and grass and will withstand tremendous abuse and hard landings. I have seen helicopters drop from 30 feet, and the floats saved the helicopter. If the floats raise the center of gravity too high, simply bend the cross supports so that the fuselage is hung down between the floats. Install them so that you can maintain the proper longitudinal C.G. I hate to say it, but the Eastman-made floats are far superior to any made in this country, and they come with all the attaching parts for very little more.
Low-Fuel Warning Devices:
Unless you have X-ray eyes and can see your fuel level in flight or have a digital clock mind, I recommend a low-fuel-warning device. There are several on the market, and at the end of this article I will give the addresses of each one. Most of the warning devices use one or more lamps that flash or cease to flash when the fuel level has reached a low. The three systems in this article will be the Wiesch system, the Walther system, and the Kavan system.
The Wiesch system has a very low battery drain and can be used to check the airborne battery condition. This system runs off the radio battery and draws 8 ma. per lamp and can operate up to three lamps in parallel. It sells for $19.95.
The Walther system operates from a separate 4.8-volt source and will drive up to three lamps. It has a very good feature in that as long as there is fuel in the tank, it keeps flashing. When the fuel goes low, it will stop flashing. This incorporates its own safety system if a wire were to break or a bulb blow out or if the unit itself were to fail. All are a warning to land and check it out. It sells for $15.00.
The Kavan Electronic-Fuel Control operates on a separate power supply and blinks only when the fuel goes low. It will drive at least two bulbs in parallel. It sells for $18.00.
I prefer the Walther system because it has its own safety by blinking all the time. I have been using this unit for over two years, and I have gotten used to it so that I am very uncomfortable when I fly a helicopter without one. Some people say you cannot see them in the daytime. This is true at some distance, but these are radio control helicopters, and it takes just a few seconds to fly by and you can see it at about 50 feet with no problem.
Helicopter Stands:
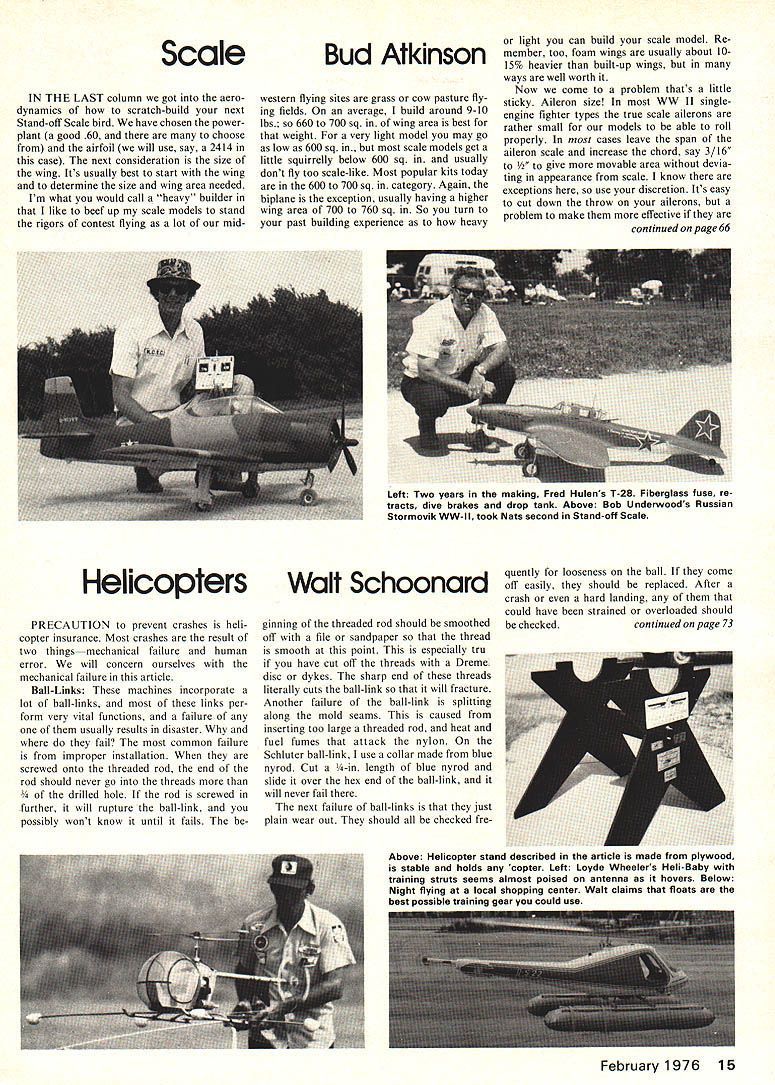
I have never liked standing on my head to start and work on my helicopter so I have the stand shown in the picture. It is made from 3/8-in. thick plywood and stands 21 inches high. It is built so that the outer legs are farther apart at the bottom 20 in. to 17 1/2 in. on top. It is very stable and holds any helicopter that I may put on it. For the Heli-Baby, I have a piece of plywood that I put on top that is two feet square. You can finish it with polyurethane varnish or cover it with Formica. Mine is finished in semi-gloss Formica black. This makes a mar-proof surface. It is held together with four 1/4-in. wing nuts and studs. When I go to a contest, I take it apart, and it is the first thing that gets packed. If you would like to build one like mine, I have the plans that I will send free to anyone that sends me a self-addressed picture of their helicopter—preferably a color one. If you are a model manufacturer, I would like to see you have a stand and I need pictures to put in the column.
Fuel Warning Device Addresses: Ron Wiesch, 7318 Crosier Dr., Dayton, Ohio 45423; Edward Walther, 3462 Bowman Dr., Winter Park, Fla. 32789; Kavan Model Products, 1424 E. Borchard Ave., Santa Ana, Calif. 92705. (My address is 2080 Sharon Rd., Winter Park, Fla. 32789.)
Transcribed from original scans by AI. Minor OCR errors may remain.

