
RADIO CONTROL JETS
Delmar Ellis, 8877 Meadowview Drive, West Chester OH 45069
FAI Jet Scale
Jets have competed on equal footing with other models in AMA Scale competition; in recent years a number of winners in major events have been from the ranks of jet modelers (for example, see the Top Gun report in the September 1995 issue of Model Aviation).
In Europe, FAI Scale is the most common competition event. Although jet modelers have won the event, they consider themselves to be at a disadvantage in rules and judging. Also, for jet modelers to be recognized as special interest groups by AMA's European counterparts, a separate FAI event for jets was needed.
Great efforts by European jet modelers resulted in a new FAI category: F4J, Jet Scale. This competition is preliminary for a trial period. An international event (comparable to a world championship) in formalized categories was conducted in Germany in late August. While FAI Jet Scale events have not been conducted in the United States (due to the popularity and perceived fairness of AMA Scale), we are still being well represented at international events.
Fliers from the United States who are competing in this event are:
- Jerry Caudle (Team Manager)
- Mike Doyle
- Garland Hamilton
- Eric Mey
- Dave Ribbe
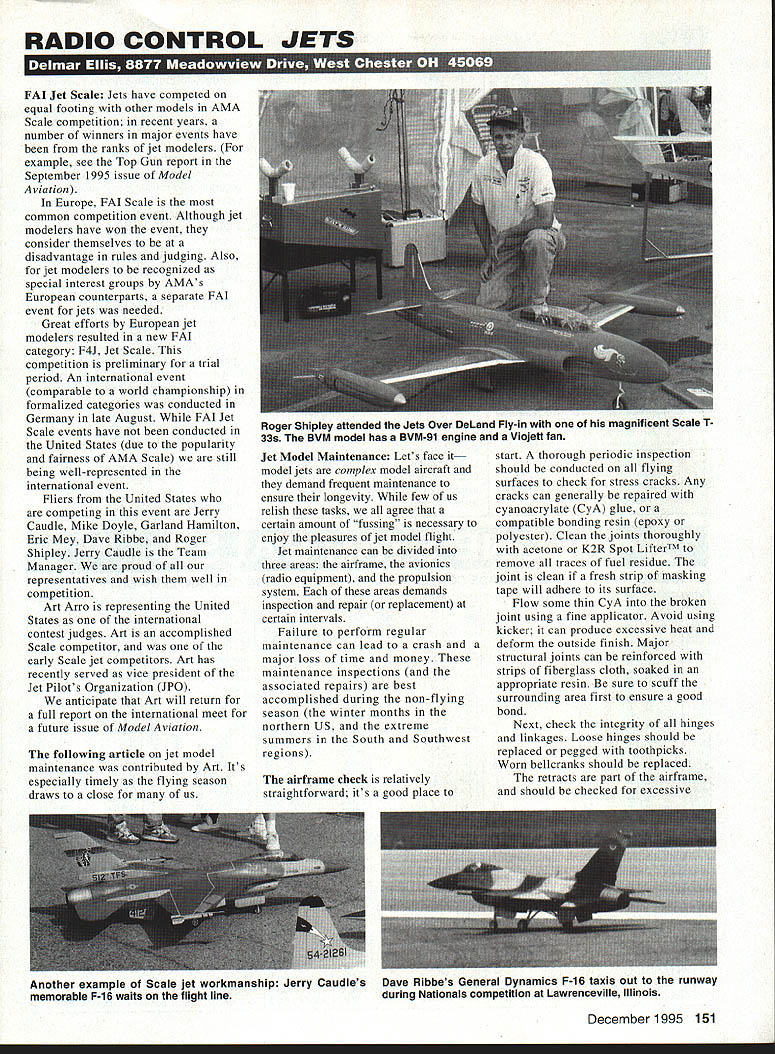
- Roger Shipley
Art Arro is representing the United States as one of the international contest judges. Art is an accomplished Scale competitor and was one of the early Scale jet competitors. Art has recently served as vice president of the Jet Pilots' Organization (JPO). We anticipate that Art will return with a full report on the international meet for a future issue of Model Aviation.
The following article on jet model maintenance was contributed by Art. It's especially timely as the flying season draws to a close for many of us.
Jet Model Maintenance
Let's face it—model jets are complex aircraft and they demand frequent maintenance to ensure their longevity. While few of us relish these tasks, we all agree that a certain amount of "fussing" is necessary to enjoy the pleasures of jet model flight.
Jet maintenance can be divided into three areas:
- Airframe
- Avionics (radio equipment)
- Propulsion system
Each of these areas demands inspection and repair (or replacement) at certain intervals. Failure to perform regular maintenance can lead to a crash and a major loss of time and money. These inspections (and the associated repairs) are best accomplished during the non-flying season (the winter months in the northern US, and the extreme summers in the South and Southwest regions).
Airframe
The airframe check is relatively straightforward and is a good place to start. Conduct a thorough periodic inspection of all flying surfaces to check for stress cracks. Any cracks can generally be repaired with cyanoacrylate (CyA) glue or a compatible bonding resin (epoxy or polyester). Clean the joints thoroughly with acetone or K2R Spot LifterTM to remove all traces of fuel residue. The joint is clean if a fresh strip of masking tape will adhere to its surface.
Flow some thin CyA into the broken joint using a fine applicator. Avoid using a kicker; it can produce excessive heat and deform the outside finish. Major structural joints can be reinforced with strips of fiberglass cloth soaked in an appropriate resin. Be sure to scuff the surrounding area first to ensure a good bond.
Next, check the integrity of all hinges and linkages. Loose hinges should be replaced or pegged with toothpicks. Worn bellcranks should be replaced. Retracts as part of the airframe should be checked for excessive play. Straighten wheel struts and tighten wheel collars. Check tires for wear—jets especially have hard tires for high takeoff speeds and to withstand excessive side loads.
Air lines should be replaced at least once each season. Clip the ends of the fittings to ensure an airtight seal; slice the end of the tubing lengthwise over the fitting before you disconnect. Avoid lateral tension which could break the plastic fittings. Clip about 1/8 inch off the air line. Reinstall by hand using round-nose pliers. Avoid using hemostats; sharp-edged pliers can cause split stress in the air line.
Avionics (Radio Equipment)
After the airframe inspection, perform a complete radio inspection. Remove the onboard battery pack from the model and cycle it once a month. Charge overnight at the recommended rate. Let the battery sit for a day or two before discharge and note the time and capacity depletion. If you suspect the battery has deteriorated (a 20% loss of capacity from previous cycles), replace it. Repeat the cycling process if you suspect battery problems and double-check the loss.
Check servo total movement, smoothness, and mounting integrity. The linkage holes in the servo arms will wear and must be checked for excessive play. Replace or repair any servo that jerks, jitters, or hums excessively.
Inspect the servo extension leads and check for frayed insulation—especially where the leads pass through bulkheads or other structural members. Use an electronic spiral-wrap sheathing on most long fuselage leads. You can tie a length of string to the servo end when you pull the extension lead out for inspection; to reinstall, pull the string (and wire) back to the servo location.
I recommend returning any questionable servos and switches (along with the transmitter and receiver) to an authorized repair center for overhaul. Remember: these centers aren't as busy during the slack season as they are at the beginning or middle of the active flying season.
Propulsion System
The propulsion system consists of the fan unit, engine, tuned pipe, and fuel system. This system endures severe operating conditions, with high rpm, heat, and vibration in most installations. You must remove this equipment from the model to inspect it properly.
Check all bolts and screws on the engine and fan unit for tightness and integrity. You will be surprised at the number of missing screws and popped-head bolts you will find in this area. Inspect the fan impeller for nicks and chafing. Minor nicks can be cleaned up with fine sandpaper; missing chunks should be replaced by the fan manufacturer (along with a rotor rebalancing). The starter-probe drive bolt should be checked for excessive play. If the socket is worn, starting will be impossible.
Peer into the exhaust port and look for scoring or deep scratches in the piston wall. The color of the piston provides a visual history of your mixture settings. With a glow plug installed, turn the engine over by hand slowly—look and listen for excessive blow-by. At Top Dead Center (TDC), rock the shaft back and forth to check for excessive rod wear or wristpin play. Anything over 10° of free play is excessive, and the engine should be overhauled by a qualified individual or service center. I recommend a conrod change after 100 flights.
After checking the top end, check the shaft at Bottom Dead Center (BDC). Check for any roughness in the bearings—these should also be replaced after the 100-flight mark. A bearing or rod that fails during operation will result in a major rebuild; replacement of these critical parts is usually more economical than repairing a trashed engine.
If you’re skilled at engine repair and servicing, you can check the rotary disc valve found on older fan engines such as the O.S. .77 or K&B .82. The rotor disc should seat flat against the inside face of the backplate. Any dishing or rocking of the disc will result in a performance loss—the rotor or backplate should be replaced. Be sure to set the proper running clearance for those parts after the rebuild.
The wire carburetor linkage should be changed after about 50 flights—the high-frequency vibration causes metal fatigue. I change the wire, the steel solder link, and the ball socket during this process.
The tuned-pipe muffler can be cleaned externally with steel wool and internally with solvent and a wire shotgun bore brush. Check the pipe welds for cracks and inspect the integrity of the pipe hanger and its O-ring. If you’re using pipe pressure, check the fitting to make sure that it’s secure and not plugged.
The fuel system is a common source of mysterious problems. Check the tank stoppers for leakage and tighten the screws if necessary. I apply a finger wipe of Innovative Model Products' PFM adhesive/sealant or Zap‑A‑Dap‑A‑Goo™ to the tank fittings for added leak prevention. Replace brass tubing every two years; the nitro in the fuel causes embrittlement in brass, leading to hairline cracks that create air bubbles in the fuel stream and play havoc with the mixture.
Change all silicone fuel tubing every year, even inside the tanks. For fliers who use pilot (puffer) pressure, I recommend replacing all exterior fuel lines with large-size tubing. Du-Bro line barbs should be soldered to all brass tank tubing to prevent leakage or a blowoff.
Finally, check the tank walls for chafing or pinhole leaks. Give the fuel and plumbing system proper attention—it’s very important.
Replace the tuned pipe O-rings and clean up any burrs on the inside neck of the pipe before reinstalling the fan in the model. I prefer to use automotive Rislone® engine treatment as a long-term storage oil; most model after-run oils tend to evaporate and become brittle after a length of time.
While all of these procedures may seem tedious and time-consuming, they will contribute to the reliability of your model jet. They can be accomplished over several evenings during the non-flying season and will definitely extend your jet flying enjoyment. These measures can also prevent a crash—it’s far easier (and cheaper) to inspect and repair a model than it is to build a new one. I hope these procedures result in lots of successful jet flying this season and beyond.
Transcribed from original scans by AI. Minor OCR errors may remain.

