

Radio Control: Pylon Racing
Bill Hager
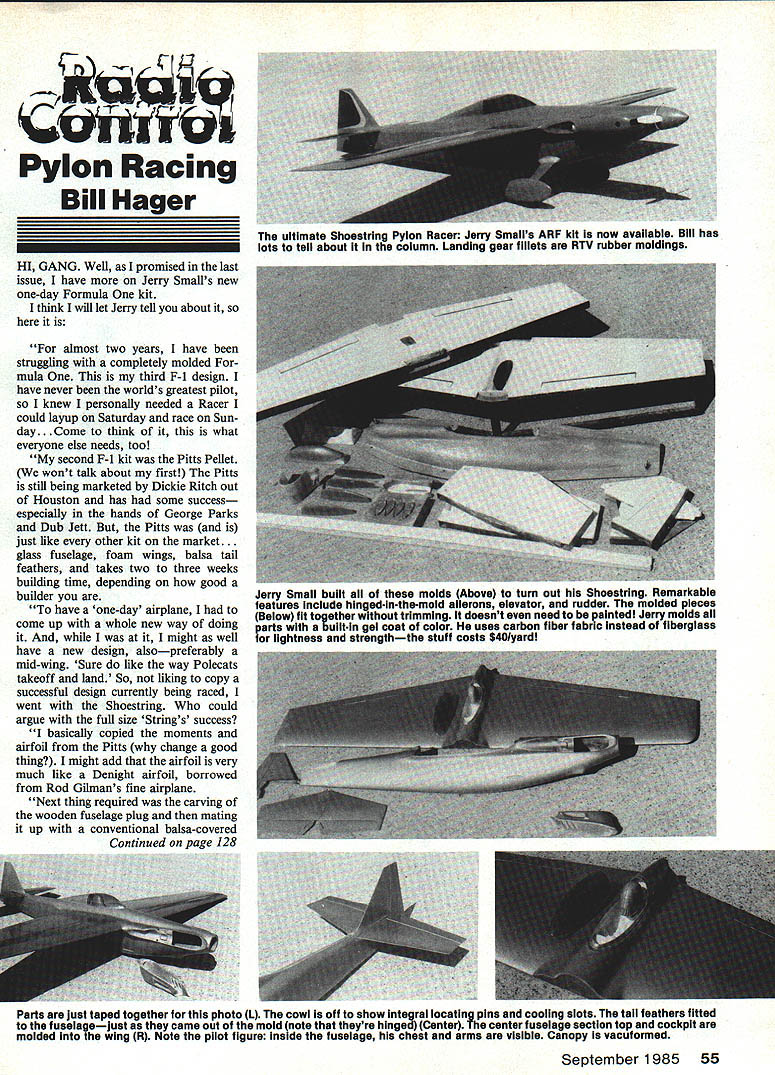
Hi, gang. Well, as I promised in the last issue, I have more on Jerry Small's new one-day Formula One kit.
I think I will let Jerry tell you about it, so here it is.
Jerry Small — the one-day Formula One kit
"For almost two years, I have been struggling with a completely molded Formula One. This is my third F-1 design. I have never been the world's greatest pilot, so I knew I personally needed a racer I could lay up on Saturday and race on Sunday... come to think of it, this is what everyone else needs, too!
"My second F-1 kit was the Pitts Pellet. (We won't talk about my first!) The Pitts is still being marketed by Dickie Ritch out of Houston and has had some success — especially in the hands of George Parks and Dub Jett. But the Pitts was (and is) just like every other kit on the market: glass fuselage, foam wings, balsa tail feathers, and takes two to three weeks building time, depending on how good a builder you are.
"To have a 'one-day' airplane, I had to come up with a whole new way of doing it. And, while I was at it, I might as well have a new design also — preferably a mid-wing. I sure do like the way Polecats take off and land. Not liking to copy a successful design currently being raced, I went with the Shoestring. Who could argue with the full-size String's success?
"I basically copied the moments and airfoil from the Pitts (why change a good thing?). I might add that the airfoil is very much like a Denight airfoil, borrowed from Rod Gilman's fine airplane.
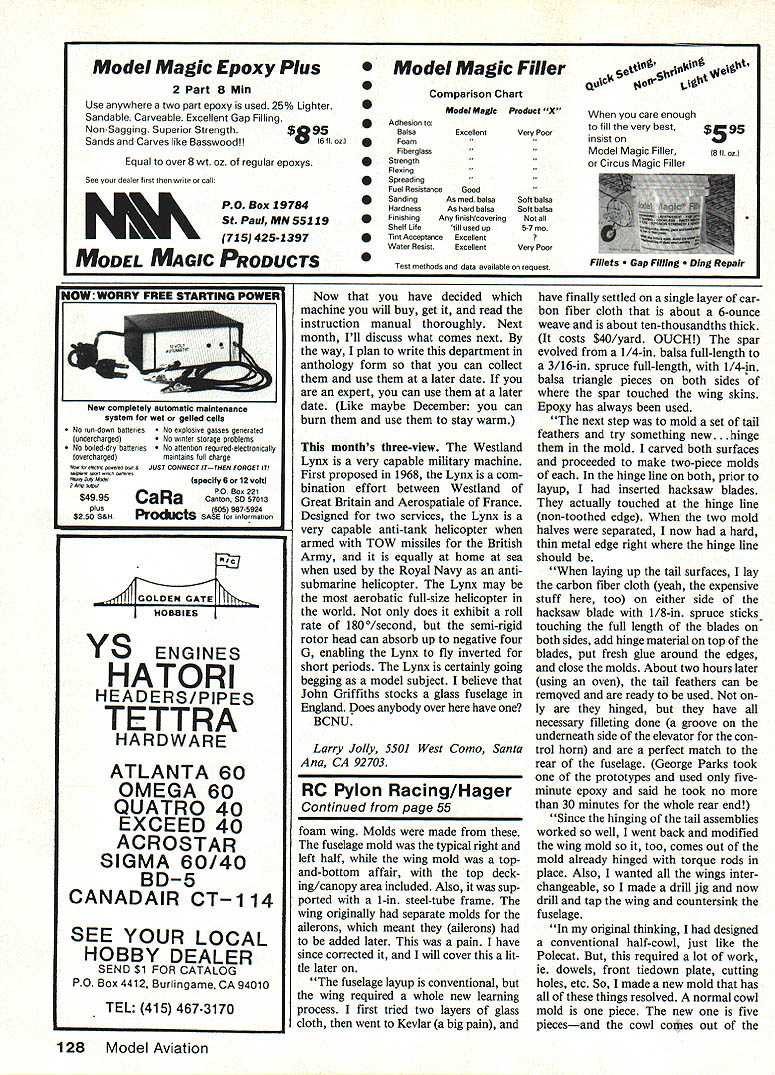
"Next thing required was the carving of the wooden fuselage plug and then mating it up with a conventional balsa-covered foam wing. Molds were made from these. The fuselage mold was the typical right-and-left half, while the wing mold was a top-and-bottom affair, with the top decking/canopy area included. The wing mold was supported with a 1-inch steel-tube frame. The wing originally had separate molds for the ailerons, which meant the ailerons had to be added later. This was a pain. I have since corrected it, and I will cover this a little later on.
"The fuselage layup is conventional, but the wing required a whole new learning process. I first tried two layers of glass cloth, then went to Kevlar (a big pain), and have finally settled on a single layer of carbon fiber cloth that is about a 6-ounce weave and is about ten-thousandths thick. (It costs $40/yard. Ouch!) The spar evolved from a 1/4-inch balsa full-length to a 3/16-inch spruce full-length, with 1/4-inch balsa triangle pieces on both sides of where the spar touched the wing skins. Epoxy has always been used.
"The next step was to mold a set of tail feathers and try something new — hinging in the mold. I carved both surfaces and proceeded to make two-piece molds of each. In the hinge half, prior to layup, I had inserted hacksaw blades. They actually touched at the hinge line (non-toothed edge). When the two mold halves were separated, I now had a hard, thin metal edge right where the hinge line should be.
"When laying up the tail surfaces, I lay the carbon fiber cloth on either side of the hacksaw blade with 1/8-inch spruce sticks touching the full length of the blades on both sides, add hinge material on top of the blades, put fresh glue around the edges, and close the molds. About two hours later (using an oven), the tail feathers can be removed and are ready to be used. Not only are they hinged, but they have all necessary filleting done (a groove on the undersurface of the elevator for the control horn) and are a perfect match to the rear of the fuselage. (George Parks took one of the prototypes and used only five-minute epoxy and said he took no more than 30 minutes for the whole tail end!)
"Since the hinging of the tail assemblies worked so well, I went back and modified the wing mold so it, too, comes out of the mold already hinged with torque rods in place. Also, I wanted all the wings interchangeable, so I made a drill jig and now drill and tap the wing and countersink the fuselage.
"In my original thinking, I had designed a conventional half-cowl, just like the Polecat. But this required a lot of work — dowels, a front tiedown plate, cutting holes, etc. So I made a new mold that has all of these things resolved. A normal cowl is one piece. The new one is five pieces — and the cowl comes out of the mold with the locating pins, leakproof corners, and all necessary holes for the engine and cooling. The cheek cowl is ready to mount (drill one hole); all holes in the cowl are precut. The rear pins, the front plate, and the exit holes are all in place, ready to go. I even got cutesy and made the Hoover-style 'louvers' real ones, not just holes.
"The canopy is vac-formed, and the pilot figure is installed in the cockpit before the canopy is glued in place. Landing-gear fillets are molded in RTV rubber, filled with a microballoon paste, and the wheel pants are laminated over foam cores. The finished parts are light, strong and require very little finishing. I gel-coat the molds in the color I want and then build up the parts in gel-coat color so that painting is minimized. I also use carbon fiber fabric instead of glass for lightness and strength — the stuff costs about $40/yard, but it is worth it.
"The result is what I call the ultimate Shoestring pylon racer. The ARF kit I now offer comes out of these molds and is amazingly quick to assemble. The parts fit so well that tether trimming isn't necessary, and almost no sanding is required. The kits have integral locating pins, cooling slots, and tail feathers fitted to the fuselage. The center fuselage section and top cockpit are molded in one piece, and the canopy is vac-formed. Landing gear, fillets and small parts are supplied. The final finish is a gel-coat color with decals applied.
"If you want more details on mold making, layup schedules, or jigging for drilling and tapping wings, write and I'll cover these topics in a later column.
"So, there it is, an airplane kit that requires only mounting the motor, the landing gear, tail feathers, and canopy. It doesn't even require painting when you're in a pinch! After waxing and PVA-ing the mold (PVA is a release agent), I spray in a base coat of Super Poxy color with satin hardener. I start the layup process after it has dried. Granted, this does not produce the expected five-color paint job, but it does give a good place to start, has no pinholes, and allows you to fly it as is.
"I originally designed this airplane for myself only, but have now started selling kits for $300 each. It's high, but worth it and should keep me from being deluged with orders.
"Here is a summary of all the features:
- Pre-painted.
- Pre-hinged surfaces.
- Wing torque rods in place.
- Wing drilled, tapped, and ready to mount.
- All parts fit.
- Vacuformed cockpit interior with separate pilot head included.
- Vacuform ASA wheel pants.
- Molded rubber (RTV) fillets for landing gear (where landing gear enters wheel pants and exits fuselage).
- Cheek cowl ready to mount (drill one hole). All holes in cowl precut.
- Wing keyed to go on one way only."
Jerry's plane has been flown in several races this year, with great success. I think you will be seeing quite a lot of them in the near future.
Believe me, this is not just a spur-of-the-moment thing. Jerry's plane is a work of art. Try it — you'll like it.
We, in racing, have been stagnant for too long. It's time to move forward with new ideas and products. I received a couple of props from a fellow pylon racer in England. They were made of carbon fiber. Yes, I know what the rule says — only wooden, fixed-pitch, two-bladed props. Think about it for a while, and we will talk about this in the next issue.
Hey out there! How about sending me something about that race your club just put on. I can't write about it if you don't send me anything! (The same goes for photos.) See you next month.
Bill Hager 706 Glen Haven Dr. Conroe, TX 77385
Transcribed from original scans by AI. Minor OCR errors may remain.

