
Radio Control: Pylon Racing
Dave Lane
THIS MONTH I would like to talk about construction techniques for the individual that has not tried Pylon racing because he thinks it too difficult. (I was corrected on my article about Q-500 aircraft in that the wing thickness is 12% instead of 15% as I stated. Thanks to Greg Doe for the correction.)
Now, for the construction of foam wings. It seems that a lot of the modelers around the country either do not like foam, or are afraid to try them.
Foam wings are not difficult to build if you follow some rather simple, but important, procedures. There are probably many different ways to build foam wings but I will only attempt to discuss the method that has been successful for me.
I am going to assume that the foam core is already cut to the desired shape. This article is not intended to cover the various methods of cutting the actual foam core. That is an art in itself and requires equipment that the average modeler probably doesn't have laying around in the shop.
Generally, the foam wing cores are supplied with the foam block they are cut from.
Examine the cores for uniformity and smoothness. You will probably find some irregularities, but these are usually minor and some mild sanding will even things out.
If you are building a wing that is supplied by the kit manufacturer and all of the wood is in the kit, then there should be no problem of selecting the proper materials for the wing. If you are starting a wing from scratch or a kit that only supplies the core, then we need to talk about the covering materials, etc.
Wings that are 10% or less, and 300 sq. in. or less, can be skinned with 1/16 x 3/4" wide balsa. Wings that are 6% and up in thickness and over 300 sq. in. usually require 3/32 x 3/4" wide balsa, medium hard.
Some wings might require skins 1/8" thickness. Generally racing aircraft leading and trailing edges should also be medium hard. Some wings will also require a rear spar of medium hard balsa. Generally, the wing with a full-length rear spar will use full span or 3/4 span ailerons and a torque tube linkage for operation. Wings without a rear spar will have inset ailerons and will use pushrods and bellcranks, although some manufacturers use torque tubes on both types of wings.
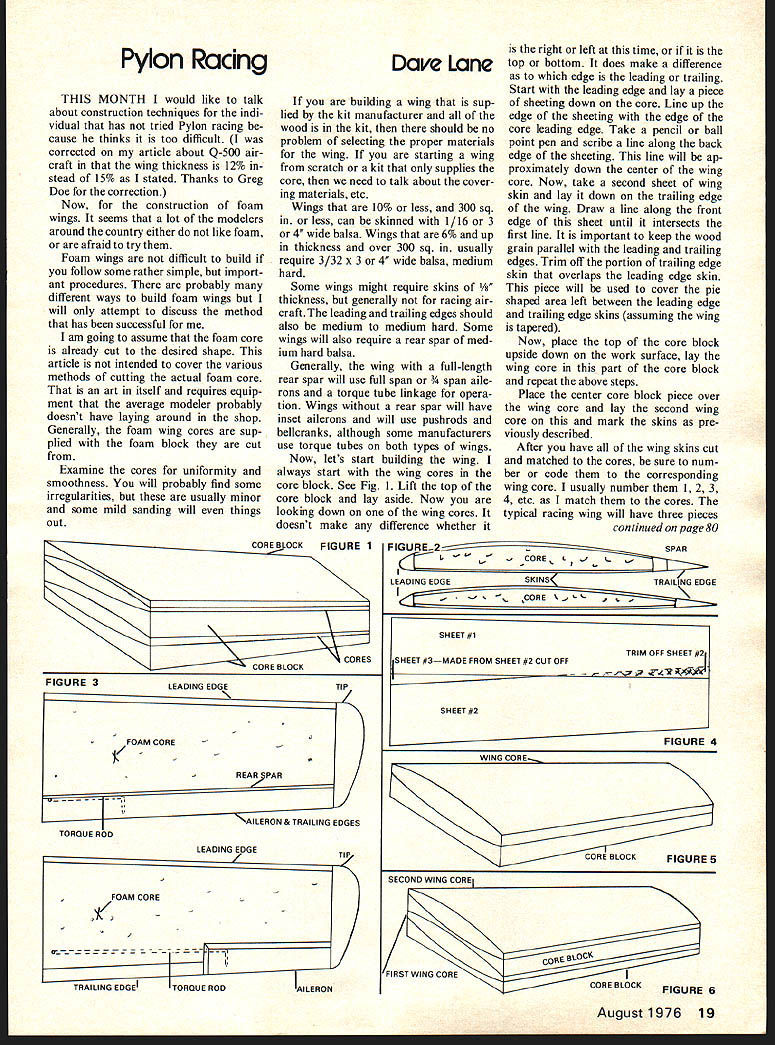
Now, let's start building the wing. I always start with the wing cores in the core block. See Fig. 1. Lift the top of the core block and lay aside. Now you are looking down on one of the wing cores. It doesn't make any difference whether it is the right or left at this time, or if it is the top or bottom. It does make a difference as to which edge is the leading or trailing. Start with the leading edge and lay a piece of sheeting down on the core. Line up the edge of the sheeting with the edge of the core leading edge. Take a pencil or ball point pen and scribe a line along the back edge of the sheeting. This line will be approximately down the center of the wing core. Now, take a second sheet of wing skin and lay it down on the trailing edge of the wing. Draw a line along the front edge of this sheet until it intersects the first line. It is important to keep the wood grain parallel with the leading and trailing edges. Trim off the portion of trailing edge skin that overlaps the leading edge skin. This piece will be used to cover the pie-shaped area left between the leading edge and trailing edge skins (assuming the wing is tapered).
Now, place the top of the core block upside down on the work surface, lay the wing core in this part of the core block and repeat the above steps.
Place the center core block piece over the wing core and lay the second wing core on this and mark the skins as previously described.
After you have all of the wing skins cut and matched to the cores, be sure to number or code them to the corresponding wing core. I usually number them 1, 2, 3, 4, etc. as I match them to the cores. The typical racing wing will have three pieces.
Radio Control: Pylon Racing
of wing skin per side for a total of 12 sections. Number the wing core the same as the wing skins so that when you start applying the skins to the cores, you will get the skins in the same sequence.
Okay? Let's talk about a cement that we can use that won't melt the foam. I use Best Test rubber cement. It is similar to Carters but does not dry out after about six months. There are several model contact cements on the market that do the job, so it really is up to the individual's preference. Goldberg's Blue-Goo should be available by the time you read this article. From what I have heard, this cement should work very well. It is tinted blue so you can see if you have the foam cores and skins completely covered with cement. This is one of the problems with Best Test since it has no color.
Once you decide what type of cement you are going to use (be sure it does not attack the foam), coat the foam cores and the skins. Set everything aside for at least 30 minutes until the cement is tacky (some cements call for less time). Before attempting to apply the skins to the cores. This waiting time allows the thinner to evaporate from the cement. If you put the skins on the cores too soon, the thinners will attack the foam and melt it. Now you have scrap!
If you have waited long enough, you can put the cores back into the core block without the cores sticking to the block. So, using the core block as a jig, apply the wing skins in the proper numerical order. After you place each skin on the core, but before you apply the next skins, be sure to lay a bead of white glue or epoxy to the edge of the sheeting so that you get a good tight glue joint between the skins.
After you have skinned the cores, check them to be sure they are straight and have the proper twist (wash-out) as called for on the plans. Put the cores back in the core block and let them dry for an hour or two.
Now you are ready to either glue or epoxy the leading, trailing edges and tips in place. Sand everything down to the desired shape, cut the aileron per plan and join the wings together with epoxy. Periodically as you assemble the wing panels, check them to be sure that you still have the proper wash-out in each panel. If they have changed, twist the panel back into shape. You usually can do this until you put the first coat of resin and glass on the wing. Be sure to use 1/2" of either elastic or glass tape to reinforce the wing center joint. If you don't tape the center joint, I can guarantee you the wing will fail in the center section on the first full power flight!
Well, hope the above information will help those that would like to build foam but have been leery of the stuff. It really is not as difficult as you might think. The first time you do it, it will probably take you longer than a built-up wing. Once you have completed a couple, you will find that you can put a foam wing together in a couple of hours.
Next month I will cover the technique of using K&B's Super Poxy finish system. (My address is: 4477 W. 136th St., Hawthorne, CA 90250.)
Transcribed from original scans by AI. Minor OCR errors may remain.

