
Pylon Racing
Dave Lane
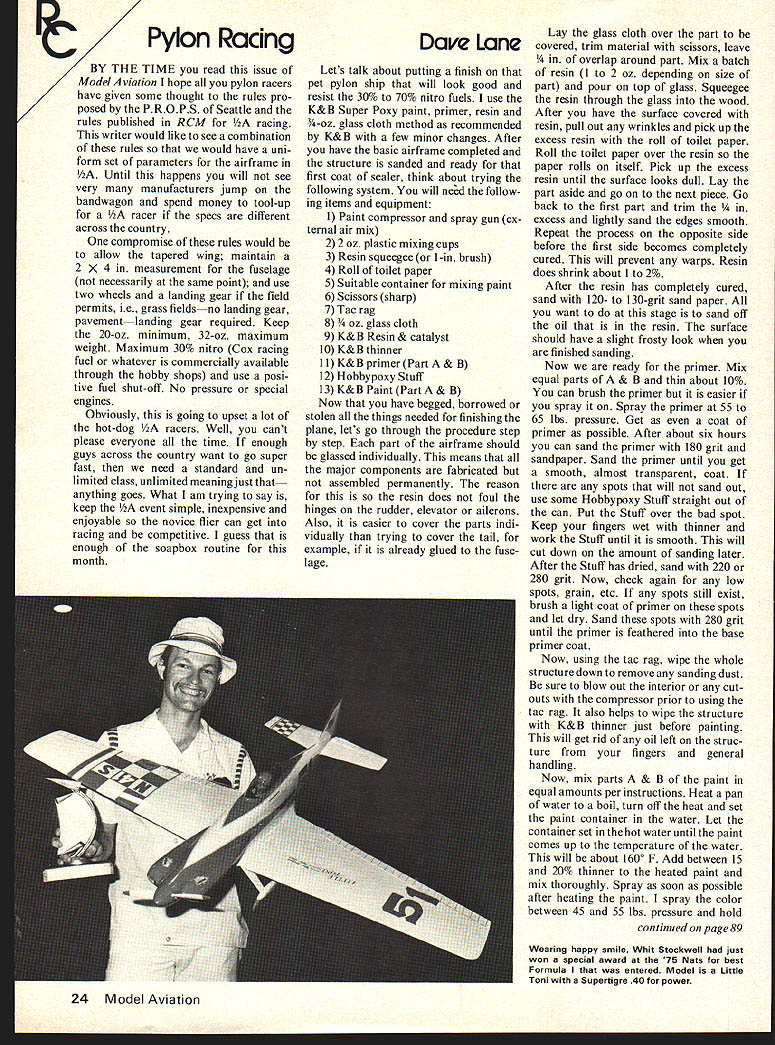
BY THE TIME you read this issue of Model Aviation I hope all you pylon racers have given some thought to the rules proposed by the P.R.O.P.S. of Seattle and the rules published in RCM for 1/2A racing. This writer would like to see a combination of these rules so that we would have a uniform set of parameters for the airframe in 1/2A. Until this happens you will not see very many manufacturers jump on the bandwagon and spend money to tool-up for a 1/2A racer if the specs are different across the country.
One compromise of these rules would be to allow the tapered wing; maintain a 2 x 4 in. measurement for the fuselage (not necessarily at the same point); and use two wheels and a landing gear if the field permits, i.e., grass fields — no landing gear on pavement — landing gear required. Keep the 20-oz. minimum, 32-oz. maximum weight. Maximum 30% nitro (Cox racing fuel or whatever is commercially available through the hobby shops) and use a positive fuel shut-off. No pressure or special engines.
Obviously, this is going to upset a lot of the hot-dog 1/2A racers. Well, you can't please everyone all the time. If enough guys across the country want to go super fast, then we need a standard and an unlimited class, unlimited meaning just that — anything goes. What I am trying to say is, keep the 1/2A event simple, inexpensive and enjoyable so the novice flier can get into racing and be competitive. I guess that is enough of the soapbox routine for this month.
Let's talk about putting a finish on that pet pylon ship that will look good and resist the 30% to 70% nitro fuels. I use the K&B Super Poxy paint, primer, resin and 1/2 oz. glass cloth method as recommended by K&B with a few minor changes. After you have the basic airframe completed and the structure is sanded and ready for the first coat of sealer, think about trying the following system. You will need the following items and equipment:
- Paint compressor and spray gun (external air mix)
- 2 oz. plastic mixing cups
- Resin squeegee (or 1-in. brush)
- Roll of toilet paper
- Suitable container for mixing paint
- Scissors (sharp)
- Tac rag
- 1/2 oz. glass cloth
- K&B Resin & catalyst
- K&B thinner
- K&B primer (Part A & B)
- Hobbypoxy Stuff
- K&B Paint (Part A & B)
Now that you have begged, borrowed or stolen all the things needed for finishing the plane, let's go through the procedure step by step. Each part of the airframe should be glassed individually. This means that all the major components are fabricated but not assembled permanently. The reason for this is so the resin does not foul the hinges on the rudder, elevator or ailerons. Also, it is easier to cover the parts individually than trying to cover the tail, for example, if it is already glued to the fuselage.
Lay the glass cloth over the part to be covered, trim material with scissors, leave 1/4 in. of overlap around part. Mix a batch of resin (1 to 2 oz. depending on size of part) and pour on top of glass. Squeegee the resin through the glass with a wood squeegee. After you have the surface covered with resin, pull out wrinkles, pick up excess resin, roll toilet paper over the resin. The paper rolls itself. Pick up the excess resin until the surface looks dull. Lay the part aside, go to the next piece. Go back to the first part, trim 1/4 in. excess, lightly sand edges smooth. Repeat the process on the opposite side before the first side becomes completely cured. This will prevent any warps. Resin does shrink about 1 to 2%.
After the resin has completely cured, sand with 120–130 grit sandpaper. You want to sand off the oily resin surface and it should have a slight frosty look when finished sanding. Now ready for primer. Mix equal parts of A & B and thin about 10%. You can brush the primer but it is easier if you can spray it on. Spray the primer at 55 to 65 lbs. pressure. Get as good an even coat of primer as possible. After about six hours, you can sand the primer with 180 grit sandpaper. Sand the primer until you get a smooth, almost transparent coat; spots will sand out. Use some Hobbypoxy Stuff straight out. Put Stuff over bad spot. Keep your fingers wet with thinner. Work the Stuff until it is smooth. This will cut down the amount of sanding later. After Stuff has dried, sand 220–280 grit. Now check again for low spots, grain, etc. If spots still exist, brush a light coat of primer on these spots and let dry. Sand these spots with 280 grit until the primer is feathered into the base primer coat.
Now, using the tac rag, wipe the whole structure down to remove any sanding dust. Be sure to blow out the interior or any cutouts with the compressor prior to using the tac rag. It also helps to wipe the structure with K&B thinner just before painting. This will get rid of any oil left on the structure from your fingers and general handling.
Now, mix parts A & B of the paint in equal amounts per instructions. Heat a pan of water to a boil, turn off the heat and set the paint container in the water. Let the container set in the hot water until the paint comes up to the temperature of the water. This will be about 160°F. Add between 15 and 20% thinner to the heated paint and mix thoroughly. Spray as soon as possible after heating the paint. I spray the color between 45 and 55 lbs. pressure and hold the spray gun between 8 and 10 in. from the surface. The first color coat does not have to be perfect but you should try to put on as even as possible to cut down on the amount of sanding later.
I usually mix one cup of paint at a time. This will cover the typical Formula One size bird two times. I consider this to be one coat. By spraying the color coat hot, the paint becomes dust free in about 6 to 8 min. It will be fingerprint proof in about 8 hrs.
After the paint has dried, look over your masterpiece and you will probably say that I didn't know what I was talking about. The first coat will usually look pretty bad unless you had a super finish at the primer stage. Sand the first color coat with 320 grit wet. This will give you the super smooth glass-like surface you want for the final coat. If you find any spots that won't sand out (and you will), get out the Stuff and patch as necessary.
Usually, at this stage of the game, I install the cockpit detail and canopy. This way the surface around the cockpit opening has a good coat of paint and is well sealed.
Mask off the canopy with vinyl electrical tape. Leave about 1/8 in. of the canopy exposed around the bottom. Mix some 5-minute epoxy and apply to the bottom edge of the canopy. Set the canopy on the fuselage and hold in place with a masking tape strap across the top of the canopy down to the fuselage on each side. Once you have the canopy tightly in place, apply a fillet of epoxy around the outside of the canopy base. Keep your finger wet with thinner or water during this operation. You should come out with a smooth fillet that will require little sanding once it dries. Brush a coat of primer over the fillet, let dry and sand. Remove the tape at the fillet and replace with a fresh strip of vinyl tape.
Now you are ready to repeat the color coat step. Again be sure you clean the entire structure carefully with the tac rag. Wipe it down again with thinner. Prepare the paint as before and spray an even wet coat over the entire structure. Be careful when spraying this coat that you do not put the spray gun in one spot for any extended length and then start again. This causes excessive overspray and will create flat spots in the gloss.
If you get a run in this coat, you are putting the paint on too wet and/or too thick. If you catch the run before it gets too large, wet your finger and carefully smooth the run out and continue to spray. Generally, after the run is smoothed out, the paint will flow enough that by the time it sets up, the run is invisible.
Let the paint set up for 30 to 45 min., and then very carefully remove the masking tape from around the canopy fillet. This will let the paint flow a little at the edge and eliminate the very sharp edge between the paint and canopy. This also helps eliminate the tendency of the paint to chip when removing the masking tape. If you plan on painting a trim color over the base color, allow the base color to dry for 24 hr.
Mask the trim with the vinyl tape and spray the trim the same way you did the base color. The vinyl tape gives a clean paint separation line and does not readily let the paint bleed under the edges like masking tape. After 30 to 45 min., pull the trim mask up and the trim color will flow enough to eliminate the sharp edge created by the vinyl tape.
Now, if you have been lucky, prayed to all of the dust gods and bowed to east and west, the finishing process is complete and no rubbing will be required. Let the paint set up for 24 hr. and then wax. If you were not lucky and did get some dust where it shows, wet sand with 600 grit and rub out with #7 DuPont Compound within 12 hr. You will not get the wet, glossy look back, but you will get a decent luster that is comparable to a dope or enamel finish that has been rubbed out.
(My address is 4477 W. 136th St., Hawthorne, CA 90250.)
Transcribed from original scans by AI. Minor OCR errors may remain.

