

Radio Control: Pylon Racing
By Bill Hager
4 Holly Springs Dr. Conroe, TX 77302
1989 Formula One season
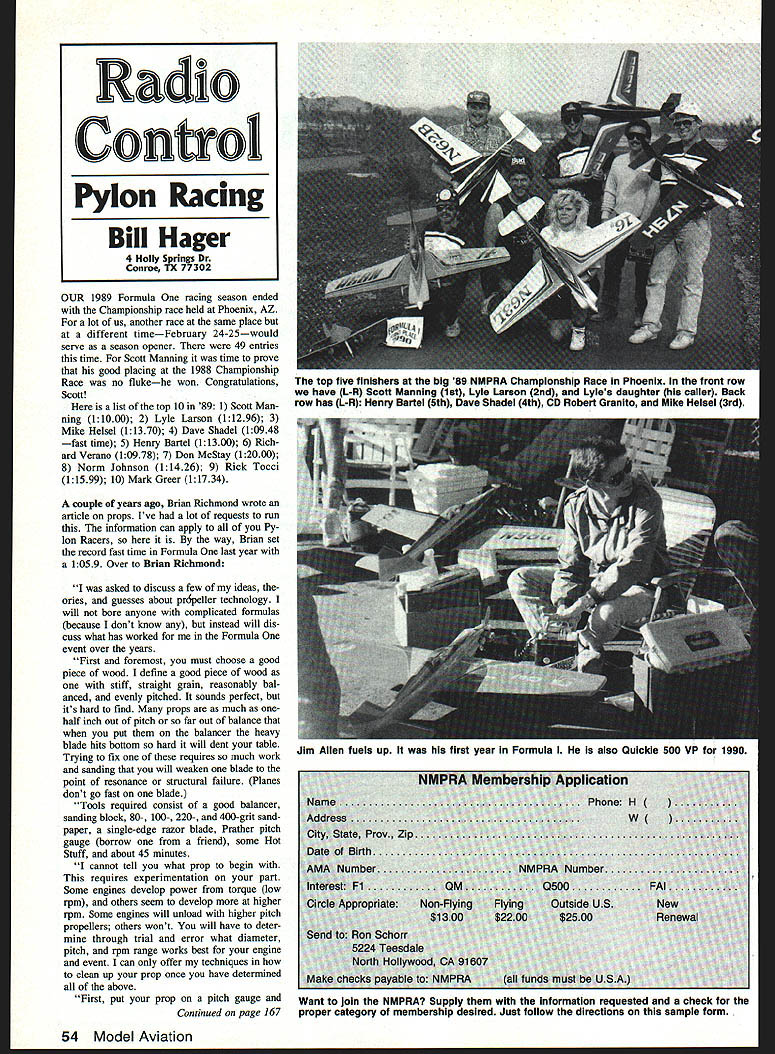
Our 1989 Formula One racing season ended with the Championship race held in Phoenix, AZ. For many of us, another race at the same place but at a different time — February 24–25 — served as a season opener. There were 49 entries. Scott Manning proved his good placing at the 1988 Championship Race was no fluke — he won. Congratulations, Scott!
Top 10 in 1989:
- Scott Manning — 1:10.00
- Lyle Larson — 1:12.96
- Mike Helsel — 1:13.70
- Dave Shadel — 1:09.48 (fast time)
- Henry Bartel — 1:13.00
- Richard Verano — 1:09.78
- Don McStay — 1:20.00
- Norm Johnson — 1:14.26
- Rick Tocci — 1:15.99
- Mark Greer — 1:17.34
Propeller techniques — Brian Richmond
A couple of years ago Brian Richmond wrote an article on propellers. I've had many requests to run it again because the information applies to pylon racers. Brian set the record fast time in Formula One last year with a 1:05.9. Over to Brian Richmond:
I was asked to discuss a few of my ideas, theories, and guesses about propeller technology. I will not bore anyone with complicated formulas (because I don't know any), but instead will discuss what has worked for me in the Formula One event over the years.
#### Choosing wood First and foremost, you must choose a good piece of wood. I define a good piece of wood as one with stiff, straight grain, reasonably balanced, and evenly pitched. It sounds perfect, but it's hard to find. Many props are as much as one-half inch out of pitch or so far out of balance that when you put them on the balancer the heavy blade hits the bottom so hard it will dent your table. Trying to fix one of these requires so much work and sanding that you will weaken the blade to the point of resonance or structural failure. (Planes don't go fast on one blade.)
#### Tools required Tools required consist of:
- a good balancer
- sanding block
- 80-, 100-, 220-, and 400-grit sandpaper
- a single-edge razor blade
- a Prather pitch gauge (borrow one from a friend)
- some Hot Stuff
- about 45 minutes
I cannot tell you what prop to begin with. This requires experimentation on your part. Some engines develop power/torque at low rpm, and others seem to develop more at higher rpm. Some engines will unload higher-pitch propellers, others won't. You will have to determine through trial and error what diameter, pitch, and rpm range works best for your engine and event. I can only offer my techniques in how to clean up your prop once you have determined all of the above.
#### Checking pitch and balancing First, put your prop on a pitch gauge and check stations three through about nine. I compare one blade to the other for even pitch. I don't care if it doesn't pitch out to what is advertised — it's not that critical. Remember, a propeller is nothing more than a rotating wing. Its job is to move a mass of air rearward, resulting in forward thrust. It does this with an airfoil (lower pressure on top of the blade) and with pitch which tries to provide a healthy angle of attack for a given rpm and airspeed.
Do you want your Scat Cat to have a twisted wing? I don't want unevenly pitched props, so I take my single-edge razor blade and scrape the back of the prop from the tip to the hub until it is perfectly flat and even at all stations. This should only take a few minutes.
#### Working the back of the blade Now, unless you're ready to try some "trick, top-secret stuff," you're done with the back of the blades. However, I never quit here. Depending on rpm and diameter, the tips of your blades can be turning at 400–500 mph! Does a jet airplane utilize a flat-bottom wing? Then why does your propeller? You accept a lot of drag when you run full-length flat-bottom blades. If you could get rid of that drag you would turn that hub into a more efficient lifting surface and get more thrust (and/or speed) for the same revs.
Start on the back of the blade about one-half to one-third of the blade length in from the tip — and carefully work toward the tip with a piece of 100-grit paper. Take a little off the leading edge and a fair amount off the trailing edge, being careful not to take to the center of the blade — approximately 30% back from the leading edge. Compare one blade to the other carefully as you go. Doing this right takes a lot of practice. If you get too frustrated, simply take the prop and break it in half. You will feel a lot better. Usually it only takes one or two such sacrifices before you have this part mastered.
#### Root treatment and undercamber Another trick I have been known to try deals with the inner root section of the blade. This part is not moving through the air very fast. Some say the root doesn't provide any thrust; it just connects the tip to the hub and is streamlined enough to make the root section pull its own weight. Figure a high-speed wing in slow flight with the leading-edge devices out and the flaps down. You will see a lot of drag from here.
I take a single-edge razor blade and slice the trailing edge at the root area to a sharp edge; take very little off, about .010 to .020. Do not thin the root too much as it will weaken the blade. The results can be surprising.
You would see some undercamber, which is an excellent source of lift (and thrust in props) at slow speeds. My brother and I turned the fastest Formula One time in the country last year using a prop with an undercambered root airfoil section, flat-bottom midsection, and semisymmetrical tips.
If you want to try this, use your finger and 80-grit sandpaper. Slowly undercamber the root to a point about one-third of the way out on the blade. The deepest camber should be about 30% back from the leading edge. The transition from undercamber to flat section to semisymmetrical should be very gradual. Now hit the entire back side of the prop first with 220-, then 400-grit sandpaper, and unscrew the pitch gauge block from the hub. The hard part is over.
#### Tips, edges, and final shaping The tips of the blades are usually in pretty good shape and require only minor cleanup work. The sharpest leading and trailing edges possible result in the lowest drag component. The only reason full-scale propellers and wings are not razor sharp is because of FOD (foreign object damage) problems — rocks and pebbles on runways would damage the leading edges. We usually don't have that problem, so I sharpen the leading edge with a block of 100-grit paper and thin and sharpen the trailing edge on the top with a block. Then I finish it up with a single-edge razor blade, again scraping from the tip toward the hub.
The trailing edges of all stock props have a very blunt edge near the hub. It is very important to clean up that area. Now lightly block the entire root so that there are no nicks from the previous steps; check the prop on your balancer (this is the point where I do the final balancing) as you go.
The final step is cutting the prop to your desired length and shaping the tips. Theory seems to indicate that at our rpm ranges, sweepback of .060 to .070 in the outer 1½ inches works best. I cut my blade now to the desired length at a slight sweepback angle (6°–7°). Then I round back the front corner with a sandpaper block.
The next step is one that I feel is very important to obtaining a good tip. I round the top of the blade down to meet the bottom using a sanding block. Do this carefully to preserve the airfoil. If done correctly, the trailing edge corner will get paper thin. Keep sanding and nearly smooth it out. The corner will now fall off. The result is an angled-back tip with a sweptback leading edge and a slightly rounded trailing edge corner.
Now lightly sand the entire blade with 400-grit paper. Seal it with Hot Stuff, and sand it again with the No. 400 paper. You're done.
Whether you just use the basic cleanup techniques or experiment with the back of the blades as I do, I think you will notice a difference. Now if you really want to go fast, let's start racing Formula One in Florida again. See you at the races!
Thanks again to Brian Richmond for sharing some "speed secrets" with us.
Where to get racing supplies
#### Kits
- Lil' Toni — Prather Products, 1660 Ravenna, Wilmington, CA 90744 (tel. 1-213/835-4764) (Terry Prather)
- Densigh Special, Cosmic Wind — Paul's Flying Stuff, P.O. Box 121, Escondido, CA 92025 (tel. 1-619/743-5458) (Paul Sternberg)
- Dening Special, Shark, Estrellita, Cosmic Wind — California Speed Pros, 32221 Alipaz #115, San Juan Capistrano, CA 92675 (tel. 1-714/661-7430)
#### Engines, stock
- Long J.A.L. Midget Mustang, Pole Cote — Ritch's Hobbies, 4104 Lark, Houston, TX 77025 (tel. 1-713/661-5458) (Dick Ritch)
- Shoestring — Don Rice, 12005 Dodson, Issaquah, WA 98027 (tel. 1-206/228-4170)
- Shoestring, Lil' Toni — Tom Storm, 1420 W. 165th, Seattle, WA 98166 (tel. 1-206/246-4258)
- Estrellita, FAI Midget Mustang — Jerry Small, 502 Cherry, Southlake, TX 76092 (tel. 1-817/481-6456)
- Super-Tigre X-40 — Ritch's Hobbies (see listing under Kits, above)
- Super-Tigre X-40 — Modeltronics, 4305 Kelly, Ft. Smith, AZ 72904 (tel. 1-501/782-8506) (Terry Rollins)
- K&B .40 — K&B Mfg., 12152 S. Woodruff, Downey, CA 90241 (tel. 1-213/803-1423) (J. Brodbeck)
#### Engines, custom work
- Custom rechrome, engine accessories, custom-billet engine, engine-rebuild specialist — Ross Racing Engines, 7515 Brookleaf, Houston, TX 77041 (tel. 1-713/937-0533) (Dave Layman)
#### Engines, modified, ready-to-race
- SuperTigre X-40 — Performance Specialties, P.O. Box 4003, Carlsbad, CA 92008 (tel. 1-619/729-1658) (Dave Shadel)
- K&B .40 — Ace Custom Engines, 7215 Foothill, Tujunga, CA 91042 (tel. 1-213/803-1423) (Clarence Lee)
#### Accessories
- Travel Box: first-class aircraft transport containers — The Brown Box, 12083 Caminito Corriente, San Diego, CA 92128 (tel. 1-619/487-5670) (Chuck Brown)
Transcribed from original scans by AI. Minor OCR errors may remain.

