
Radio Control: Pylon Racing
Bill Hager
4 Holly Springs Dr., Conroe, TX 77302
Before we get started this month, please note the revised kit and engine list as a correction for the January 1991 issue. I had grabbed an old list that wasn't even close to being correct. Sorry, guys. I will try to keep this list updated and run it several times during the year.
Since this is the building season for most of us, I thought I'd pass along an article by Duane Gall on installing a firewall. It's from the Colorado Competition Society newsletter. Over to Duane:
Installing a firewall (Duane Gall)
Life is tough when you're a kitmaker. After a year or two of R&D — carving a fuselage plug, making the mold, testing prototypes, etc. — when you finally get to the point where you can lay up a decent fuselage and cut some wing cores in only a couple of evenings, it's bad enough to be told you charge too much for the stuff. But it's even worse when the proud owner of a secondhand kit calls you up in the middle of the night to say, "Hey, I'm afraid to try and put the firewall in this thing. Can I bring it over and have you do it?" Believe me, if it were possible to prefabricate this part of the assembly, I would. But the installation of the firewall in a fiberglass fuselage is something that has to be done "custom." No two modelers share the same taste in engines, mounts, throttle/shutoff installations, fuel tanks, etc.; there are just too many variables to allow this process to be standardized.
Admittedly, if you've never done it before, the thought of attacking your shiny new fish with a Moto-Tool is kind of scary. But there's a first time for everything. If nobody ever did anything he hadn't done before, none of us would be here, would we?
So here's how it's done:
- Prepare the engine assembly
- Start with your engine, engine mount and spinner, all bolted together into a neat little unit. (A propeller isn't necessary at this stage and may get in the way.) Ditto for the muffler.
- Decide which side of the fuselage the engine will stick out of, then draw the approximate size and shape of the necessary hole with a marking pen.
- Set the engine assembly next to the fuselage, with the spinner backplate lined up with the nose ring, and determine how far back the engine mount extends. This will be the approximate location of the firewall. Mark this position.
- Fit the engine through the nose
- Disassemble the engine from the mount and spinner.
- With goggles on and Moto-Tool fired up, cut a hole just big enough for the engine to slide in, and stick the crankshaft through the nose ring. Bolt the spinner to the crankshaft. The worst part is now over.
- Sand the front nose ring flat if it has flash or irregularities so the spinner backplate fits snugly. This interface determines the thrust line, so take care it is not crooked.
- Position the mount and firewall
- Slide the engine mount into position from behind the engine, accessing through the wing saddle area or radio access hatch depending on the airplane. Bolt the engine to the mount. You may have to enlarge the engine cutout to accommodate bolts and a driver.
- Some kits have a precut firewall; others require cutting and trial fitting. Your goal is for the firewall to slide in from behind and come to a gentle stop, touching uniformly around the inside of the fuselage and contacting the back of the engine mount. It must sit flat against the engine mount.
- Align and temporarily attach the firewall
- Tape the spinner firmly in place against the nose ring with masking tape to maintain alignment. The engine and mount should now be suspended inside the fuselage, with the engine cylinder free to swing a few degrees (when viewed from the front). If it doesn't, find and remove any bind or obstruction.
- While holding the engine cylinder in the desired orientation, press the firewall against the back of the engine mount and sneak a couple of drops of instant glue into the interface. When cured, unbolt the engine from the mount and pull the mount/firewall assembly out the way it came in.
- Drill and prepare mount-to-firewall holes
- Without removing the mount from the firewall, drill all mounting holes (plus holes for throttle pushrods, fuel lines, etc.), and install blind nuts for the mount.
- Pop the mount loose, sand away any excess instant glue, apply a small amount of Vaseline or wax to the back of the mount (to protect threads), and apply your favorite fuelproofing to the firewall. Bolt the mount to the firewall permanently.
- Final firewall installation
- Clean the inside of the fuselage with alcohol or acetone and sand lightly so glue will stick.
- Slide the mount/firewall assembly into place and bolt the engine to it.
- Remove the tape holding the spinner against the nose ring and push the assembly forward another 1/16" or so to allow the spinner to turn freely (this can increase available horsepower).
- Keeping the spinner aligned with the nose ring, drop instant glue around the outside edge of the firewall to tack it in place.
- Secure and reinforce
- For extra security, pin the firewall in place with toothpicks so you can remove the engine without knocking alignment loose. Drill 1/8" holes from the outside (through the fuselage material) into the firewall at several points around the perimeter, install short cut-off toothpicks in the holes with instant glue. Five or six toothpicks will usually do it.
- The final step is to reinforce the firewall-to-fuselage joint with a permanent installation material. Duane prefers slow-set epoxy (e.g., Hobbypoxy Formula 2) and small pieces of 4-oz. fiberglass cloth, applied to both the inside front and rear using a disposable brush.
A couple of additional notes:
- On some racing planes with rear-exhaust engines, you may need to add an exhaust channel — usually made of 1/4" plywood. Duane does this after the firewall is in, but before gluing it in place, and then reinforces and fuelproofs the panel with the same epoxy and cloth used on the firewall to make the whole front end a more integrated unit.
- While firewalls require the rigidity and permanence of glass cloth, other parts of a fiberglass airplane should use different adhesives. For example, ultra-rigidity is the last thing you want when installing a servo tray; use RTV silicone adhesive instead. Make the tray out of 1/8" ply, have it nestle nicely in the fuselage, and "trap" the edges with an ample bead of RTV on both top and bottom.
- When adding tail feathers you don't want a bulletproof joint, because if you cartwheel the airplane on landing you'll just break the balsa parts. Better to use five-minute epoxy with microballoons mixed in, so the joint will fracture before the balsa gives way and you can repair it easily with thin CA.
- Finally, it's better to do the firewall first, before putting on the tail feathers or other fragile appendages.
Now that you know how to do firewalls, you can choose from any number of nifty fiberglass airplanes — not just racers but also lots of great sport planes, pattern planes, and even jumbo scale planes if you like. But the best part is, when people call me in the middle of the night, now I'll just tell them to call you!
Thanks, Duane.
Contest report — Central Texas Shoot-out Q-500 (Fred French)
"The third annual Central Texas Shoot-out Q-500 race was held June 23–24, 1990 in Georgetown, just north of Austin on Interstate 35. Each year this event draws more and more contestants as Quickie grows in Texas.
"The weather was hot and the racing was close. This year, as in the past, the top prize was a Rossi .40 for the contestant with the highest total points for the two days of racing. I was pleased to see many new Novice fliers who accounted for a Texas Outlaw Quickie win. It certainly made for more fun and more prizes for the contestants and contest workers.
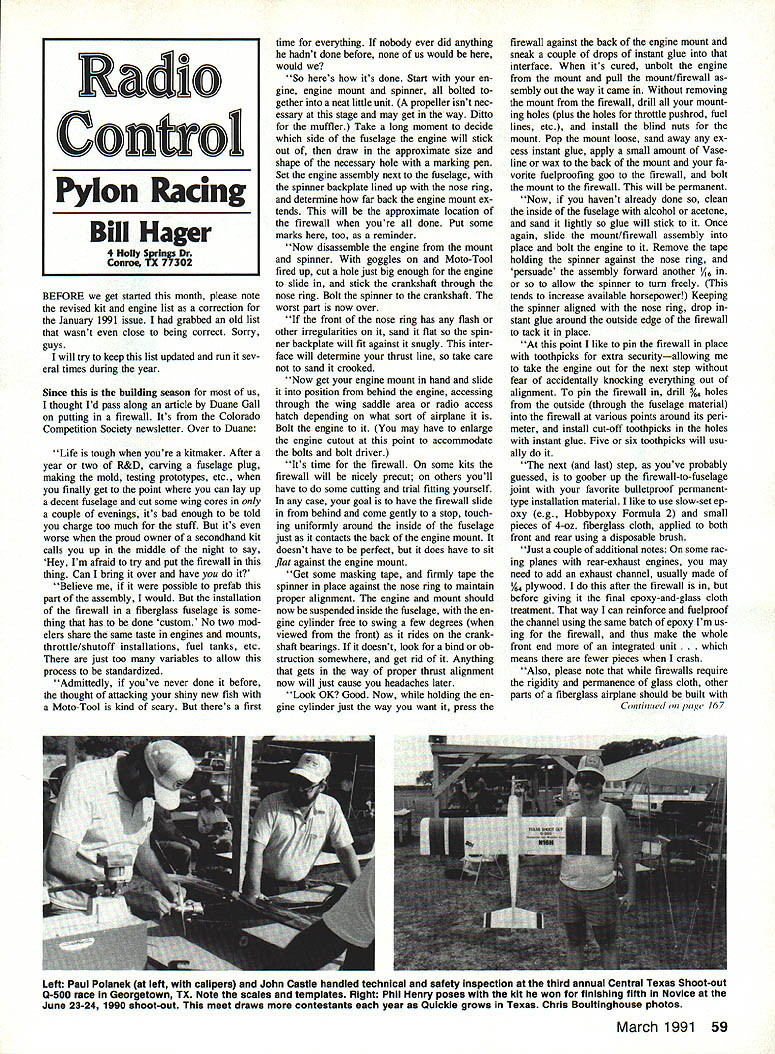
"The Georgetown Aero-Modelers club has worked hard to make this event better each year. My special thanks to all the members and workers who helped make this a success. Extra-special thanks to Terry and Hal Smith and Woody Erickson, who are always supportive of club activities. In addition, thanks to Paul Polinek and Frank Williams for running the flight line and to Chris Boultinghouse, who took the pictures.
"Before I get into the race results, let me explain that the Novice fliers are in the same matrix with the Experts. A Novice is anyone who has never trophied in any Pylon Racing event.
"After two days of flying, we had a tie between Randy Ritch and Jerry Denton for the Rossi .40. The flyoff was a close race for a few laps, until Jerry cut the number one only. It appeared that Jerry had airspeed but was a little quick on the sticks.
"Congratulations go out to Randy, who is also on top in district points this year. Several fliers, among them Steve and Ken Klein, Ricky Cranfill, Bob Miller and Dickie Ritch, were going good, but midairs and the ground thinned the competition. The top Novice was Doyle Irwin, who put together two good days of racing."
Results
- June 23
- Expert: 1) Randy Ritch (fast time — 1:22.37); 2) Steve Klein; 3) Ken Klein; 4) Jerry Small; 5) Bob Greer.
- Novice: 1) Doyle Irwin; 2) Paul Sandoval; 3) Jeff Horn (fast time — 1:32.89); 4) Ric Reichelt; 5) Phil Henry.
- June 24
- Expert: 1) Jim Young; 2) Keith Fredrickson; 3) Bill Rutherford; 4) Drew Jerina; 5) Jerry Denton.
- Novice: 1) Doyle Irwin; 2) Phil Henry; 3) Paul Sandoval; 4) Leon Maddox; 5) Richard Weather.
Updated kit and engine list
Below is the updated information promised at the beginning of the column.
#### Formula One
Kits:
- Lil Toni — Prather Products (Terry Prather), 1660 Reveno, Wilmington, CA 90744 (tel. 213-835-4764).
- Denight Special — Corsair Wind / Paul's Flying Stuff (Paul Stenberg), P.O. Box 121, Escondido, CA 92025 (tel. 619-743-5458).
- Denight Special (Shark, Estrella) — San Juan Capistrano, CA 92675 (tel. 714-661-7430).
- Pole Cat — Ritch's Hobbies (Dale Ritch), 4014 Lark, Houston, TX 77025 (tel. 713-661-5458).
- Shoestring — Don Rice, 12205 206th St., Issaquah, WA 98027 (tel. 206-226-4170).
- Estrellita — Jerry Small, 502 Cherry, Southlake, TX 76092 (tel. 817-481-6456).
Engines and related parts:
- Nelson Engines: Formula One, Quarter Midget, Q-500 — Performance Specialties (Dave Shadel), P.O. Box 4003, Carlsbad, CA 92008 (tel. 619-729-1658).
- K&B .40 — K&B Mfg. (J&J Broadbeck), 12152 S. Woodruff, Downey, CA 90241 (tel. 213-803-1423).
- Modified / Ready to Race:
- SuperTigre X-40 — Performance Specialties (Dave Shadel), P.O. Box 4003, Carlsbad, CA 92008 (tel. 619-729-1658).
- Boss Racing Engines — Dave Layman, 7515 Brookleaf, Houston, TX 77041 (tel. 713-937-0553).
- K&B .40 — Lee Custom Engines (Clarence Lee), 7215 Foothill, Tujunga, CA 71402 (tel. 213-803-1423).
Accessories:
- Travel box: first-class aircraft transport container — The Brown Box (Chuck Brown), 12083 Caminito Corriente, San Diego, CA 92128 (tel. 619-487-5670).
- Parachute: Paul's Flying Stuff (Paul Stenberg), P.O. Box 121, Escondido, CA 92025 (tel. 619-743-5458).
- Custom-built molds — Kristopher Wilson (tel. 714-717-5602).
- Painted pilots — A. McDaniel, 14601 S. Joshua, Jamul, CA 92035 (tel. 619-698-3907).
- Custom-built F-1s — California Speed Prods., 32221 Alipaz #115, San Juan Capistrano, CA 92675 (tel. 714-661-7430).
#### Q-500
Kits:
- Thunder Q-II — Paul's Flying Stuff (Paul Stenberg), P.O. Box 121, Escondido, CA 92025 (tel. 619-743-5458).
- China Clipper — Model Tech (available through hobby stores).
- T-Bird — California Speed Prods., 32221 Alipaz #115, San Juan Capistrano, CA 92675 (tel. 714-661-7430).
- Texas Outlaw — Dickie Ritch, 4104 Lark, Houston, TX 77025 (tel. 713-661-5458).
- Spect Cat — Flite Line Models (hobby stores).
- Yellow Jacket — Mills Airplane Models, 2868 Hambleton, Riva, MD 21140 (tel. 301-956-3308).
- Lass O'Goo — Barry's Model Products (Barry West), 600 Vincent, Mt. Dora, FL 32757 (tel. 904-383-1222).
Accessories:
- Engine mount (closed-in type) — Fourmost Products (hobby stores).
- Engine mount — Paul’s Flying Stuff, P.O. Box 121, Escondido, CA 92025 (tel. 619-743-5458).
- Engine mount — custom made; check hobby stores and speed shops for more options.
Engines (continued and miscellaneous suppliers):
- See local hobby shops or contact the manufacturers listed above for the latest availability, accessories, and parts.
Transcribed from original scans by AI. Minor OCR errors may remain.

