
Radio Control: Pylon Racing
Bill Hager 4 Holly Springs Dr. Conroe, TX 77302
WELL HERE WE ARE; it's 1991, the year in which all your radios must be gold stickered or be listed in Model Aviation as approved. As pylon racers it might be wise to look at what frequencies will be used at this year's National Aeromodeling Championships. Of course, if you aren't going to the Nationals I guess you can use whatever frequency you want!
Here is the list of frequencies to be used at this year's AMA Nationals:
- Channel 13 — 72.05
- Channel 16 — 72.11
- Channel 19 — 72.17
- Channel 22 — 72.23
- Channel 25 — 72.29
- Channel 28 — 72.35
- Channel 31 — 72.41
- Channel 34 — 72.47
- Channel 37 — 72.53
- Channel 40 — 72.59
- Channel 43 — 72.65
- Channel 46 — 72.71
- Channel 49 — 72.77
- Channel 52 — 72.83
- Channel 55 — 72.89
- Channel 00 — 50.80
- Channel 03 — 50.86
- Channel 06 — 50.92
- Channel R/BK — 53.20
- Channel Y/BK — 53.40
- Channel V/BK — 53.70
For those of you who don't already know, the 1991 Nationals will be held at Lawrenceville, Illinois again on July 13 through 21. I went last year and plan on going again this year. To those of you who have never been to a national championship competition and might be thinking about going, it would be the perfect time to meet some of the people you have been reading about; to compete with the best from all parts of the United States and the world. Just think — a whole week of nothing but model airplanes, all kinds, sizes, and shapes! The Nationals have always been a great place for me to get new ideas, learn new things, and make new friends. Try it; I'm sure you won't be sorry.
For you computer nuts, you might consider using Matrix Master to set up your race. For those already using it, there has been an update. For more information on this, write to Matrix Master 1991 Update, 931 Ohio Ave., Lemoyne, Pennsylvania 17043.
I'm still getting mailings about the RC Unlimited Pylon racing event that I wrote about a few months ago. It looks like the first race might be sometime in early October of this year. For more on this write to RC Unlimited, 565 Mercury Lane, Brea, California 92621.
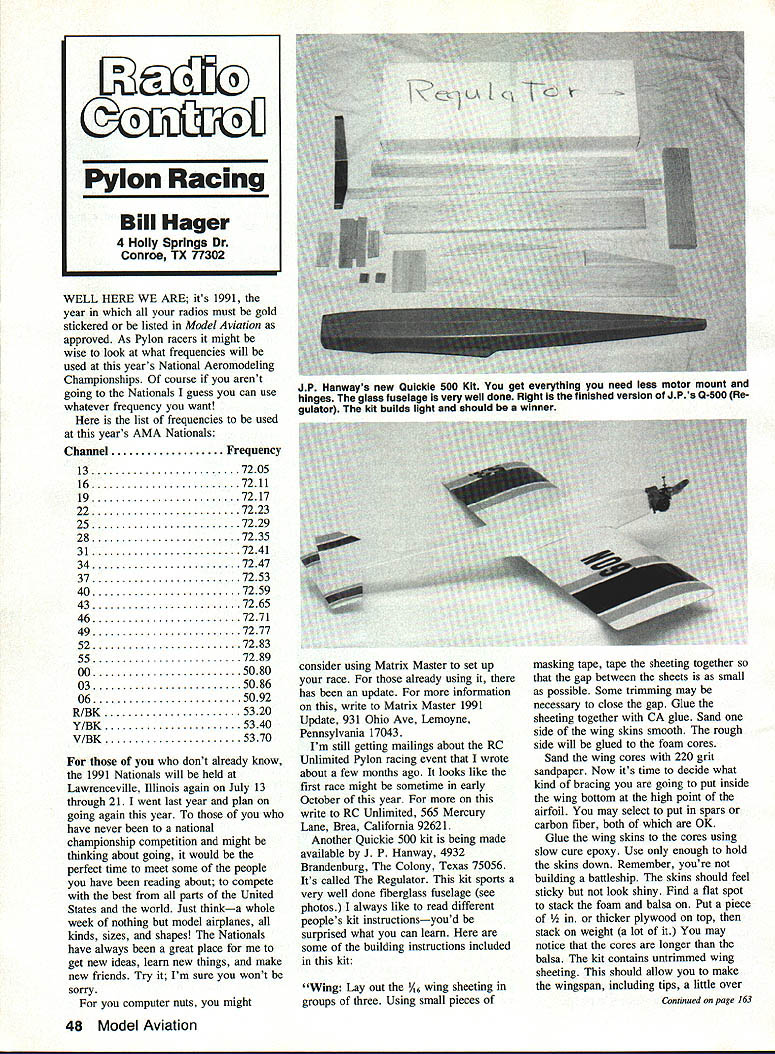
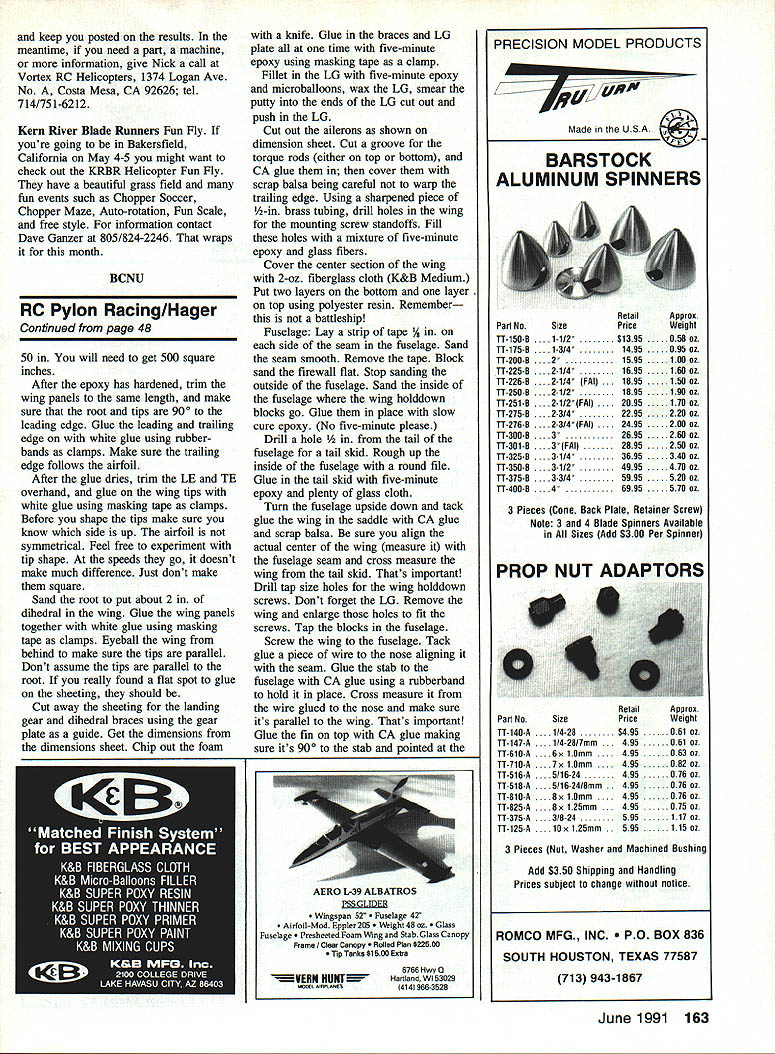
Another Quickie 500 kit is being made available by J. P. Hanway, 4932 Brandenburg, The Colony, Texas 75056. It's called The Regulator. This kit sports a very well done fiberglass fuselage. I always like to read different people's kit instructions — you'd be surprised what you can learn. Here are some of the building instructions included in this kit:
Wing
Lay out the 1/4" wing sheeting in groups of three. Using small pieces of masking tape, tape the sheeting together so that the gap between the sheets is as small as possible. Some trimming may be necessary to close the gap. Glue the sheeting together with CA glue. Sand one side of the wing skins smooth. The rough side will be glued to the foam cores.
Sand the wing cores with 220-grit sandpaper. Now it's time to decide what kind of bracing you're going to put inside the wing — bottom or top at the high point of the airfoil. You may select to put in spars or carbon fiber, both of which are OK.
Glue the wing skins to the cores using slow-cure epoxy. Use only enough to hold the skins down. Remember, you're not building a battleship. The skins should feel sticky but not look shiny. Find a flat spot. Stack the foam and balsa. Put a piece of 1/2" or thicker plywood on top, then stack on weight (a lot of it). You may notice that the cores are longer than the sheeting. The kit contains untrimmed sheeting. This should allow you to make the wingspan including tips a little over 50 in. You will need to get 500 square inches.
After the epoxy has hardened, trim the wing panels to the same length, and make sure that the root and tips are 90° to the leading edge. Glue the leading and trailing edge on with white glue using rubber bands as clamps. Make sure the trailing edge follows the airfoil.
After the glue dries, trim the LE and TE overhang, and glue on the wing tips with white glue using masking tape as clamps. Before you shape the tips make sure you know which side is up. The airfoil is not symmetrical. Feel free to experiment with tip shape. At the speeds they go, it doesn't make much difference. Just don't make them square.
Sand the root to put about 2 in. of dihedral in the wing. Glue the wing panels together with white glue using masking tape as clamps. Eyeball the wing from behind to make sure the tips are parallel. Don't assume the tips are parallel to the root. If you really found a flat spot to glue on the sheeting, they should be.
Cut away the sheeting for the landing gear and dihedral braces using the gear plate as a guide. Get the dimensions from the dimensions sheet. Chip out the foam with a knife. Glue in the braces and landing-gear plate all at one time with five-minute epoxy using masking tape as a clamp.
Fillet in the landing gear with five-minute epoxy and microballoons, wax the landing gear, smear the putty into the ends of the landing-gear cutout and push in the landing gear.
Cut out the ailerons as shown on the dimension sheet. Cut a groove for the torque rods (either on top or bottom), and CA glue them in; then cover them with scrap balsa being careful not to warp the trailing edge. Using a sharpened piece of 1/2-in. brass tubing, drill holes in the wing for the mounting screw standoffs. Fill these holes with a mixture of five-minute epoxy and glass fibers.
Cover the center section of the wing with 2-oz. fiberglass cloth (K&B Medium). Put two layers on the bottom and one layer on top using polyester resin. Remember — this is not a battleship!
Fuselage
Lay a strip of tape 1/8 in. on each side of the seam in the fuselage. Sand the seam smooth. Remove the tape. Block sand the firewall flat. Stop sanding the outside of the fuselage. Sand the inside of the fuselage where the wing holddown blocks go. Glue them in place with slow-cure epoxy. (No five-minute please.)
Drill a hole 1/8 in. from the tail of the fuselage for a tail skid. Rough up the inside of the fuselage with a round file. Glue in the tail skid with five-minute epoxy and plenty of glass cloth.
Turn the fuselage upside down and tack-glue the wing in the saddle with CA glue and scrap balsa. Be sure you align the actual center of the wing (measure it) with the fuselage seam and cross-measure the wing from the tail skid. That's important! Drill tap-size holes for the wing holddown screws. Don't forget the landing gear. Remove the wing and enlarge those holes to fit the screws. Tap the blocks in the fuselage.
Screw the wing to the fuselage. Tack-glue a piece of wire to the nose aligning it with the seam (wire glued to the nose). Glue the stab to the fuselage with CA glue using a rubber band to hold it in place. Cross-measure it from the wing to the nose and make sure it's parallel to the wing. That's important! Glue the fin on top with CA glue making sure it's 90° to the stab and pointed at the wing trailing edge.
Shape the canopy, smear it with polyester and microballoons, sand it, and glue it on aligned with the seam. (Don't leave it off.)
Landing Gear
File the LE and TE of the gear round. Sharpening it isn't any better; it just takes longer. (120 mph is slow for airplanes.) Glue the 1/4-in. balsa block to the landing-gear base and shape it to fit the wing. Don't forget to countersink the holes for the wing mounting screws. Drill holes for mounting axles before you finish the gear.
Finishing
Monokote the wing as usual. Monokote the stab and fin leaving 1/16-in. raw balsa exposed between the fuselage and the covering. Iron down the edge of the stab and fin covering well, then sand the covering out 1/8 in. from the fuselage. Use tape to protect the finish. Fillet the stab, fin, and canopy using five-minute epoxy and microballoons. Form the fillet with a piece of tubing and remove the extra with a razor blade before it gets hard. Sand the fillets then remove the tape.
Actually you probably will change the setup several times during this process. So far you have been careful not to sand any more of the fuselage than necessary to get glue to stick. Putty up any voids you find and sand it. Use no coarser than 320-grit paper and only enough to dull the surface. The primer is an automotive lacquer primer and most paints will stick to it. (R&B will.)
Underneath there probably are pinholes, so don't sand it off unless you like filling pinholes. Tape off the stab and fin 1/16 in. outside the fillets and cover with paper. Spray on a light coat of paint.
Reprint courtesy of J. P. Hanway, The Colony, TX. See you next month.
J. P. Hanway's new Quickie 500 kit gets everything you need — motor mount, hinges, glass fuselage — very well done. Right now the finished version of J.P.'s Q-500 Regulator kit builds light and should be a winner. I'll keep posted on results. Meantime, need part/machine information? Give Nick a call: Vortex RC Helicopters, 1374 Logan Ave. No., Costa Mesa, CA 92626; tel. 714/751-6212.
Kern River Blade Runners Fun Fly — going to Bakersfield, California, May 4–5? You might want to check out the KRBR Helicopter Fun Fly. They have a beautiful grass field and fun events such as Chopper Soccer, Chopper Maze, Auto-rotation, Fun Scale, and freestyle. For information contact Dave Ganzer, 805/824-2246.
BCNU. RC Pylon Racing / Hager
Transcribed from original scans by AI. Minor OCR errors may remain.

