
Radio Control: Pylon Racing
Dave Lane
LAST MONTH we talked about fuel tank installation, so this month let's talk about that hunk of aluminum that the fuel tank feeds.
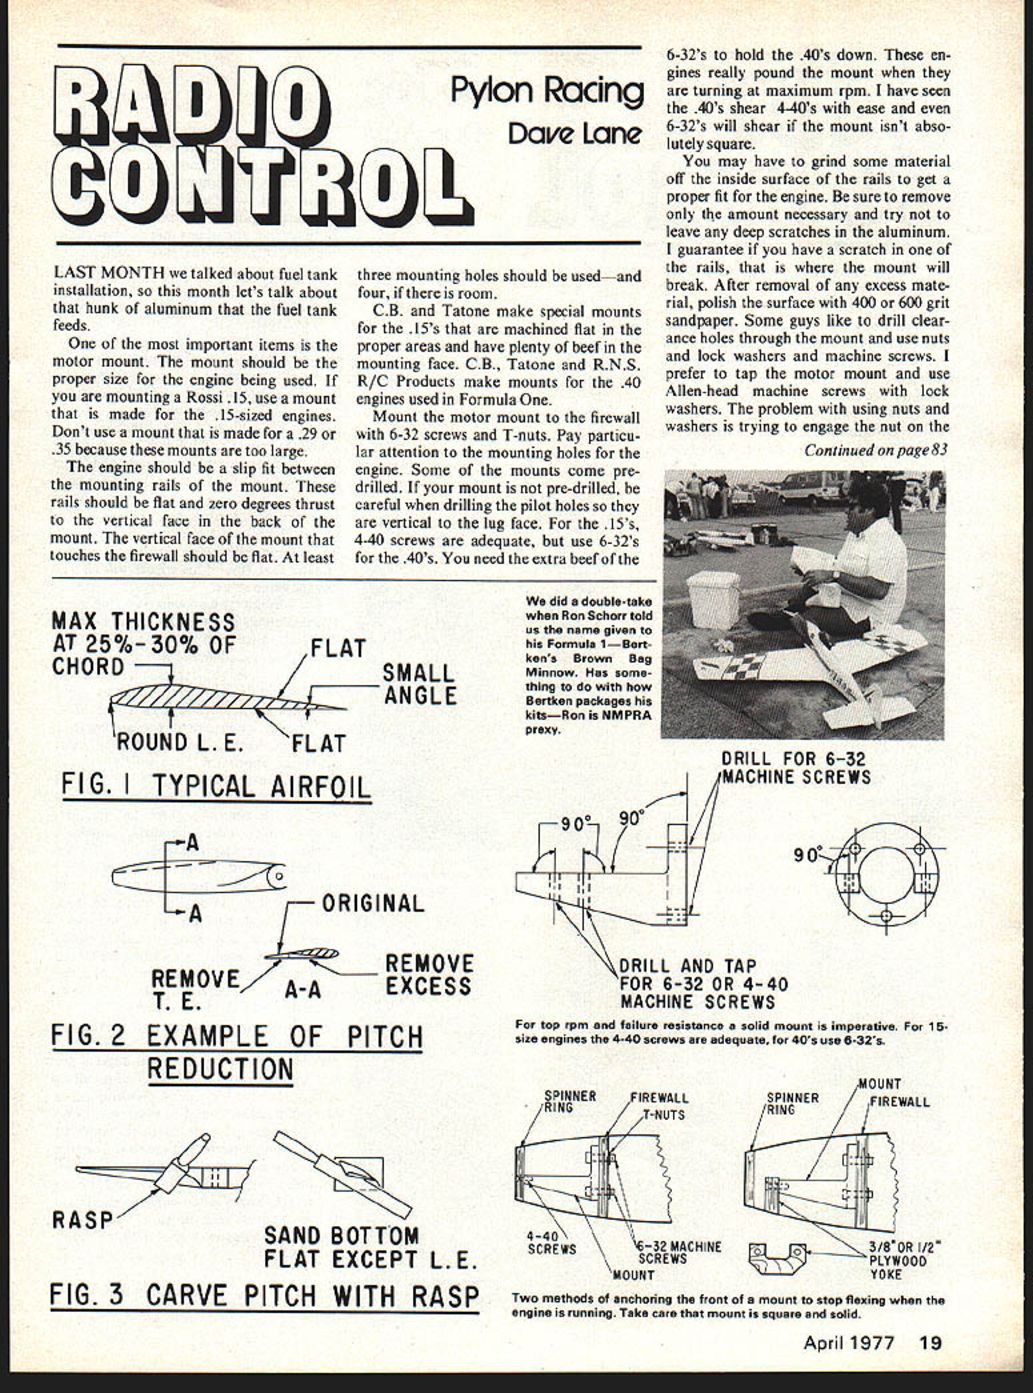
One of the most important items is the motor mount. The mount should be the proper size for the engine being used. If you are mounting a Rossi .15, use a mount that is made for the .15-sized engines. Don't use a mount that is made for a .29 or .35 because these mounts are too large.
The engine should be a slip fit between the mounting rails of the mount. These rails should be flat and zero degrees thrust to the vertical face in the back of the mount. The vertical face of the mount that touches the firewall should be flat. At least three mounting holes should be used—and four, if there is room.
C.B. and Tatone make special mounts for the .15's that are machined flat in the proper areas and have plenty of beef in the mounting face. C.B., Tatone and R.N.S. R/C Products make mounts for the .40 engines used in Formula One.
Mount the motor mount to the firewall with 6-32 screws and T-nuts. Pay particular attention to the mounting holes for the engine. Some of the mounts come pre-drilled. If your mount is not pre-drilled, be careful when drilling the pilot holes so they are vertical to the lug face. For the .15's, 4-40 screws are adequate, but use 6-32's for the .40's. You need the extra beef of the 6-32's to hold the .40's down. These engines really pound the mount when they are turning at maximum rpm. I have seen the .40's shear 4-40's with ease and even 6-32's will shear if the mount isn't absolutely square.
You may have to grind some material off the inside surface of the rails to get a proper fit for the engine. Be sure to remove only the amount necessary and try not to leave any deep scratches in the aluminum. I guarantee if you have a scratch in one of the rails, that is where the mount will break. After removal of any excess material, polish the surface with 400 or 600 grit sandpaper. Some guys like to drill clearance holes through the mount and use nuts and lock washers and machine screws. I prefer to tap the motor mount and use Allen-head machine screws with lock washers. The problem with using nuts and washers is trying to engage the nut on the screw. Usually there just isn't enough clearance between the mount and the fuselage to accept nuts. Fingers and tweezers make the job difficult.
Formula ships front rails should be secured to the fuselage either with the spinner ring through a plywood yoke mounted in the fuselage. Anchoring the front of the mount to the structure will stop flexing when the engine is running. This is usually worth another 200 to 400 rpm. The main thing to remember when installing the mount in the fuselage is to keep it square and solid. Nothing is more frustrating than having a good strong engine poorly mounted and wondering why it won't turn 17,500 rpm when someone else's is turning 20,000.
Following information about Midget props was written by Bob Root (QMRC Newsletter). I don't belong to the A-Midget organization but thought you might like to find out the pros.
A. Important characteristics — following list things to look for in modifying props:
- Airfoil shape. Based on Formula experience the blade shouldn't be too thick — maybe 10% thickness. Flat bottom except near leading edge. Thin trailing edge. See Fig. 1.
- Blade w
2) Blade width: Time will tell. I feel the racing shapes will work best such as the narrow Rev-up or Top Flite pylon shapes. Too wide equals low rpm. Too narrow equals slow (inefficient) top speed and acceleration. I don't feel that tip shape is important, but a raked tip is rumored to reduce flutter if this is a problem.
3) Pitch and diameter: This will also require experimentation, but the 7-5 props seem to be close (they measure approximately 7" diameter, 4.5" pitch). A pitch change is a necessity if any correlation between prop performance and actual size is to be achieved. I have seen (one make of) 7-5 props with a measured pitch as low as 4.2 and as high as 4.9. The optimum prop is found in the air, but I shoot for a ground rpm of 21,000 to 21,500 for my Rossi (using my tach readings). I think a constant pitch along the entire blade is best, but the tip pitch can be reduced to increase rpm. Too small diameter equals slow (inefficient) acceleration. Too low pitch equals reduced top speed but good acceleration.
B. Modification Steps
1) First sand the back of the hub to get equal pitch on both blades.
2) Next, flatten and smooth the back of the blades. If a pitch change is needed, start with a wider blade and narrow it so there is material available for changing the pitch. (See Fig. 2.) Remove material from the leading edge to increase pitch or from the trailing edge to reduce pitch. A little material removal goes a long way so check with a pitch gauge as you go. A half-round wood rasp works best. (See Fig. 3.) Because of the twist in the blade, a sanding block tends to round the airfoil rather than produce the desired flat bottom.
3) Once the back is smooth with equal pitch in both blades, form the airfoil. Thin and smooth the top, and form the leading edge. A sharp L.E. is not good. Round it somewhat. Fig. 1 shows a typical airfoil.
4) If span is to be reduced, do it first or now. Thin and shape the tips now.
5) Next balance the prop by removing material from the front of one blade. This will preserve the pitch you so carefully formed on the back side.
6) Run the prop on your engine and note the rpm. If it's in the ballpark, fly it and see how it works. If it is too low, cut the span or put washout (reduce pitch) in the tip. Use the Fig. 2 method to get washout in the outer 1/2 inch of span. If the prop flutters give it to your worst enemy and start over. A funny noise and an rpm lower than expected equals flutter. Not only will your plane go slower, but you stand the chance of having it come apart while running.
C. Recommendations
Until someone comes up with the optimum prop (or I find a major breakthrough), I will be trying the following props:
- 7-SN Rev-Up: Thin T.E. a little and clean up. Cut span a little if necessary. This may be the best prop when running with a muffler. (This is the prop I am currently using unmodified.)
- 7-SN Top Flite: This has a little more pitch than (1). Clean up and form good airfoil (bad airfoil out of box). If rpm is still low, trim span slightly.
- 7-6N Rev-Up: This has higher pitch than (2). Thin, clean up, cut span and maybe washout tips to get rpm up. RPM is low out of box.
- 7-5 Rev-Up: This has more blade area so it will allow bigger pitch changes if anyone learns how to take advantage of it. Ditto on the 7-5W Top Flite.
Dave Lane, 4477 136th, Hawthorne, CA 90250.
Transcribed from original scans by AI. Minor OCR errors may remain.

